Last updated on: April 23, 2026
Program items are specific itinerary options that registrants can choose from once they have selected a registration option. These itinerary options can be configured to only appear once specific registration options are selected, or for all registration options. They can also be configured to be automatically selected once a registration option is selected.
To define program items, do the following:
- Go to Events > Find events.
- Search for and open the event.
- From the Showcase tab, scroll down to the Program area.
- Select Add new program item.
In This Article
Info tab
From the Info tab, enter general information about the program item:
- Program item code - The code must be alphanumeric, contain no spaces, and be unique among all registration options and program items in the event.
- Program item name - The name that appears to public users.
- Description - The description of the program item that will appear to public users.
- Start date and time and End date and time - The start/end time of the program item. The date and time range is based on the system Time zone setting.
- Display to staff users only - When enabled, the program item only displays to staff users.
- Enable time-based itinerary conflicts - This option is automatically selected for new program items if Enable time-based itinerary conflicts in program items by default is enabled for the overall event (event definition). When enabled, people registering for program items containing conflicting time schedules will be notified of the program item time conflicts. The warning will appear in the event registration window and again in the cart. If you want registrants to be able to checkout even with itinerary conflicts, make sure Allow non-staff registrants to complete registration with conflicts in their itinerary is enabled in the event definition. Deselect this option if you do not want time-based conflicts to apply to this program item.
- Conflict codes - Add or select Conflict codes as an alternative or an addition to time-based conflicts. For example, use conflict codes for program items that do not have time-based conflicts, but do have an overall scheduling conflict.
- Add a new conflict code when you want to start a new conflict that will eventually be added to other program items. To add a conflict code, type your desired code in the Conflict code field, then select Add conflict code. Continue adding as many conflict codes as necessary.
- Select conflict codes when there is already an existing program item with a defined conflict code for which you want to create a conflict with.
Note: Conflict codes are exclusive to each event, and are not shared between events. To permanently delete a conflict code from the list, make sure it is not being used by any program item, then save the program items. Reopen the program item, and the conflict code will no longer display.
- Linked program items - Enter program items in the Linked program items field to associate them with a parent program item. This will automatically enroll registrants of the parent program item to the linked program items.
- Capacity – Defines the participant limit, indicating the maximum capacity allowed for the program item. If you set a maximum capacity, once that limit is reached, iMIS disables relevant registration buttons and links and prompts registrants to review any registrations pending in the cart, if affected. Entering no value allows unlimited registrations. The program item's capacity, including the quantity selected per registrant, counts toward the event's total capacity.
- Max quantity per registrant – If the Max quantity per registrant attribute for this event was set to greater than 1, you can add a number of guests to your registration. For example, if the attribute was set to 4, you can specify up to a maximum of four registrants as part of your registration (yourself and three guests). The Max quantity per registrant attribute cannot be greater than 255.
- Print tickets - Enable Print tickets to allow tickets to be printed for registrants of this program item. When enabled, a Print tickets button appears on the Dashboard for the event. You can print tickets With badges or Without badges.
- Category – Designates one or more terms, separated by semicolons, as being relevant categories for this function. For example, if the program item targets both intermediate and advanced practitioners, you might enter Intermediate;Advanced.
- Track – Designates one or more terms, separated by semicolons, as being relevant tracks for this function. For example, if the function serves both managers and technologists, you might enter Management;Technical.
- Sort sequence - If there are multiple program items with the same start date and time, you can enter a Sort sequence to determine what order they appear in the program. Program items with the same start date and time will be sorted by this value, lowest to highest (items with a value of 0 will be the first in the order). The date and time range is based on the system Time zone setting.
- Award continuing education units to attendees when event is closed - Select to define continuing education unit types and the number of units to be awarded. See Defining and marking CEU attendance on the web for information on setting up CEUs and marking attendance.
- Continuing education type - Select a CEU type from the drop-down. This drop-down will not display if no CEU types have been defined.
- Units to award - Enter the number of units to be awarded.
Note: If this option is enabled and you mark all attendees as absent, you will receive the following message when trying to close an event: All attendees were marked absent for the following functions. Do you wish to close the event anyway?
- Image - Select an image from the Image Selector or upload a new one to the Document system:
- The maximum supported characters for an event Image file path is 255 characters. Event program item images support 100 characters.
- To display program item images, enable Display program item images in the Event Program Display content item.
- Additional information - Enter HTML text in the Additional information panel:
- There is no limit on size. See Understanding the toolbar icons for more information about how to use the Additional information HTML editor.
- Event managers can add downloadable content to an event, such as slides or manuals for an upcoming webinar. This allows attendees to view the slides or manual before and after the event. To add downloadable content to an event, use the Content Link Manager.
Note: A program item ending at 10 a.m. and another program item beginning at 10 a.m. are not recognized as time conflicting. If there is no ending time for a program item, a time-based conflict is not recognized.
Note: If you delete the parent program item, it does not remove the linked program items from your itinerary. You must manually delete linked program items to remove them from your itinerary.
Note: This limitation can be overridden by staff.
Pricing tab
From the Pricing tab, set the prices for the program item. Once pricing is defined, when hovering over a program item with a cursor, staff users will see a tooltip that explains how the price is determined. The tooltip indicates whether it’s based on a pricing group, regular event pricing (member, standard, or complimentary), or timing (early, standard, or late).
Default & Members pricing
You can set both Default and Members price fields, so that members can enjoy the benefit of a reduced fee. Note that the price you enter auto-fills the Members price. Leave it (to prevent any discounting) or override the price by lowering the amount, or selecting Comp for those members to not be charged a fee. When your members view an event, they will see only the appropriate fee.
Pricing groups
You can also set additional Pricing Groups for both registration options and program items. These pricing groups allow you to define a regular price, along with early and late pricing for specific groups. See Pricing groups for products and events.
Not Available & Comp
Select whether the function will be made available to the pricing groups in your system by checking or unchecking the Not available option. To make the function complimentary, select the Comp option.
Note: A price of 0.00 or a blank price is considered undefined, so select the Comp option. Options with undefined pricing are hidden from public users.
Selecting Not available excludes all members of the pricing group from registering, or being registered, with a few caveats:
- If a contact qualifies for more than one pricing group, and any of the pricing groups are available, the contact will be able to view and register for the function.
Example: Rush Lincoln is a regular member and part of the South Chapter. He is registering for the Music Educators Conference. The Keeping performance skills sharp program item is not available to the Members pricing group. However, South Chapter members can register at a price of $50. Therefore, Rush will pay $50 in registration fees for this program item.
If both the Member and South Chapter pricing groups were marked as Not Available, Rush would not be able to register himself for the Keeping performance skills sharp program item. - Staff can register a pricing group member, even if Not available is checked.
- Non-staff users can register a member of an eligible pricing group, even if the event function is not available to them.
Early, Regular, & Late Price
Each pricing group has the following options:
- Early Price - If you entered an Early Cutoff date for your event, the Early Price fields will be available.
- Regular Price - This price is available after the Early Cutoff date has passed and until the Regular Cutoff date. If you entered both an Early and Regular Cutoff date for your event, the Regular Price fields will be available.
- Late Price - If you entered a Regular Cutoff date, Late Price fields will be available.
Income Account
Select an Income Account for each of the pricing groups, so that transactions related to the respective pricing group will be recorded to the specified GL account. Please note the following:
- If a pricing group's Income Account is set to Default, the income account for the registration option (defined on the Accounting tab) will be used.
- If the registration option's Income is defined as Default, the pricing group (if also Default) will use the system settings for Income. This is defined in Financial Entities on the Default Accounts tab.
Accounting tab
Define the following from the Accounting tab.
Financial entity
From the drop-down, select the financial entity to be associated with this function. If this option is left blank the function will use the financial entity defined for the overall event. See Assigning financial entities to transactions for further details.
Tax category
If you have enabled Canadian taxation or VAT taxation in iMIS, you can select the Tax category. The Tax category specifies the taxation rules to be applied. The taxation method is set up for your default organization (Settings > Finance > Financial entities).
Note: See Taxation for more information on setting up Canadian and European (VAT) taxation methods in iMIS.
Canadian taxation
- GST - If your organization uses the Canadian taxation method with GST as the taxation authority, select GST/HST or PST. If the function is non-taxable, do not select an option. If the function is taxable, select one or both options.
- GSTINC - If your organization uses the Canadian taxation method with GSTINC as the taxation authority (generally countries in the Asia-Pacific region), select Taxable or Non-Taxable.
VAT taxation
Charitable item & Fair Market value
Enable Charitable item if the program item is considered a gift. The fees for the program item will appear in the registrant’s Giving History.
Note: You must use a charitable financial entity for program items that are considered gifts.
Only program items marked as Charitable items can include a Fair market value (FMV). The FMV represents the estimated value of any benefits the donor receives in return for their purchase. For example, in an event registration, the tax-deductible amount is typically the registration fee minus the FMV of any included benefits (like meals or gifts).
Income & Deferred income
Choose the GL account to assign to the program item. The Default option will use the system default account for events. If needed, you can also choose a Deferred income account to assign to the program item. The Deferred income option is available if you are licensed appropriately. See Deferred income in iMIS.
Note: These accounts are defined in the GL_ACCOUNT general lookup table. See General lookup tables for more information.
Questions tab
Create required or optional questions for a registrant who is registering for this function. In order for responses to each group of questions to be saved, registrants must select Save Response before checking out.
Note: If you are working with a copied event or used a template to create the event, the event questions are copied over and cannot be deleted. If needed, you can hide questions.
Reporting on questions
Event questions can be reported on using the FormDefinitionFieldData and FormFieldResponseData business objects. See Reporting on event questions.
Creating a new question
Do the following to create a new question:
- Select Add new.
- Question - Type in the question.
- Required - Enable to indicate that an answer to the question is Required. When the Required option is enabled, system administrators and staff users can submit registrations without answering the required questions, while public users must answer all required questions before submitting.
- Hidden - Enable to hide the question from registrants.
- Answer Type - Choose the type of answer:
- Yes/No – The registrant can only select either Yes or No.
- Numeric integer – The registrant can enter only whole numbers (positive or negative).
- Numeric decimal – Registrant can enter any number with up to four decimal places. If more are entered, they will be truncated to the fourth place (not rounded).
- Single-line text – The registrant can enter an answer of only one line in a text box.
- Multi-line text – The registrant can enter lengthy answers in a multiple-line text box.
- Dropdown list – The registrant can select one of several listed options as defined in a drop-down list.
- Defined by explicit list - Event organizers configure drop-down list explicitly, defining each option manually:
- Display Value - The Display Value field determines the text seen by registrants.
- Data Value - The Data Value field is only used in the database. For example, if you chose to display long sentence answers to registrants, the Data Value field would enable you to record abbreviated versions of those options in the database.
- Defined by query - Define a static group of list options for an individual question through a pre-arranged query.
- Defined by explicit list - Event organizers configure drop-down list explicitly, defining each option manually:
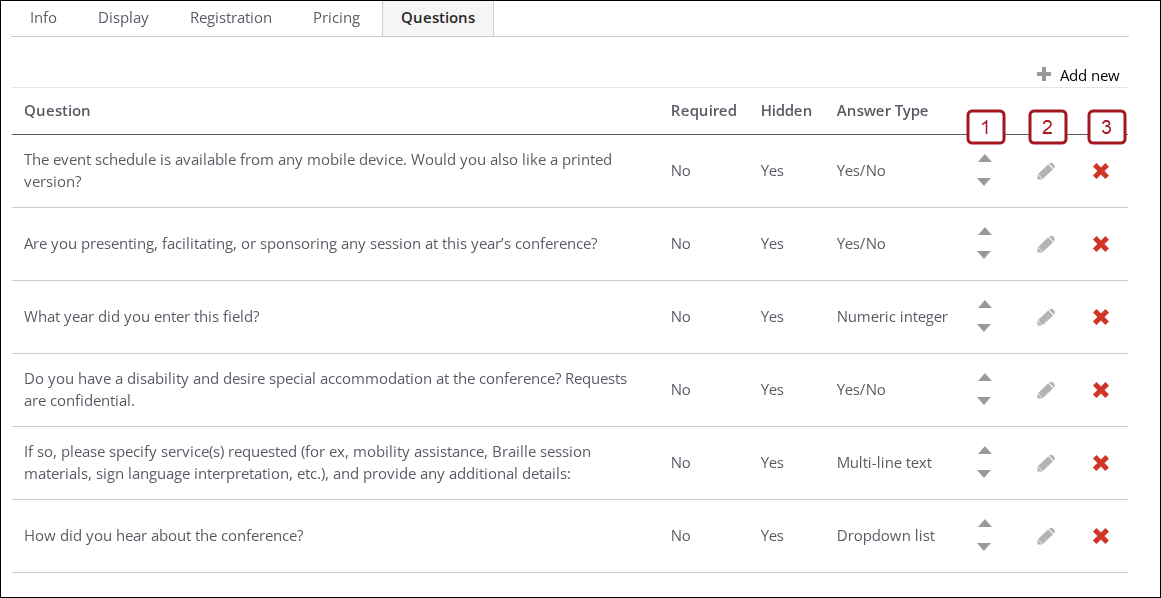
Modifying questions
- To adjust an existing question, click the edit icon.
- To change the presentation order of your questions, click the up and down arrows.
- To delete a question, click the delete icon.
Note: Questions with responses already recorded cannot be deleted. You can hide them instead. To hide a question, click the edit icon, then enable Hidden.
Note: The modifications made on the Questions tab determine the content viewed by registrants after they have added a program item to their itinerary. If a system administrator makes changes to forms while a registrant is completing a form, it is possible that either the question or the registrant response will be lost. Make your changes and updates at a time that few people will be registering.
Registration options tab
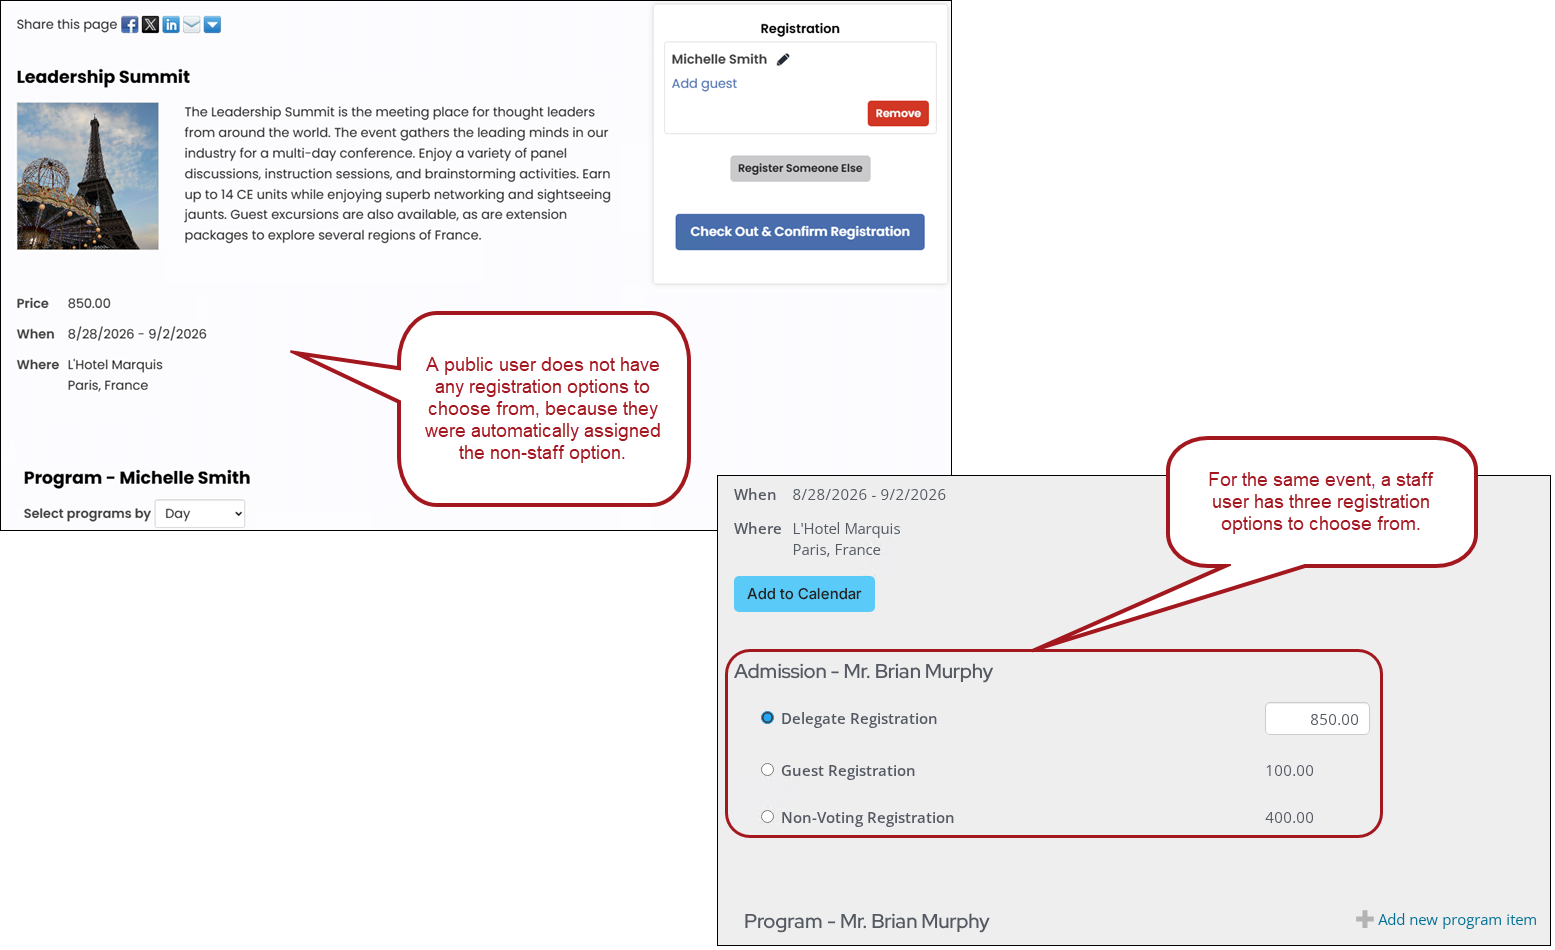
As an event planner, you can easily customize how program items should display for each registration option. You can define the display options from the context of a specific registration option or a specific program item. For example, you can configure the guest registration option to only display the guest-allowed program items.
For each registration option, choose how the current program item should display when a registrant chooses this registration option:
- Display and allow user to add/remove – The current program item displays the registration option, and the registrant can register for it. This option is available only if the item allows registration.
- Display and do not allow user to add/remove – The current program item displays for the registration option, however, staff users can register contacts for the program item. The setting is still honored for public users who will be unable to register for the program item.
- Do not display – The program item does not display for the registration option. However, staff users can view the program item. The setting is still honored for public users.
When Register by default? is selected and either Display and do not allow user to add/remove or Do not display are chosen, registrants will be auto-enrolled for that program item.
Note: When a registrant selects a different registration option, program items added to registrations by default are not automatically removed.
Plan tab
See Specifying resources for an event.