The following can be done with communication templates:
- Compose an email template
- Choose email recipients by selecting an IQA query
- Add query data sources to the template allowing you to insert merge fields from additional data sources in the message
- Send an email directly to the recipients
To define a new email template, go to Marketing > Communication templates > New > Communication. Use the following information to help you define a new template and understand the available options.
Header tab
Use the Header tab to define basic information for the communication. Review the following to understand specific details about the Header tab fields:
- From - Designates who the email is from. The From email address cannot exceed 64 characters. If the email address is provided through a query-supplied value, ensure that the supplied email does not exceed 64 characters. The email address will be shortened when the email is sent if it exceeds the maximum character length.
- To - If every recipient address entered in the To field cannot be resolved, then the communication will fail to send. If one address in the To field is valid then the communication will send to that particular address and ignore any addresses that could not be resolved.
- CC and BCC -
- If you want to include additional addresses to which the communication can be sent without sending additional copies and creating additional interaction log entries, enter those addresses in the Cc or Bcc field. Any addresses entered in the Cc or Bcc fields will be included on each copy of the communication but will not cause additional copies to be sent.
- When sending a Standard email using the iMIS mail service, the same email address cannot appear in more than one of the To, Cc, or Bcc fields. If an address is repeated, it will be included only once, with precedence given in the order of To, Cc, and then Bcc.
- If you would like a staff person to receive the order confirmation template, you must enter their email address in the Bcc field of the order confirmation template.
When sending a Standard email using the iMIS mail service, the same email address cannot appear in more than one of the To, Cc, or Bcc fields. If an address is repeated, it will be included only once, with precedence given in the order of To, Cc, and then Bcc.
Example: You enter {#party.Email} and anotheremail@example.com in the To field, meaning one copy of the communication is sent to the recipient’s primary email address, and a second copy is sent to anotheremail@example.com. The recipient will have two entries in the communication log for the two copies of the communication. To send only one copy of the communication with one interaction log entry, enter {#party.Email} in the To field, and add any additional email addresses in the Cc or Bcc fields.
- Subject - The subject line presented to recipients. The Subject cannot contain the < > symbols. If using a Client key that is licensed to a demo or test system, the Subject contains iMIS Demonstration.
- Type - Provides recipients with classes of emails to opt in and out of. See Managing communication preferences.
Defining friendly names
By default, email addresses display in the From, To, Cc and Bcc fields. If you would like to display a friendly name, simply enter the friendly name in the field before the email address. For example, “Your Organization Name <info@yourorganization.com>” will display to recipients as “Your Organization Name.”
Note: For advanced email, 50 characters is the maximum length that can be used for the friendly name. If the friendly name is provided through a query-supplied value, ensure that the supplied name does not exceed 50 characters. The friendly name will be shortened when the email is sent if it exceeds the maximum character length.
Recipients tab
Click the Recipients tab to select the contacts to whom you will send the email:
- Click Select to select the query you want to use as the primary data source. This query retrieves the contacts to whom you will send email. By default, the SelectedContact query, which retrieves the selected contact (the contact you are signed in as or working on behalf of) is the primary data source. See Creating recipient queries for communications for more information.
- Deselect the names of any contacts that you do not want to receive the email.
- To continue composing your email template, click Return to Compose.
- Two parameters in your communication are auto-filled. The To field includes the parameter {#party.Email}, and the salutation field includes {#party.FirstName}. These values, along with any other party fields, will only be resolved if your recipient query has a valid column that identifies the contact's ID.
Note: The query must have a column that identifies the contact’s ID. Also, if the query contains filters with required or optional prompts, it must have default values because they cannot be changed when the email is sent.
Note: If the query contains filters with required or optional prompts, you cannot deselect recipients from the list.
Note: It is possible for more than one person or organization to have the same email address. In this case, each recipient will still receive the email regardless.
Data sources tab
Use the Data sources tab to add additional data sources to the email template. Fields from the data sources can be inserted in the email message. The party data source, which provides basic information about email recipients, is a default data source. Do the following:
- Click Add data source.
- Select a query.
- If needed, change the Alias for the data source. The Alias is how you refer to the data source when creating the email communication. Fields from the data source will be prefixed by the Alias in the Insert field drop-down. The default Alias is the query name.
- Click OK.
- To edit a saved data source, click its edit icon and make the necessary changes. If a filter in the additional data source matches a display column in the recipient query, the property is used to link the two queries. For example, if the additional data source uses ContactKey as a filter, and the recipient query uses ContactKey as a display column, their information can be linked. On the filter tab in the additional data source query, the Comparison type should be set to Equal, and In Search? should be set to Required.
- If the additional data source is providing data about individual recipients, include a filter for an ID property (ID or PartyID) in the data source definition, then include the same property on the Display tab of the source query with an alias of PartyId. This will ensure that the data source is linked to the Recipient query.
- Click Return to Compose.
Important! When creating a new communication template or editing an out-of-the-box template, the Data sources tab will have a Default query with an Alias of party. Do not remove this data source! You may add additional data sources, but the Default data source should remain to ensure that the email is received.
When the additional data source does not use filters or uses non-matching filters, the same data will be returned for each recipient. These data sources are useful when you want to insert standalone information, such as the name of a program administrator, that is not related to the recipient list in the email message.
If an additional data source returns multiple data rows, a foreach statement can be used in the body of the communication to display data from each of the rows.
Body tab
The Body tab offers many different features to help you customize the communication template.
Insert field drop-down
Use the Insert field drop-down to add fields to be merged for each recipient. Available fields include columns from the recipient query and added data sources and also commonly used contact properties. Any fields that are not found from the defined data source will resolve as blank.
The following are common insert parameters:
- {#party.FirstName} - Use this parameter to address all recipients by their first name
- {#party.Email} - Use this parameter in the To field to send the communication to all contacts in your query
- format="C" - Currency: Convert 123.456 to $123.46 ("C", en-US)
- format="d" - Short date: Convert 6/15/2009 1:45:30 PM to 6/15/2009 (en-US)
Example: {#ProgramItems.BeginDate format="d"}
- format="D" - Long date: Convert 6/15/2009 1:45:30 PM to Monday, June 15, 2009 (en-US)
Note: You can reformat these fields with a formatting string. To specify a format, add format="FORMAT_HERE" inside the brackets, with FORMAT_HERE specified by .NET Framework Standard Format Strings. For example: {#iqa.DataAdded format="d"}.
Note: By default, inserted properties are HTML-encoded. This means that any HTML characters in your properties are rendered as plain text. Use the noencode attribute to ensure HTML markup is rendered in the browser.
There are both Date/Time and Number formats available:
For more information on formatting types, please reference the .NET framework.
Using placeholders
Use placeholders within the content and the title to denote areas that will resolve against the data sources.
Placeholders can be used to populate attributes within HTML tags, such as the src attribute of <img> and <a> tags. Placeholders are specified using { } notation. For example:
{datasource[.property... ] [attributes]}
The {#...} placeholder embeds data into the content or title at the placeholder location. The placeholder consists of the following components:
- datasource - The name of the data source.
- property - (optional) The name of the property. Can be chained together using dot notation. For example, prop1.prop2.prop3. Where the property is a collection, a specific item can be accessed using [i] notation. For example, .Address[1] would return the item at index position 1 from the Address collection.
- attributes - (optional) A space delimited set of attributes, some of which require values. Multiple attributes can be specified:
- uppercase - Convert the data to uppercase.
- lowercase - Convert the data to lowercase.
- format - Format non-string values, such as format="d".
- noencode - By default, inserted properties are HTML-encoded. This means that any HTML characters in your properties are rendered as plain text. Use the noencode attribute to ensure HTML markup is rendered in the browser.
Example: <strong>{#Party.FirstName noencode}</strong>
inserting LINKS
Use the Insert link drop-down to add many different types of links:
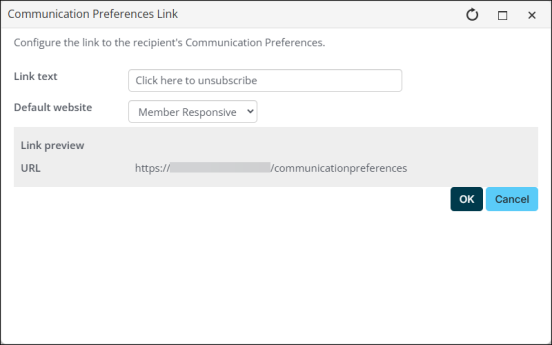
Select Communication Preferences Link to include a subscription preferences hyperlink in your email. This link will enable users to manage their email subscriptions directly, without logging in to your site.
Note: Your query must include contacts in order for the subscription preferences link to work.
- Provide the hyperlink text to appear in the email.
- Select a website from the drop-down. This is the website where users will manage their communication preferences.
- The link preview displays the hyperlink that will be inserted into the email. Once the link has been inserted into the email body, you can adjust it through the hyperlink designer or directly in HTML mode. Do not adjust any of the query parameters and always test any changes to the URL.
Note: Ensure that the URL is accessible outside of your corporate network. If the hostname portion of the URL is localhost, or an internal server name, then the link will not work when your recipients try to click it. We recommend that you click the link to verify that you are taken to the correct page. The hostname for your website is determined by a setting in RiSE. To set the hostname, go to RiSE > Site Builder > Manage websites. Select the website. On the Properties tab, the Website base URL(s) setting determines the hostname.
Warning! Testing the link inside your corporate network does not confirm it will work when accessed over the internet. Be sure to test the link from a device not connected to the network.
The communication creator comes equipped with a donation-link generator that permits the donor to skip the sign-in process. The link is tokenized, meaning the donor is identified and is not required to fill in their contact information. When the gift is processed, it is associated with the appropriate contact.
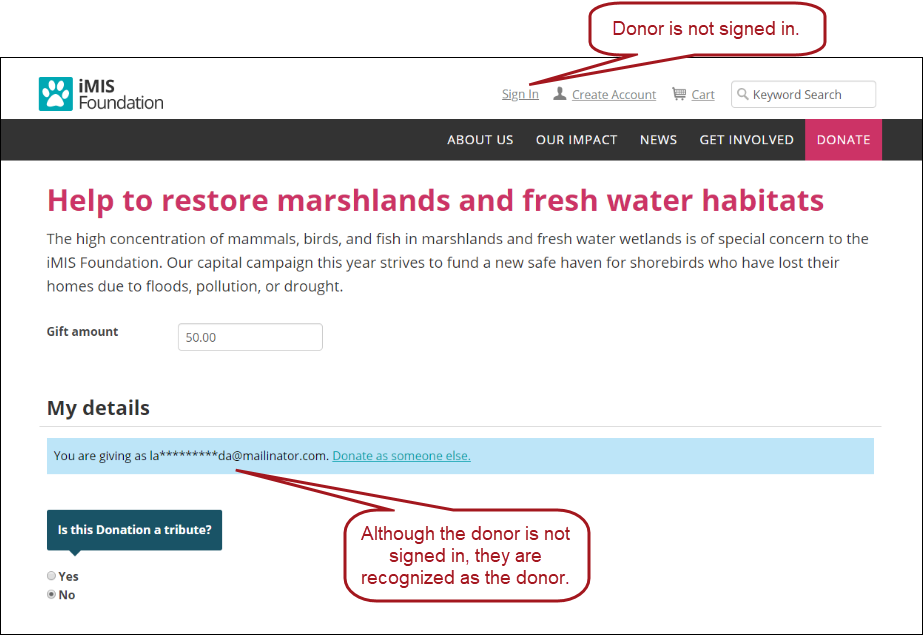
Note: Contacts can clear the token by using a different link on the Give Now page. No personally identifiable information is available for the contact on the Give Now page.
To permit donors to give without logging in, add the donation link to a communication:
- Go to Marketing > Communication templates.
- Create a new template (New > Communication) or open an existing template for edit.
- Click the Body tab.
- From the Insert link drop-down, select Donate link:
- Enter the Link text.
- Define the Content or URL. By default, the ~/GiveNow shortcut is selected. Choose a different page or shortcut if you do not want to direct users to the page defined at the ~/GiveNow shortcut.
- Enter a CSS Class that will be applied to the link.
- If the Content or URL is pointing to an iMIS content record, select a Default website.
- Enter or select a Source code to associate this link with a marketing campaign.
- Enter Additional URL parameters to include in the link. To add multiple URL parameters, follow this format: param1=value1¶m2=value2¶m3=value3
- Leave Donor is auto-selected based on communication recipient enabled. This check allows the donor to be recognizable when they click the link in the communication.
- Enter a numerical value in the Days until link expired field. The value entered here is the amount of days that the token will recognize the donor and have them automatically associated with the donation. After the number of days entered here has passed, the donor can still use the link in the communication, but they are no longer automatically associated with the donation and must login to the site as they normally would.
Note: The Days until link expired number must be at least 1 but no more than 366.
- Click OK.
- Continue configuring the communication.
- Send the communication.
See Permitting donors to give without logging in for more information.
Select Content or URL to insert a standard link into the communication:
- Enter the Link text.
- Define the Content or URL:
- Select content from the Document browser.
- Type in a content record's direct path. For example, @/iCore/DefaultStaff.
- Type in a shortcut URL. This will preserve the link even if the content is moved in the document system. The shortcut must conform to the format ~/Shortcut.
- Type in a direct link. For example, http://www.help.imis.com.
- Enter a CSS Class that will be applied to the link.
- If the Content or URL is pointing to an iMIS content record, select a Default website.
- Enter or select a Source code to associate this link with a marketing campaign.
- Enter Additional URL parameters to include in the link. To add multiple URL parameters, follow this format: param1=value1¶m2=value2¶m3=value3
- Click OK.
- Click OK.
The communication creator enables you to dispatch direct payment links for invoices via email. These links allow recipients, whether logged in or not, to view pertinent invoice details and pay the full invoice balance on a secure page. When a payment is submitted by an unauthenticated user, it is associated with the Bill to contact. For authenticated users, payments are linked to the account of the logged-in user, whether they are paying their own invoices or on behalf of someone else.
Important! This feature does not support partial payments. Additionally, the Direct Debit payment method is only supported for authenticated users and is not accessible for guest payments.
To add the pay invoice link in a communication, do the following:
- Go to Marketing > Communication templates.
- Create a new template (New > Communication) or open an existing template for edit.
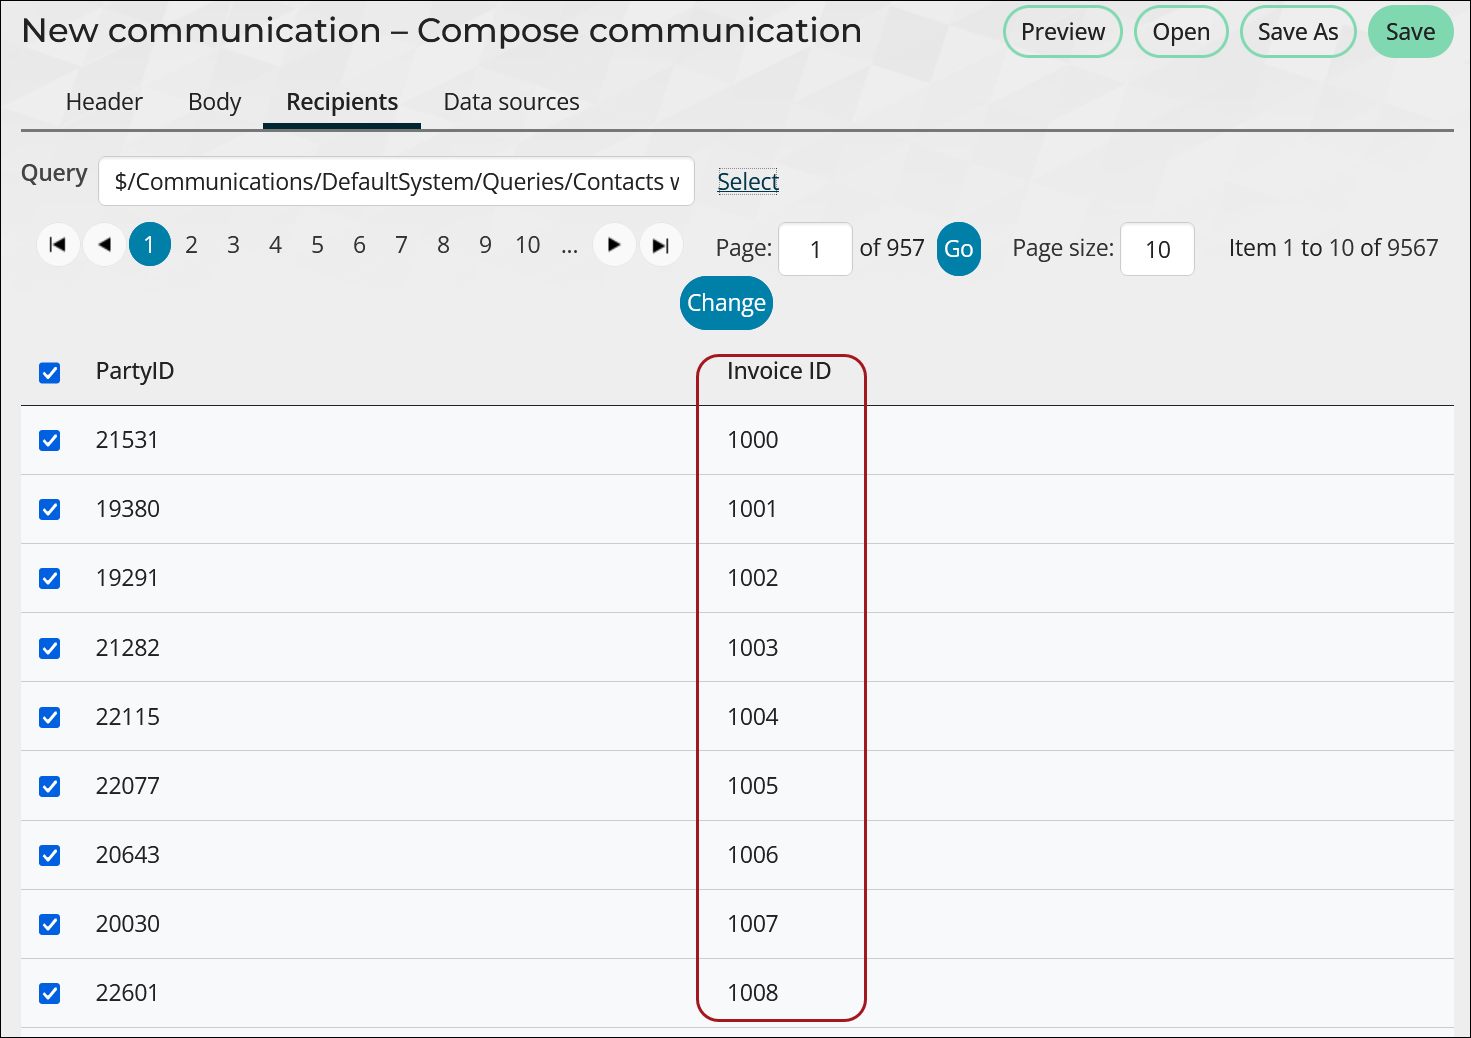
- Click the Recipients tab. Ensure the recipient query contains display columns for the contact’s ID and the InvoiceID. If the InvoiceID column is missing, a warning message displays when previewing or sending a communication with the Pay Invoice Link.
- Click the Body tab.
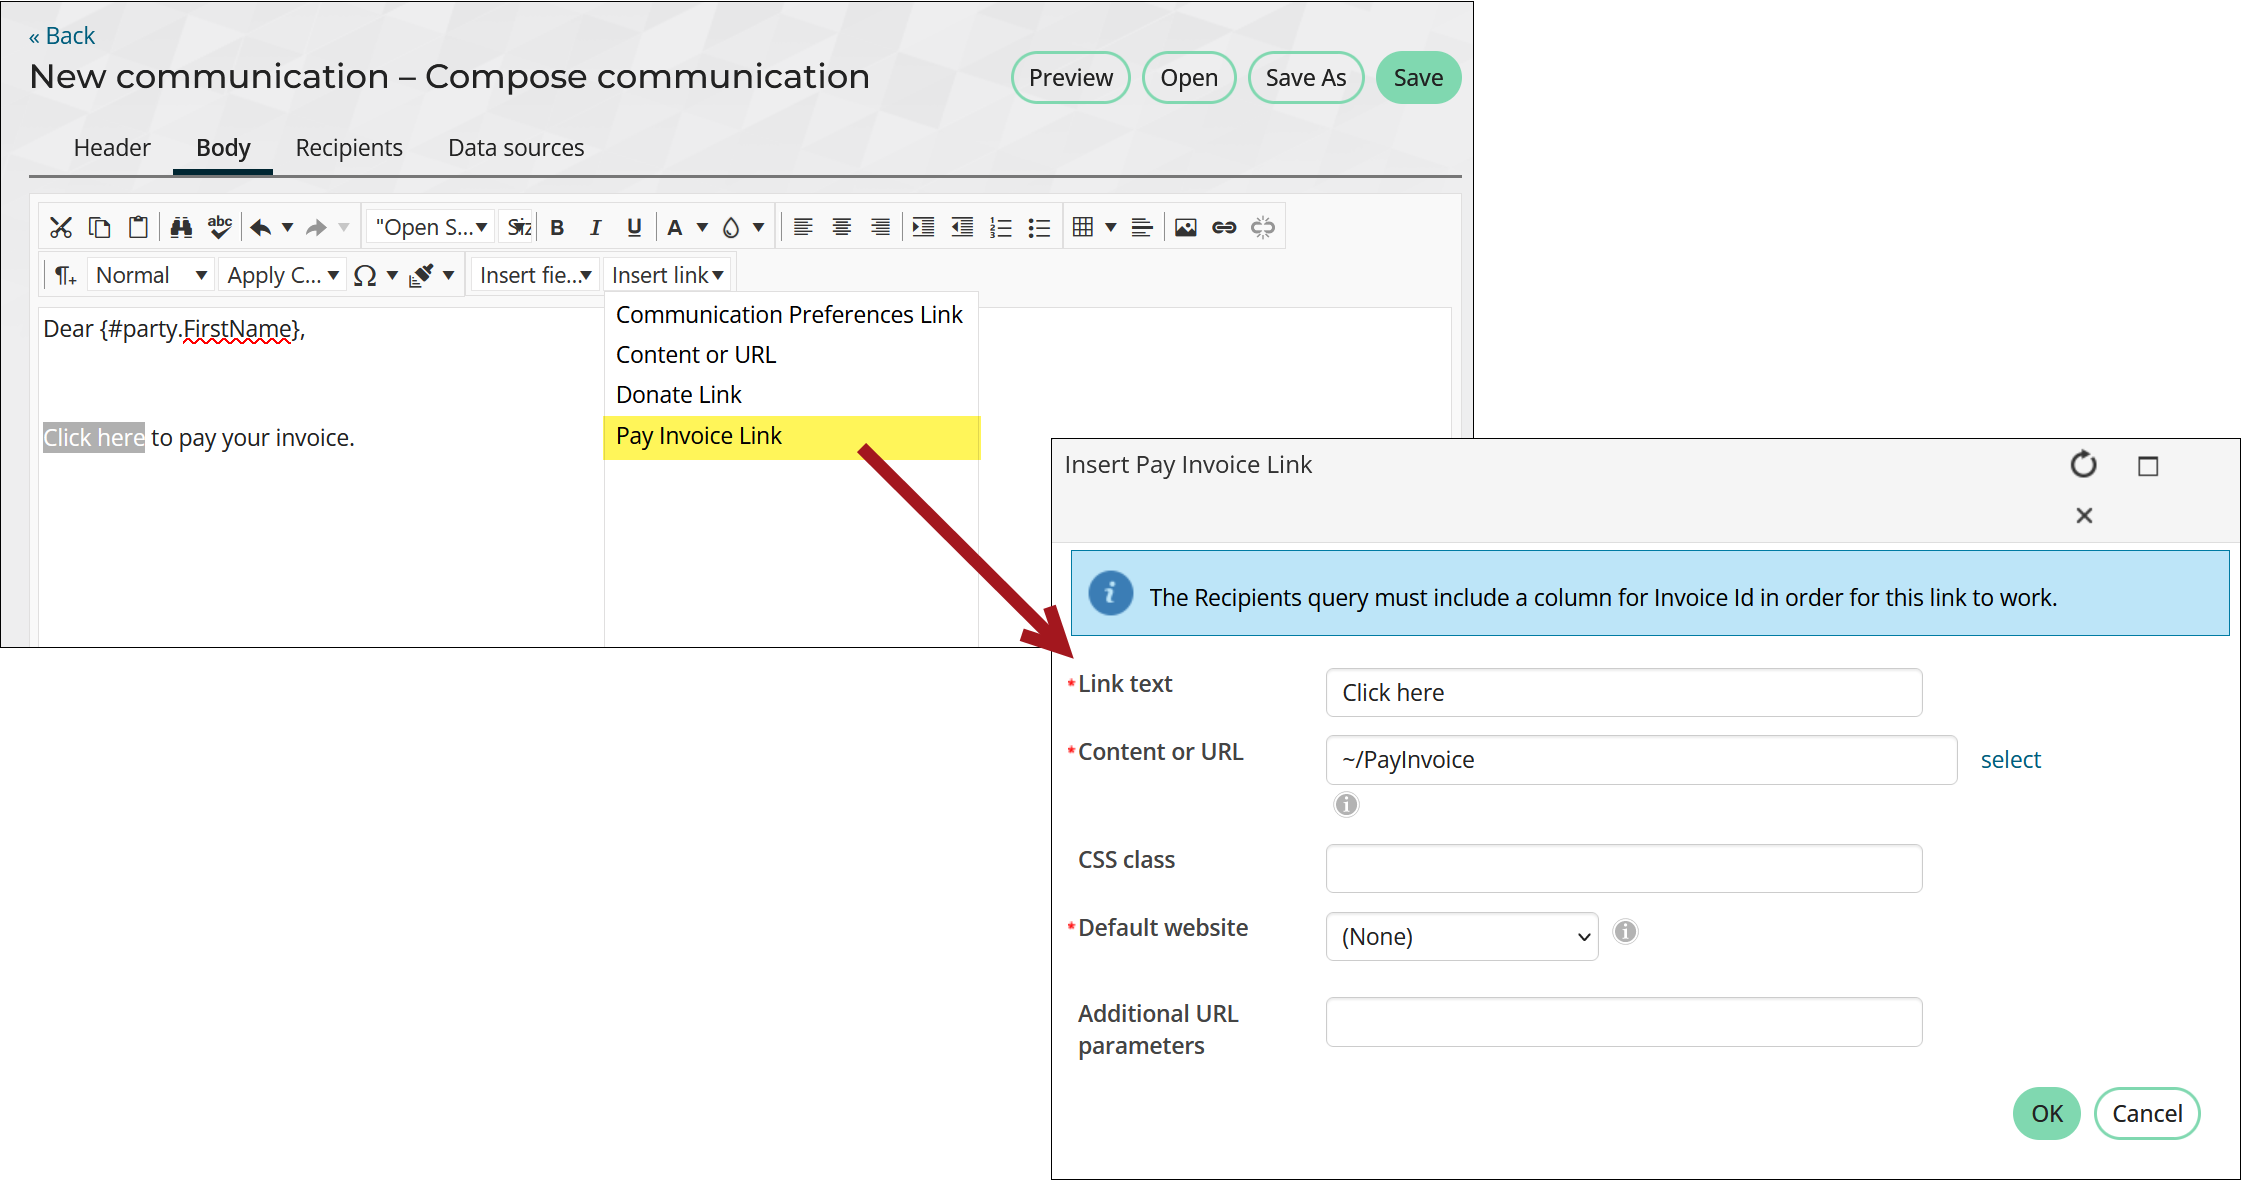
- From the Insert link drop-down, select Pay Invoice Link:
- Enter the Link text.
- Define the Content or URL. By default, the ~/PayInvoice shortcut is selected. Choose a different page or shortcut if you do not want to direct users to the page defined at the ~/PayInvoice shortcut.
- (optional) Enter a CSS Class that will be applied to the link.
- Select a Default website.
- (optional) Enter Additional URL parameters to include in the link. To add multiple URL parameters, follow this format: param1=value1¶m2=value2¶m3=value3
- Click OK.
- Continue configuring the communication.
- Preview, then Send the communication.
Tip! The sample Event Invoice, Event Invoice Report Writer, Invoice Notice, Invoice Notice Report Writer, Order Invoice, and Order Invoice Report Writer templates include the pay invoice link out-of-the-box. If you choose one of these templates, ensure the link correctly points to your website.
Adding an anchor link allows email recipients to jump to a specific location within the email:
- Highlight the word or sentence you want the link to jump down to.
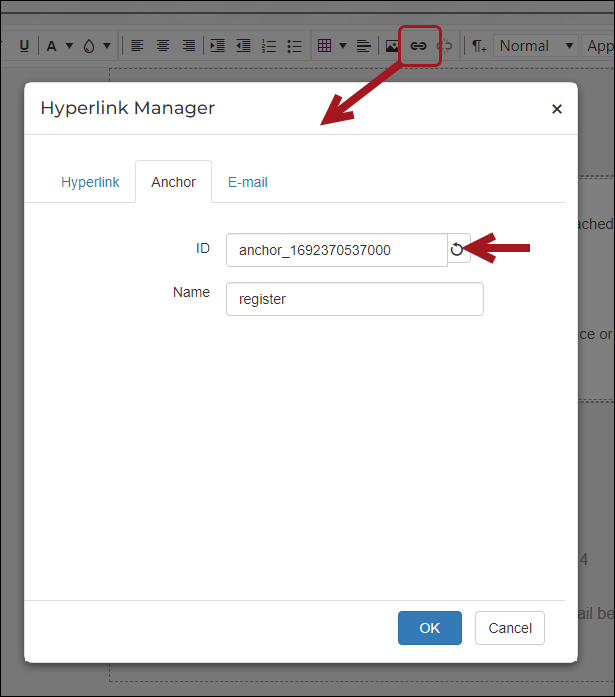
- Click the Hyperlink Manager (Ctrl + K).
- Click the anchor tab.
- Generate an ID, and then enter a value for Name.
- Click OK.
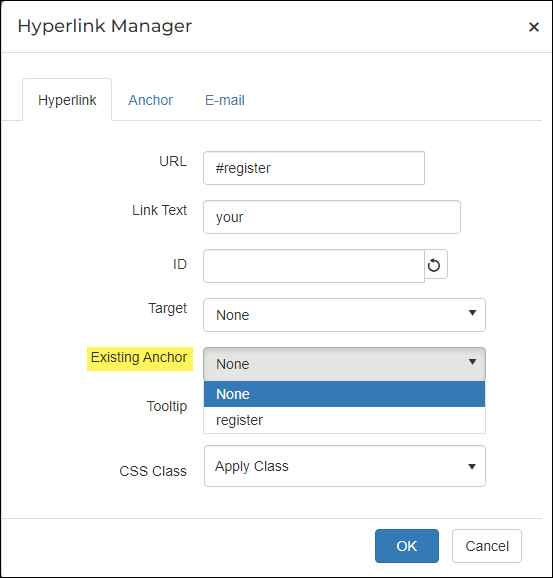
- Go to the text you want to link and highlight it.
- Open the Hyperlink Manager (Ctrl + K).
- Select the appropriate anchor from the Existing Anchor drop-down.
- Click OK.
Inserting custom data using the foreach placeholder
To include repeating data in the body of email from an associated data source, use the {foreach} placeholder. For more information, see Using the foreach placeholder.
Note: To see a live example of the {foreach} placeholder in action, watch the Communication Creator - Advanced features video at the bottom of this page.
Adding attachments
Select Add attachment to include a PDF or RDL (SSRS report) from the Document System as an attachment to your communication.
Note: When opened as an attachment, reports containing subreports are not displayed properly in a PDF viewer. It is recommended that you do not send reports containing subreports as attachments.
- Select Add attachment and navigate to the Document System folder where the file will be saved.
- Click New > Adobe PDF or Reporting Services Template.
- Click Select to browse for the file.
- Select the file, then click Open.
- Enter a file Description, then click Upload.
- Select the file, then click OK.
See Attaching a Report Writer report to a communication template and Creating a communication with an attached SSRS report.
Previewing, saving, and sending communication templates
Review the following information for specific details about previewing, saving, and sending communication templates.
Preview
You must enter From and To addresses to preview the email. Click Preview to view a preview of the email for each recipient. Click Prev or Next to review the email for each recipient.
Saving
To save this email as a reusable template, click Save or Save As. The Document browser is displayed, allowing you to define a Name for this template. After the template is saved, the name you define for the template is shown in the editable Template name field. The email template is saved in the $/Common/Communications folder in the Document system.
All information in the template is included in the saved drafts including the recipient/query list, attachments, and message content. It is recommended to use a naming convention to identify your query in any saved email drafts. For example enter "All Members Thank You Communication" instead of "Thank you communication" to avoid any confusion about the content of the draft.
Sending
(optional) To send the email to the recipients immediately, click Send. Review the Communication Confirmation, then click Yes, Send Now or No, Go Back to make additional changes. A confirmation notification is displayed. The confirmation indicates that the number of messages attempted matches the number of results selected. Errors are listed individually explaining why the email was not sent.
To review the status of your communication job, go to the Communication logs (Marketing > Communication logs). For more information, see Communication logs.