Last updated on: June 08, 2026
With iMIS, you can create reusable templates for your future communications to ensure list, messaging, and brand consistency. You can utilize your templates when emailing contacts directly, when emailing a list of contacts retrieved in a Query Menu content item, and when composing a new communication from Marketing > Communication templates.
To create a new communication template, go to Marketing > Communication templates > New > Communication.
In This Article
Header tab
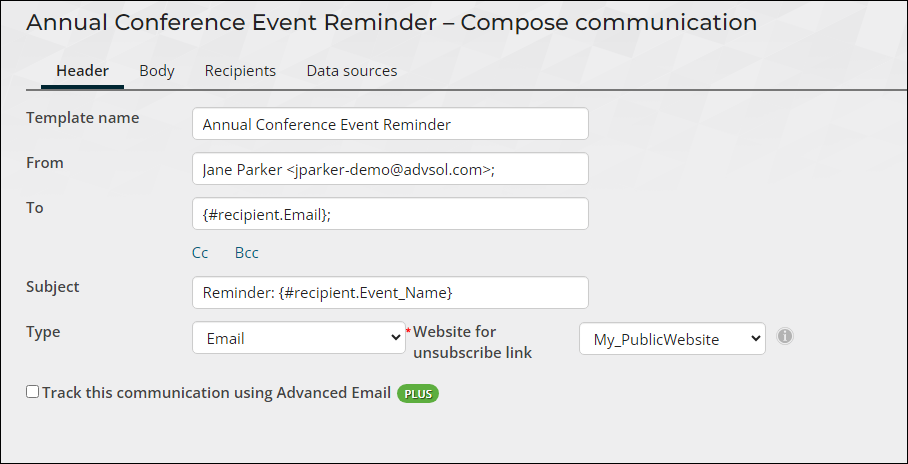
From the Header tab, enter the following information:
- From - Enter the email address that will send the communication:
- (optional) To display a friendly name, type the name first, followed by the email address in angle brackets. For example: Your Organization Name <info@yourorganization.com>. Recipients will see this as “Your Organization Name.” The angle brackets around the email address are required.
Note: For Advanced Email, the maximum length of the From email address is 64 characters and the maximum length of the friendly name is 50 characters. Addresses and names exceeding the maximum length will be shortened when the email is sent.
- To – This field automatically populates with {#party.Email}, which includes the primary email associated with each iMIS ID returned in the recipients query:
- (optional) Enter additional addresses as needed. Each additional address will receive a new copy of the communication, and each new copy will have an entry in the communication log
- (optional) Click the Cc or Bcc links to enter Cc or Bcc email recipients. These addresses will be included on each copy of the communication but will not receive their own copy or entry in the communication log.
Note: When sending a Standard email using the iMIS mail service, the same email address cannot appear in more than one of the To, Cc, or Bcc fields. If an address is repeated, it will be included only once, with precedence given in the order of To, Cc, and then Bcc.
- Subject – Enter the subject line of the email:
- The Subject line cannot contain the < > symbols.
- After the communication is sent, the Subject line will contain the words iMIS Demonstration If you are using a Client key that is licensed to an iMIS demo or test system.
- Type – Select a communication Type for the drop-down. Depending on the communication Type’s subscription properties, users can manage their communication preferences. This setting works with Advanced Email. See Managing communication preferences for more information.
- Website for unsubscribe link – This option appears when the selected communication Type allows unsubscribing. Select a site to host the unsubscribe link, used by email clients to generate a one-click unsubscribe option within their interface. For more information, see Enabling one-click unsubscribe for communications.
- Track this communication using Advanced Email - See Advanced Email for more information.
Note: This option is not available for Advanced Emails.
Body tab
Compose the body of your communication template. Use any of the follow features to enhance the message:
- Adding links to communication templates
- Assigning source codes to hyperlinks
- Using the insert fields in a communication template
- Using the foreach placeholder
- Using conditional functions in communication templates
- Uploading a PDF to use as an attachment to a communication template
- Creating a communication with an attached SSRS report
Important! To avoid performance issues, do not embed or paste base64-encoded web fonts into content intended for use in communications. Including base64 fonts can significantly increase the size of Communication Log records, potentially impacting system performance.
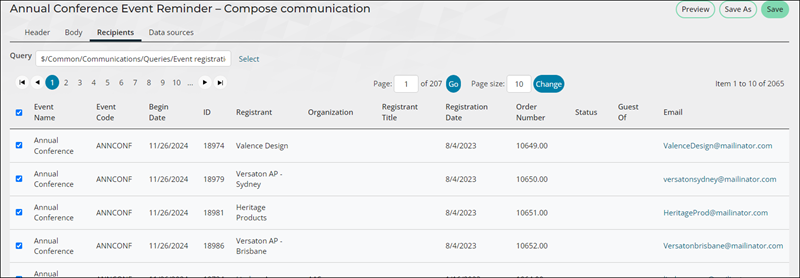
Recipients tab
Requirements for the recipients query
There are several requirements for a recipient query. Review Creating recipient queries for communications for full details.
Adding a recipient query
From the Recipients tab, select the contacts to whom the email will be sent to:
- Select a query to use as the primary data source. This query retrieves the contacts to whom you will send the communication. The default primary data source is the SelectedContact query, which retrieves the contact you are signed in as or working on behalf of.
- (optional) Deselect the names of any contacts you do not want to receive the email.
Note: If the query contains In Search? filters that are Required or Optional, you cannot deselect recipients.
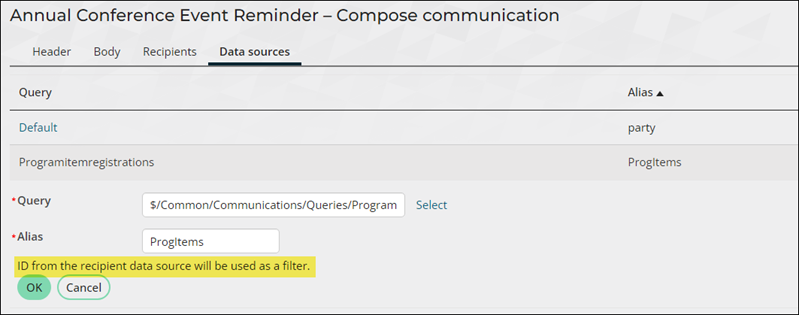
Data sources tab
Add data source queries when you want to include the data from those queries in the communication template. See Recipient and data source queries for more information.
Important! Each template contains the Default query (Alias of party) on this tab. This query provides basic information about the recipients, is automatically added. To ensure that the email is received, do not remove the Default data source: $/Communications/DefaultSystem/Queries/Party/Default
To add a data source query, do the following:
- Select Add data source.
- Select the query.
- (optional) Change the Alias of the data source. Fields from the data source will be prefixed by the Alias in the Insert field drop-down.
- Click OK, and then click OK again to add the data source. The data source is not added until you click OK.
- Save the template. The query is not available in the Insert field drop-down until the template is saved.
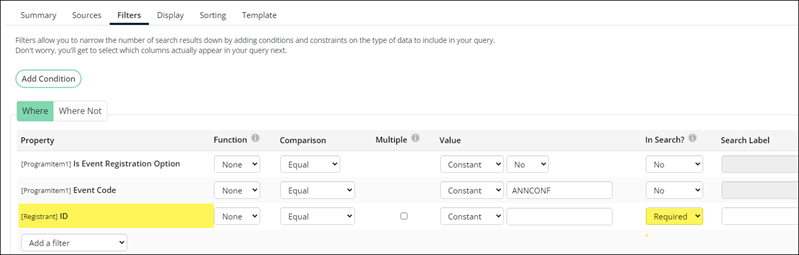
Linking a data source query to the recipient query
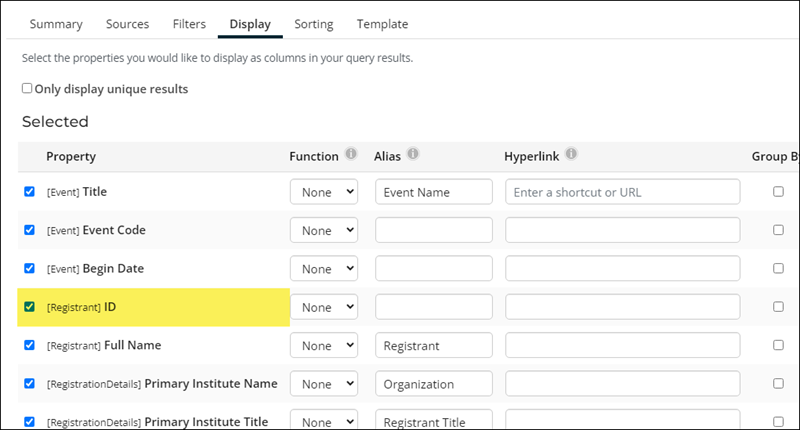
If the additional data source is providing data about individual recipients, the data source query must be linked to the recipient query through an ID property. This ensures each recipient only receives data related to them.
Note: When ID is used as a filter in the data source query, display columns from the this query that are inserted into the body of the template will remain available when the template is used in a context where the recipient query is replaced.
To link the two queries, do the following:
- Data source query - From the Filters tab, add an ID property . Set In Search? to Required.
- Recipient query - From the Display tab, add an ID property.
Previewing and saving
Click Preview to view a preview of the email for each recipient. Ensure that any merge fields in the email appear correctly. Click Prev or Next to review the email for each recipient. The preview will stop showing after the 18th record.
Click Save or Save As to save this email as a reusable template. The Document browser is displayed, allowing you to define a Name for this template. By default, the email template is saved in the $/Common/Communications folder in the Document system.
Sending the communication
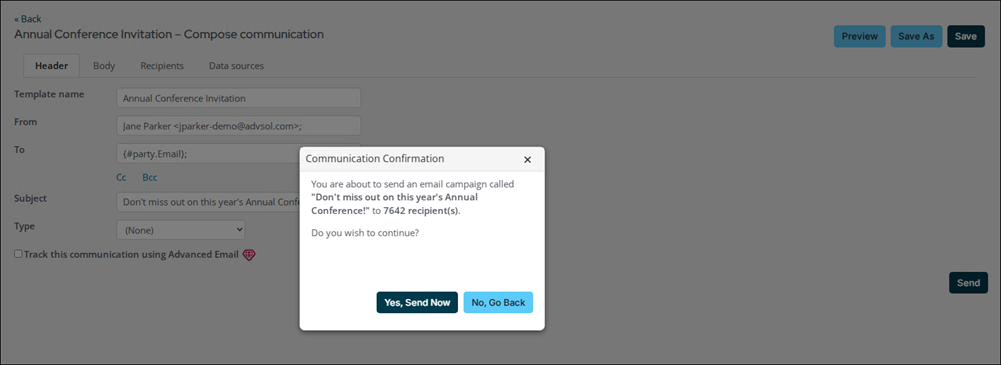
Click Send to send the email to the recipients immediately. Review the Communication Confirmation, then click Yes, Send Now or No, Go Back to make additional changes.
A confirmation notification is displayed indicating that the number of messages attempted matches the number of results selected. Errors are listed individually explaining why the email was not sent. To review the status of your communication, go to the Communication logs (Marketing > Communication logs). For more information, see Communication logs.
Note: If any emails bounce, check to see if the email contains invalid characters. For more information, see Regular expression to validate email addresses.