Last updated on: January 27, 2026
Use the Insert field drop-down to add fields from your data sources. Any fields that are not found from the defined data source will resolve as blank.
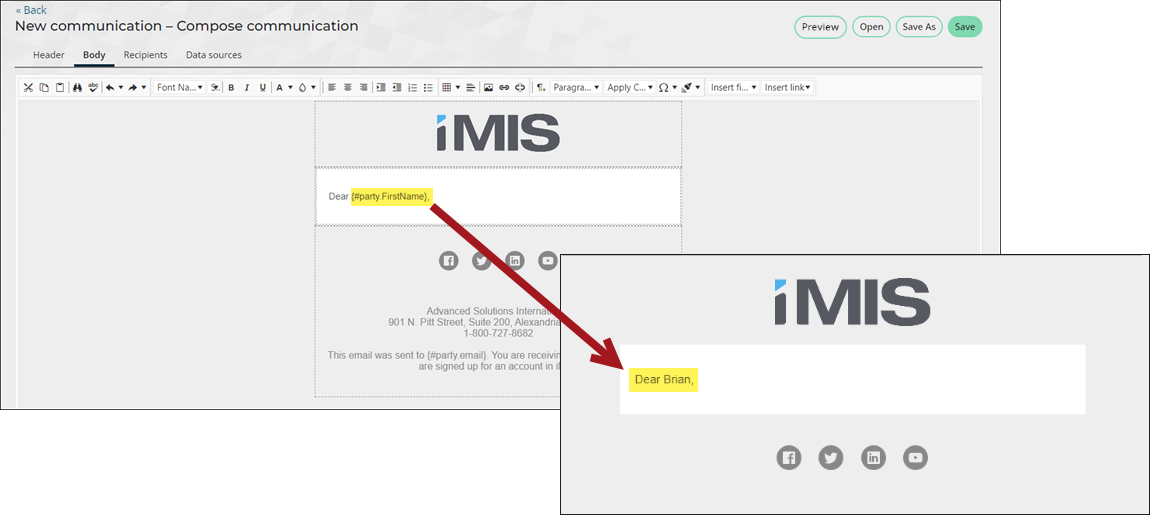
Use the {#party.FirstName} parameter to address all recipients by their first name. Use the {#party.Email} parameter in the To field to send the communication to all contacts in your query.
Placeholders, specified using {} notation, denote areas of the communication that will resolve against the data sources. Edit the placeholders as needed.

The {#...} placeholder embeds data into the content or title at the placeholder location. The placeholder consists of the following components: {#datasource[.property... ] [attributes]}
- datasource - The name of the data source.
- (optional) property - The name of the property. Can be chained together using dot notation. For example, prop1.prop2.prop3. Where the property is a collection, a specific item can be accessed using [i] notation. For example, .Address[1] would return the item at index position 1 from the Address collection.
-
attributes - Attributes are added as part of the property placeholder and will alter the way the resolved property displays. Attributes are formatted as follows: {#[datasource].[property] [attribute]}. Multiple attributes may be specified on a single placeholder. The following attributes are available:
- noencode – For security purposes, property values are HTML encoded by default, meaning they will display as plain text. If your property contains HTML that you know is safe, use the attribute noencode to force the property value to display as rich HTML. For example, {#Event.Description noencode} will display the event description including rendering any HTML from the description.
- uppercase – Converts the value of the property to display in all uppercase.
- lowercase – Converts the value of the property to display in all lowercase.
- format – Numbers and date properties may be formatted to improve readability. For example, {#Event.BeginDate format="d"} will display the event Begin Date without the time.
- The following formats are available for numbers:
- format="C" – Displays a currency sign and appropriate decimal places along with the number based on the current culture. For example, 123.456 would display as $123.45.
- format="N" – Displays the number with a comma after every 3 places. For example, 1234.567 would display as 1,234.567. You can also specify the number of decimal places to display using N0x where x is the number of decimal places. For example, using format="N02" would display as 1,234.58.
- format="P" – Displays the number as a percentage. For example, 1.2345 would display as 123.45 %. You can also specify the number of decimal places to display using P0x where x is the number of decimal places. For example, using format="P01" would display as 123.5%.
- The following formats are available for dates and date times:
- format="d" – Displays the date as a short date without time based on the current culture. For example, in the US the date would display like 6/15/2018.
- format="D" – Displays the date as a long date without the time based on the current culture. For example, in the US the date would display like Friday, June 15, 2018.
- format="M" – Displays the month and day of the date based on the current culture. For example, in the US the date would display like June 15.
- format="f" – Displays a long date and short time based on the current culture. For example, in the US the date time would display like Friday, June 15, 2018 1:35 PM.
- format="g" – Displays a short date and time based on the current culture. For example, in the US the date time would display like 6/15/2018 1:35 PM.
- format="t" – Displays a short time based on the current culture. For example, in the US the date time would display like 1:35 PM.