Last updated on: January 27, 2026
The Email settings allow you to configure the iMIS mail service, a custom mail service, or turn on test mode:
- Go to Settings > Email settings.
- (General tab) The following settings are on the General tab:
- Send stand emails using:
- iMIS mail service: This option is used to configure both standard email and Advanced Email settings.
- Custom mail service: This option allows configuring iMIS to send standard email communications via your own SMTP server or a third-party SMTP service.
- Turn on "Test mode": This option disables all emails being sent, except for emails sent using Advanced Email. This option should only be used during testing.
- Send stand emails using:
- (Mail services tab) The following settings are configurable on the Mail services tab:
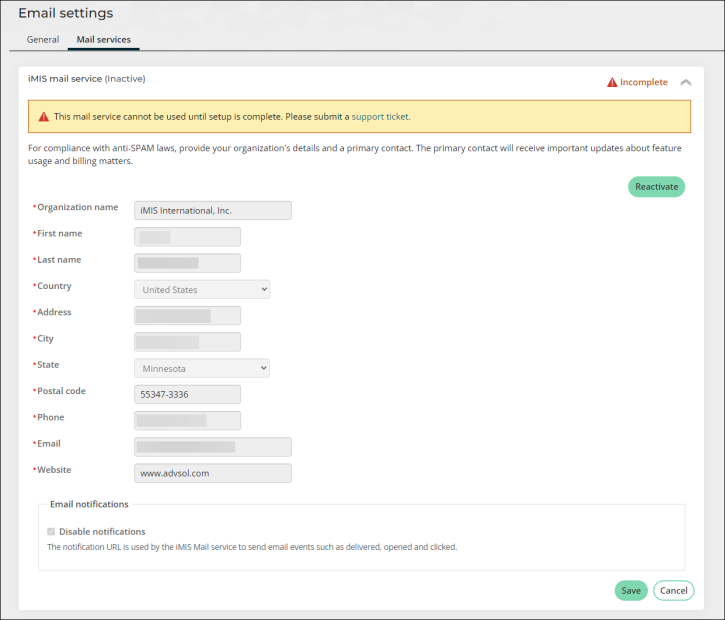
- iMIS mail service:To comply with anti-SPAM laws, provide the required organization's details and a primary contact:
- Organization name
- First name
- Last name
- Country
- Address
- City
- State
- Postal Code
- Website
- Email notifications: Available only with the Advanced email - Premium license.
- Disable notifications: The notification URL is used by Advanced Email to indicate within iMIS when events pertaining to a particular email have occurred (delivered, opened, clicked, etc.) When this option is selected, email notifications will not be received. For standard mail configurations, this option is selected by default, and notifications are always disabled. For Advanced Email configurations, this option is deselected by default, and notifications are sent.
Important! Enter the organization's full name. Do not use an acronym in this field.

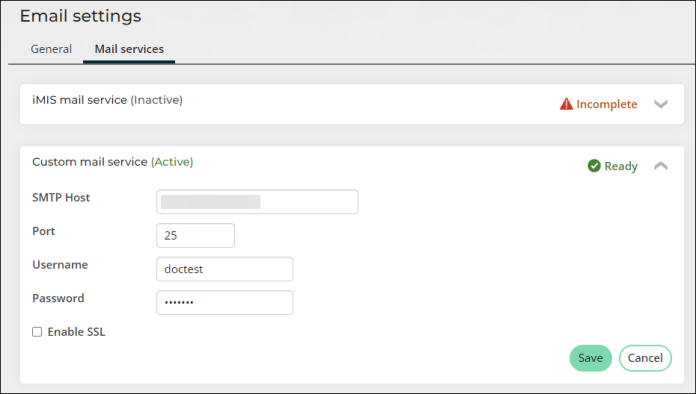
- Custom mail service:
- SMTP Host - The host name of the SMTP server.
- Port - Specifies the port used for SMTP connections. Typically, this is either 25 or 587.
- User Name - The user name to be used to access the SMTP Host.
- Password - The password to be used to access the SMTP Host.
- Enable SSL - Select this option to enable SSL security on your communications.
Note: For new installations, the Port value must be populated. Contact ASI Hosting for assistance with defining the port used for SMTP transactions.
Note: There are two types of credentials that are accepted for SMTP: Default and Network. If a User Name and Password are supplied, it is assumed that the credential type required for the SMTP Host is Network. If the User Name and Password are not supplied, then the credential type defaults to Default credential mode.

- iMIS mail service:To comply with anti-SPAM laws, provide the required organization's details and a primary contact:
- Click Save.
-
Submit an ASI Hosting support ticket, and include the following information:
Advanced email:
- Subject: (AEM) CNAME records needed for DNS
- Content: I have just completed configuration of Advanced Email in my iMIS settings. Will you send me CNAME records so that I can add them to the DNS?
iMIS mail service:
- Subject: (iMIS mail service) CNAME records needed for DNS
- Content: I have just completed configuration of iMIS mail service in my iMIS settings. Will you send me CNAME records so that I can add them to the DNS?
-
When you receive your CNAME records from someone at ASI, add the CNAME records to the DNS. Please contact your DNS Provider and make the necessary updates.
 Example of CNAME records added to a DNS
ASI cannot update your DNS for you. Please contact your DNS Provider and make the necessary updates. The following is an example of what your DNS should look like after the CNAME records have been added:
hostname: [ url123.yourorg.org ] / data: [sendgrid.net ]
hostname: [ 1234567.yourorg.org ] / data: [sendgrid.net ]
hostname: [ imismail.yourorg.org ] / data: [ u1234567.wl143.sendgrid.net ]
hostname: [ s1._domainkey.yourorg.org ] / data: [ s1.domainkey.u1234567.wl143.sendgrid.net ]
hostname: [ s2._domainkey.yourorg.org ] / data: [ s2.domainkey.u1234567.wl143.sendgrid.net ]
Only information inside the [ ] needs to be entered.
-
After you have added your CNAME records to the DNS, reply to your ASI Support ticket with the following information:
"I have added my CNAME records to the DNS. Please verify I have configured the CNAME records correctly."
Warning! Do not send any communications until you have been verified by someone at ASI.
Note: If someone at ASI tells you that your account is not verified, you will need to make sure you have properly configured your CNAME records. ASI highly recommends someone from an IT department adds the CNAME records to the DNS.
- After you have been verified by someone at ASI, you can begin using standard emails.