Last updated on: June 19, 2026
Note: This is a licensed feature. For more information, contact your AiSP or ASI Technical Support.
Advanced Email makes it easy for you to manage interactions with your constituents, providing you with the tools you need to make interactions efficient and effective. This feature enables you to send email more reliably, track the effectiveness of individual emailed communications, and apply what you learn to continually improve your communication approach.
For information about using Advanced Email to send communications, see Sending an email using Advanced Email.
Setting up your Advanced Email account
Do the following to set up your Advanced Email account:
- Go to Settings > Email settings.
- Do one of the following:
- From the General tab, select Finish setup to use service.
- From the Mail services tab, click the drop-down for iMIS mail service to configure the following settings:
- Organization name
- First name
- Last name
- Country
- Address
- City
- State
- Postal Code
- Website
- Email notifications:
- Disable notifications: The notification URL is used by Advanced Email to indicate within iMIS when events pertaining to a particular email have occurred (delivered, opened, clicked, etc.) When this option is selected, email notifications will not be received. For standard mail configurations, this option is selected by default, and notifications are always disabled. For Advanced Email configurations, this option is deselected by default, and notifications are sent.
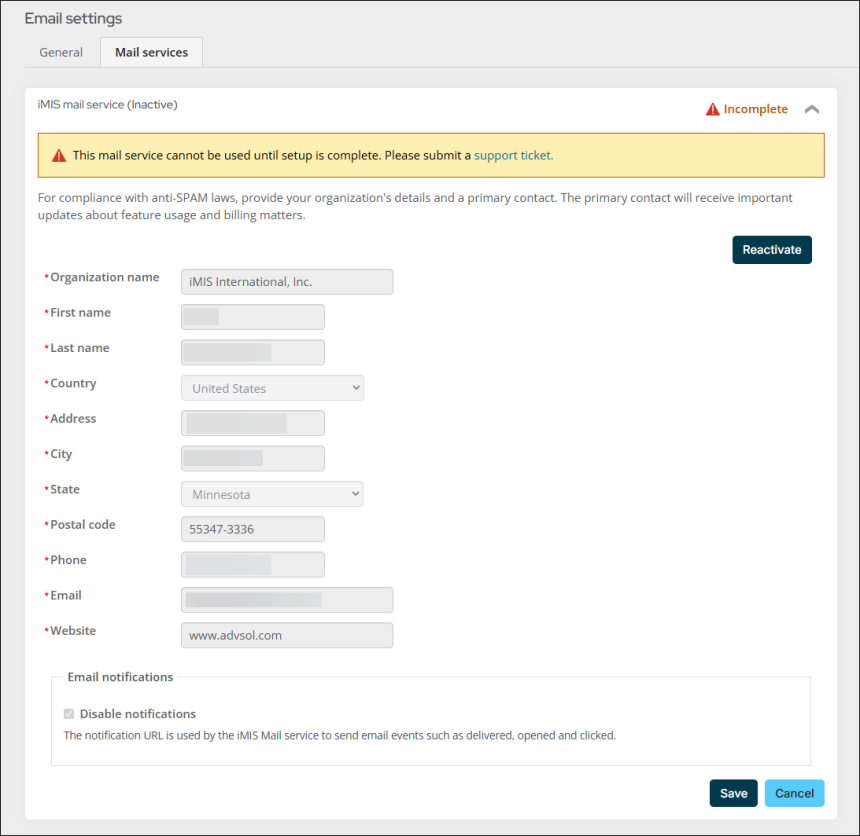
- (optional) Advanced Email is disabled by default for test databases in order to avoid redirection of live email notifications to the test database. A Reactivate button is displayed whenever a change in the configured SQL server or database name is detected. Click Reactivate only when the database is the primary live database. This database will then receive notifications, whereas any previously configured database will not.
- If Reactivate is accidentally clicked and you want to revert to using the original database, go to Settings for the original instance and click Save. This will update the Advanced Email service account with the original notification URL.
- Enabling and disabling notifications turns notification tracking for all new Advanced Emails for all instances of iMIS for an organization on and off. Deactivate and Reactivate updates the Advanced Email server setting for the URL to which all email notifications will be sent. Deactivation happens automatically whenever iMIS determines that the current database or SQL server name has changed, whereas reactivation for any instance of iMIS sets the email notification URL to point to the instance from which you reactivate, as the live database.
- Click Save.
Submit an ASI Hosting support ticket, and include the following information:
Advanced email:
- Subject: (AEM) CNAME records needed for DNS
- Content: I have just completed configuration of Advanced Email in my iMIS settings. Will you send me CNAME records so that I can add them to the DNS?
iMIS mail service:
- Subject: (iMIS mail service) CNAME records needed for DNS
- Content: I have just completed configuration of iMIS mail service in my iMIS settings. Will you send me CNAME records so that I can add them to the DNS?
When you receive your CNAME records from someone at ASI, add the CNAME records to the DNS. Please contact your DNS Provider and make the necessary updates.
 Example of CNAME records added to a DNS
ASI cannot update your DNS for you. Please contact your DNS Provider and make the necessary updates. The following is an example of what your DNS should look like after the CNAME records have been added:
hostname: [ url123.yourorg.org ] / data: [sendgrid.net ]
hostname: [ 1234567.yourorg.org ] / data: [sendgrid.net ]
hostname: [ imismail.yourorg.org ] / data: [ u1234567.wl143.sendgrid.net ]
hostname: [ s1._domainkey.yourorg.org ] / data: [ s1.domainkey.u1234567.wl143.sendgrid.net ]
hostname: [ s2._domainkey.yourorg.org ] / data: [ s2.domainkey.u1234567.wl143.sendgrid.net ]
Only information inside the [ ] needs to be entered.
After you have added your CNAME records to the DNS, reply to your ASI Support ticket with the following information:
"I have added my CNAME records to the DNS. Please verify I have configured the CNAME records correctly."
Warning! Do not send any communications until you have been verified by someone at ASI.
Note: If someone at ASI tells you that your account is not verified, you will need to make sure you have properly configured your CNAME records. ASI highly recommends someone from an IT department adds the CNAME records to the DNS.
- After you have been verified by someone at ASI, you can begin using Advanced Email Marketing.