Last updated on: June 30, 2026
Use the Membership Configuration Wizard to set up the essential components of iMIS membership from one location. The wizard guides staff users through the required workflow to create the following in iMIS:
- Customer types (Member types)
- Billing cycles
- Billing products (Membership fees)
Before using the membership wizard for first-time setup, ensure the following tasks are complete:
- Run the demo data removal script.
- Define Financial entities, including the default entity.
- Define General Ledger accounts and assign default accounts to the default financial entity.
After the initial setup, you can go back and update any membership components as needed by going to Membership > Configuration wizard.
In This Article
- Setting up membership using the Membership Configuration Wizard
Member types
Non-member contact types
Membership billing options defaults
Membership fee labels
Member types: Configure billing options and fees
Billing options
Term length and primary fees
Defining membership fees with a default or other fixed term length
Defining membership fees with a variable term length
Updating membership using the Membership Configuration Wizard
Reviewing membership configuration
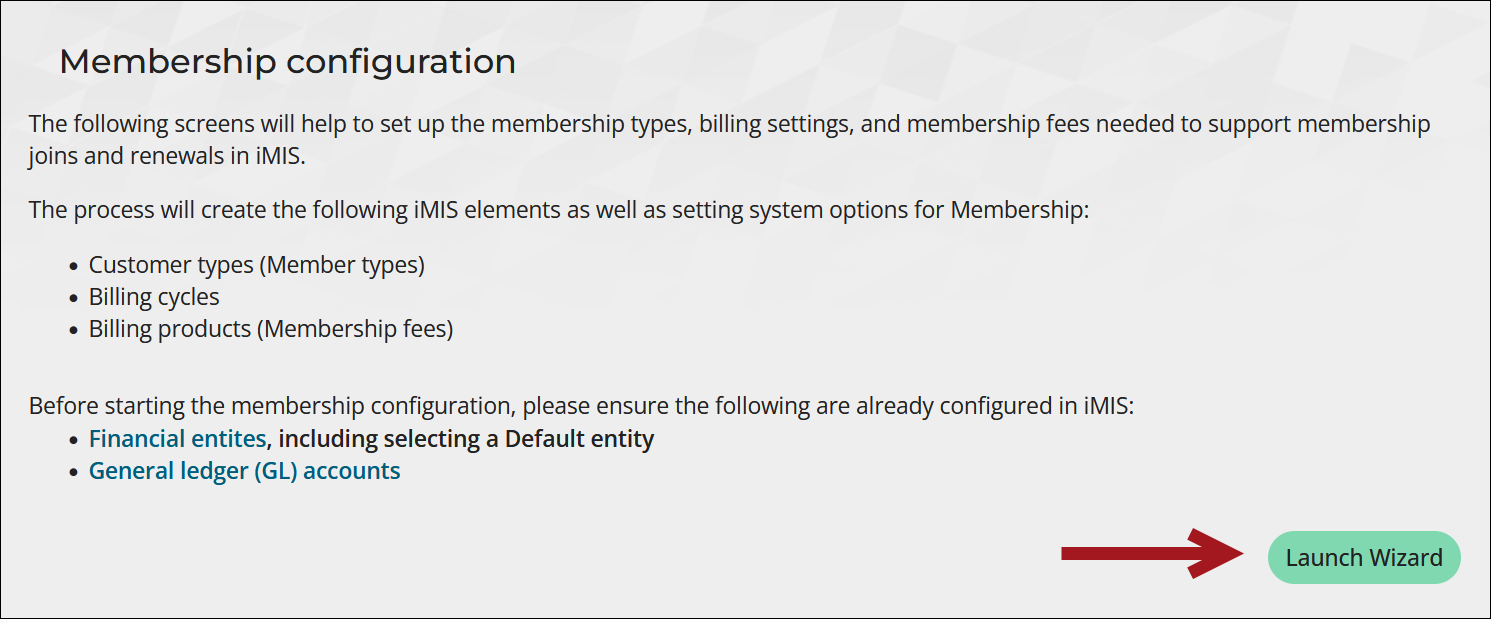
Setting up membership using the Membership Configuration Wizard
To use the Membership Configuration Wizard for first-time setup, do the following:
- Go to Settings > Membership.
- Click Membership Configuration Wizard.
- From the Membership configuration screen, click Launch Wizard.
- Configure the system settings from each of the following screens:
- Member types – Define member Customer types.
- Non-member contact types – Define non-member Customer types.
- Membership billing options defaults – Configure the default membership Billing options.
- Membership fee labels – Update membership Activity types.
- Configure the Member type billing options and fees for each member type:
- Billing options – Configure a Billing cycle for each member type.
- Term length and primary fees – Define Billing products that will be added to the Customer type Fees.
- Click Save & Continue on each page to save the configurations or Save to save your changes without moving on to the next screen. To return to the previous page, select Back or Previous, or select the desired page under Previous screens.
- From the Review membership configuration screen, review and save the configurations.
- When the setup is complete, click Complete Configuration.

Important! Do not use the Back button in your browser. Doing so will cause the wizard to reset to the first screen. Select Back or Previousfrom the membership wizard only.
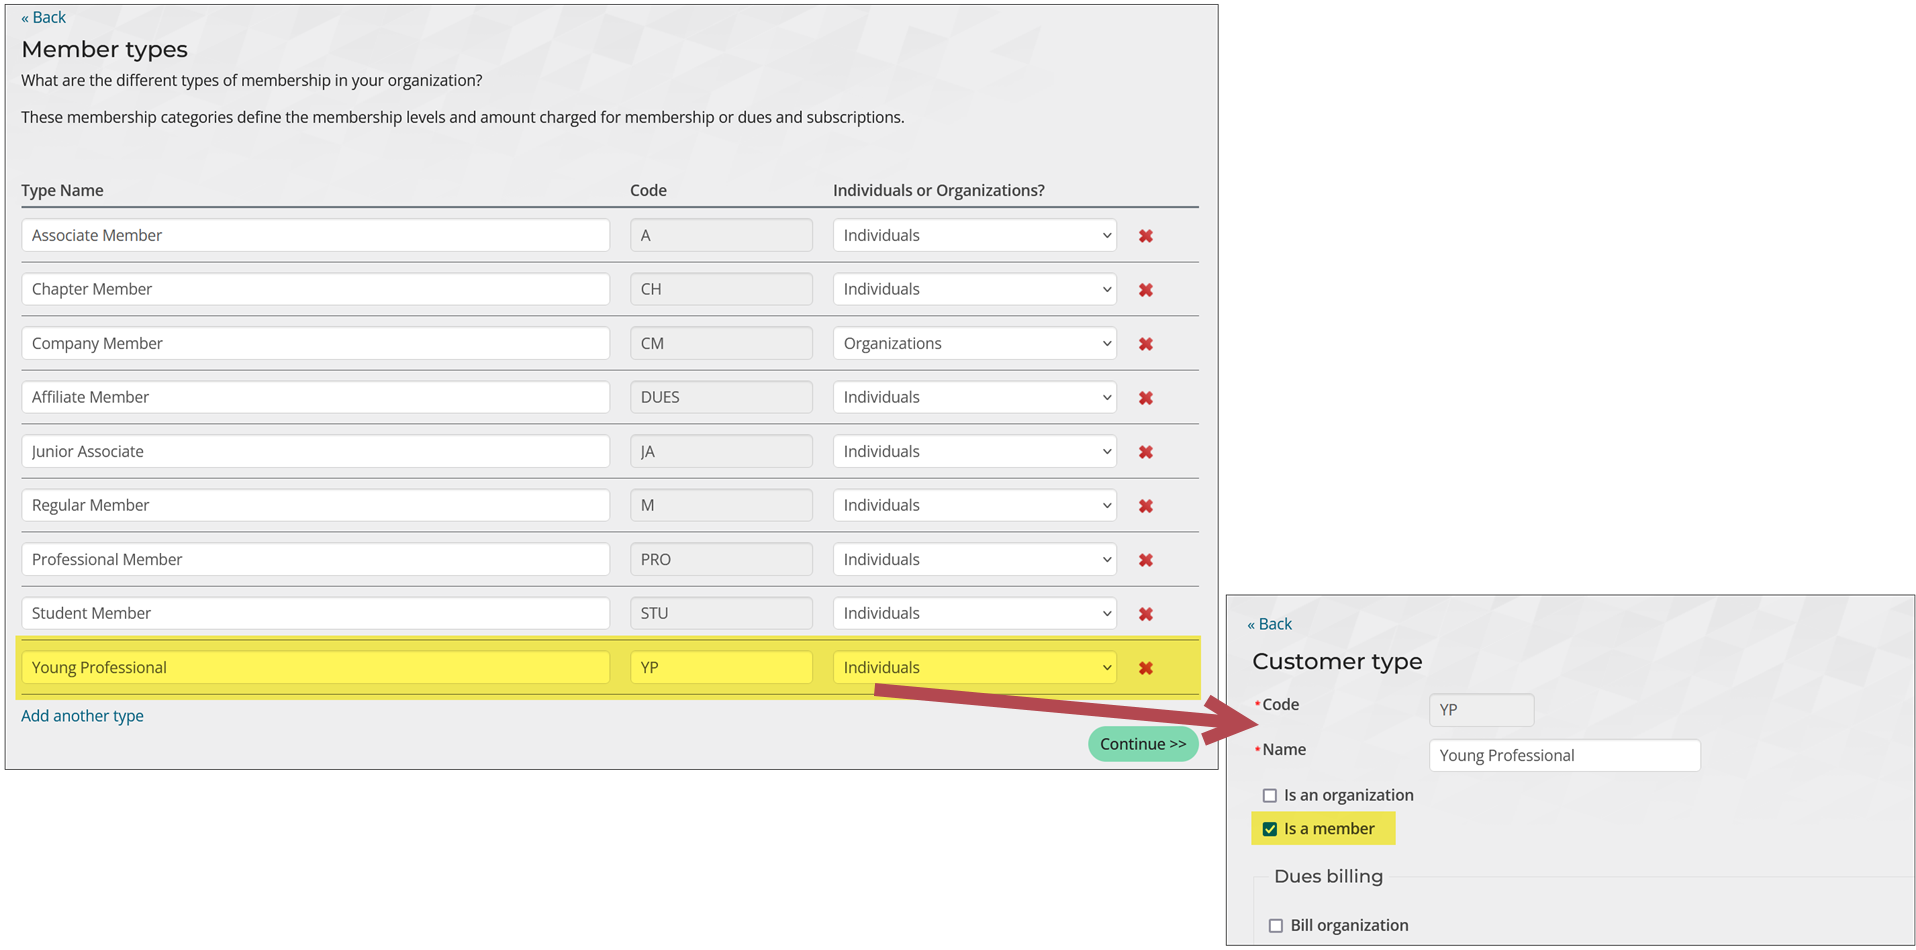
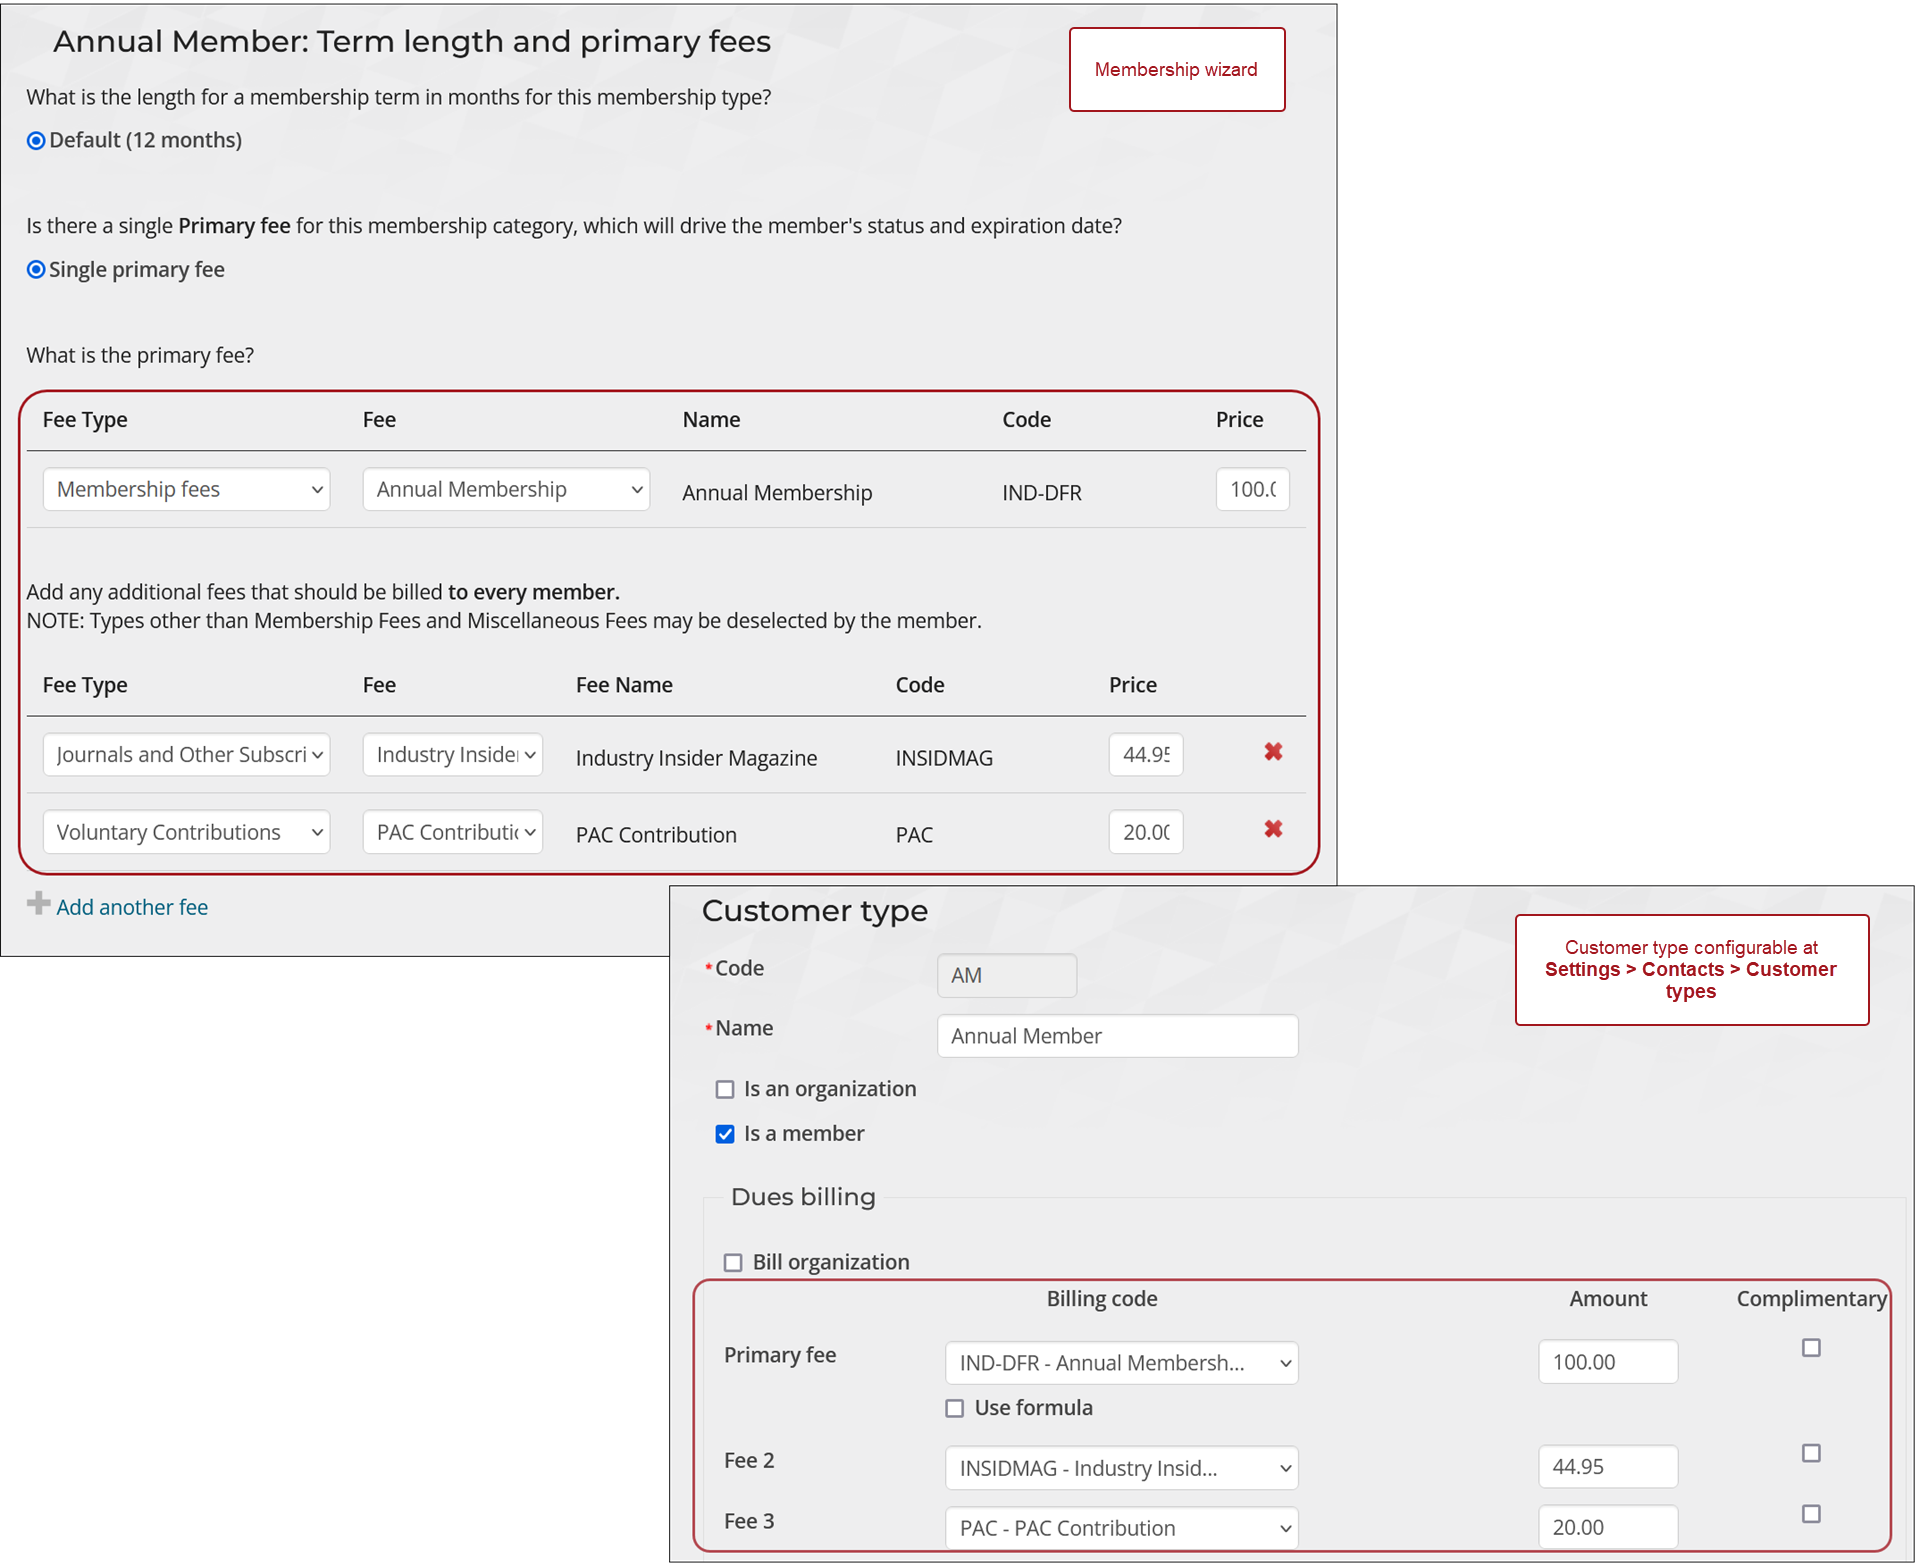
Member types
Each new member type creates a customer type with Is a member enabled. After a member type is created here, it is available at Settings > Contacts > Customer types.
Tip: Member types and Customer types are interchangeable terms. All member types are customer types with Is a member enabled.
Define the types of members for the organization:
- Select Add another type.
- Enter a Type Name and Code.
- From the Individuals or Organizations? drop-down, select whether the membership type is for individuals or organizations (companies).
- Repeat steps 1-3 to define additional member types.
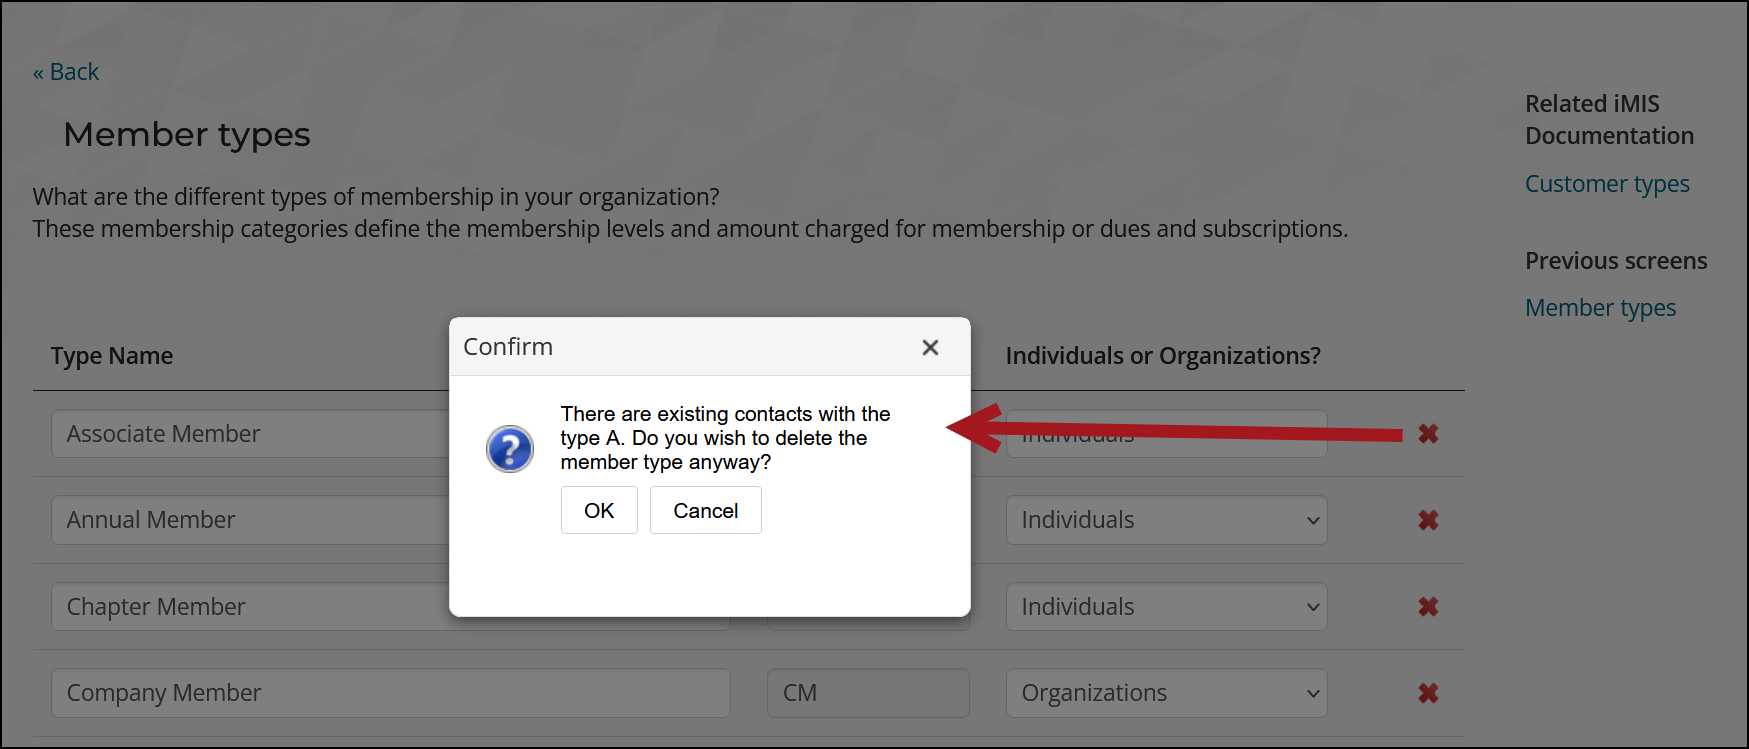
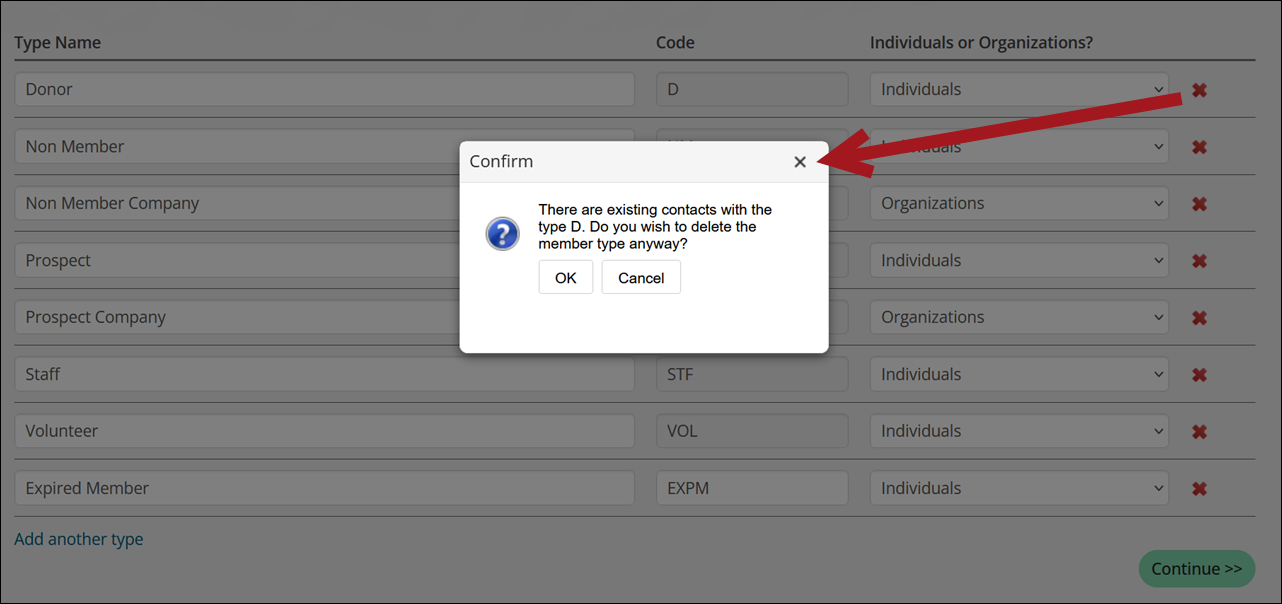
- Click the delete icon to delete the customer type. If there are existing contacts with this type, a confirmation window displays. Click Yes to confirm the deletion.
- Click Save or Save & Continue. Each type added in the wizard is automatically added to the customer types window (Settings > Contacts > Customer types), with the Code and Name defined, Is a member enabled, and Is an organization enabled when selected.
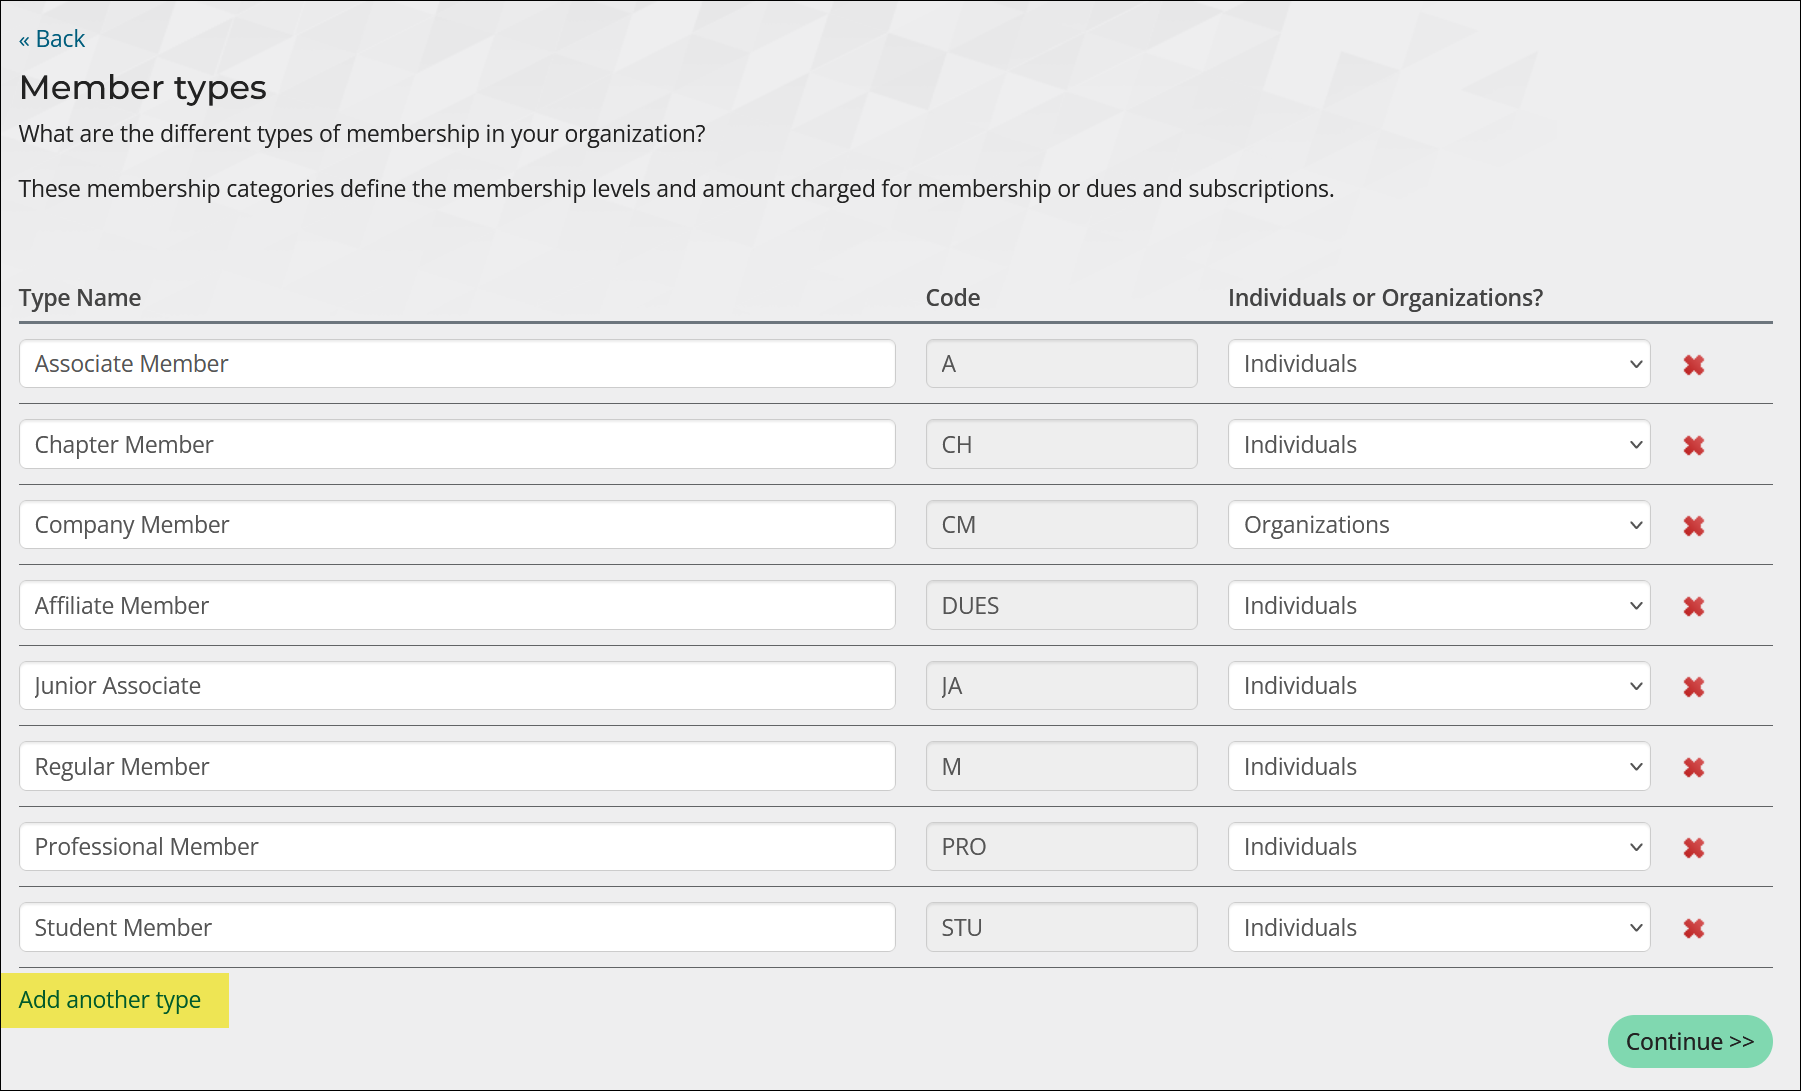

Important! Do not delete the M customer type. This customer type is required for event pricing groups and various other default pricing areas throughout iMIS.
Note: Customer types added here should not be assigned to members until the customer type has been assigned a Primary fee. Primary fees are defined on the Member type billing options and fees screen.
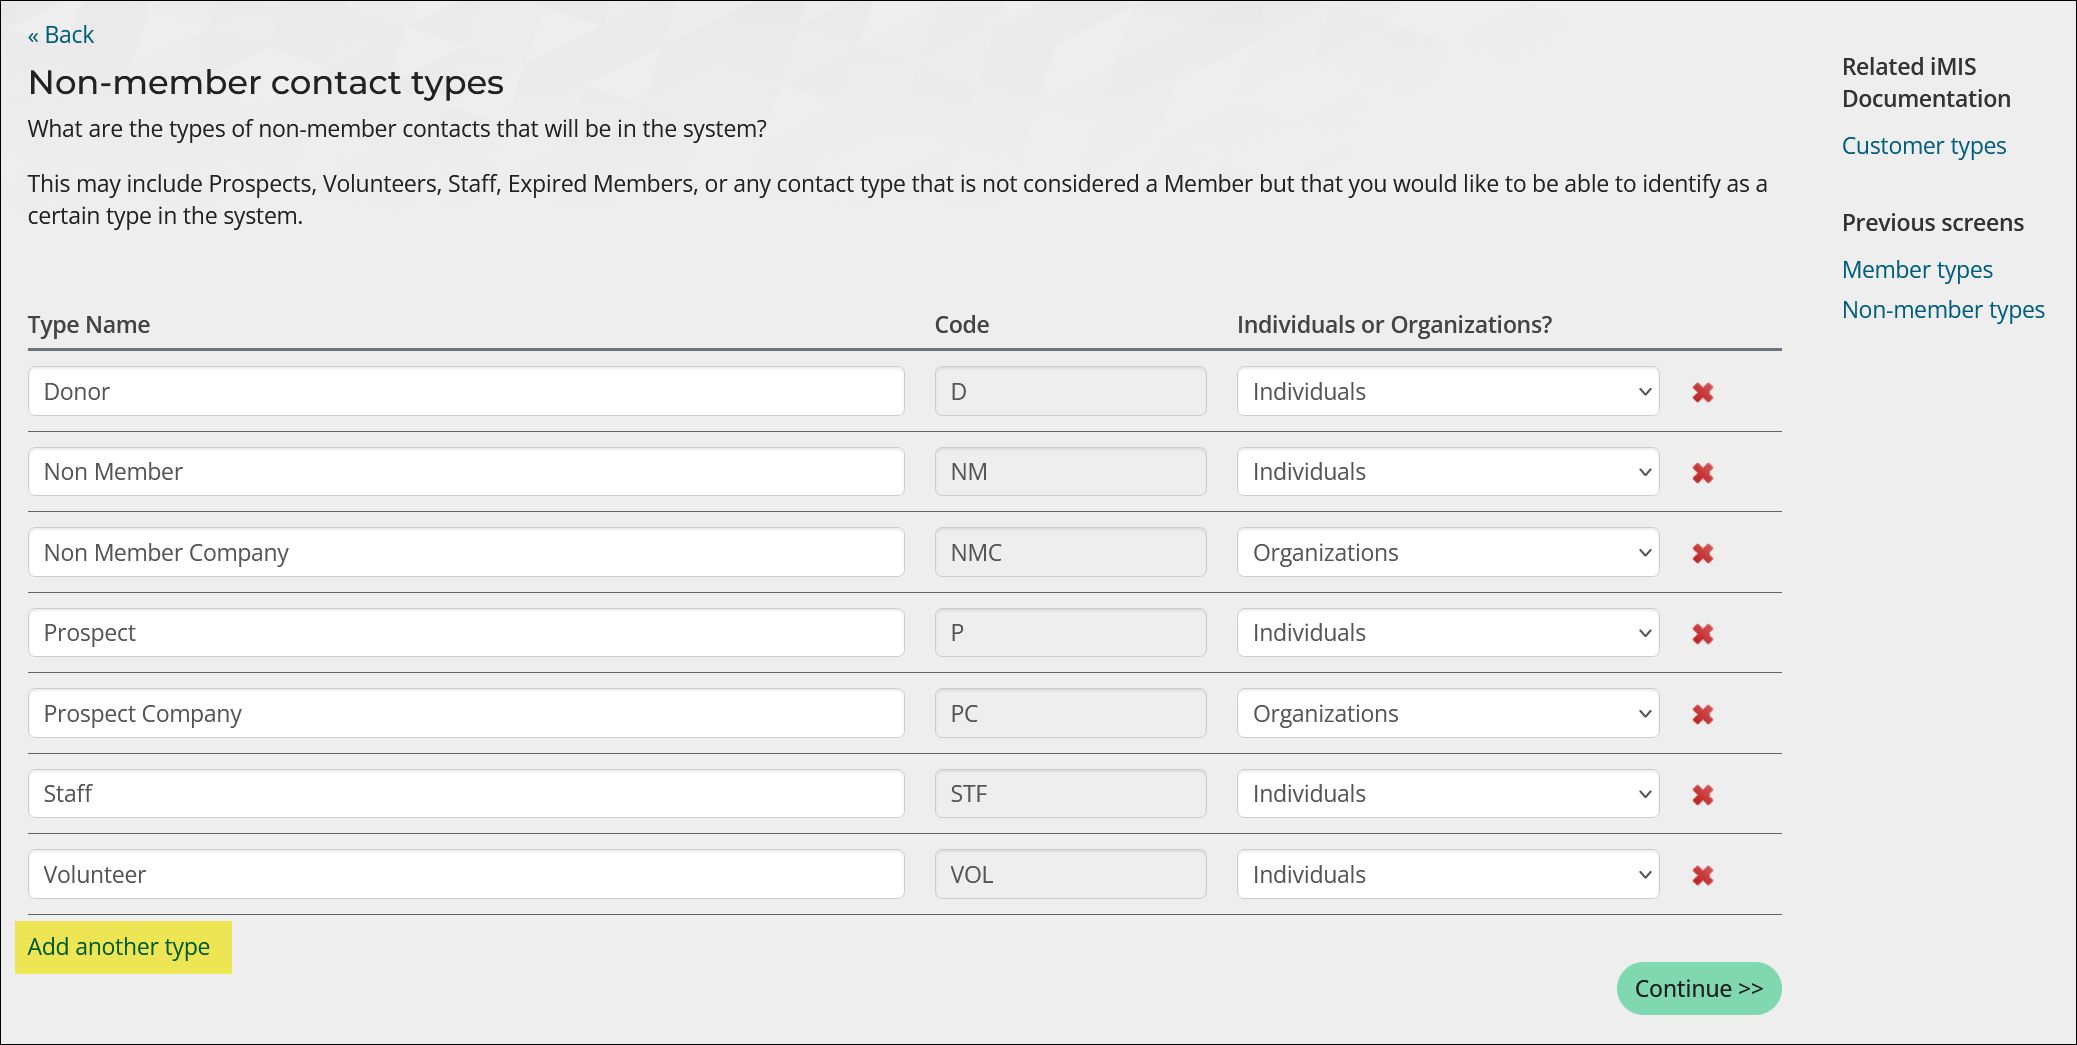
Non-member contact types
Create customer types for non-members, or users who have not yet purchased a membership.
Do the following:
- Select Add another type.
- Enter a Type Name and Code.
- From the Individuals or Organizations? drop-down, select whether the contact type is for a person or organization (company).
- Repeat steps 1-3 to define additional non-member contact types.
- Click the delete icon to delete the customer type. If there are existing contacts with this type, a confirmation window displays. Click Yes to confirm the deletion.
- Click Save or Save &Continue. Each type added in the wizard is automatically added to the customer types window (Settings > Contacts > Customer types), with the Code and Name defined, Is a member disabled, and Is an organization enabled when selected.

Important! Do not delete the NM customer type. This customer type is required for event pricing groups and various other default pricing areas throughout iMIS.

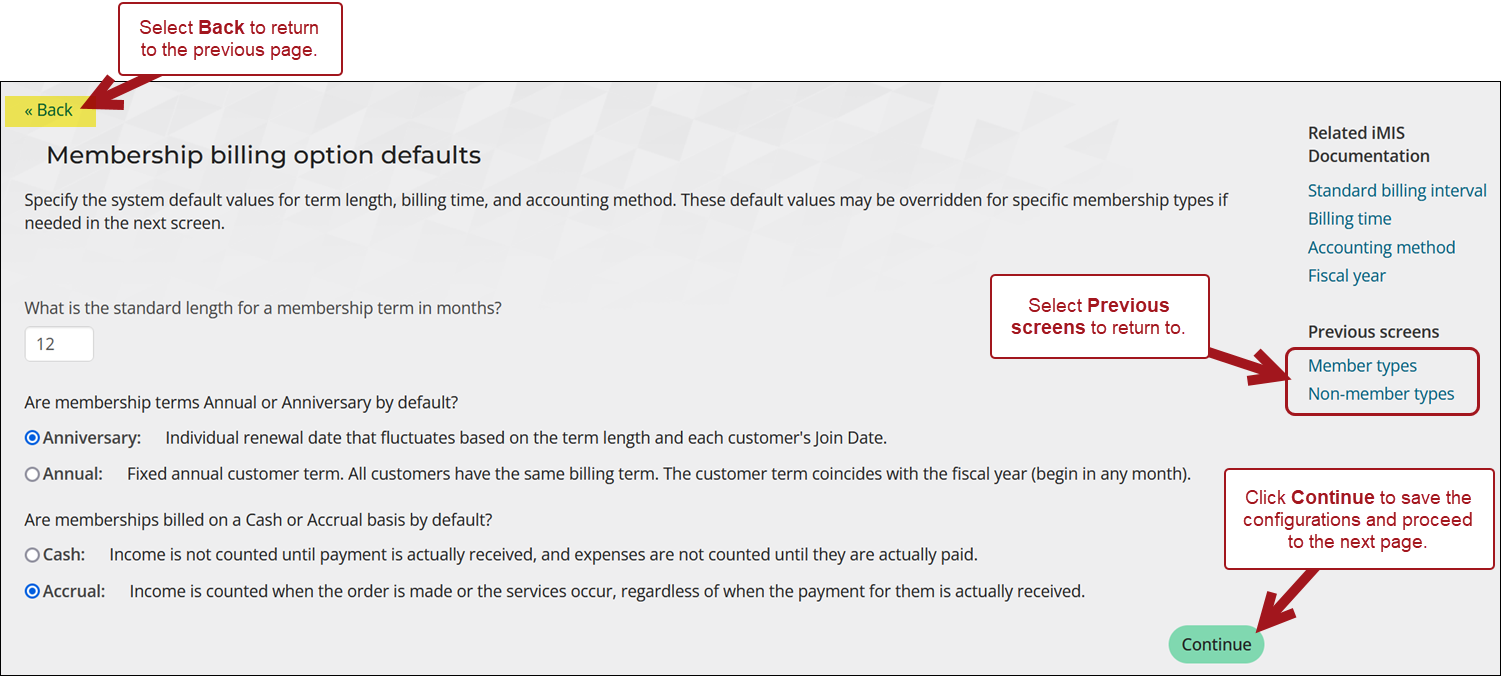
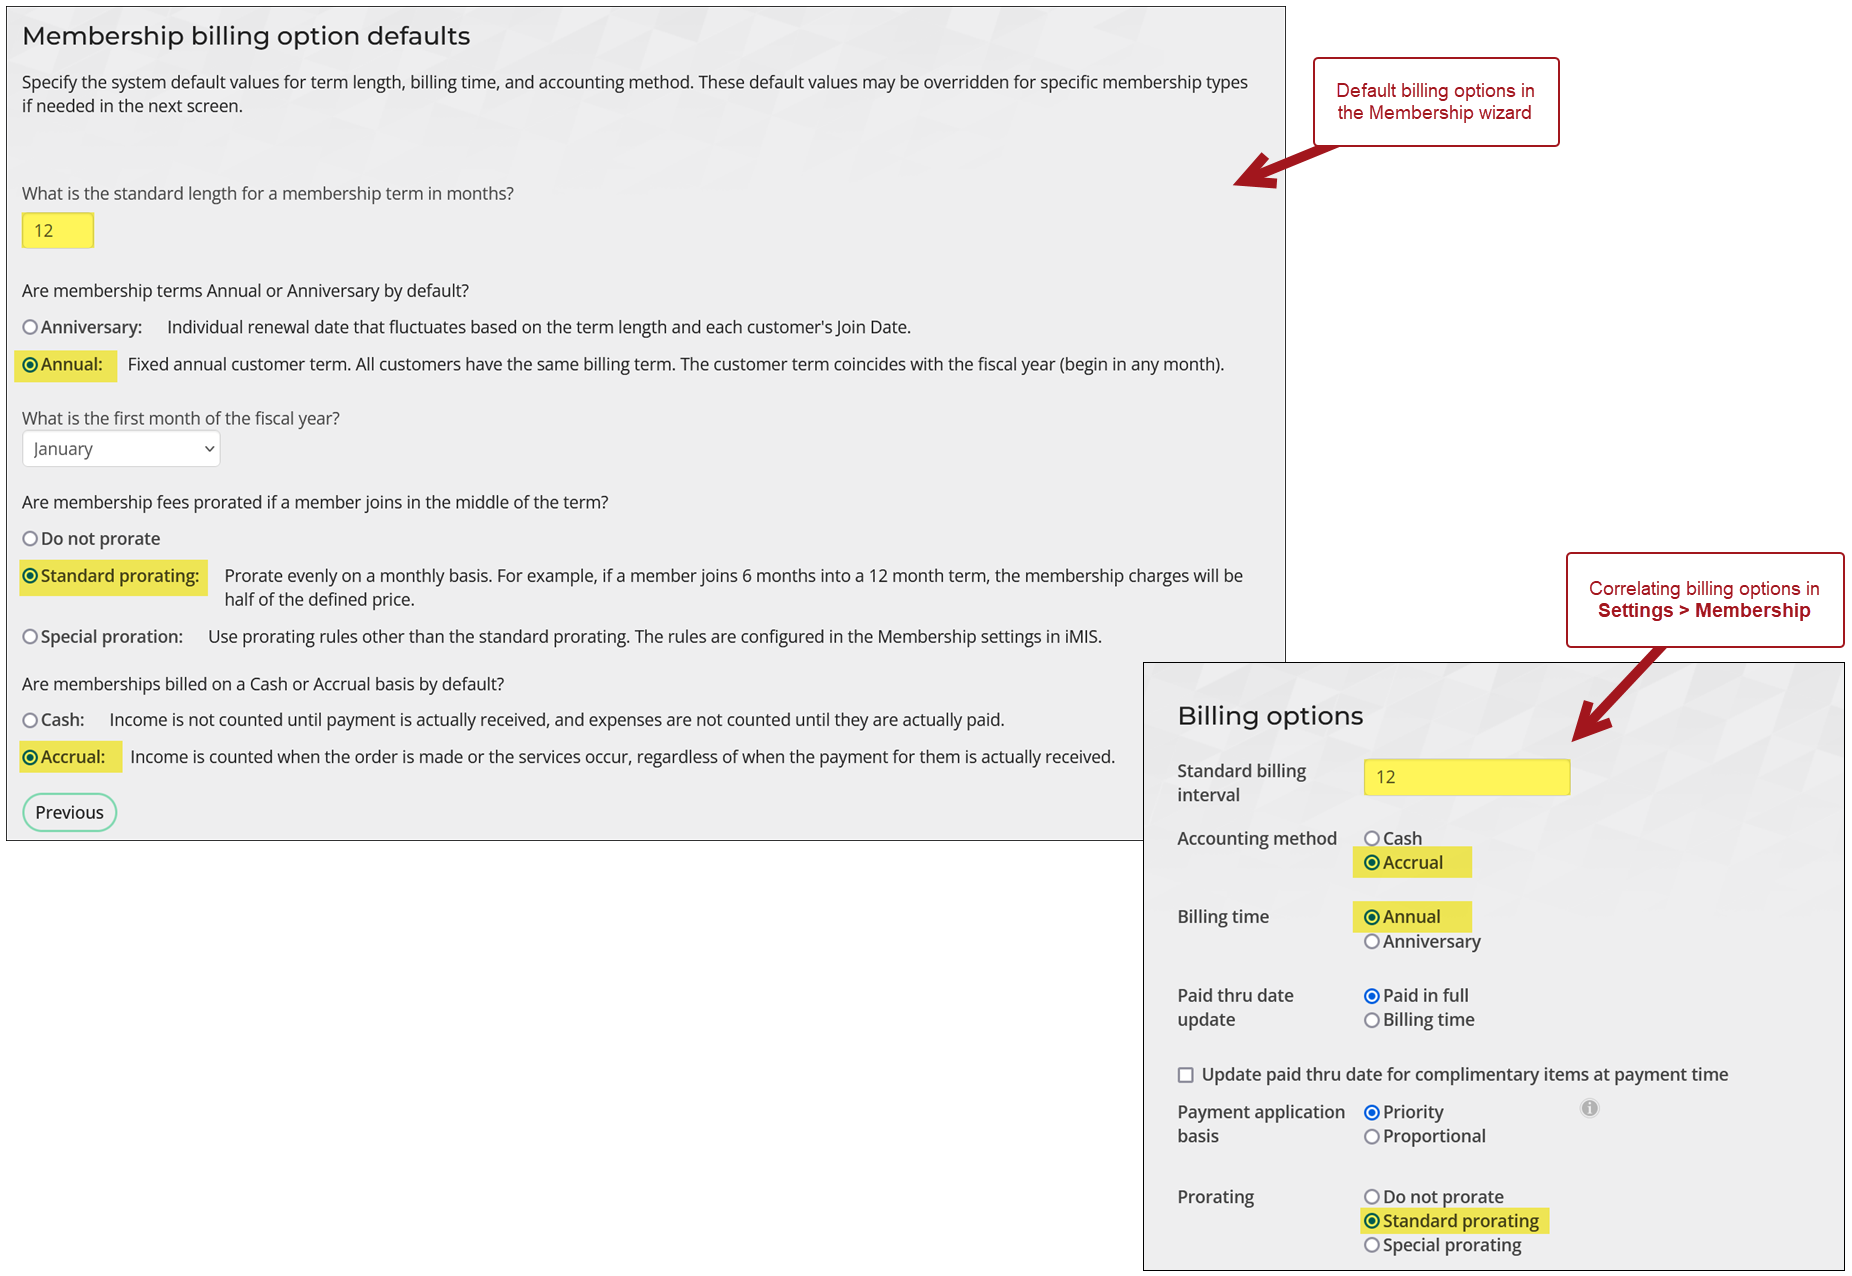
Membership billing options defaults
Specify the system default values for term length, billing time, and accounting method. These configurations update the Billing options portion of the membership settings (Settings > Membership) and may be overridden for specific membership types if needed in the next screen.
Do the following:
- Enter the default length for a membership term. This updates the Standard billing interval.
- Select whether the default membership terms are an Anniversary or if they are Annual. This updates the Billing time. If you select Annual, additional settings appear:
- Select the first month of the fiscal year. This updates the First month of fiscal year (number) accounting setting (Settings > Finance > General).
- Select if you would like to prorate membership fees for members who join in the middle of the term. This updates the Prorating membership setting. See Defining prorating rules for details.
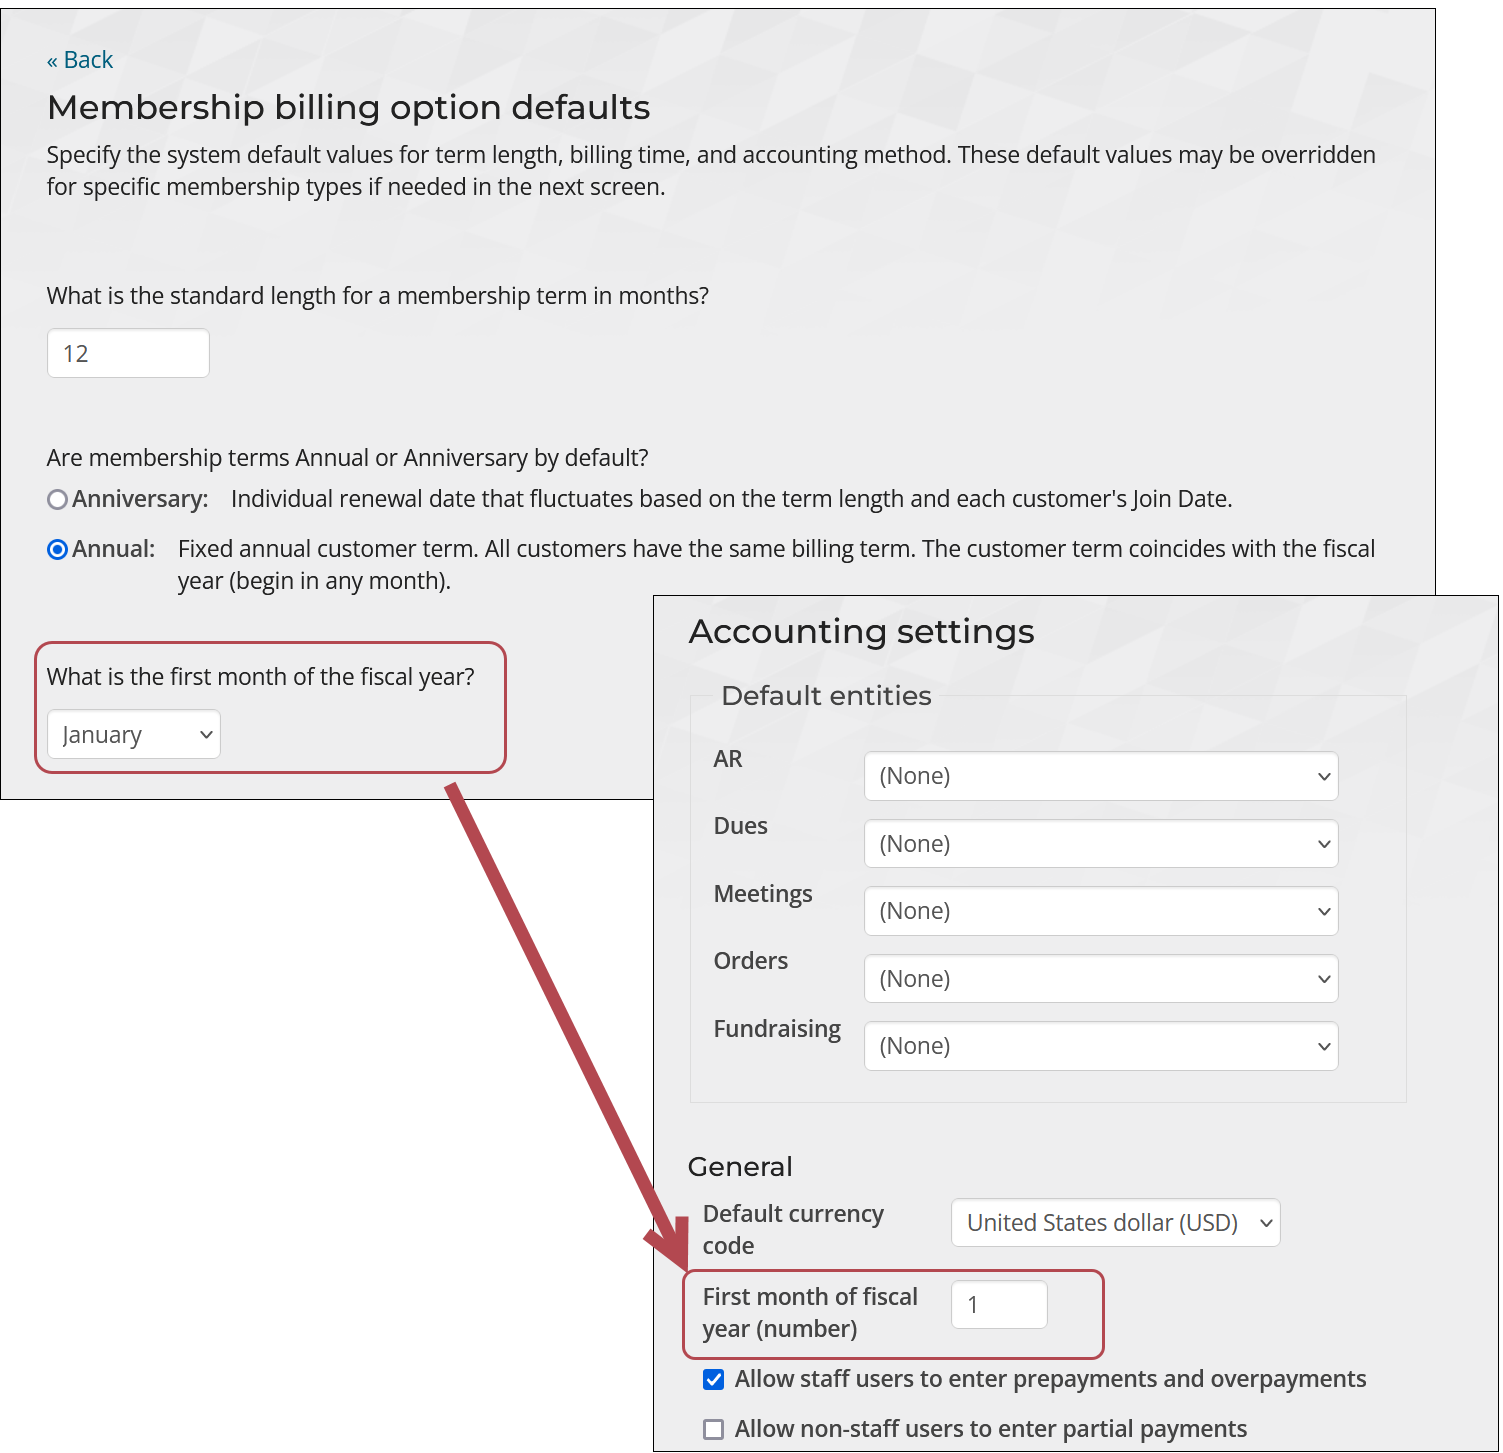
- Select whether memberships are Cash based or Accrual based by default. This updates the Accounting method.
- Click Save or Save &Continue. The configurations update the correlating billing options from Settings > Membership.
Membership fee labels
Configure the labels to display for each membership type during the join and renewal processes. These labels are displayed to public users when purchasing their membership. The labels entered from this screen update the corresponding Activity type description (Settings > Contacts > Activity types).
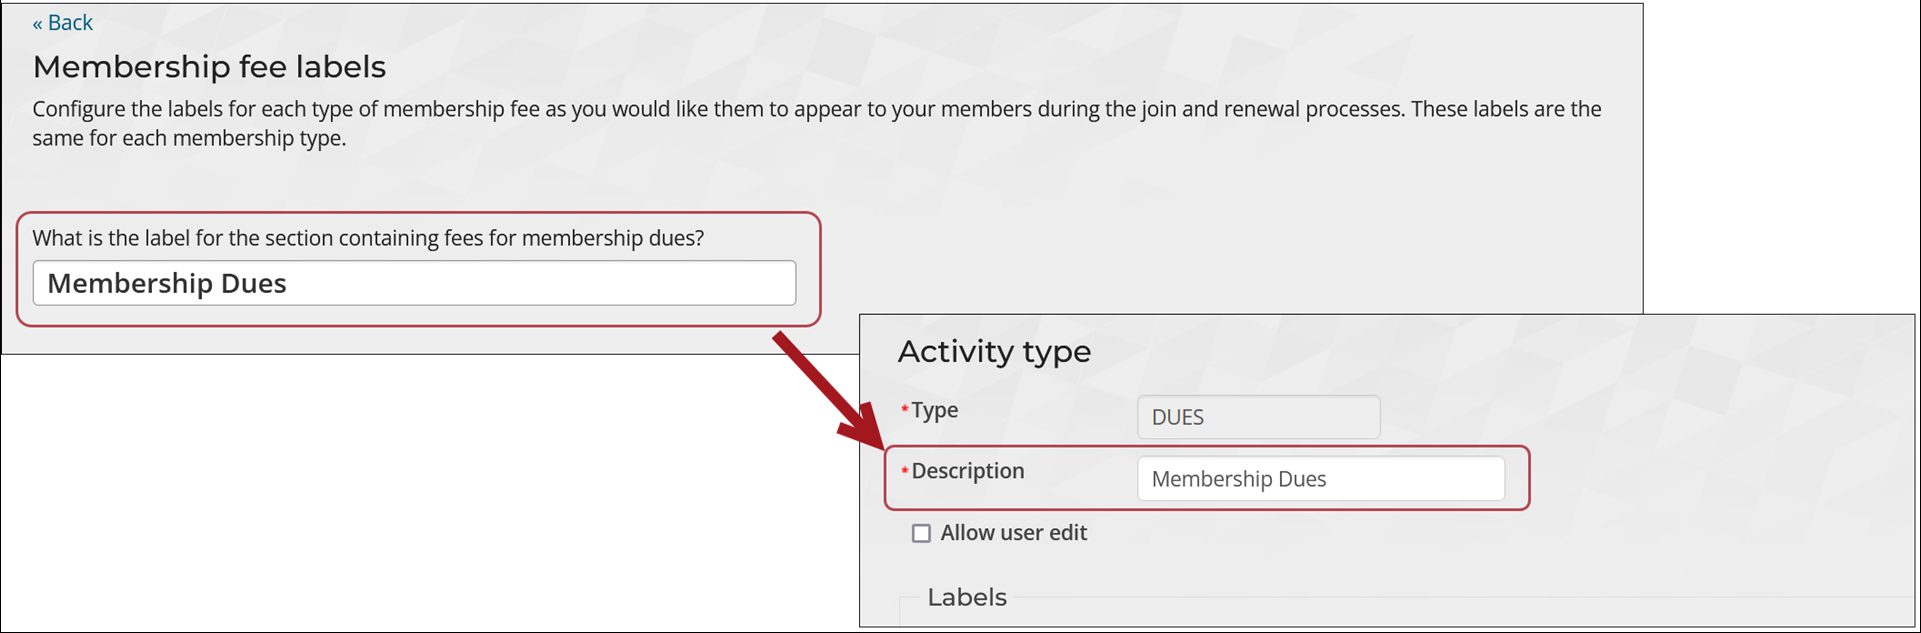
Edit the following labels as needed:
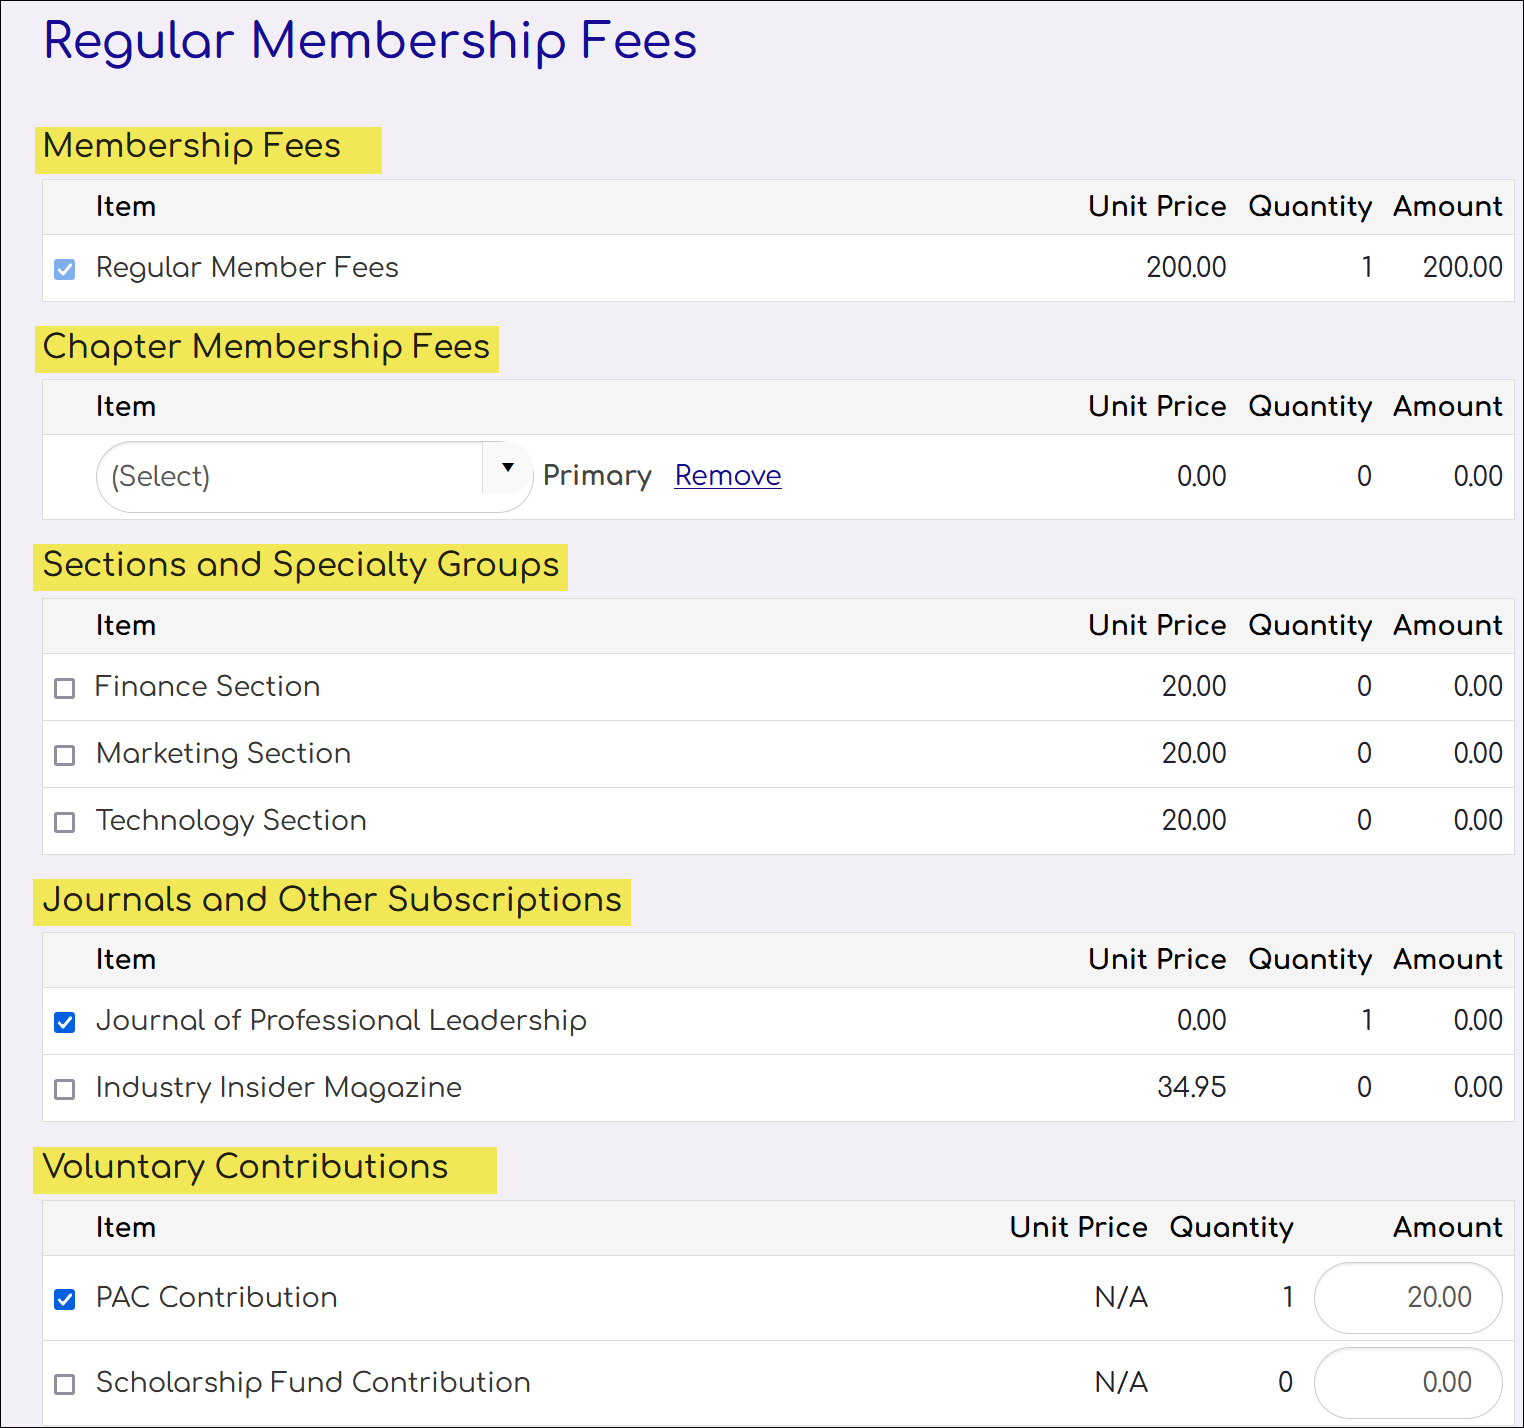
- Section containing fees for membership dues – Updates the DUES activity type. This label appears above the primary fees.
- Section containing Chapter options – Updates the CHAPT activity type. This label appears above the chapters available for the user to join.
- Section containing Specialty or Specialty group fees – Updates the SEC activity type. This label appears above the sections or specialty groups.
- Section containing Journals or other subscriptions fees – Updates the SUB activity type. This label appears above the available subscriptions such as journals and magazines.
- Section containing voluntary contributions – Updates the VOL activity type. This label appears above the non-mandatory contributions such as PACs or foundations.
- Click Save or Save &Continue. The labels are saved as the descriptions for the correlating activity types and displayed to users during the join/renewal process. For more information, see Understanding Join Now.
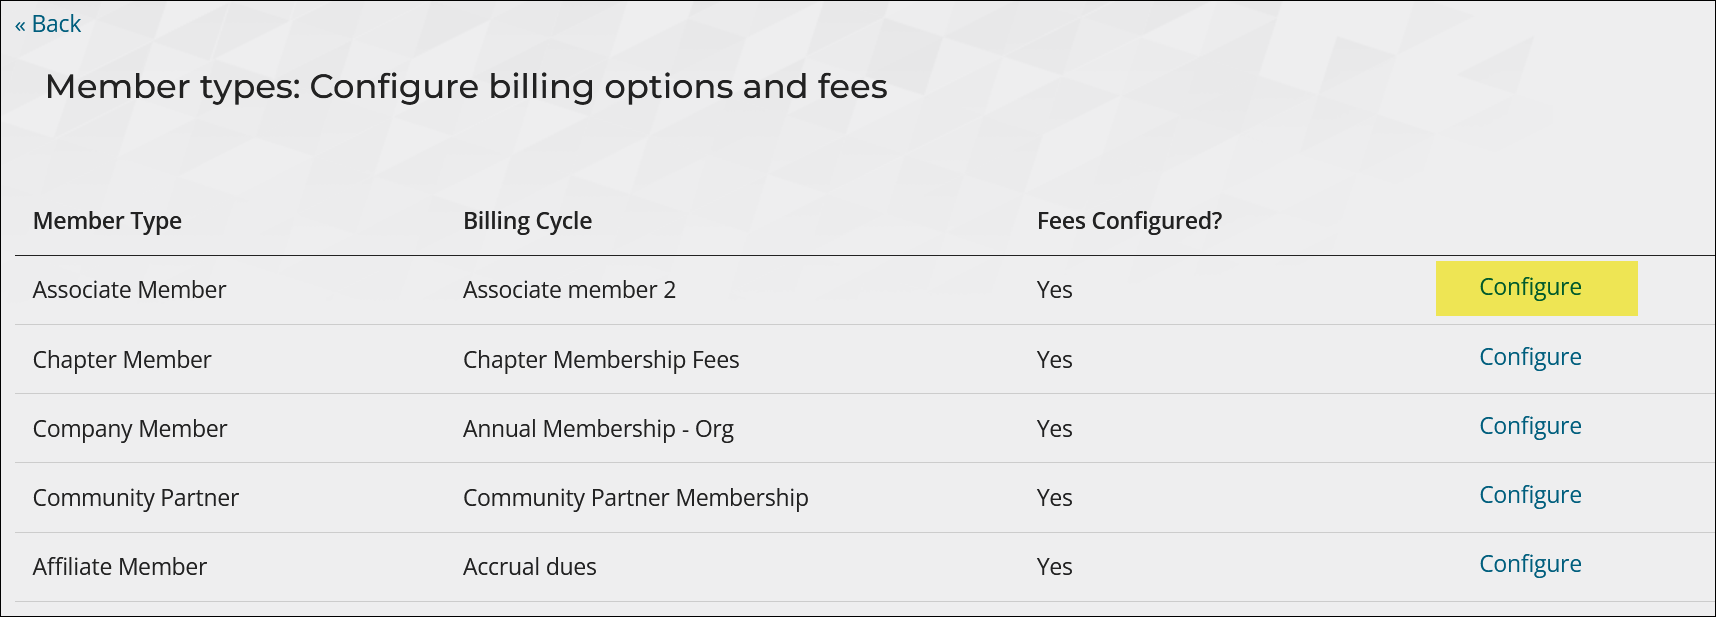
Member types: Configure billing options and fees
The Configure billing options and fees screen lists the following details for each member type:
- Member Type – One row per member type defined on the Member types screen. Non-member types are not included here.
- Billing Cycle – Displays the billing cycle defined for each member type. If no billing cycle exists, the column is blank.
- Fees Configured? – Yes displays if fees have been configured for the customer type from the Term length and primary fees page or from outside the membership wizard.
Note: Billing cycles are listed here if they have Membership cycle enabled, Use to display join item set selected, and have the associated member type as the ONLY member type selected in the cycle. If multiple billing cycles meet these criteria, Multiple appears here.
Do the following to configure billing options and fees from this screen:
- Select Configure for the member type.
- Define the Billing options.
- Click Save or Save &Continue.
- Define the Term length and Primary fees.
- ClickSave or Save & Continue to return to the landing page.
- Repeat these steps for each member type. If a member type is intended for members to join or renew against, make sure a billing cycle is configured here.
- Click Continue from the landing page to Review and submit all configurations.
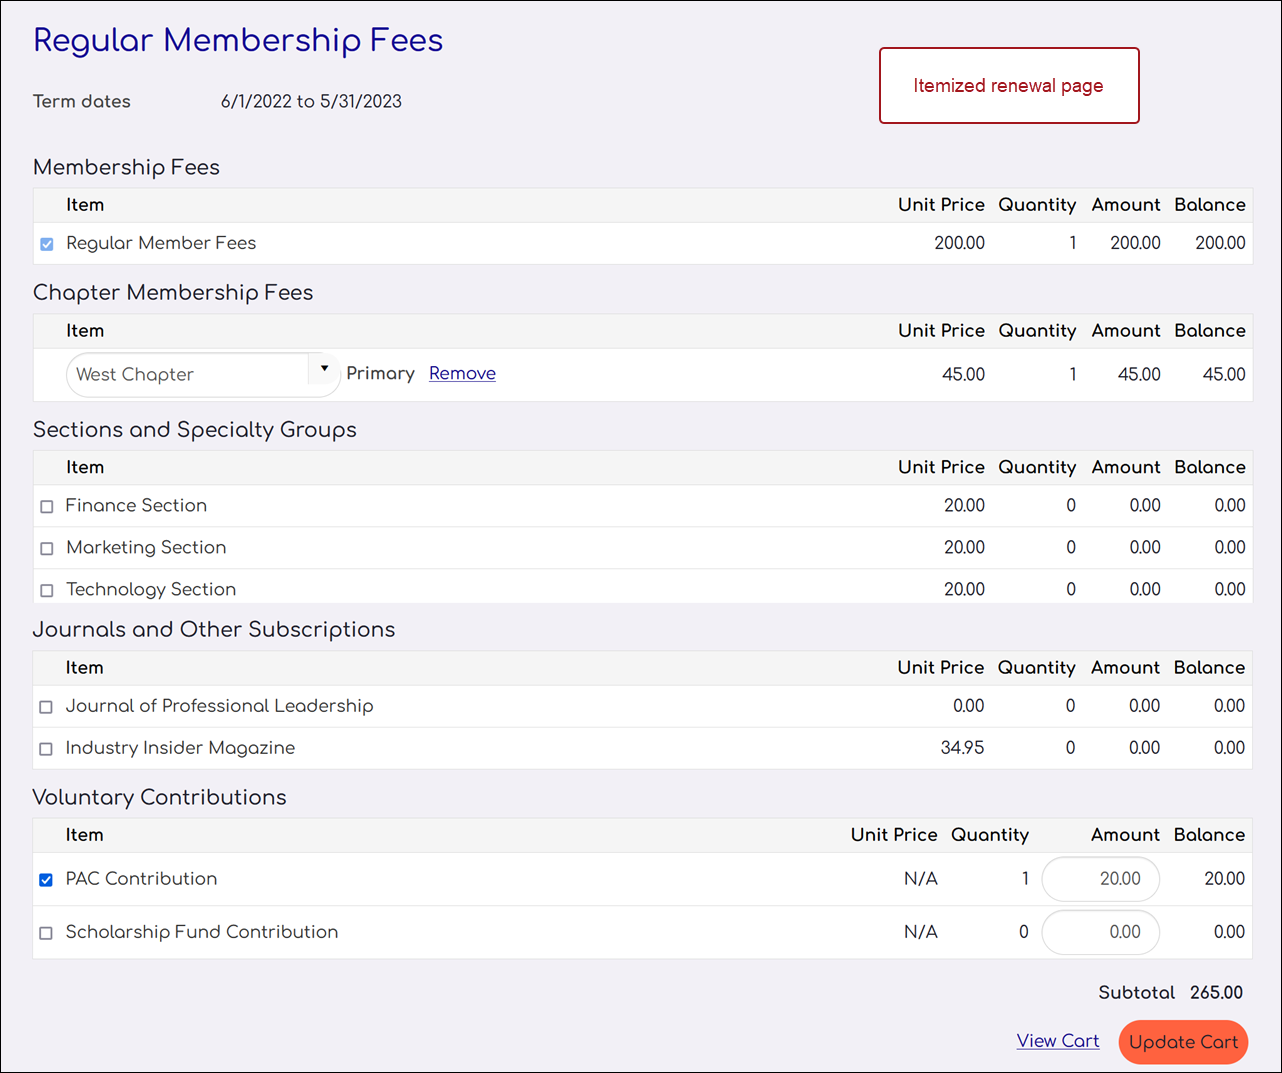
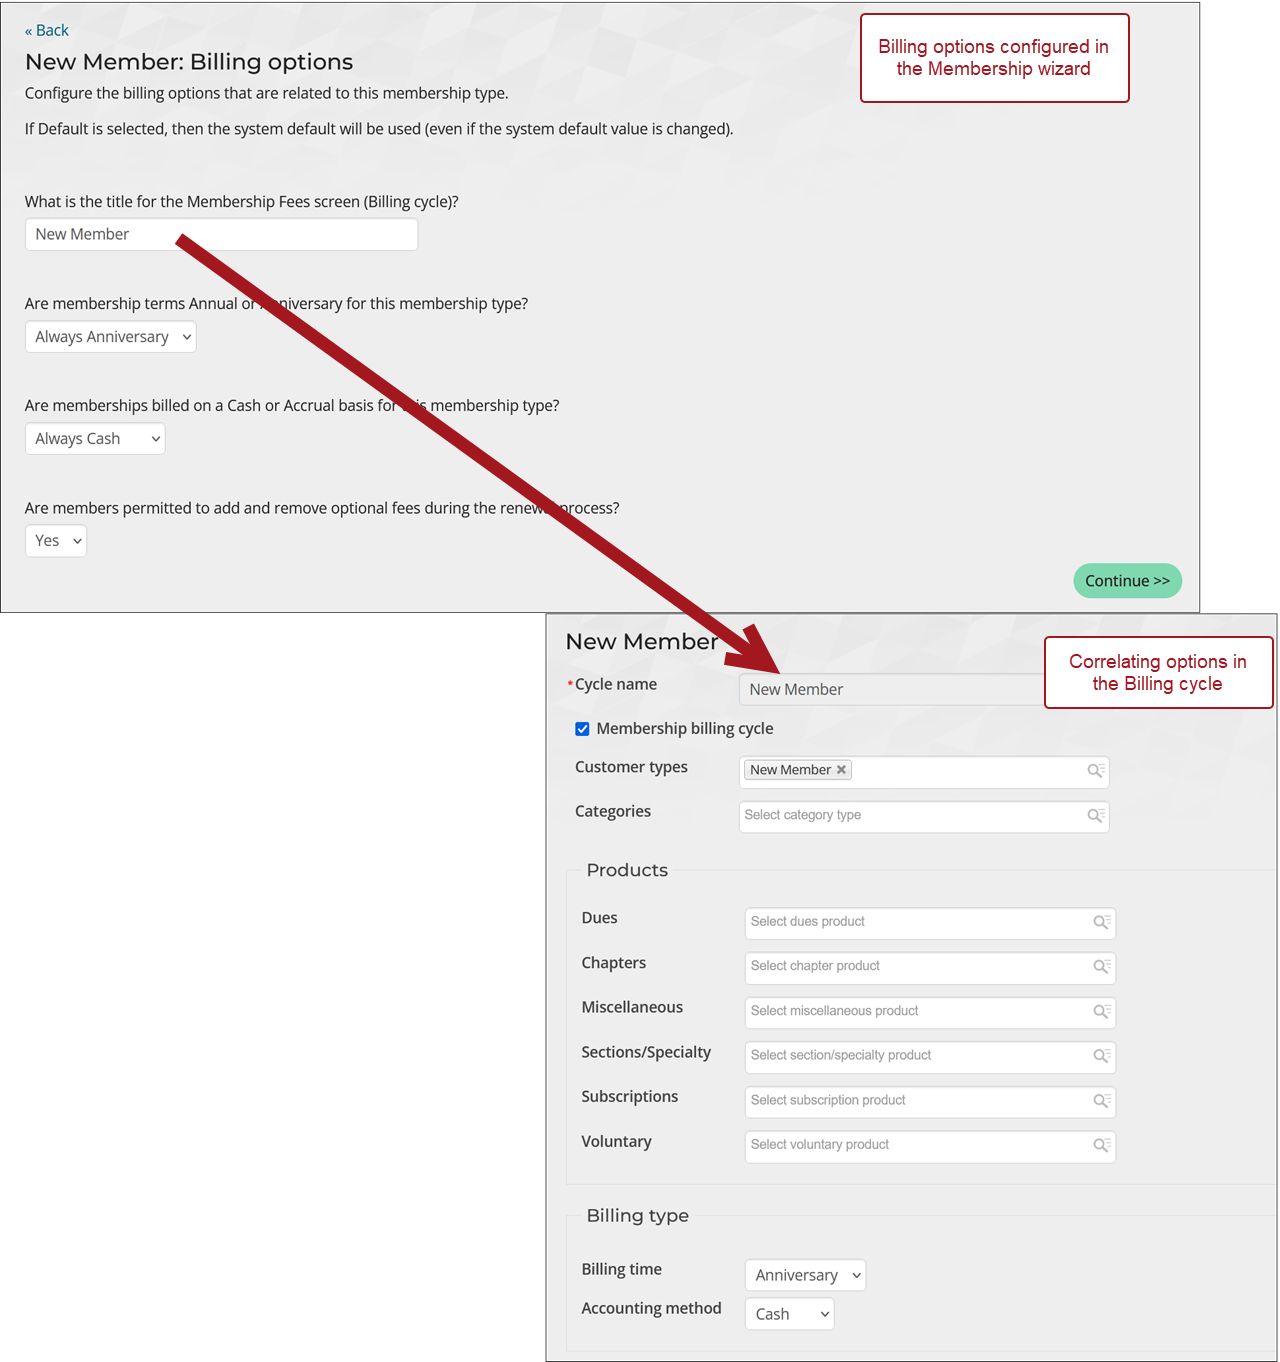
Billing options
The Billing options specified here are saved as a Billing cycle. Billing cycles are used to present membership fees for joins and renewals, as well as to generate renewal invoices. The fees included in the billing cycle are specified on the next screen.
If a Billing Cycle is already listed for the member type, the cycle is available to configure here.
Note: Billing cycles appear here if they have Membership cycle enabled, Use to display join item set selected, and the associated member type as the only Member type selected. If multiple billing cycles meet these criteria, the first cycle alphabetically appears here. For more information, see Setting up billing cycles.
Do the following to define the billing cycle:
- Enter a title for the billing cycle. This value is saved as the Cycle name, and it is read-only for existing billing cycles. This value also appears as the page title when the billing cycle is used to present membership fees for joins or renewals.
- Select whether the membership terms are Anniversary or Annual. This determines the Billing time of the cycle.
- If Annual, select the month when the annual membership term begins. This determines the First month of term for the cycle.
- Select whether memberships are Cash based or Accrual based. This determines the Accounting method of the cycle.
- Select whether the members are permitted to add and remove optional fees during the renewal process. This corresponds with the Use to display itemized renewals option. If No is selected, then members can only pay renewal invoices as-is. They cannot add or remove optional items.
- Click Save or Save &Continue. If the billing cycle already exists (if the title field is read-only), any changes are saved to the existing billing cycle. If no billing cycle exists for the customer type, the billing options specified here are saved as a new billing cycle.
Note: The Use to display join item set option is enabled in billing cycles created by the wizard.
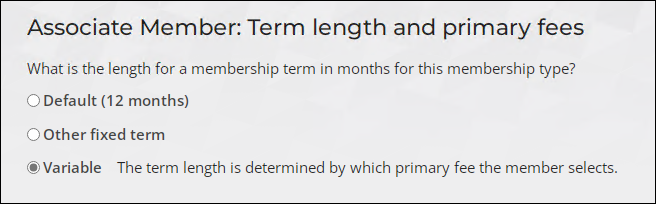
Term length and primary fees
Define the billing products, or fees, to bill every member of this type, starting with the term length. The fees defined on this screen are added to the customer type.
Term lengths can be either Default, Other fixed term, or Variable.
Defining membership fees with a default or other fixed term length
Do the following to define billing products, starting with a default period or other custom period, such as 24 months:
- Select the term length:
- Default – The term length defined in the Membership billing options defaults screen.
- Other fixed term - Select Other fixed term if the term length differs from the Default term length. The Term span in months option is populated with this value in the billing product chosen as the primary fee and the Use primary fee billing product to determine term length option is automatically selected in the billing cycle.
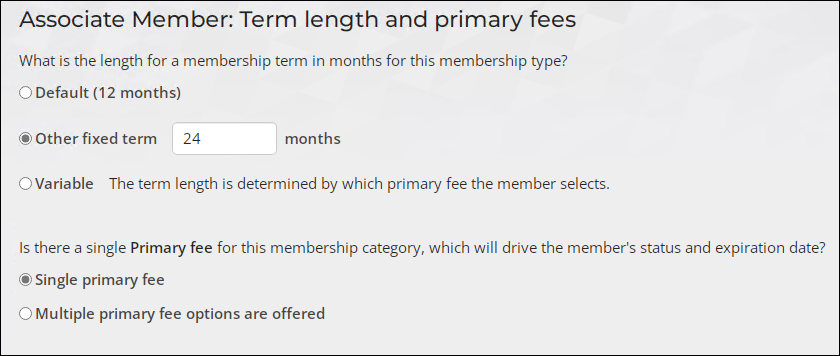
- Select if this member type has a Single primary fee or if Multiple primary fee options are offered.
-
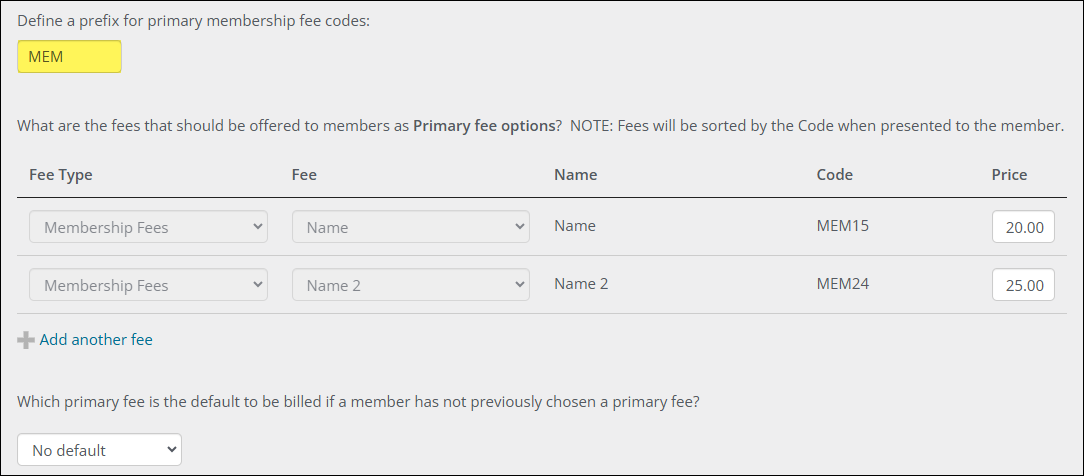
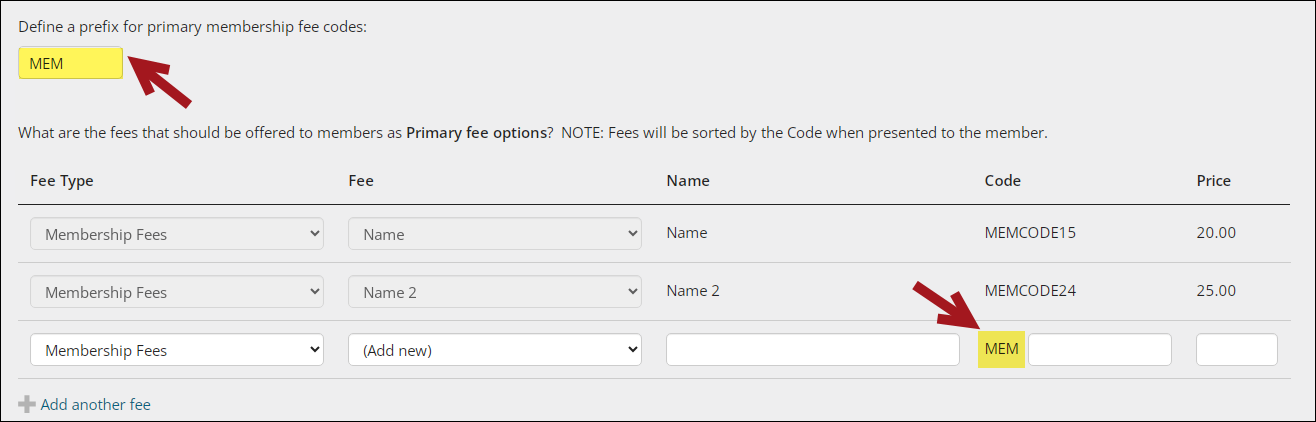
Define a prefix. You cannot add additional primary fees until a prefix is defined.
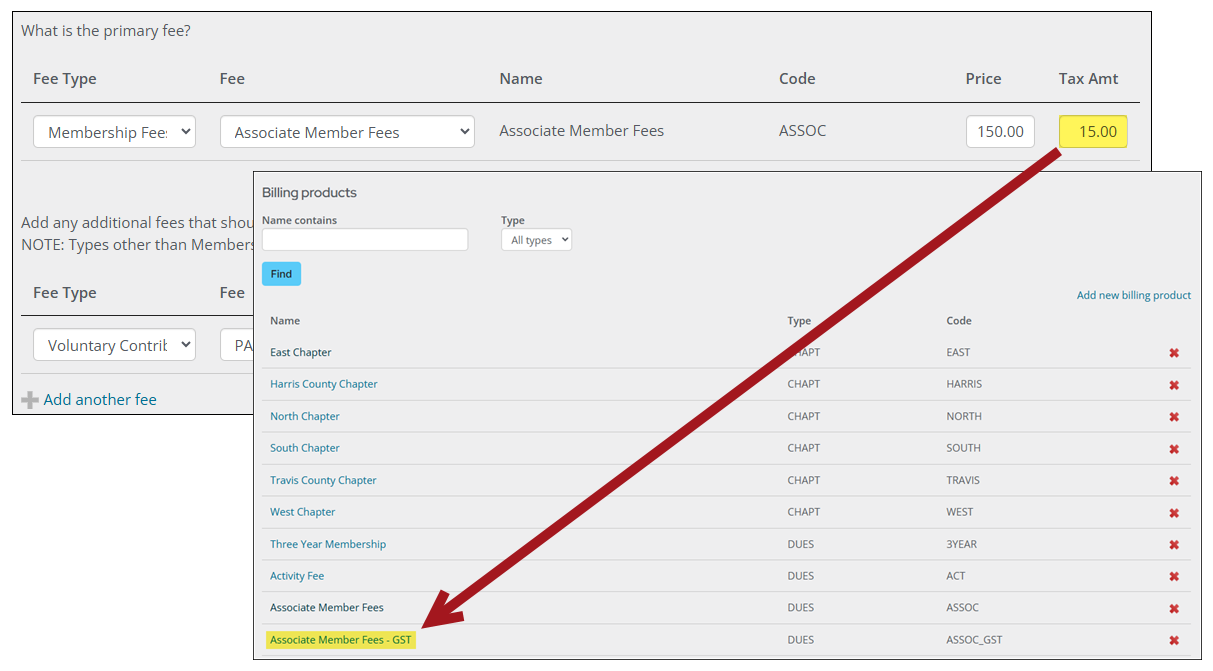
- Define the primary fee. The primary fee is required for member customer types. If Multiple primary fee options are offered is chosen, you must define at least two primary fees.
- Choose a Fee Type. The values in the drop-down correspond with the labels defined in the Membership fee labels screen.
- From the Fee drop-down, select an existing fee or select Add new. Enter the following information for new fees:
- Enter a descriptive Fee Name. This name will be displayed on the customer's bill and in other areas of iMIS.
- Enter a Code that identifies the product. Review the following about the Code field:
- The code entered should not contain any spaces or special characters other than an underscore (_ ) and should contain no more than 15 alphanumeric characters: a-z, A-Z, 0-9. When a Prefix is being used, the first three characters of the code are predetermined.
- The code should never be one of the following values: DUES, SEC, SUB, VOL, MISC, or CHAPT.
- Enter the Price to charge for this fee. If you alter the Price for an existing billing product, the updated price will be stored in the Customer type and not in the billing product itself.
Enter a Tax Amt. Entering a tax amount is only available if the default Financial entity is configured with GST Inclusive as the Taxation method (voluntary contributions are exempt). This creates a separate GST billing product.
Note: Chapter fees are not available as primary fees when a Prefix is being used.

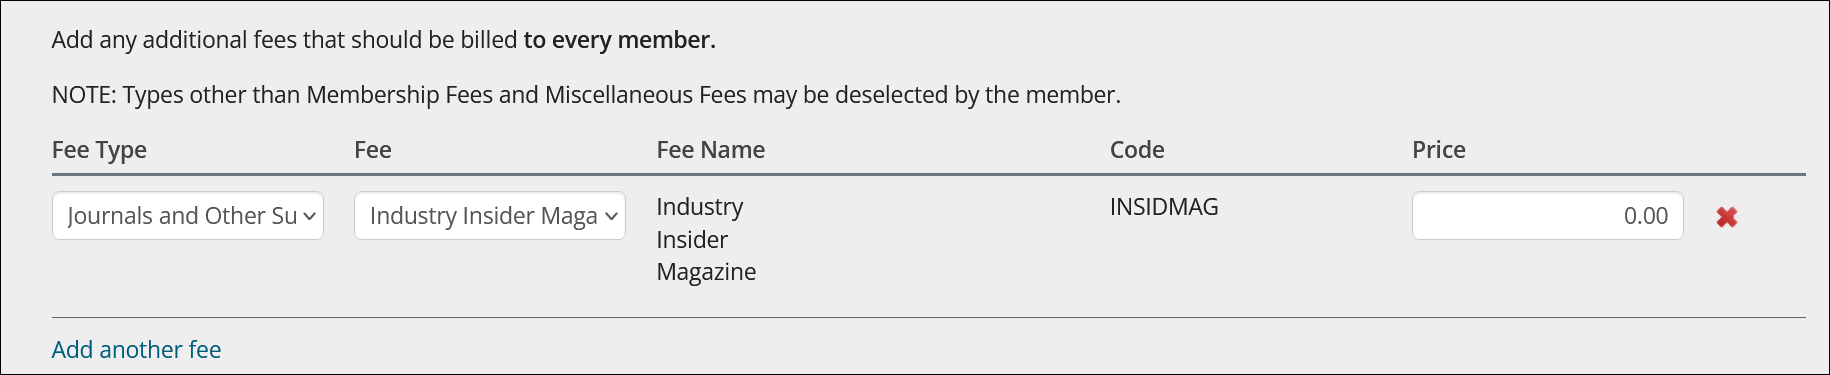
- Define any additional fees to bill every member of this type. Each of these billing products is added to the customer type as fees. If the price is 0.00, then Complimentary is selected for the fee.
- If using multiple primary fee options, choose a default primary fee option. If there is no default, choose No default.
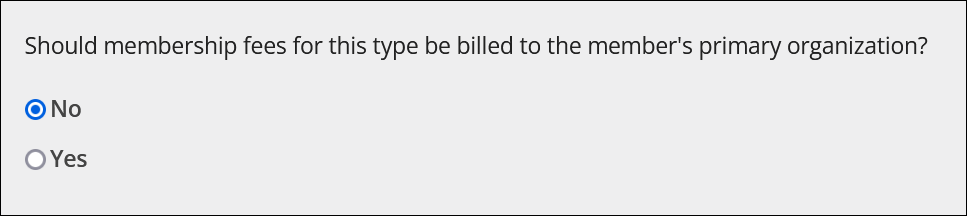
- Select if the membership fees for customers of this type will be billed to their parent organization. Select Yes to enable Bill organization for the customer type.
- Click Save or Save &Continue. The primary fee and additional fees are added to the customer type, and each new fee creates a billing product. The wizard returns to the Member types: Configure billing options and fees landing page.
If choosing Multiple primary fee options are offered, the following is required:
Note: The prefix will be added as the first characters of the Code for any defined primary fees. Any existing fees with a Code that starts with the prefix will automatically be included in any primary fees.
Defining membership fees with a variable term length
Do the following to define membership fees with a variable term length:
- Select Variable as the term length. The term length depends on the primary fee the member selects.
-
Define a prefix for the primary membership fee codes. You cannot add additional primary fees until a prefix is defined.
- Define the primary fees. There must be at least two defined.
- Choose a Fee Type. The values in the drop-down correspond with the labels defined in the Membership fee labels screen.
- From the Fee drop-down, select an existing fee or select Add new. Enter the following information for new fees:
- Enter a descriptive Fee Name. This name will be displayed on the customer's bill and in other areas of iMIS.
- Enter a Term Length for each fee added.
- Enter a Code that identifies the product. Review the following about the Code field:
- The code entered should not contain any spaces or special characters other than an underscore (_ ) and should contain no more than 15 alphanumeric characters: a-z, A-Z, 0-9. The first three characters of the code are predetermined by the prefix.
- The code should never be one of the following values: DUES, SEC, SUB, VOL, MISC, or CHAPT.
Note: There should be a separate fee for each unique term length.
- Enter the Price to charge for this fee. If you alter the Price for an existing billing product, the updated price will be stored in the Customer type and not in the billing product itself.
Enter a Tax Amt. Entering a tax amount is only available if the default Financial entity is configured with GST Inclusive as the Taxation method (voluntary contributions are exempt). This creates a separate GST billing product.
Note: Chapter fees are not available as primary fees when a Prefix is being used.
- Define any additional fees to bill every member of this type. Each of these billing products is added to the customer type as fees. If the price is 0.00, then Complimentary is selected for the fee.
- Select if the membership fees for customers of this type will be billed to their parent organization. Select Yes to enable Bill organization for the customer type.
- Click Save or Save &Continue. The primary fee and additional fees are added to the customer type, and each new fee creates a billing product. The wizard returns to the Member types: Configure billing options and fees landing page.
Updating membership using the Membership Configuration Wizard
Do the following to use the Membership Configuration Wizard after the initial setup:
- Go to Membership > Configuration wizard.
- Select Modify on the specific area you wish to update, such as Membership types.
- Make any updates as needed.
- Click Save & Continue on each page to save the configurations or Save to save your changes without moving on to the next screen. To return to the previous page, select Back or Previous or select the desired page under Previous screens.
- Select Return to Configuration summary when finished. The Return to Configuration Summary link can be found by selecting Configuration summary under Previous screens. You can also return to the Configuration summary by selecting Return to Configuration summary after clicking Save.
- You can select Modify on the Review membership configuration summary again to continue updating configurations at any time. Adjustments made from other areas of iMIS are automatically reflected in the wizard.
Important! Do not use the Back button in your browser. Doing so will cause the wizard to reset to the first screen. Select Back or Previous from the membership wizard only.
Reviewing membership configuration
Once you finish the first-time setup, click Complete Configuration. After completing the wizard, you may go back and select Modify to update any components.