Last updated on: January 27, 2026
Use this tutorial to understand how to successfully create membership dues and subscription items for joins and renewals.
Tip: Before you begin, ensure you have reviewed and completed the iMIS Finance: Getting Started and Best Practices guide.
Setting up membership
The following core areas make up the iMIS membership structure:
- Customer types – The membership levels of certain groups of contacts, such as Non members, Individual Members, Associate Members, or Student Members.
- Billing products – The fees or subscriptions that are billed to members.
- Billing cycles – When and how to bill the specified Customer types for the specified Billing products.
To set up membership, do the following:
Note: Complete the following steps manually or use the Membership Configuration Wizard.
Go to Settings > Membership. Review and update the settings based on the needs of your organization. See Configuring billing options for a full description of each setting.
Customer types define the membership levels of certain groups of contacts. They can be defined from Settings > Contacts > Customer types.
Create at least one customer type for non-members, also known as authenticated users. These users have an account but have not yet purchased a membership. Upon purchase of a membership, these users are transitioned to an Is a member customer type.
Member customer types define the membership levels and amount charged for membership or dues and subscriptions. Assign a different customer type to each major member class. The following settings must be configured to define a member customer type:
- The Is a member option must be enabled.
- The Primary fee must be defined.
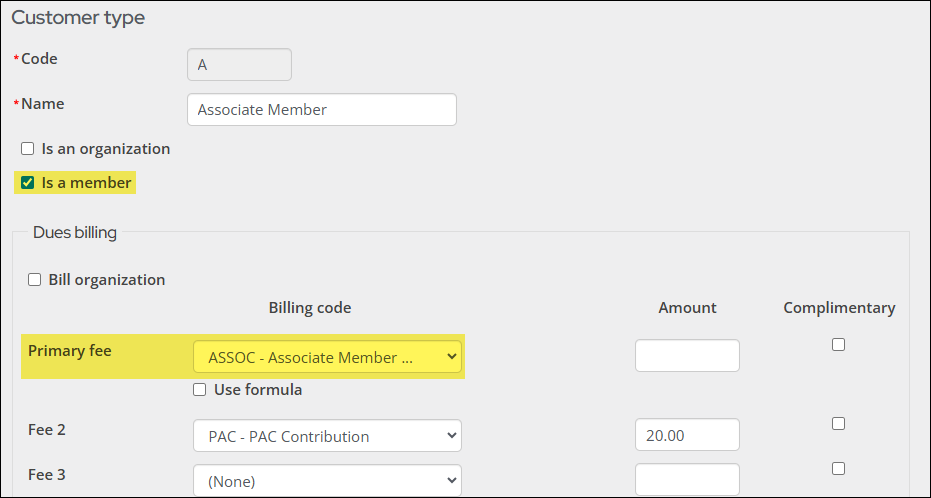
See Customer types for more information.
Billing products are the membership fees and subscription items that are billed to members. They are classified into the following types:
- Dues – Membership fees. Dues products are the Primary fees added to Customer types and are typically non-optional fee items.
- Chapters – Separate dues for chapter or local groups.
- Miscellaneous – Reserved for miscellaneous charges. Miscellaneous items are always required and cannot be deselected in an itemized renewal. Normally, special pricing rules dictate the conditions for charging for a miscellaneous item. For example, special pricing rules that are based on the Join Date.
- Sections/Specialty – Additional section memberships such as professional specialty groups. Generally, these products would not be defined at the Customer type level, because they normally represent groups that are joined only by request.
- Subscriptions – Optional subscriptions, such as journals and magazines. These products would be defined within the Billing cycle (and not the Customer type) because they are optional.
- Voluntary – Non-mandatory contributions such as PACs or foundations. These products would be defined within the Billing cycle (and not the Customer type) because they are optional.
A new billing product should be created for each potential dues or subscription product that will be billed. Once defined, billing products can be added to customer types as fees and billing cycles as products.
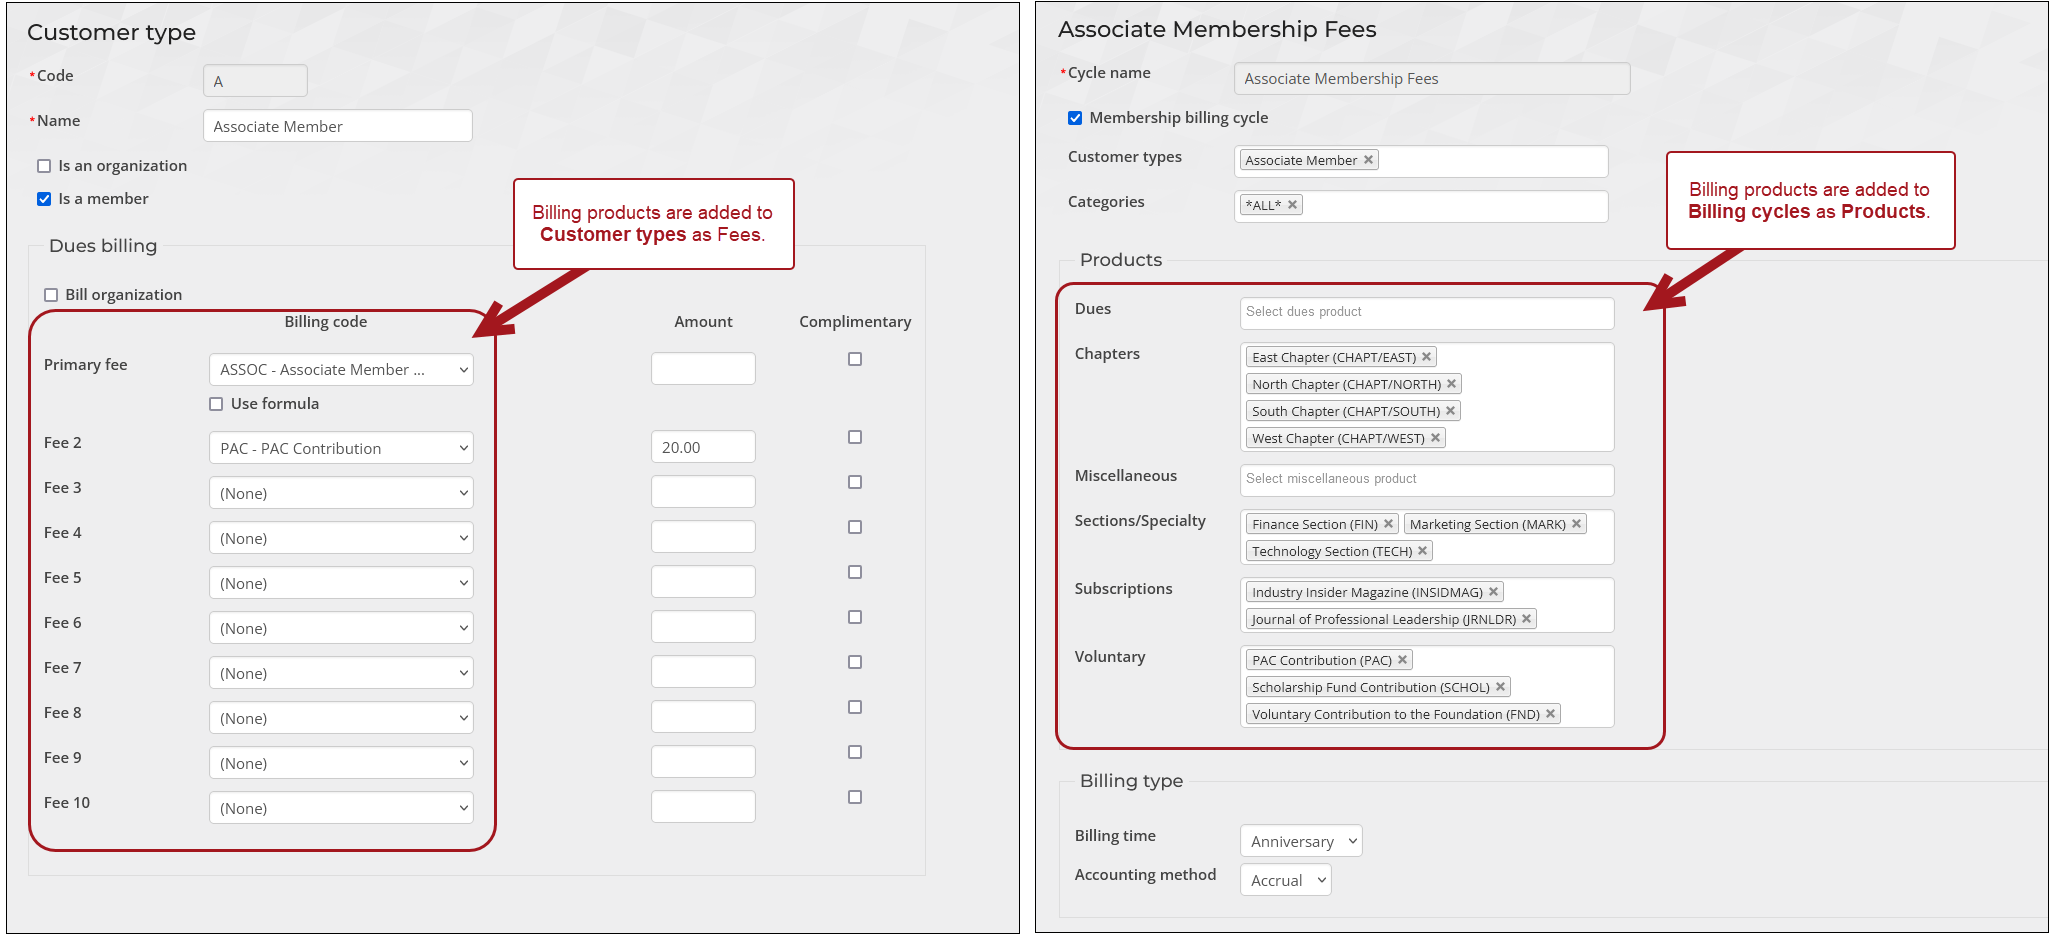
See Defining billing products to begin creating billing products.
Billing cycles define when and how to bill the specified Customer types for the specified Billing products. Create a billing cycle for each specific type of membership.
Go to Membership > Billing cycles and select Add new billing cycle. Define the following essential settings:
- Cycle name – Identifies the group of members that you want to generate invoices for. It also serves as the heading that is displayed above the three products or term length choices whenever a member processes a join or a renewal payment.
- Membership billing cycle – Enable to designate the billing cycle as a dues billing.
- Customer types – Select the customer types to be billed in billing cycle, keeping the following notes in mind:
- Select only one customer type when the following are true:
- The billing cycle will be used for new member joins. Join Now billing cycles must only have a single customer type selected, so iMIS knows which customer type to assign the member when they initially pay fees. For more information on membership joins, see Setting up Join Now.
- The invoices generated with this billing cycle may need to be adjusted. To adjust a dues invoice, iMIS requires the associated customer type to be in a billing cycle by itself.
- Select more than one customer type when the billing cycle is used to generate mass renewals. In most cases, you will have one billing cycle for each customer type AND a billing cycle with multiple customer types for mass renewals. Join billing cycles can also be used for renewals, and it is not required to have a billing cycle with multiple customer types.
- Select only one customer type when the following are true:
- Products – Choose any additional billing products from the Dues, Chapters, Miscellaneous, Sections/Specialty, Subscriptions, or Voluntary categories.
- Use to display join item set and Use to display itemized renewals – It is recommended to always enable these two options.
Important! Remember the Primary fee is already selected in the customer type definition, so you do not need to select the Primary fee again in the billing cycle definition.
See Creating billing cycles for details on the remaining settings.
Review and configure the following optional membership areas according to the needs of your organization:
- Billing categories – Subcategories of customer types which define membership fee amounts when the customer type is not specific enough for an association's needs.
- Special pricing – Unique pricing rules within a billing product that the Standard and Discount prices do not account for.
- Prorating – Organizations can assign an amount to an activity or product that is proportional to some base (determined by a formula or procedure). Prorating is only applied to organizations that bill on an annual or fixed-term basis, as opposed to an anniversary or rotating term basis.
- Multi-year billing – Organizations can offer multiple membership-term options to existing and prospective members, rather than offering one default membership term length.
- Non-dues billing cycles – To offer subscription products such as journals and magazines separately from membership fees, organizations can create a separate billing cycle for non-membership subscriptions. These billing cycles also allow users to renew their existing subscriptions outside of the membership renewal process.
Joining (Join Now)
The Join Now feature in iMIS is how prospective members or non-members become members. Through the Join Now process, non-members select a membership type and complete payment to finalize their membership. After joining, they can renew based on their member type. See Allowing members to renew in advance.
Note: Until a member joins, they will not have the Paid through or Renewed through dates populated. These dates should not be manually populated. After the member has purchased their membership, the Paid through and Renewed through dates will be populated.
Before you can offer Join Now membership options to contacts, the customer types, billing products, and billing cycles must be configured. See Setting up membership for details.
Offering Join Now from the public website
Offering Join Now from the public website enables members to self-serve and join the organization without assistance from staff users.
The following types of contacts can see the Join Now button:
- Non-members: After a new contact is created, the customer type is set to Non Member by default. A non-member is someone whose customer type has Is a member disabled.
- Inactive members: An inactive member is anyone who has a customer type with Is a member enabled and:
- Contact Status is set to Inactive or Deleted
- Paid through date is null or in the past
- Renewed through date is null or in the past
- Staff users: Staff users can perform membership joins on behalf of non-members and inactive members directly from the Staff site.
- Company administrators: Company administrators can perform membership joins on behalf of non-members and inactive members but only for contacts in their company.
The Join Now button is available on the out-of-the-box staff account pages. Having the Join Now button available on the staff-facing account pages allows staff users to join the association on behalf of members.
Most users will make copies of the out-of-the-box account pages, so they can tailor the content to fit their organization’s needs. It is not required to change the out-of-the-box configuration for the Join Now button, but if you would like to, do the following:
Note: The following steps assume you are already working with a copy of the out-of-the-box account pages.
- Enable Easy Edit.
- Navigate to your account page.
- Locate the Renewal Button content item (which is actually the Invoice Payment Link), then click Configure.
- Review and update the Join Now settings. The following are available:
- Enable join button for non-members and inactive members – When enabled, the Join Now button functionality is available on the page.
- Display to staff users only - When enabled, the join button will display on non-member and inactive member profile pages, but the button will only be visible to staff users.
- Button text - Enter the text that appears on the button. By default, the text is Join Now.
- Message - Enter text to be displayed above the button. For example, you could enter a message that explains to users what to expect when they click the button.
- Click Save & Publish.
Tip: The Join Now and Renew Now button share the same content item. After the member joins the organization, the button turns into the Renew Now button.
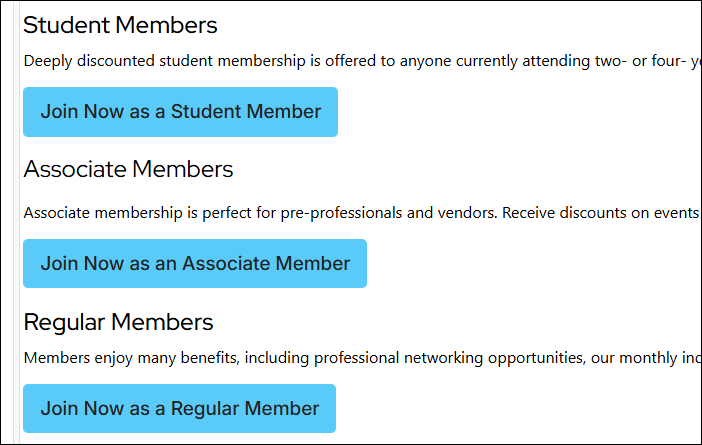
A Join Now page is a single page on the public website where prospective members can review the available membership options. Each available option has a Join Now button that takes the user through the process of becoming a member.
Example: The association offers Student, Associate, and Regular membership options. The Join Now page contains an overview, price, and Join Now button for each membership option.
Step 1: Create a Sign-Up page
The Sign-Up page requires users to create an account and sign into the website before they can purchase a membership. Each member must have an account before they can join as a member.
Do the following to create a Sign-Up page:
- Go to RiSE > Page Builder > Manage content.
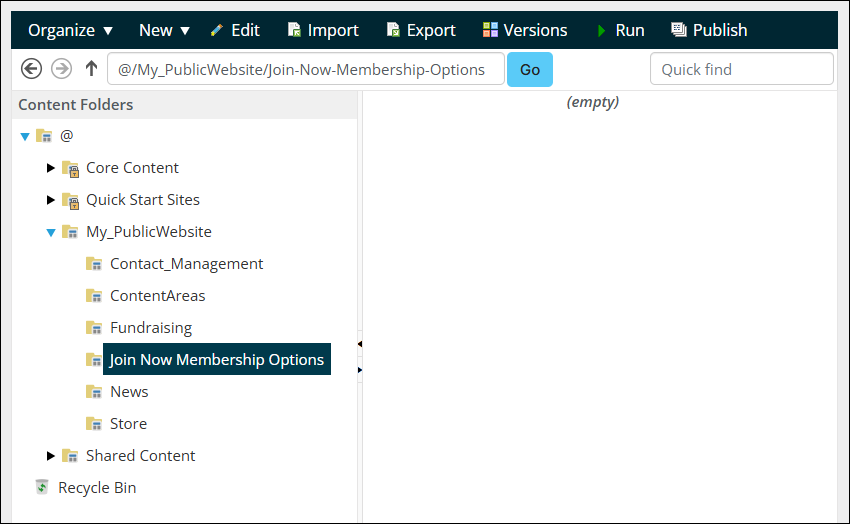
- Navigate to the folder where the Join Now membership content will be stored.
- Create a new folder to store the membership option pages.
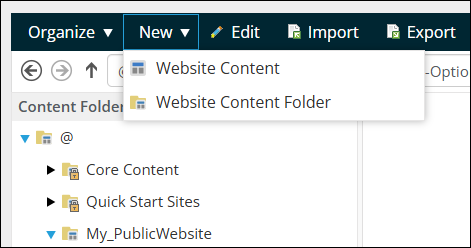
- Click New > Website Content.
- Enter a Title, such as Create an account.
- Select Add content.
- Click the Contact folder.
- Double-click the Contact Account Creator.
- Configure the Contact Account Creator:
- Enable or disable the options you want available when the member is creating an account.
- Ensure Include option to create an account is enabled.
- From the Redirects options, choose Previous page.
- Click OK.
- Click Save & Publish.
Step 2: Create the pages for each membership option
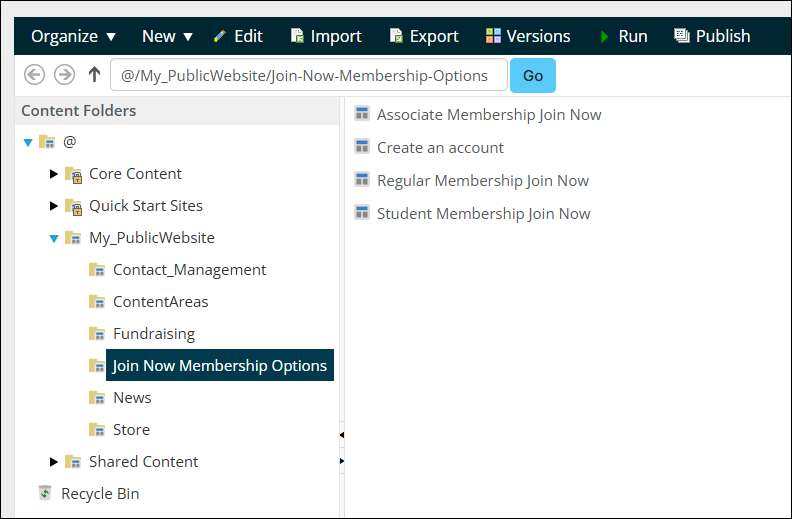
In this example, the association offers Student, Association, and Regular membership options. Each button must navigate to the correlating membership billing cycle where the member can define their membership.
Do the following to create individual pages for each membership option:
- Go to RiSE > Page Builder > Manage content.
- Navigate to the folder location where the membership option pages are stored.
- Click New > Website Content.
- Enter a Title, such as Student Membership Join Now.
- Select Add content.
- Click the Commerce folder.
- Double-click the General Product Display.
- Define the following in the General Product Display:
- Default product to display: Enter the name of the billing cycle, replacing spaces with underscores. The name is case sensitive.
- Click OK.
- Click the Redirect rules tab:
- From the Conditions for redirect drop-down, select User is not authenticated.
- From the Target URL or shortcut for redirect field, select the page created in Step 1.
- Click Save & Publish.
- Repeat steps 3-9 for each membership option.
Step 3: Create a single page where prospective members can review and purchase an available option
Members will need to know the available membership options, what is included, and the prices.
Note: If there is already a button style the website regularly uses, locate the button class now. If not, use the out-of-the-box button classes (RiSE > Style Guide > Base elements > Buttons).
Do the following to create a membership offering page:
- Go to RiSE > Page Builder > Manage content.
- Navigate to the folder location where the membership option pages are stored.
- Select New > Website Content.
- Enter a Title, such as Membership Options.
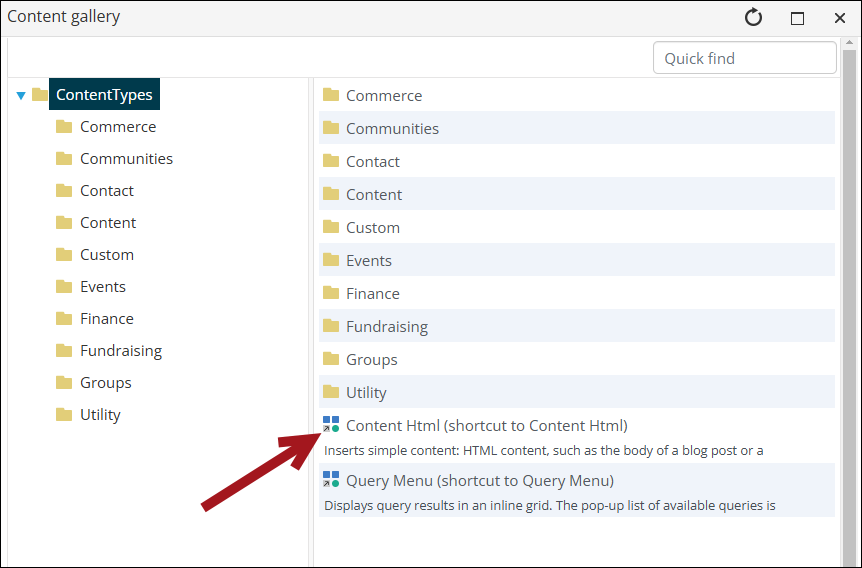
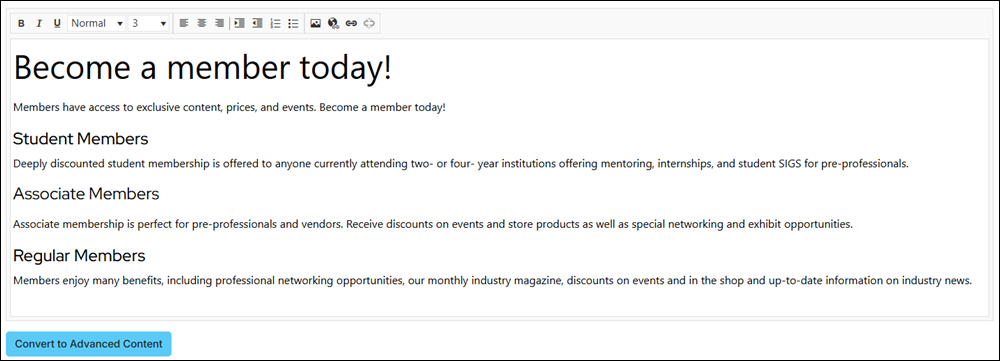
- Select Add content, then double-click the Content Html content item.
- Enter content that needs to display to members about the membership options, such as available options, details about the options, and pricing.
- Enter text that will eventually become the Join Now button for each membership option.
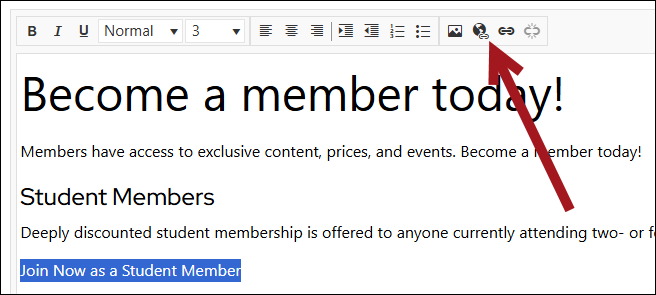
- Highlight the text that will become the Join Now button.
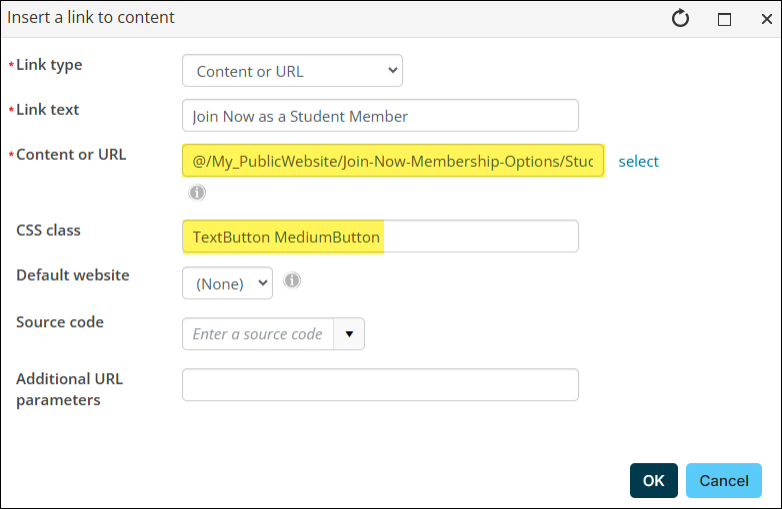
- Click the Content Link Manager button:
- From the Content or URL field, select the correlating Join Now page.
- In the CSS class field, enter the button class name. For this example, use TextButton MediumButton.
- Click OK.
- Repeat the process for the other Join Now button options.
- Continue designing the page to fit the association’s needs.
Step 4: Add the single page to the public website
The last step is to add the page you created in Step 3 to the public website, so prospective members have access to it and can begin joining the association.
Do the following to add the page to the public website:
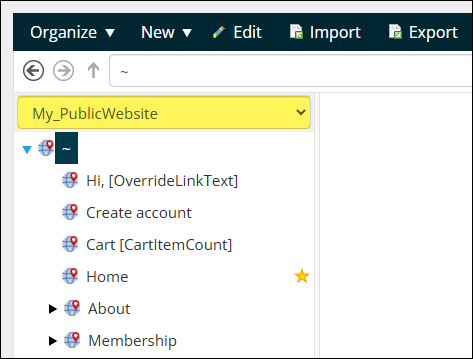
- Go to RiSE > Site Builder > Manage sitemaps.
- From the drop-down, select the public website.
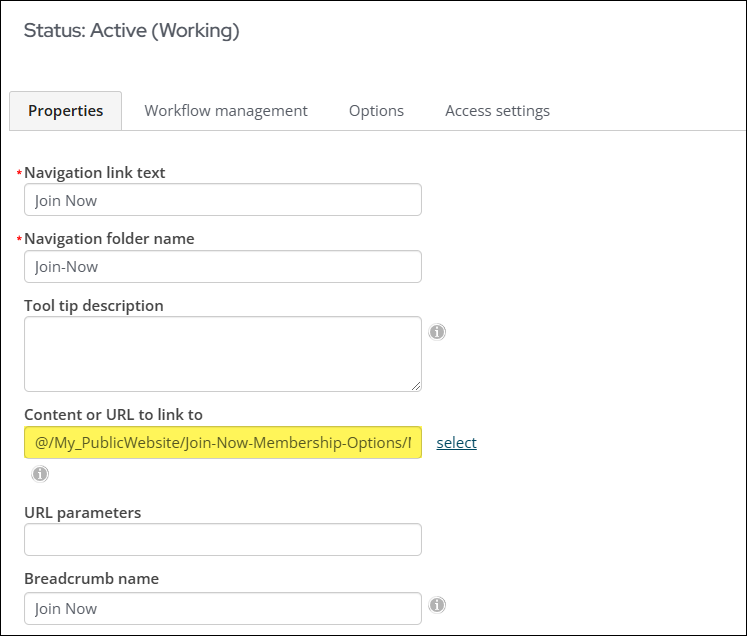
- Select or add a new navigation item.
- From the Content or URL to link to field, select the page created in Step 3.
- Click Save.
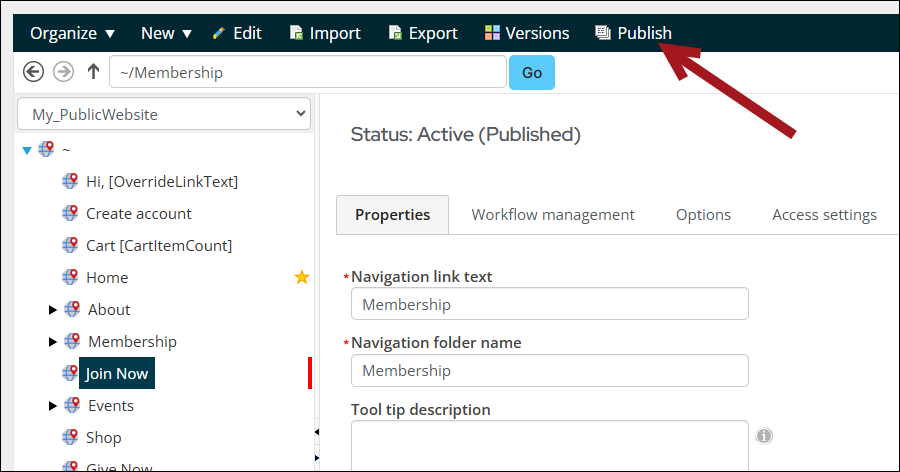
- Publish the navigation item.
- Navigate to the public website to confirm the new page appears correctly and that all buttons are working properly.
Understanding Join Now
The Join Now perspective is similar between public users and staff users (staff users who are joining the organization on behalf of a public member). Review the following information to understand how a public user can join for themselves and how a staff user can join on behalf of a member.
The following is one example of how a non-member can become a member from a public website:
- The non-member navigates to the public website, then clicks the Join Now navigation item.The member navigates to the public website and clicks Membership > Benefits > Individual.
-
Then they click Compare Memberships or scroll down to the Our memberships section.
- The member clicks Join - associate.
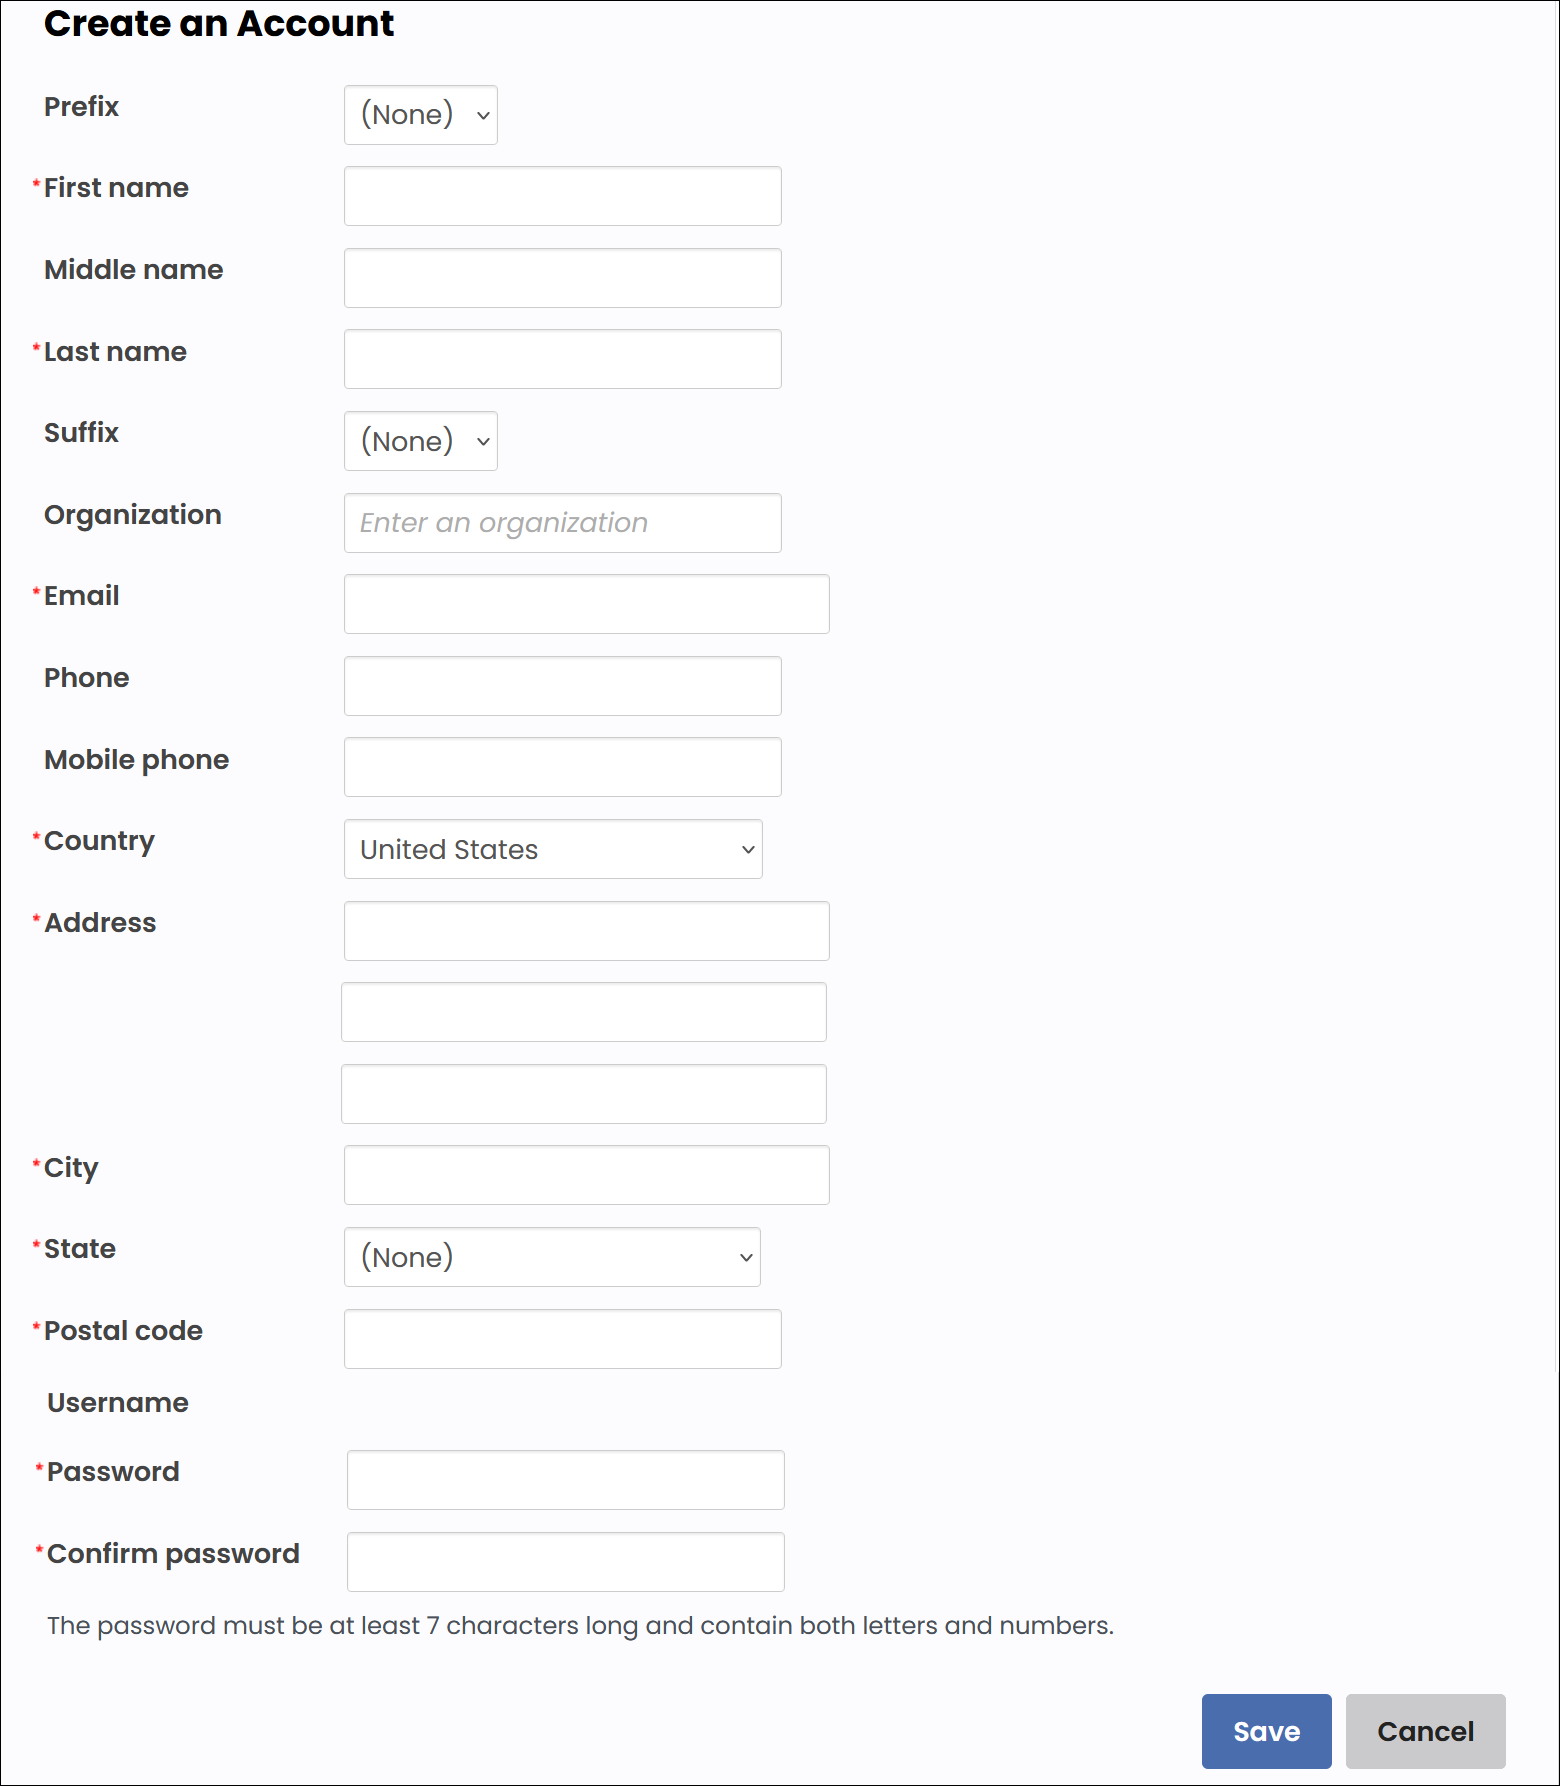
- The member is not logged in and does not have an account, so they are redirected to the Sign Up page and begin filling out the information.
- The member clicks Save and is directed to the Member Information demographics page.
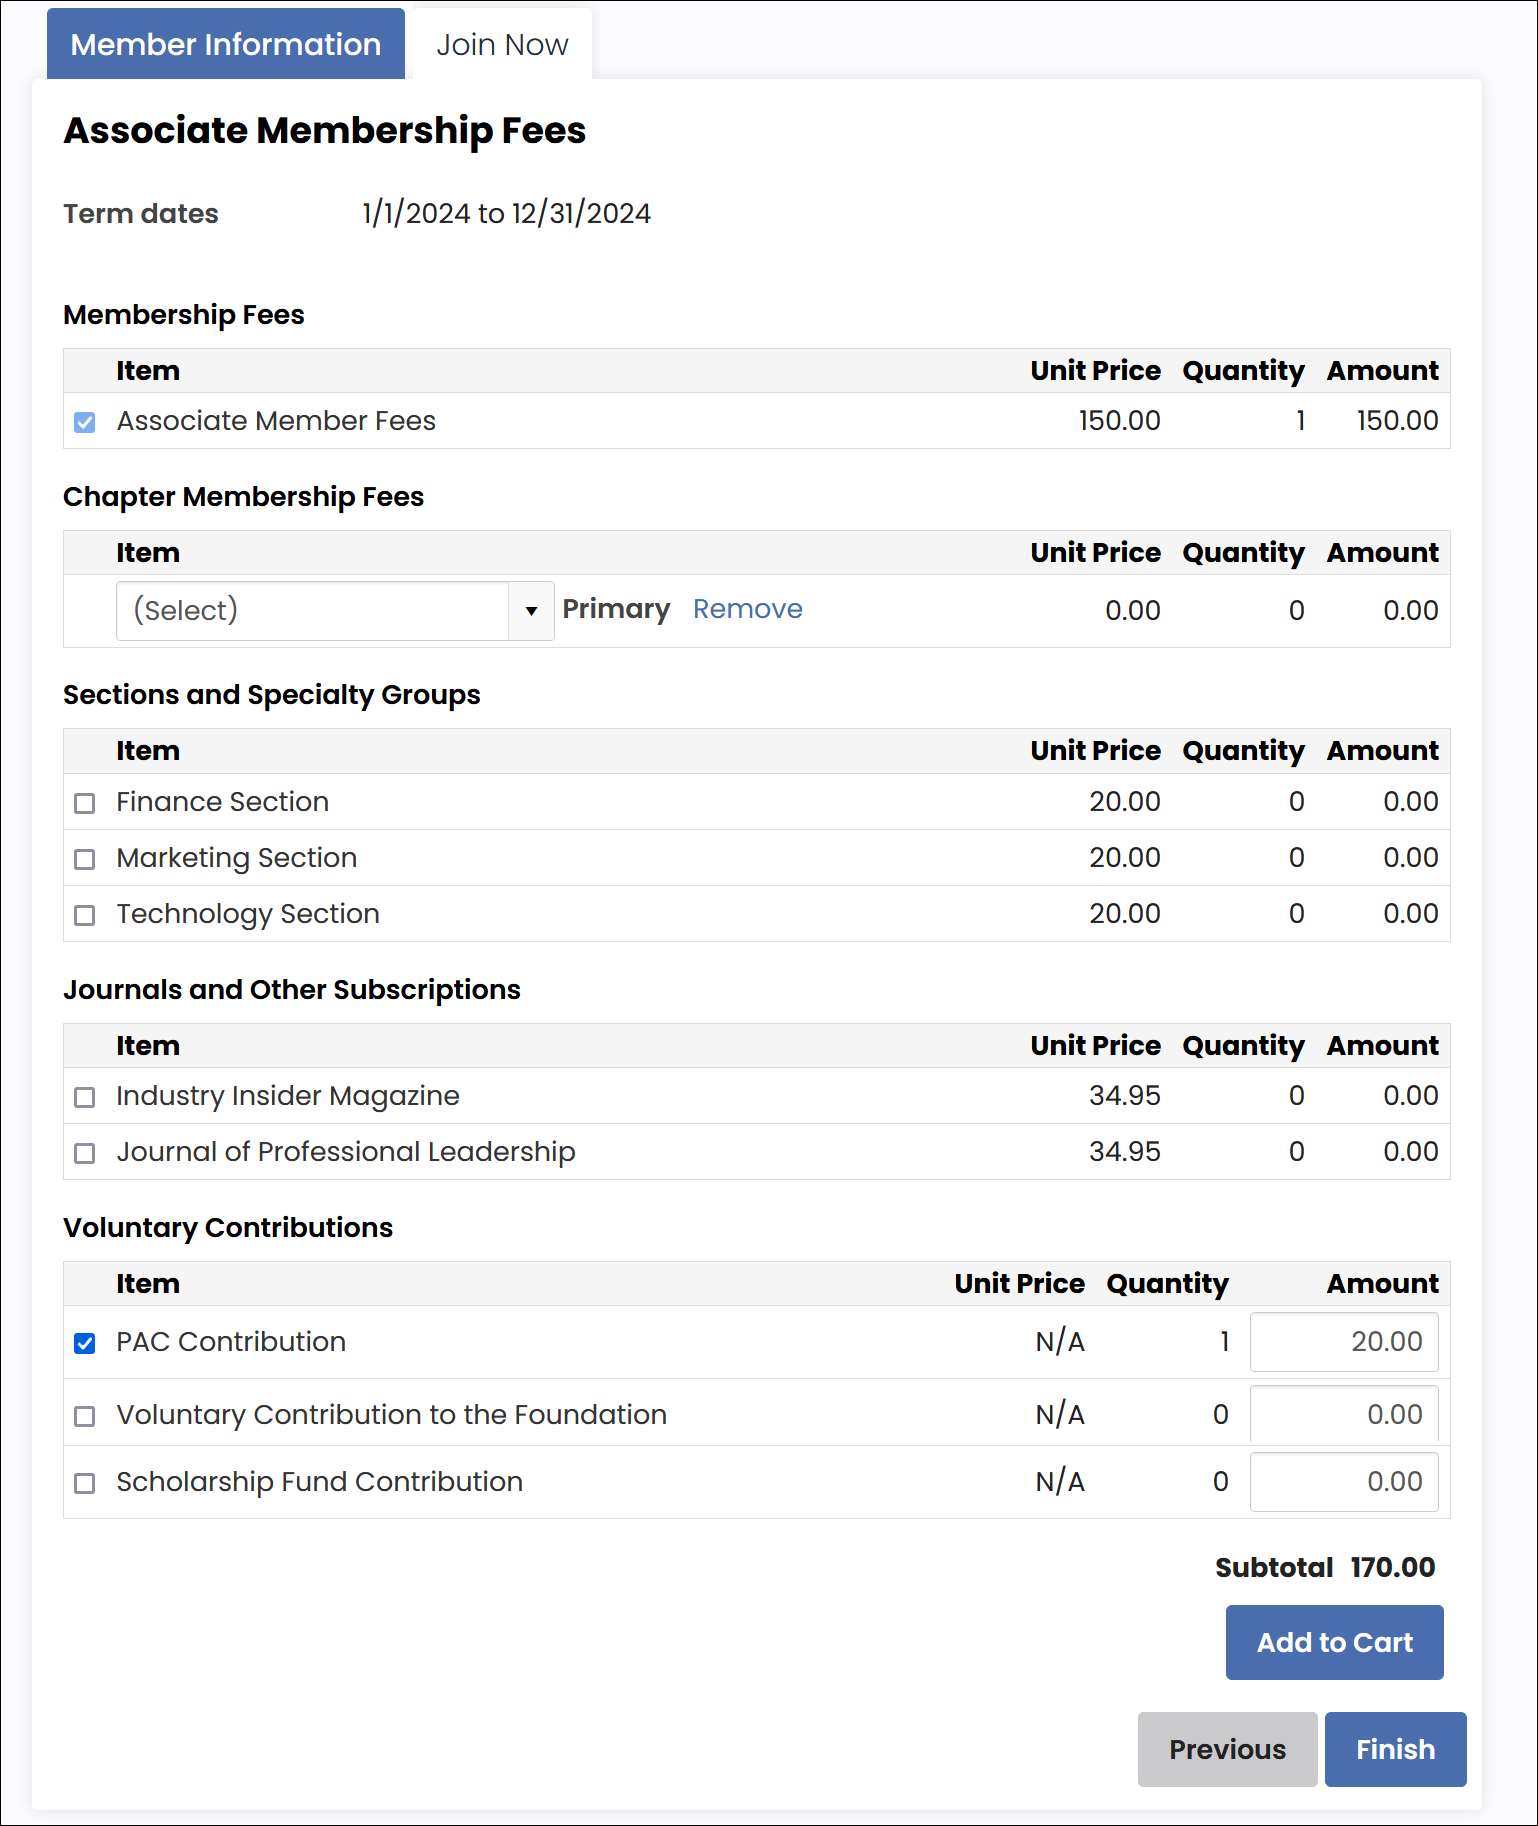
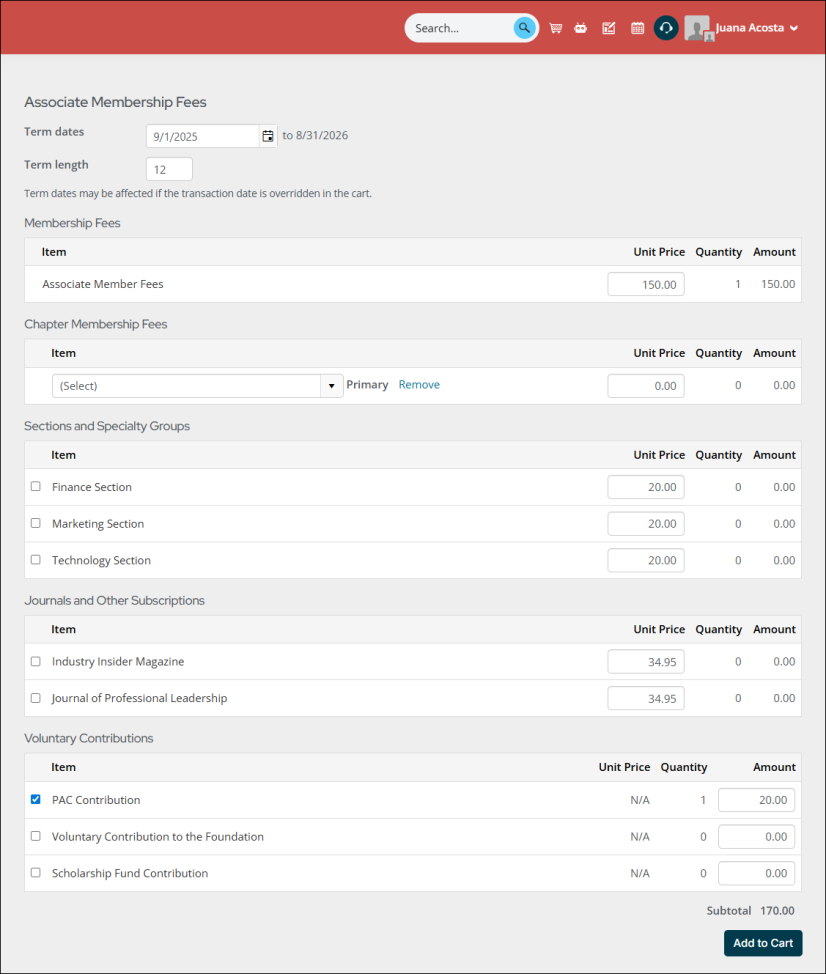
- After clicking Next, the Associate Member billing cycle is presented to the member. They tailor their membership to their liking, then they click Add to Cart.
- The member reviews the membership one last time, then clicks View Cart.
- From the cart, the member enters their payment details and clicks Submit Order. The member is now officially an Associate Member of the organization.


The following is an example of how a staff user can join the organization on behalf of a member:
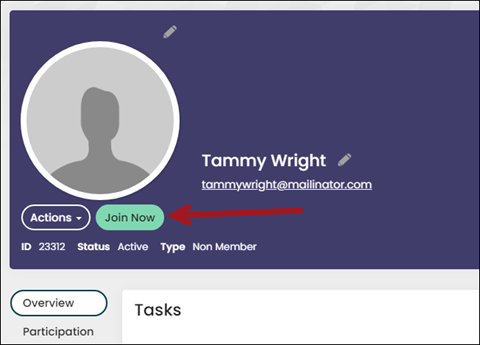
- The staff user navigates to the contact’s account page.
- The staff user clicks Join Now.
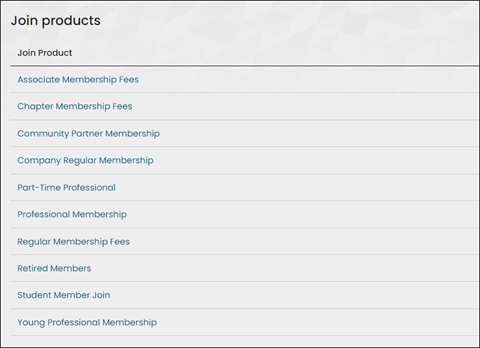
- The staff user chooses the billing cycle.
- The staff user updates the membership options, then clicks Add to Cart.
- The staff user reviews the selections one more time, then selects Proceed to Checkout.
- From the cart, the staff user can pay the membership using a payment method provided by the member, or they can select Pay Later. Selecting Pay Later adds an open invoice to the member’s account that can be paid later by the member or staff user.
- The staff user clicks Submit Order. The order is confirmed and the contact is officially a member of the association.
Note: If the contact does not have an account page, the staff user must first create one (Community > Add contact).
Renewing (Renew Now)
Members see the Renew Now button on their account page or on a Join Now page after renewals are successfully generated. From the Staff site, staff users also see the member’s Renew Now button on the member’s account page. The member or staff user can process the renewal using the Renew Now button.
Understanding Renew Now
Review the following information to learn more about the Renew Now process.
Generating mass billing enables you to process a billing cycle for all members who match the parameters defined in the selected billing cycle.
iMIS decides which members to bill by comparing the Paid through date to the renewal Effective date. When a member is successfully billed for renewal, their Renewed through date (also known as the Billed through date) is automatically advanced to the last day of the billed term. The Paid through date is also automatically advanced when the first item of the customer type is paid in full (the primary fee).

Notes
- To fully automate the membership renewal process for staff users, see Automating the membership renewal process.
- If you need to generate a renewal for a single member, see Generating renewal for single contact.
- If the member’s customer type is configured to bill the organization, then their organization will be billed for the membership fees. See List Billing for more information.
Prerequisite conditions for successful renewal invoice generation
To generate membership renewal invoices, the following conditions must be met:
- The member must be an active member, which includes the following:
- The assigned member type must be one in which the Is a member checkbox is enabled.
- The Contact status must be set to Active.
- The Paid through and Renewed through (sometimes referred to as Billed through) dates must fall before the Effective date as displayed (or overridden) on the Generate renewals window.
- There must be a single active membership subscription (as listed in the Membership fees section on the Membership tab). There will be no active membership subscription row for either a newly created contact or a former member. The only option for a new contact or a former member to purchase a membership term and become an active member is through a Join process.
Example: The Effective date is 1/1/2023. Anyone who has a Paid through date of 12/31/2022 or earlier is picked up in the billing run, if they have not already been billed.
Generating membership renewal fees
Do the following to generate membership renewal fees:
- Go to Membership > Renewals > Generate renewals.
- Enter a Billing run name. Make sure this name is unique so that you can differentiate this renewal with other renewals.
- Select the Billing cycle to process. The customer type(s) defined in the billing cycle determine who is billed.
- The Bill date defaults to today's date and generally does not change. This is the date the billing run was generated and processed.
-
The Effective date is the key date that determines which members are included in a billing run. Members whose Paid through date are earlier than the Effective date are included. This date represents the start of the new membership term for those being billed.
Understanding how the Effective date is populated
While you can manually update the Effective date, it is automatically set based on one of the following criteria:
- Default number of months prior to expiration that members are billed for renewal setting in the billing cycle - When set to anything other than 0, the Effective date is determined by the number defined in this setting.
- Advance start month as of setting - When the above setting is set to 0, the Advance start month as of setting (Settings > Membership) is used to determine whether to advance the Effective date to the following month. If the renewals are generated before the Advance start month as of setting, then the Effective date is the first of the current month.
EXAMPLES Default number of months prior to expiration that members are billed for renewal Billing run date Advance start month as of Effective date 3 December 1, 2024 Not used March 1, 2025 1 January 1, 2025 Not used February 1, 2025 0 January 1-14, 2025 15 January 1, 2025 0 January 15-30, 2025 15 February 1, 2025 - If licensed for AutoPay, review the selection under AutoPay options and confirm it is correct. By default, the Default AutoPay option defined in the selected billing cycle is chosen here. See Creating a billing cycle for AutoPay renewals for more information on these options.
- (optional) Enable any of the Other options:
- Only bill a single contact - Enable this option when you want to generate the renewal for a single contact instead of an entire group of contacts.
- Member ID - Enter the ID of the member you want to bill, or search for the member. See Generating renewal for single contact.
- Only bill contacts who are included in a particular query - Enabling this option will allow you to select an existing query, or create a new query, of contacts to be billed. Only contacts included in this query, and who meet all other restrictions, will be billed.
- Only bill contacts in a particular chapter - Enabling this option and then selecting the desired Chapter will limit the billing to just those whose primary chapter is the one selected.
- Do not prorate - When enabled, the dues are not prorated.
- Do not apply credits - When enabled, outstanding AVAIL_CREDIT balances from iMIS 2017 are not applied during the renewal calculation. For more information, see Working with AVAIL_CREDIT balances after upgrading.
Note: At least one of the query's datasources must include CsContact or CsContactBasic, and must include the column iMIS Id. This query cannot contain optional or required filters.
- Only bill a single contact - Enable this option when you want to generate the renewal for a single contact instead of an entire group of contacts.
- Click Generate Bills. You will see a confirmation message that says the selected billing cycle was submitted for processing.
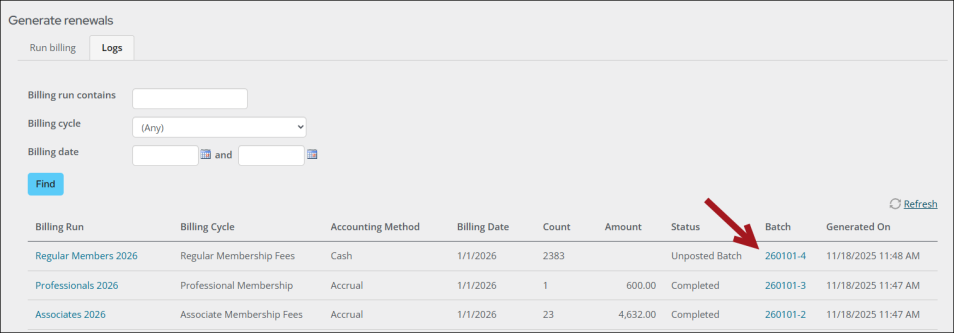
- Click the Logs tab. The billing run was successful if the Billing Run name is a link. Clicking the link, you can review everyone who was picked up and billed. The billing run was not successful if the Billing Run name is not linked. See Billing troubleshooting for potential solutions.
- If any of the following are true, there is a batch to post after the billing is generated:
- The Accounting method at Settings > Membership is set to Accrual and the associated billing cycle has the Accounting method set to Default.
- The billing cycle has the Accounting method set to Accrual.
- (if licensed for AutoPay) The AutoPay option was set to Bill all contacts and there were AutoPay invoices generated in the billing run. If there were non-AutoPay invoices also generated in the billing run and the Accounting method is set to Cash, those invoices are automatically posted and appear in a separate billing run. AutoPay invoices always appear in a batch.
- (if licensed for AutoPay) The billing cycle has Only bill contacts enrolled in AutoPay selected as the Default AutoPay option.
- Persisted cash membership invoices are enabled.
Do the following to post the batch:
- Click the Logs tab.
- Find the billing run, then select the Batch number.
- Review the batch information (See Reviewing and printing accrual-based membership fee batches for more information), then click Post Batch.
- If you need to send email notices to those who have just been billed, see Generating renewal fee reminders.
Note: After renewals are generated, it is not possible to change the billing run name. Billing run names are not accessible to anyone but staff users.

Tip: Anyone picked up in the renewal billing run has their Renewed through date automatically advanced. The Paid through date will automatically advance after the primary fee item is paid in full.

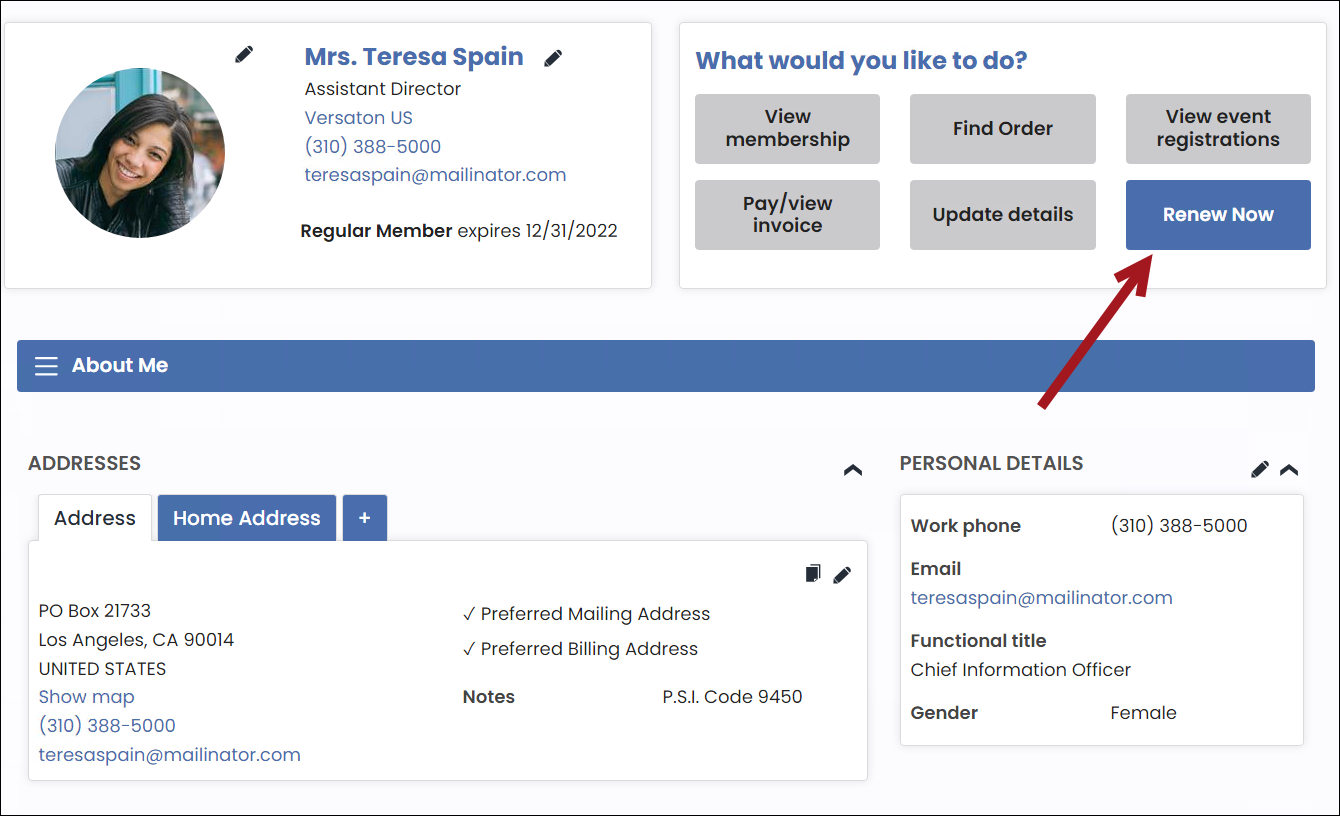
Members see the Renew Now button on their account page after renewals are successfully generated.
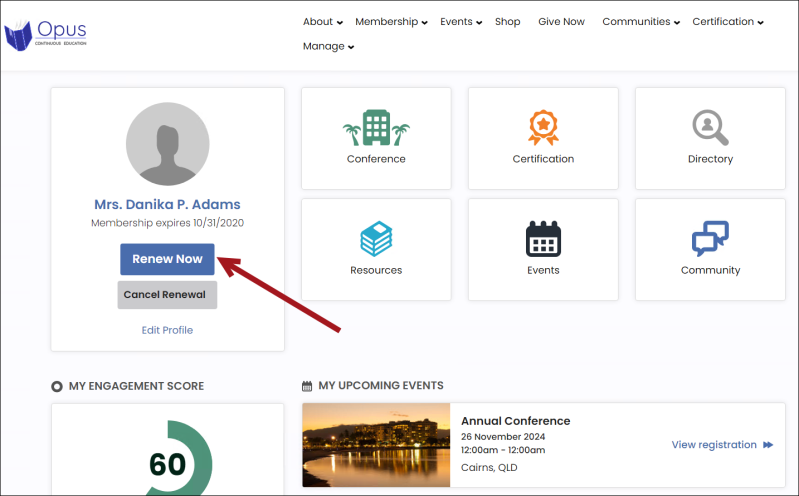
Staff users also see the member’s Renew Now button on the member’s account page.
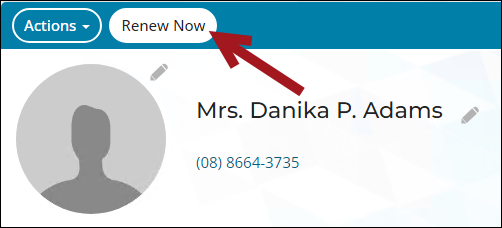
The Renew Now button can also be found on the Join Now pages.

The member or staff user can process the renewal using the Renew Now button. The following outlines the process a member uses to renew their membership themselves using the Renew Now button:
- The member navigates to the public website and logs in using their username and password.
- The member navigates to their account page, then clicks the Renew Now button.
- The member is taken one of two places, depending on if the Use to display itemized renewals checkbox is enabled on the billing cycle that was used to generate the renewal invoice:
- When disabled, the member is taken directly to the cart.
- When enabled, the member is taken to the itemized renewal page where they can review and update the items defined in their membership (except the primary fee).
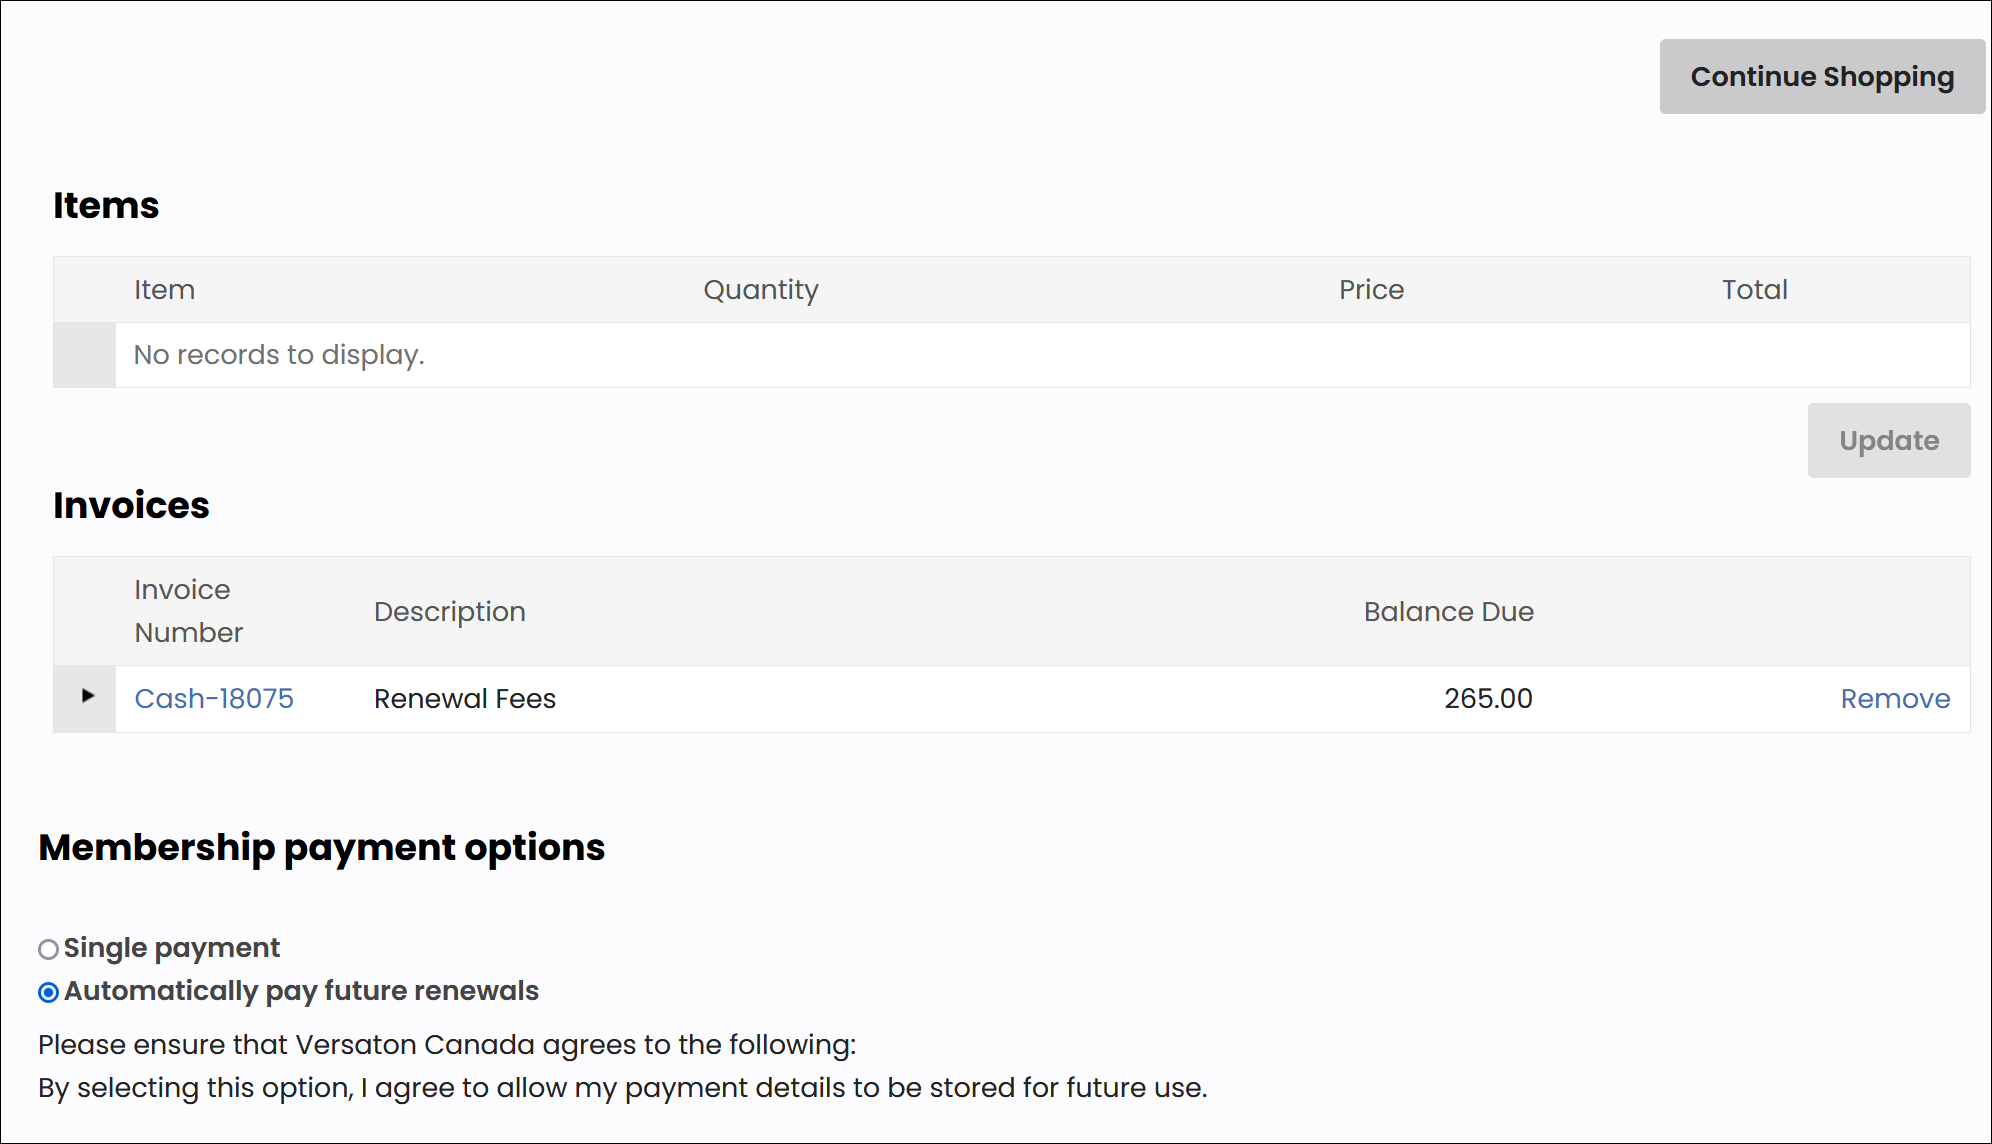
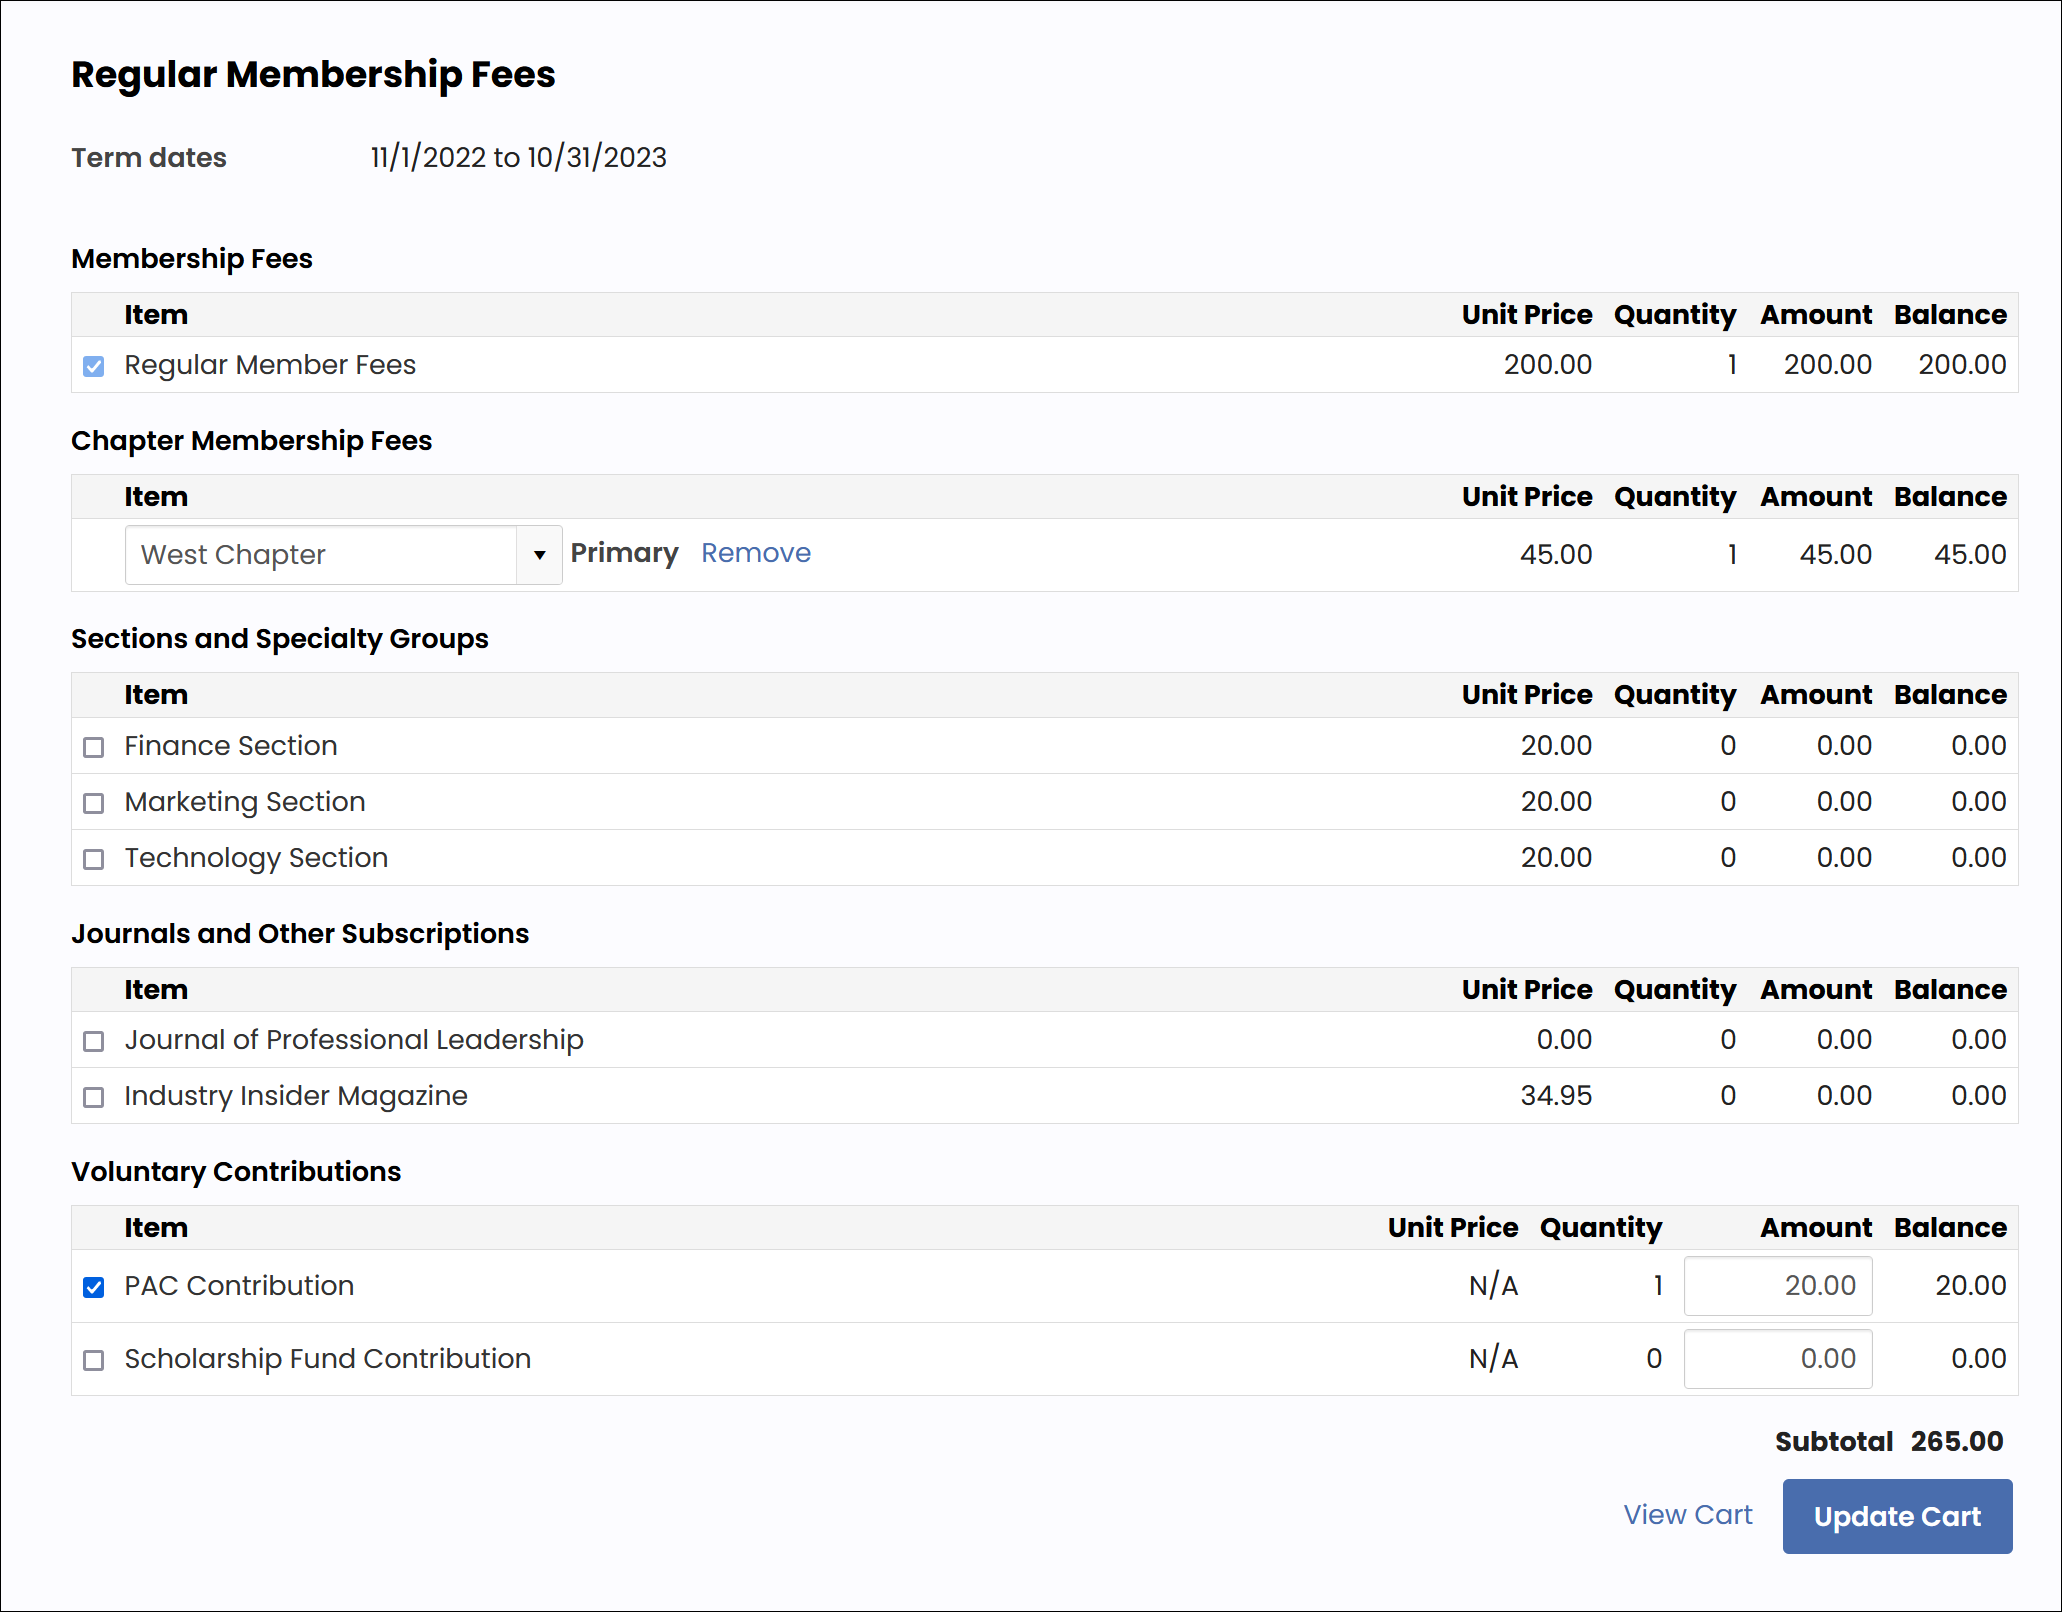
- When ready, the member purchases the membership and is automatically sent an order confirmation email.
After the renewal invoice is paid
The following changes occur after the member’s renewal is paid for and the transaction is processed:
- The Paid through date is advanced to match the Renewed through date.
- The Member status is set to Renewed.
- The Status changed date is set to the date when the member status was changed.

From the Transactions tab, the invoice has moved from the Open invoices section to the Invoices section. From the Invoices section, the invoice is shown as paid with a zero-amount balance.

From the Membership tab, the Membership fees section reflects the new paid through date and zero balance, and new Membership billing history line items are added based on the membership products purchased.


From the Participation tab, the order confirmation is available under the Communications section.

Out-of-the-box, the Renew Now button is located on user account pages and is displayed using the Invoice Payment Link content item.
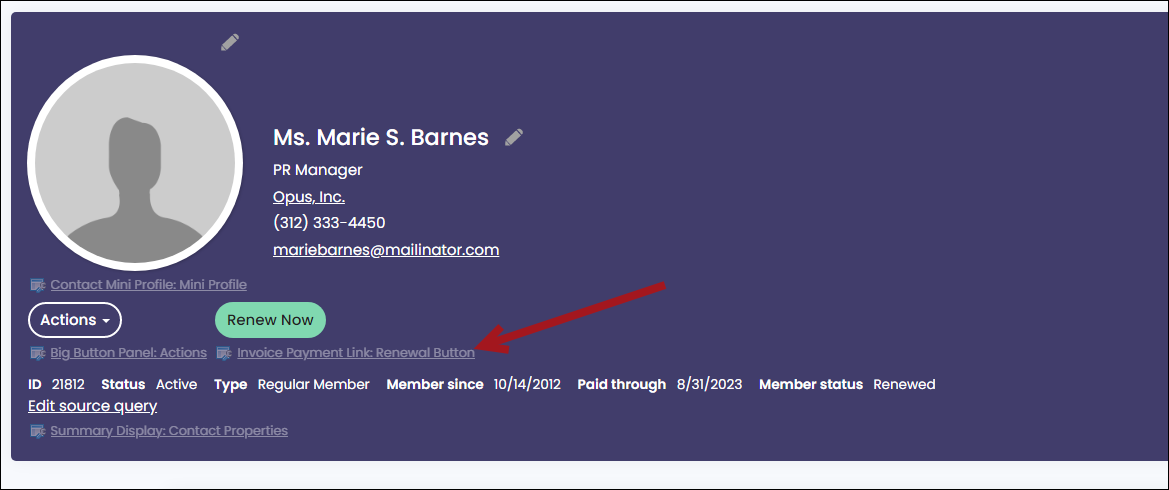
If you are working with a copy of the out-of-the-box account pages, you can modify the Renew Now button:
- Change the label text from "Renew Now" to the desired text
- In addition to displaying a renewal button, the Invoice Payment Link content item can be used for additional purposes:
- When the selected contact has other unpaid invoices that are due, the button can be configured to display as a Pay open invoices option. See Paying open invoices for more information.
- When the selected contact is a non-member or inactive member, a Join Now button can be configured to display so that they can register as a member directly from their profile page. Staff users and company administrators can use this button to join as a member on behalf of the contact. See Configuring Join Now from profile pages for more information.
- When the selected contact is a member and is not due for renewal (their membership renewal fees have not been billed), but they are eligible to renew their membership in advance, a Renew Now button can be configured to display. There must be a billing cycle correctly configured for itemized renewals for the selected member's customer type in order to renew in advance. Eligibility for renewing membership prior to billing is determined by the system settings. See Allowing members to renew in advance for more information.
Reviewing the membership data after joining or renewing
Staff users can review and update key membership data from a contact’s account page. This section covers the various areas of out-of-the-box account pages that contain membership data.
The Membership tab contains the following core membership data:
The Membership fees and Subscriptions queries allow staff users to edit subscription data for the next billing term:
- Membership fees – Displays all items purchased at the time the member joined or renewed.
- Subscriptions – Displays items purchased outside of the renewal process through a non-dues billing cycle.
Staff users can edit a membership fee or subscription by selecting the Item.
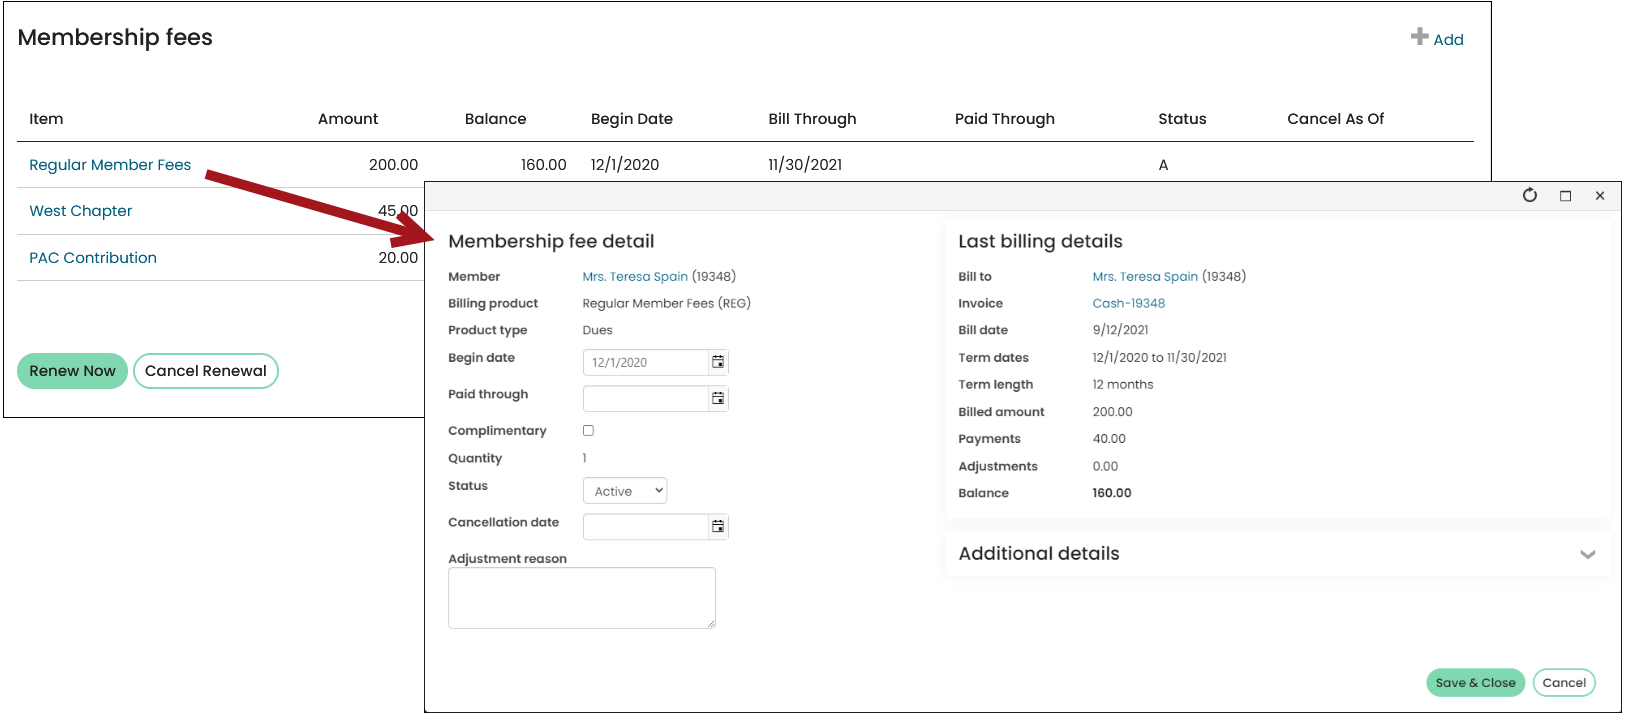
The following fields can be updated:
- Begin date – The projected begin date for a dues or non-dues subscription item. Refers to the first date of a term through which the item has been billed, whether payment has been received.
- Paid through – The expiration date of the membership or subscription item, or the period through which the member has paid for the item. Controls the paid-through date for the single line item. Editing this date will not update the member’s overall paid-through date (CsContact.Paid Through).
- Complimentary – When enabled, the member is charged 0.00 for the billing product on their next billing term. For details, see Assigning an item as complimentary for a single member.
- Status – Can be updated to Active or Inactive. Setting an item to Inactive will cancel the subscription item and automatically hide the Cancellation date field. If you are setting the primary fee product to Inactive, the membership will be cancelled.
- Cancellation date – Enter a date or set the Status to Inactive:
- Entering a cancellation date – Enter a date if you wish to cancel the subscription item on a future date. The night after this date, the subscription line is set to inactive. To cancel the subscription item today, set the Status to Inactive. When the Status is set to Inactive, the Cancellation date field is hidden. Any line item with a Cancellation date will not be billed for the next term unless the same product is defined in the Customer type. If a member’s invoice was accidentally cancelled, you can clear this date, so that the subscription is no longer cancelled.
- Setting the status to inactive – To cancel the subscription item today, simply set the Status to Inactive. When the Status is set to Inactive, the Cancellation date is hidden.
- Deleting subscription records - To delete the subscription item, click Delete. For more information, see Deleting subscription records.
For more information on these queries, see Ensuring account pages have membership queries.
Staff users can also add a new fee or subscription prior to billing a member for their next term by clicking the +Add button.

For more information, see Adding subscription items to member's accounts before generating renewals.
The Membership details panel contains the core individual membership settings. Staff users can edit these settings by clicking the edit icon.

The Membership details fields are automatically populated by iMIS when a member joins or renews their membership. It is not recommended to manually change these fields (with the exception of the Billing category and Bill to ID for renewals), unless the data needs to be corrected.
The following fields are core membership data fields located on the Membership details panel:
- Member type – The Customer type of the contact. The process to change from one member type to another varies depending on whether the renewal invoice has already been generated or paid. For details, see Changing member types.
- Chapter – The primary chapter of the contact.
- Billing category – A subcategory of the Member type which defines additional membership fees. For more information, see Setting up billing categories.
- Bill to ID for renewals – The ID number of the third-party contact responsible for the contact’s membership fees. This ID is used during List billing when an organization is directly billed for their members' membership fees.
- Paid through – The expiration date of a customer's dues or the period through which a customer has paid. This date is always the last day of the month. This date is automatically advanced by iMIS when the primary fee item on the customer type is paid in full. This date may need to be adjusted when correcting a membership renewal billing.
- Renewed through – The date through which a customer has been billed for products, regardless of whether the customer has paid. This date is automatically advanced by iMIS when a record is bulled through a membership cycle (Membership > Renewals > Generate renewals). This date may need to be adjusted when correcting a membership renewal billing.
- Renew months – If this value is greater than zero, it is used to determine the number of months for which the contact’s membership will be renewed. If the Renew months field is left blank or at zero, the default Standard billing interval is used.
Warning! It is advised that the Renew months value is never manually modified by a staff user. For more information, see Changing the renewal term length.
The following properties cannot be edited:
- Member status – The current status of a contact record as it relates to the organization’s membership structure as defined in their customer type. Member Status is assigned based on properties in a contact’s primary membership and is therefore not user-definable. The status can be New, Dropped, Renewed, or Reinstated. See Member status for more information.
- Status changed – The date of the transaction or action that resulted in the member status changing.
- Member since – The Join Date. It can be manually set, but if not, it will be populated with the transaction date that was in place when the join was processed for this member.
The Chapters and sections area lists the chapters and sections the contact has joined along with their roles.
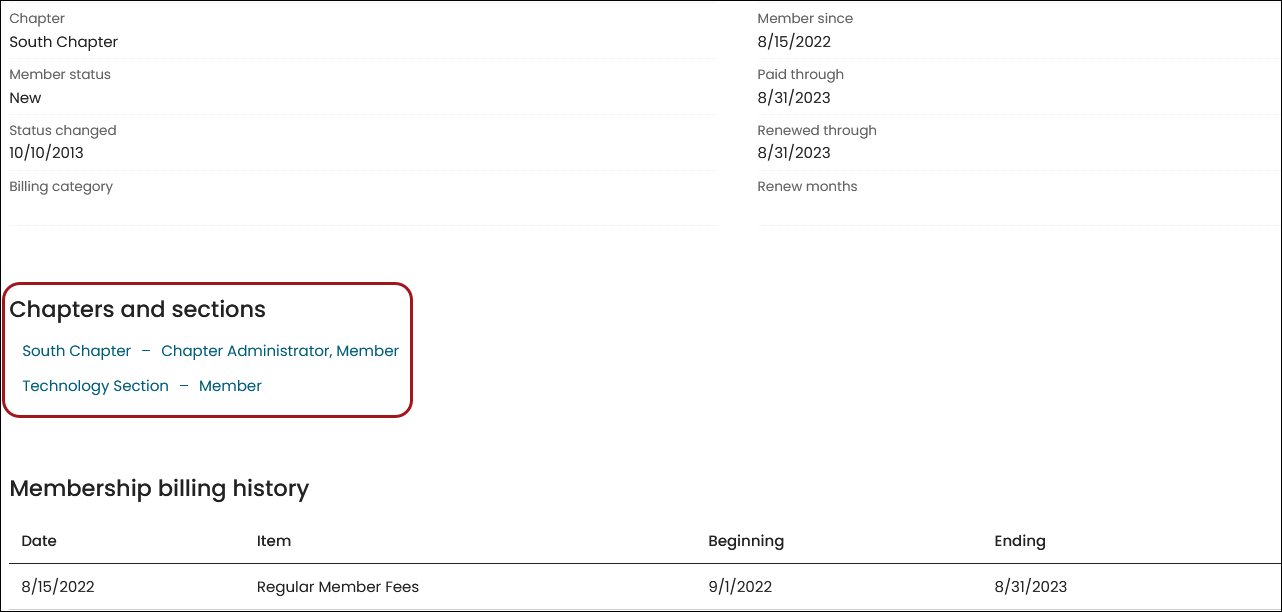
Selecting the chapter’s name opens the chapter dashboard.
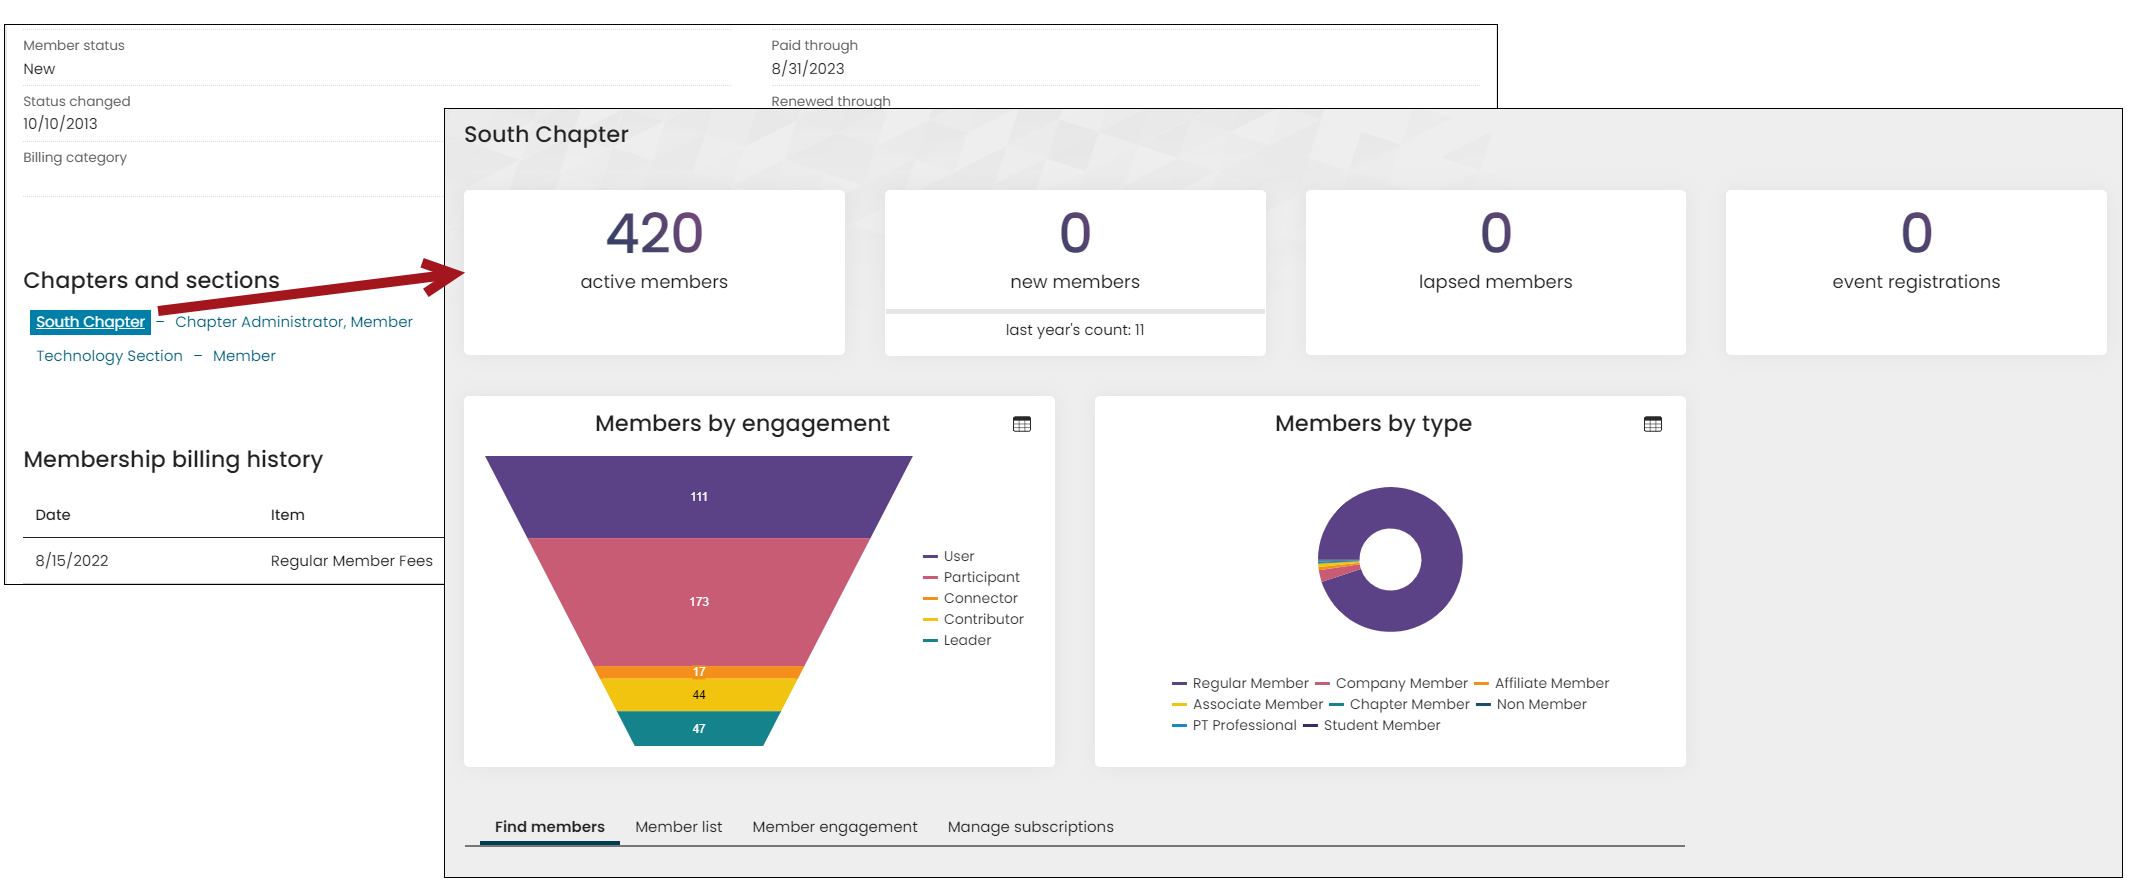
Selecting the role next to the chapter’s name opens the Group member detail window.
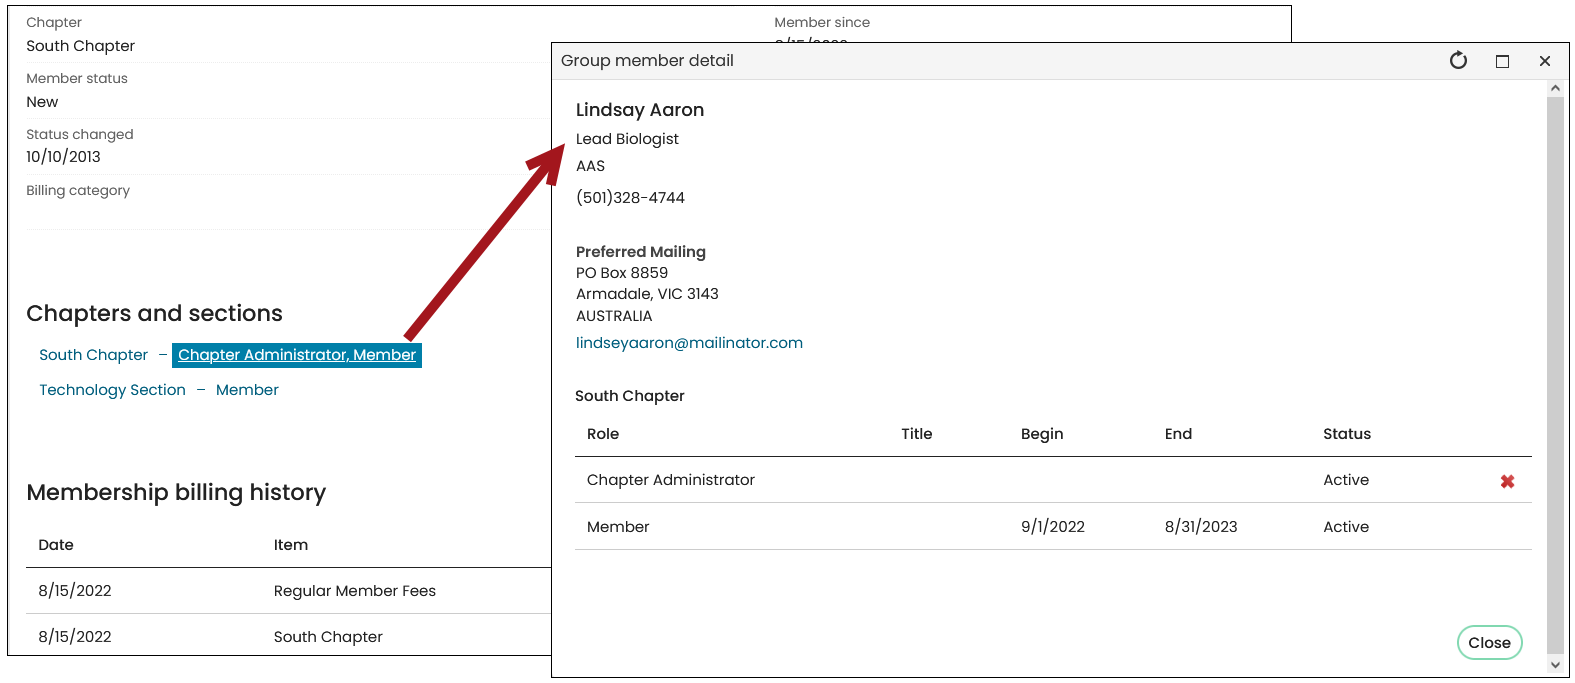
From this window, staff users and chapter administrators can assign or remove the Chapter Administrator role. For more information, see Assigning the Chapter Administrator role.
The Membership billing history contains details on all previous membership terms that were paid through either a join or a renewal payment process.
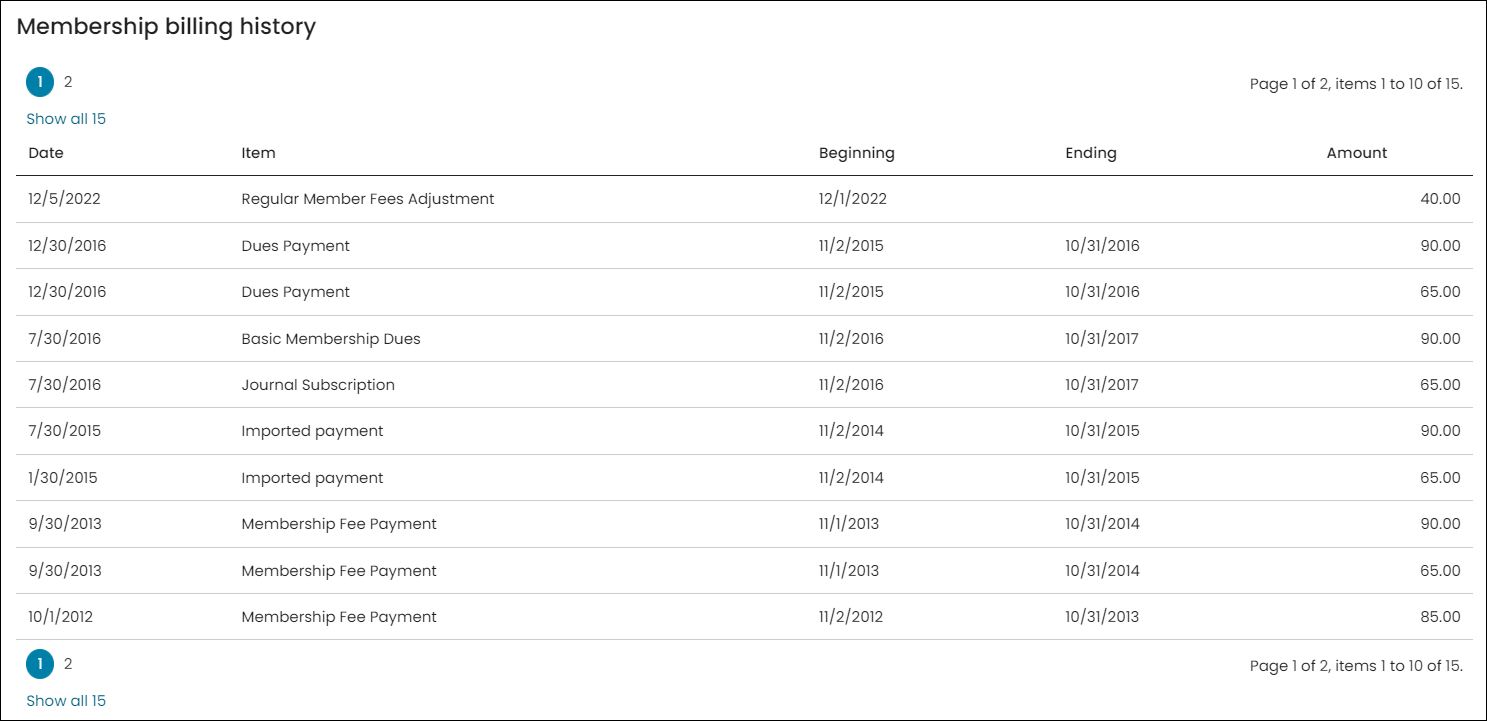
Additional membership data can be found in the following areas of account pages:
Communications
On the Participation tab, the Communications log displays a history of previous confirmations sent to the member after their join or renewal payment was processed. For more information, see Interaction Log.
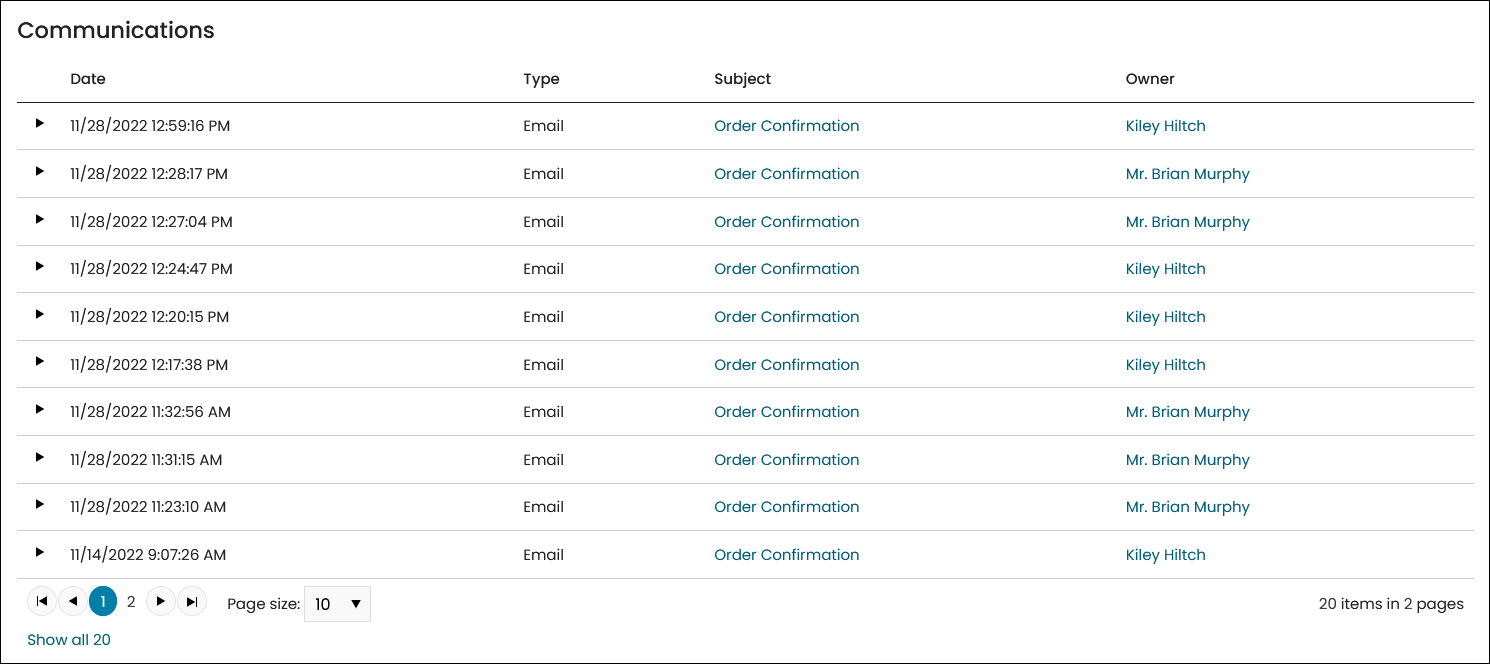
Change history
On the About tab, the Change history displays changes to certain key membership attributes, such as member type, status, and join date. For more information, see Change history overview.
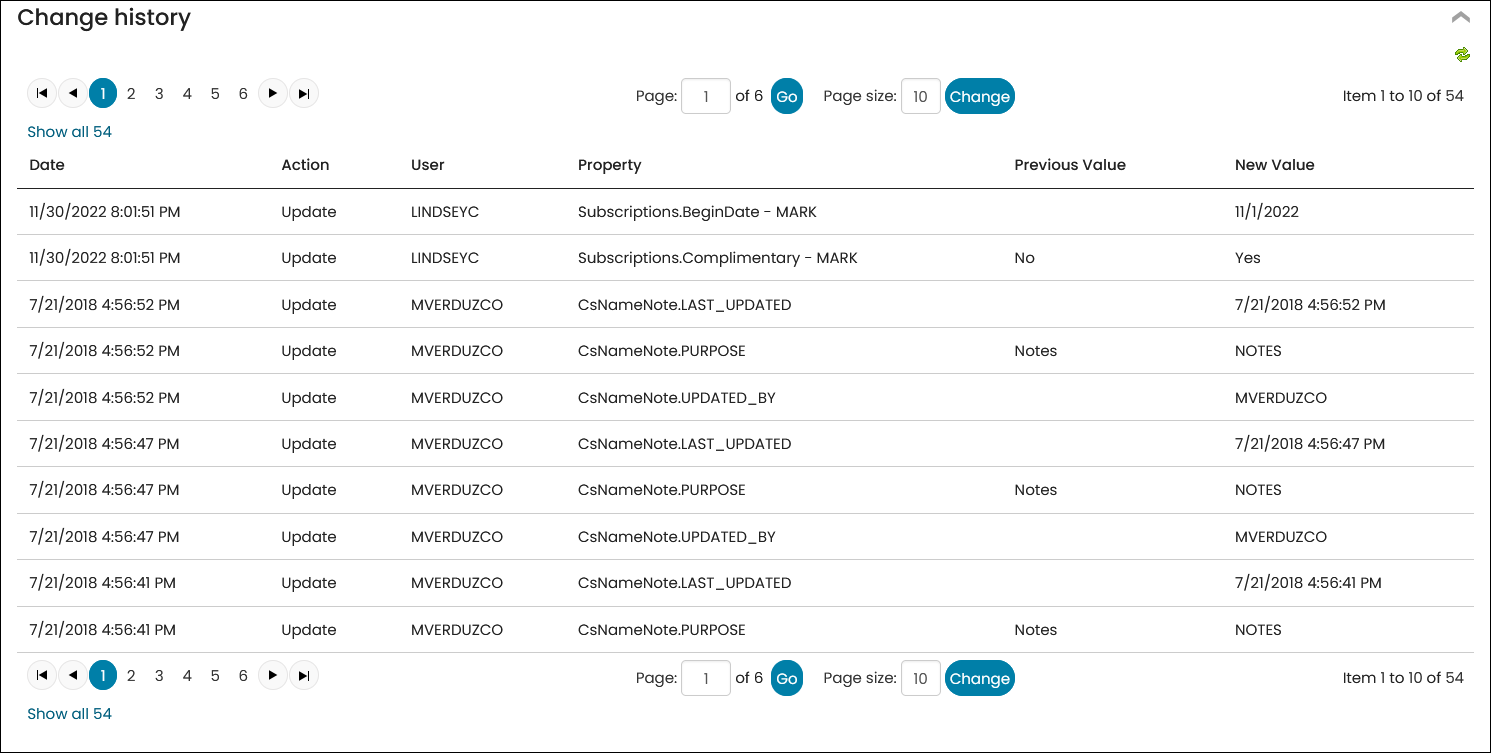
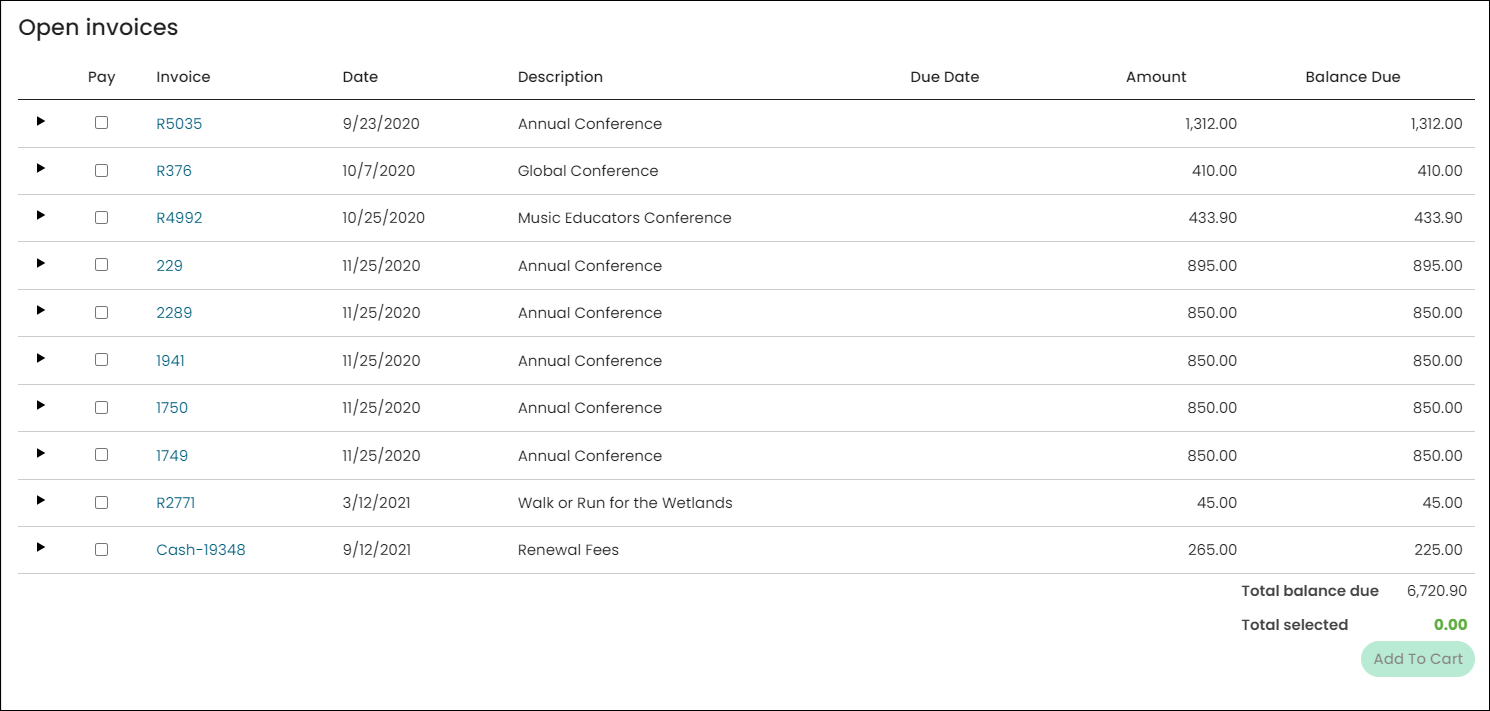
Open invoices
On the Transactions tab, the Open invoices query displays any outstanding or unpaid membership renewal invoices. Staff users can review or reverse an individual invoice by selecting the invoice number. For more information, please view Adjusting and reversing membership invoices.
Membership Best Practices
Review the following best practices when working with iMIS Membership data.
It is important that the core membership properties, such as Status, Customer type, Renewed through date, and Paid through date are only updated when specific instructions are prompting you to do so. Otherwise, let iMIS populate the core membership properties through Joins, Renewals, and other related processes.
Example: When processing a new membership join, add the member to iMIS, then use the Join Now button to process a join and record the payment. The new member will automatically be assigned the correct customer type, and their paid and renewed through dates are automatically set correctly as soon as the payment is processed.
When you receive a bank transfer or payment that needs to be recorded along with a renewal or a join on behalf of a new or renewing member, a good rule of thumb may be to set the transaction date equal to the date that you received the payment. That way the correct date will be applied for calculating the term dates, and the correct join date will be populated into the Member since date, as well.
When you process a transaction for a contact who is not currently an active member, you must process a Join Now. If you receive funds for the purchase of a membership term for an individual who is not currently an active member (assuming this is not related to a lapsed board member), then you should process the transaction as a Join Now and not generate a renewal.
Adjusting or cancelling memberships is an important role in the member management process. From a membership invoice, there are two different reversal options:
- Reverse only
- Reverse and cancel membership
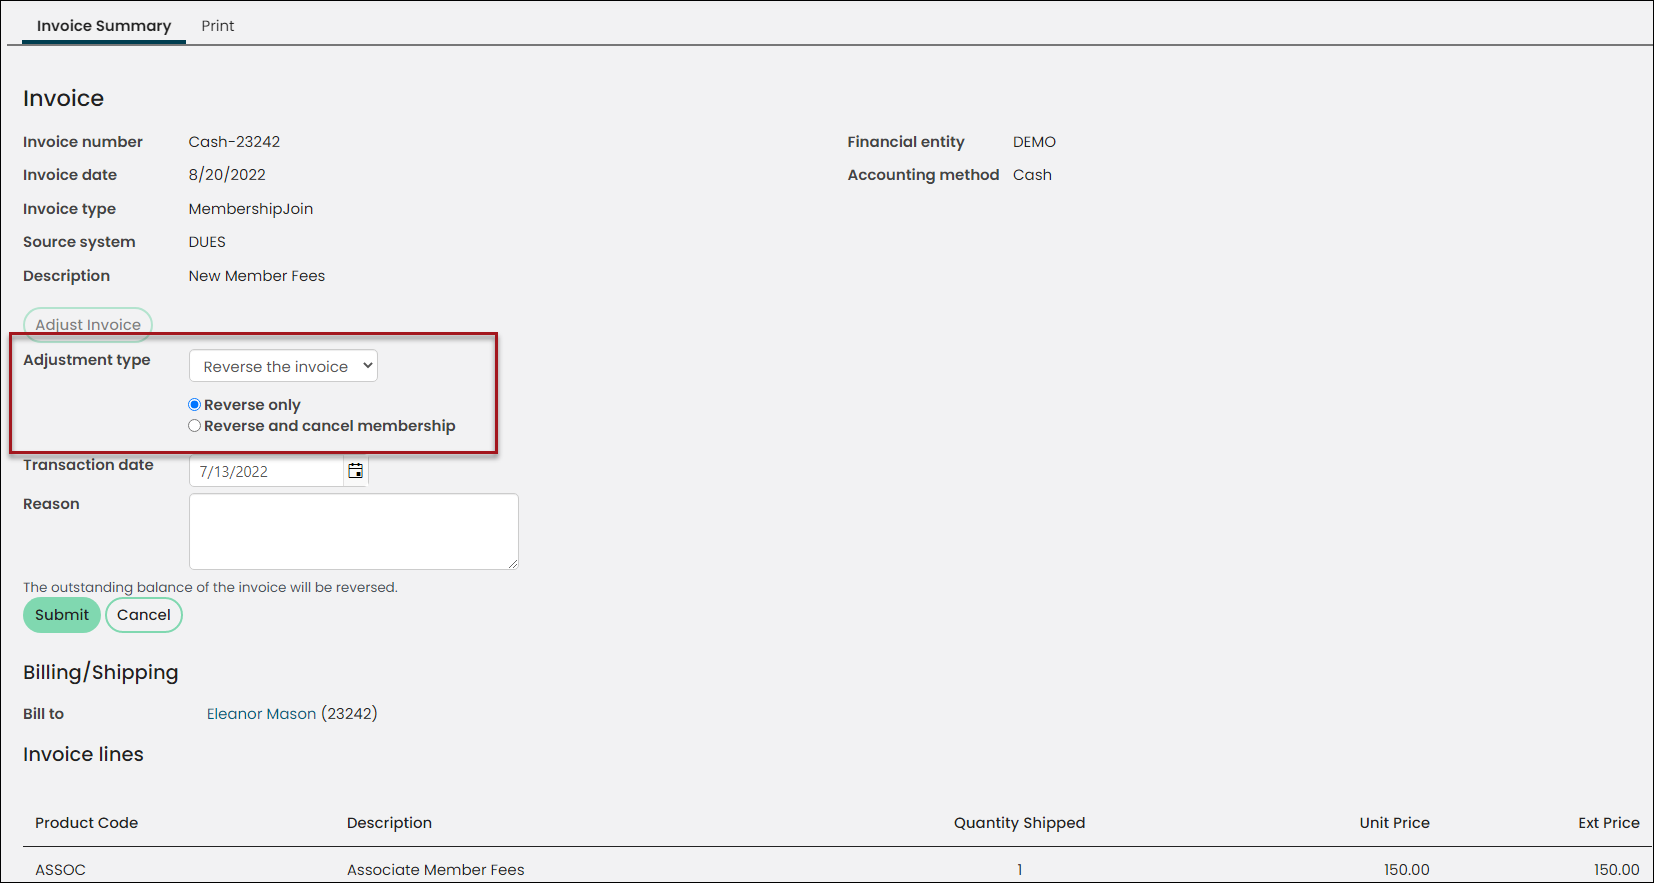
Reverse only versus Reverse and cancel membership
Review the differences between the Reverse only and Reverse and cancel membership options.
reverse only
The Reverse only option leaves the overall membership and subscriptions of a member in an Active state. Use this option when reversing invoices for members who will remain with an Active status, such as:
- Member is expired and not paying their renewal for this term, but they have the potential to become a member again in the future and will be billed through the Generate renewal process (rather than rejoining through the Join Now button).
- Reversing an invoice so that a corrected replacement invoice may be generated.
- Reversing duplicate invoices generated for the same member and membership term.
Note: If you want former or expired members to be able to rejoin through the Generate renewal process, then always choose Reverse only.
Reverse and cancel membership
The Reverse and cancel membership option leads to the inactivation of all subscriptions in addition to the cancellation of the membership. This option should only be used when reversing an unpaid invoice for a member who failed to renew their membership in time and there are no plans for them to ever rejoin again (i.e. the member is deceased or out of business).
See Correct membership renewal billings and Understanding the membership invoice reversal options.
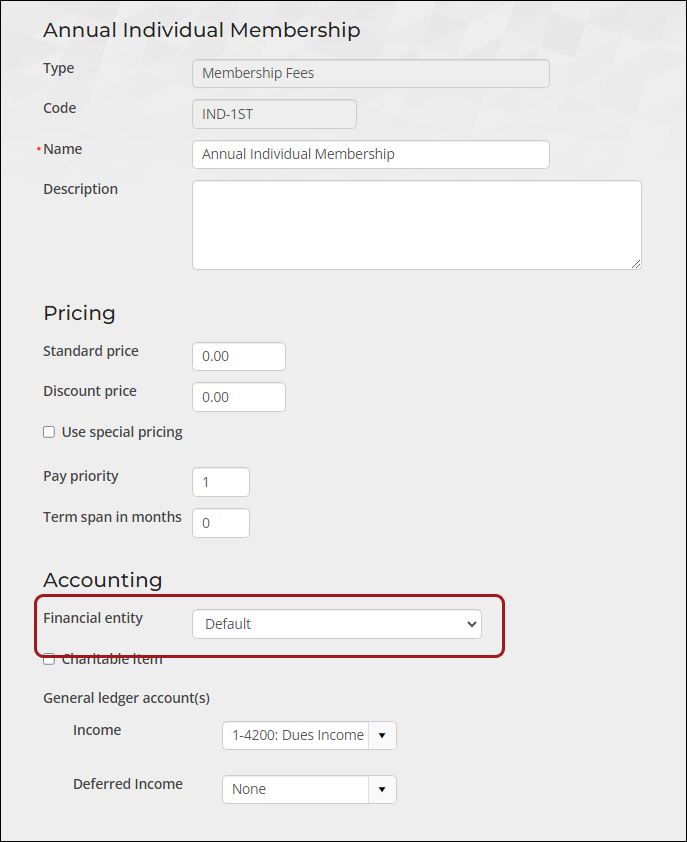
The financial entity directly or indirectly associated with the membership or subscription income and any accounts receivable amount is assigned through this hierarchy:
- Overall product definition: Specific financial entity assigned to the billing product in the Accounting section of the product definition. The financial entity is assigned here specifically or left unpopulated, which displays as Default.
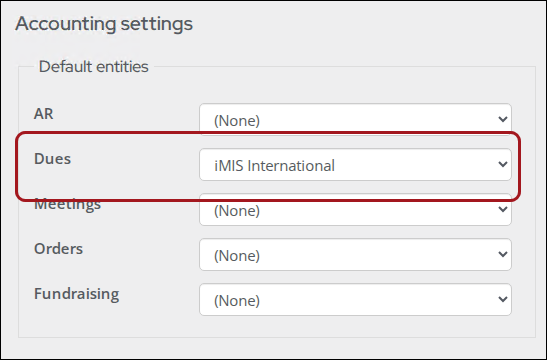
- Default entities - Dues: Specific financial entity assigned for Dues under the Default entities section at Settings > Finance > General. A financial entity is assigned here or left unpopulated.
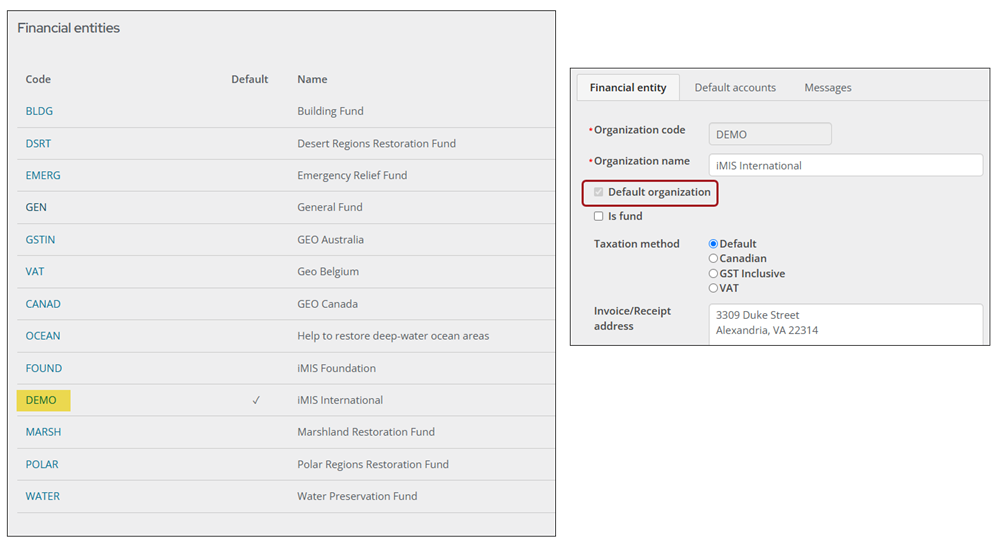
- Default financial entity: If a financial entity is not assigned to either of the above, then the overall system default entity is assigned as the financial entity associated with the billing product. This is the entity with Default organization enabled at Settings > Finance > Financial Entities.
A member is considered expired when their Paid through date is in the past. Managing expired members is important, because it ensures that only paying members are receiving benefits. It is important that the open invoices associated with expired members are reversed, so iMIS is up-to-date with active invoices that members intend to pay.
The out-of-the-box Membership tab on account pages contains many powerful options to successfully manage members. Take some time to review the available settings, so you know how to correct data, add new subscription rows, and cancel existing subscriptions.
Articles to review
When a billing category's Code is greater than five characters, the billing run may fail. Be sure to confirm all billing category codes are five characters or less.
Billing categories are populated through a General lookup table (Setting > General lookup tables). From the Table name drop-down, choose CATEGORY. See Creating billing categories.
Each billing product has a specific Type. These types are a maintained code in iMIS that allow you to classify billing products and should never be used as a billing product's code. The following should not be used in the Code field when creating a new billing product:
- DUES
- SEC
- SUB
- VOL
- MISC
- CHAPT
Additionally, ensure billing cycle names do not match any billing product Code. The billing cycle name identifies as a product code. Any billing cycle with the same name as a billing product Code must be recreated with a different name. Be sure to update content records that are using the billing cycle.
The following rules should be kept in mind when creating or editing customer types:
- Do not delete the out-of-the-box M and NM customer types. These customer types are required in many default pricing areas throughout iMIS, such as event pricing groups.
- Do not use CON as a customer type code.
When generating a renewal for a single member, always override the Effective date to the day after (or the first day of the month after) the member’s Paid through date. This is a good standard to follow and is especially critical to follow when you generate a special purpose renewal for a lapsed member.
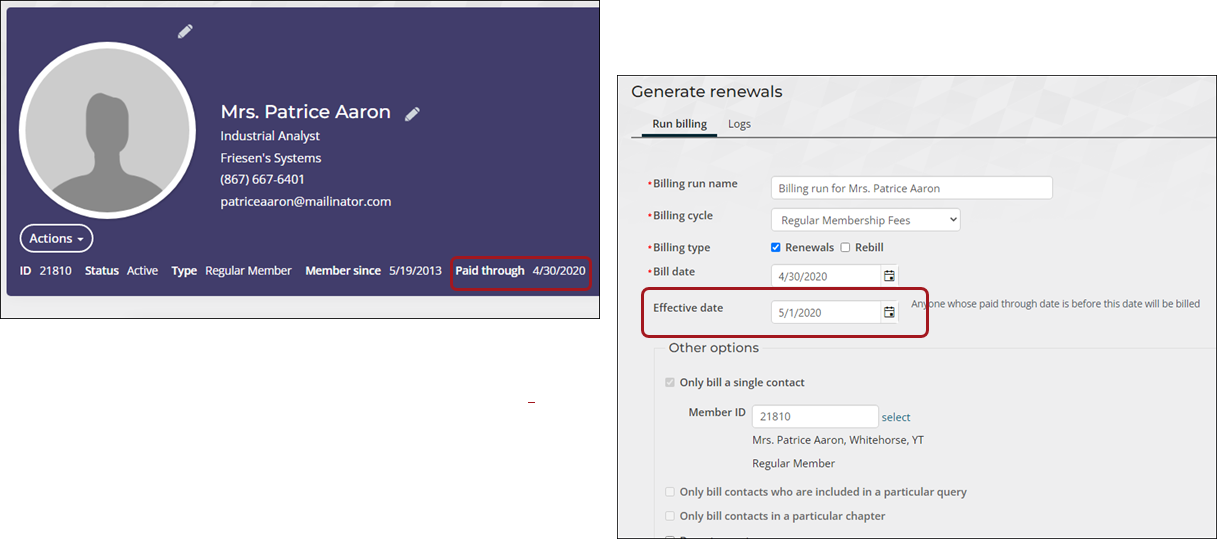
Otherwise, there is a possibility that there will be a gap between the end of the member’s last term and the beginning of their next term. This will especially happen if the number of months between the Paid through date and the Effective date is greater than the grace period.
Articles to review
From the Membership > Renewals > Generate renewals window, there is an option to manually assign the Billing runname. It is important that the Billing run name is something meaningful and easy to identify in the Logs. For example: Student Member Renewals – January 2025.
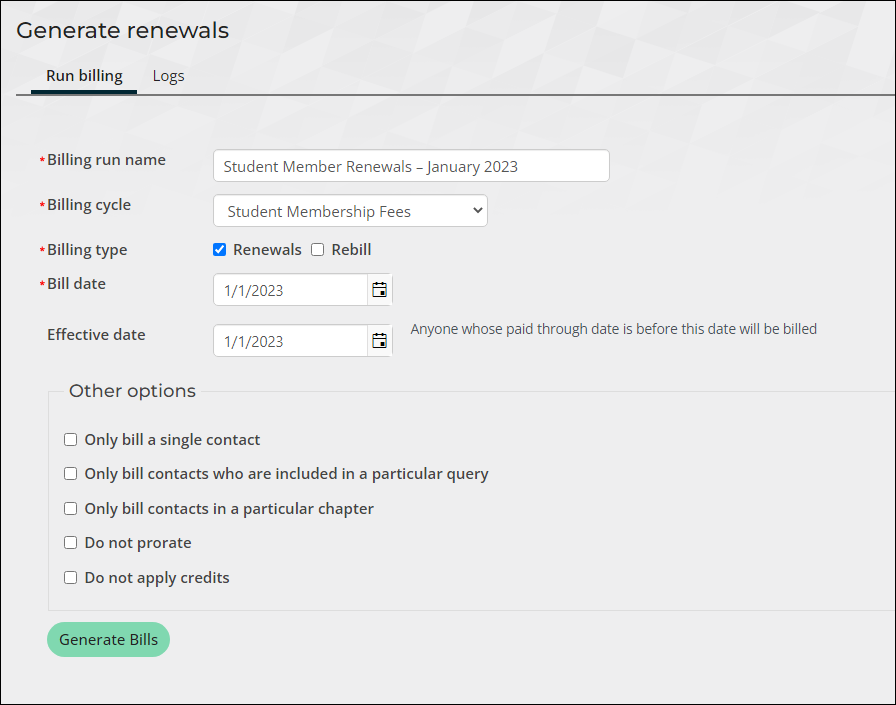
Make sure the Effective Date is one day greater than the maximum Paid Through (expiration) date for the members you wish to generate the renewals for.
The Effective date is one of the values that determines who is picked up in the mass billing run. If a member’s Paid through date (expiration date) is before the Effective date, the member is picked up in the billing run. The Effective date is also the first day of the new billing term for the members picked up for billing.
The billing log will detail the number of transactions generated. If it displays zero, that means the conditions were not in place for any member to be picked up for billing (see Billing troubleshooting).

If the transactions generated was greater than zero and the accounting method is set to Accrual, the logs will display an unposted batch.

The batch must be reviewed for accuracy. There are several reports available to assist staff users when reviewing the batch for accuracy.
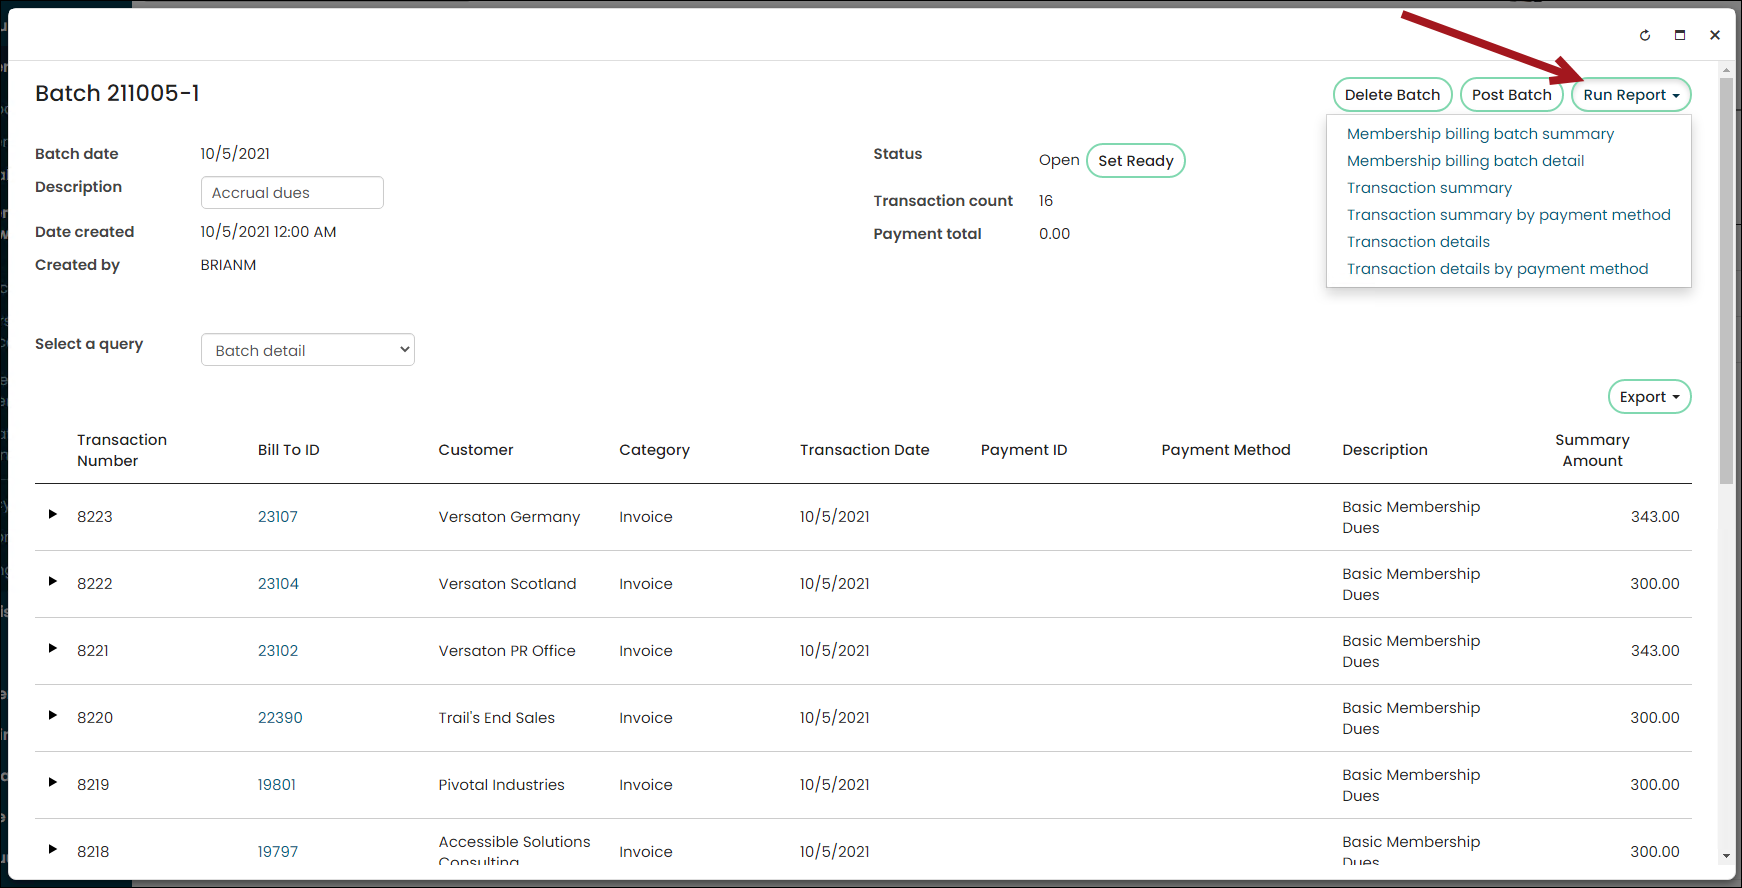
If you find something is incorrect, delete the batch and correct the problem. The billing will need to be generated again. If the batch is correct, post the batch. See Reviewing and printing accrual membership fee batches.
Send a welcome email to new members when they join for the first time. This process can be automated using the New member welcome email process automation task.
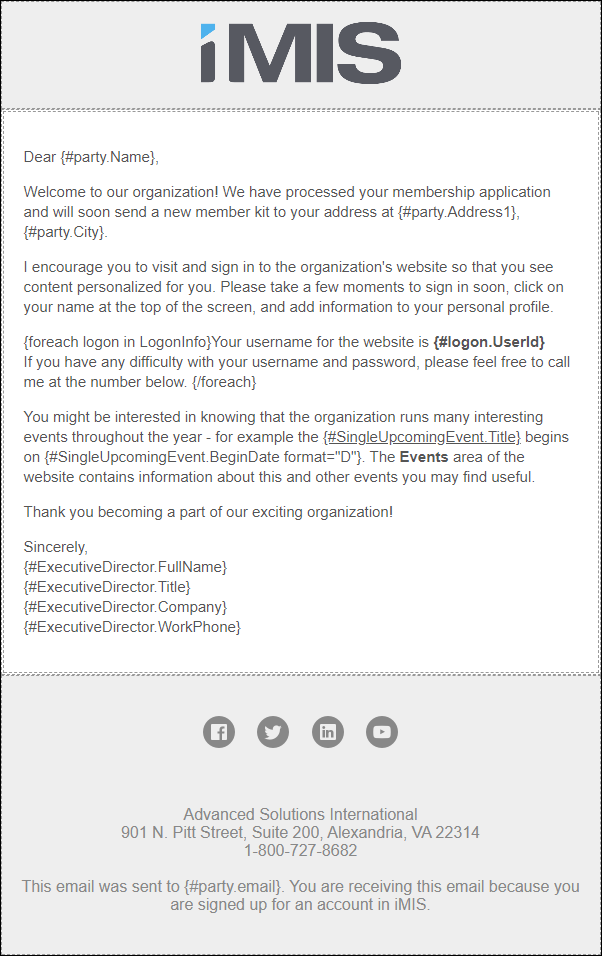
Do the following to ensure new members receive a customized welcome email automatically when they join:
- Create and save the communication template to send to new members.
- Go to RiSE > Process automation.
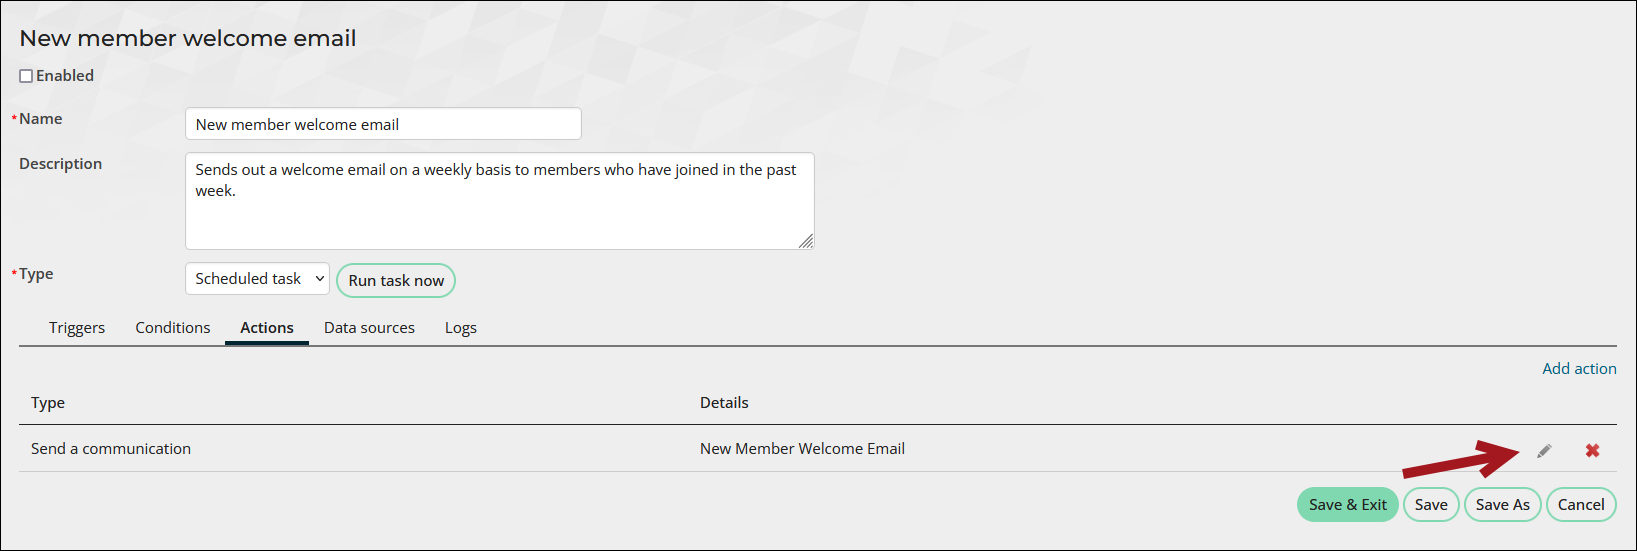
- Open the New member welcome email scheduled task.
- Click the Actions tab.
- Select the edit icon.
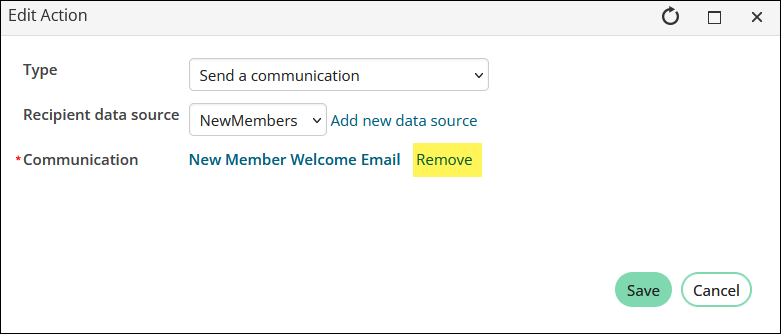
- From the Communication line, Remove the existing template, then Select the template you just created.
- Click Save.
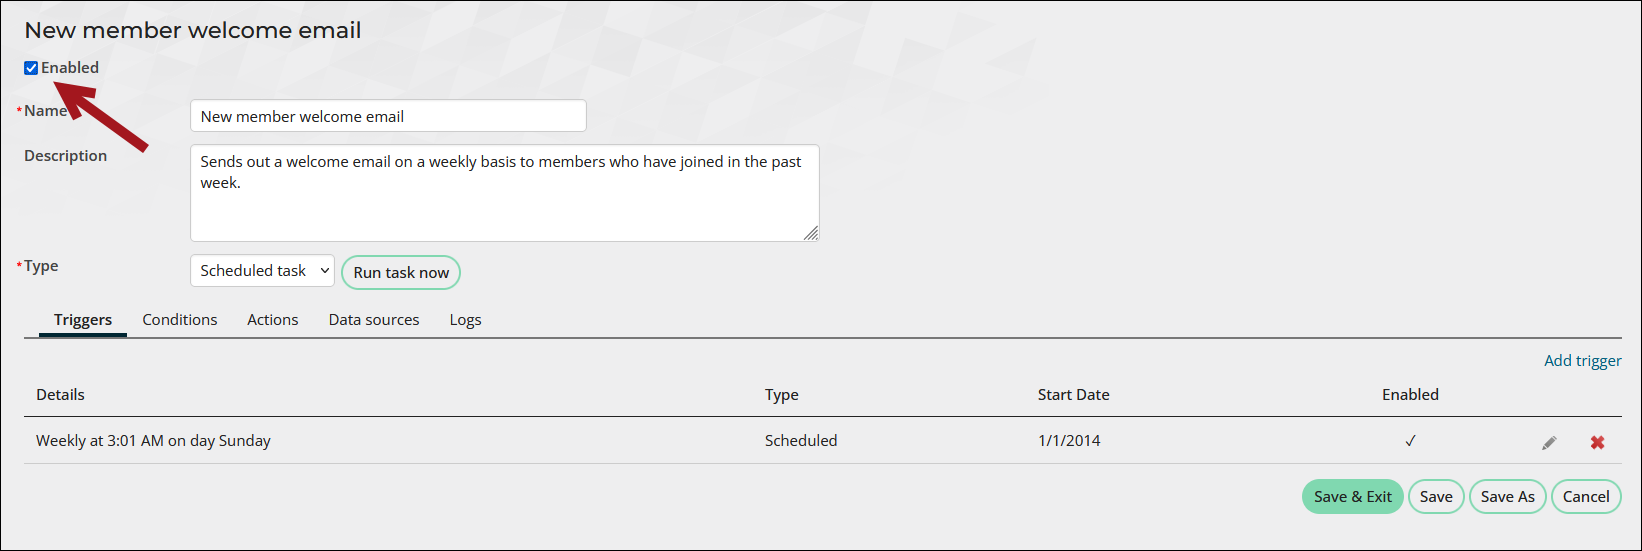
- Select the Enabled checkbox.
- Click Save & Exit. The customized new member welcome email will be sent weekly to all members who have joined in the past week.
Note: To quickly create a template, copy the New Member Welcome Email template (Marketing > Communication templates > Templates > Samples), and paste the template in the Templates folder. Make changes to the copied template, such as modifying and updating the sample ASI and iMIS information.
