Last updated on: January 27, 2026
List billing enables an organization to be directly billed for their members' membership fees. To pay membership fees, staff users or company administrators can select Renew Now from the organization profile page and are then taken to the list billing page. From here, they are able to adjust individual memberships that are included in the list billing.

In This Article
- Important notes: Before you begin
Configuring list billing
Generating list billing invoices
Adjusting list billing invoices
Processing list billing renewals
Important notes: Before you begin
Review the following notes before you begin with list billing and/or Bill to ID for renewals:
- List billing is not supported with AutoPay.
- To properly review list billing invoices, the InvoiceDetail shortcut must be set to the following: @/iCore/Finance/Report-Writer-Invoices/Invoice-Detail-Report-Writer. The SSRS version of the Invoice Detail report is not supported, so it is important that the Report Writer version is used instead.
Configuring list billing
List billing can be defined at the customer type level, or by setting a Bill to ID for renewals for individual members. When renewals are generated for a customer type, the member’s organization will be billed for the membership fees if Bill organization is selected in the customer type.
Understanding the Bill to ID for RENEWALS PROPERTY
The Bill to ID for renewals specifies the ID number of the third-party contact responsible for taking care of fees. The Bill to ID for renewals is only used with list billing and will be honored whether or not the customer type has Bill organization enabled.

When is list billing not billED to the primary organization?
There are a few instances in which the member’s primary organization will not be billed for the renewal membership fees:
- If the member does not have a primary organization, then the member will receive their own invoice.
- If the member has a different Bill to ID for renewals listed on their profile page that does not match their primary organization, then the primary organization will not be billed. Instead, the organization associated with the Bill to ID for renewals will be billed.
Configuring list billing on a customer type
Do the following to configure list billing for a specific customer type:
- Go to Settings > Contacts > Customer types.
- Select the customer type.
- Enable Bill organization.
- Click Save & Exit.
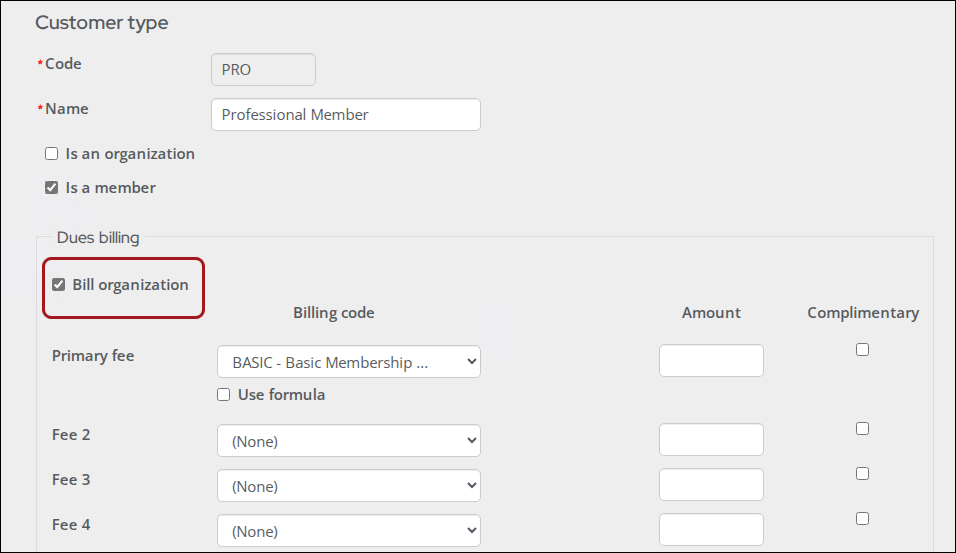
All members who renew under this customer type are eligible for list billing. The member must define their primary organization in order for the membership fees to be billed to the organization/company.
Generating list billing invoices
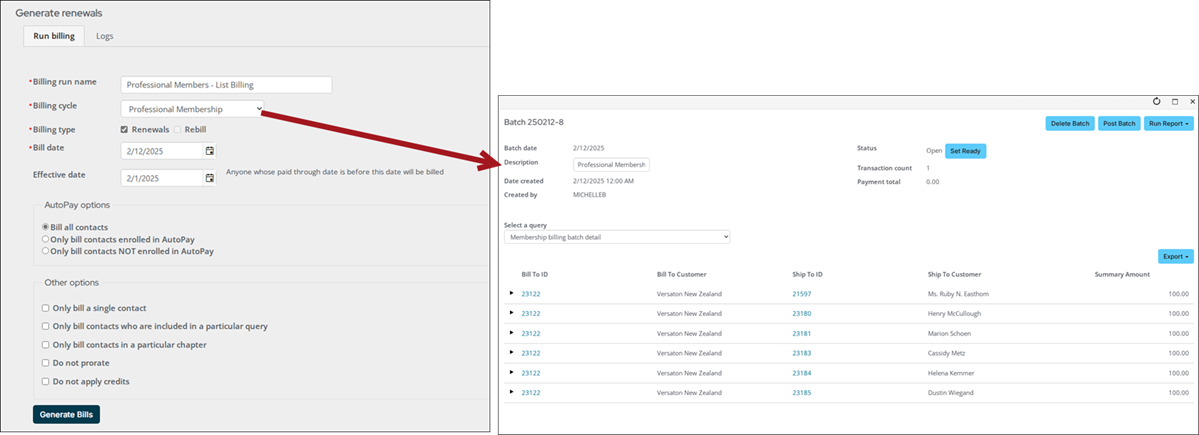
List billing invoices are generated from Membership > Renewals > Generate renewals, just like all other invoices. See Generating membership renewal fees for more information.
Adjusting list billing invoices
Adjustments include removing and adding membership line items, editing line-item prices (staff only), cancelling memberships, or electing to pay certain memberships later.
List bill items can be adjusted from two places:
- In conjunction with paying for the list bill - When selecting Renew Now from an organization profile page, a staff user is able to adjust individual members, and then proceed to checkout. See Processing list billing renewals for more information.
- Before paying for the list bill – Invoice line items can be adjusted or fully reversed (Finance > Invoices) prior to the checkout process.
Adjusting list billing invoices prior to checking out
To adjust invoice line items prior to checkout, do the following:
- Go to Finance > Invoices.
- Search for the invoice using the Bill to ID or enter the company name in the Bill to name contains field.
- Select the Invoice Number to open the invoice.
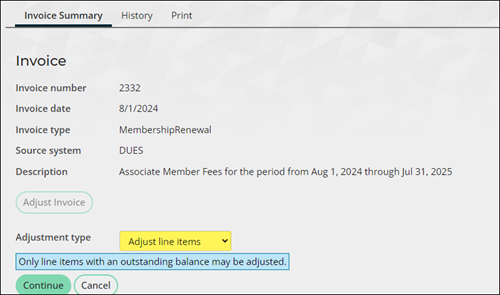
- Click Adjust Invoice.
- From the Adjustment type drop-down, select Adjust line items.
- Click Continue.
- Search for the member, then either Edit their membership, or Cancel the membership altogether:
- Select Edit to modify the amount of a line item. If the line item is a non-mandatory product, you are able to remove the item from the renewal. If the line item is a DUES or MISC item, it cannot be deselected from the renewal.
- When all the changes have been made, click Submit.
- If you would like to cancel the changes and go back to the invoice page, click Cancel.

- Select Cancel to cancel a member's renewal. Their renewed through date is cleared and their existing paid thru date remains, but is not moved forward.
- Select Edit to modify the amount of a line item. If the line item is a non-mandatory product, you are able to remove the item from the renewal. If the line item is a DUES or MISC item, it cannot be deselected from the renewal.

Note: Once an item is removed or its balance changed to zero, the item will no longer be available for future adjustment.
Any changes to the invoice will display in the Adjustments section at the bottom of the invoice. To review the details of the adjustments further, review the associated batch (Finance > Batches).
Note: Membership updates might not be reflected until the associated batch is posted.
Processing list billing renewals
As a staff user or company administrator, you are able to click Renew Now on a company’s profile page to pay membership fees that are billed to the company. The membership renewals must first be generated before the Renew Now button appears. See Generating membership renewal fees for more information.
Note: In order to edit membership items included in the list billing, the member's Customer type must be associated with at least one Billing cycle that has Use for itemized renewals enabled. If no valid billing cycle is found, then public users (including company administrators) will not see the Edit and Cancel links in the list billing renewal screen. See Setting up billing cycles for more information.
The Count and Amount of Members with balance due and the Total selected for payment is displayed for each Membership renewals list. The Count and Amount columns change based on modifications made to the renewal list. For example, if a member invoice is deselected – Pay later or Cancel – the Count and Amount will reflect this adjustment.
Do the following to process and make changes to list bill renewals:
- From the company profile page, click Renew Now.
- Select a Show option to filter the returned list of renewals:
- All – Displays all members eligible for renewal.
- Pay now – Displays the members who will be included in your list billing payment.
- Pay later – Displays the member renewals that Staff opted to pay later.
- Cancelled – Displays the members who have been cancelled from the current payment. These members will not have their memberships renewed at this time.
- Search members – Enter a full or partial name of a specific member, then click Find.
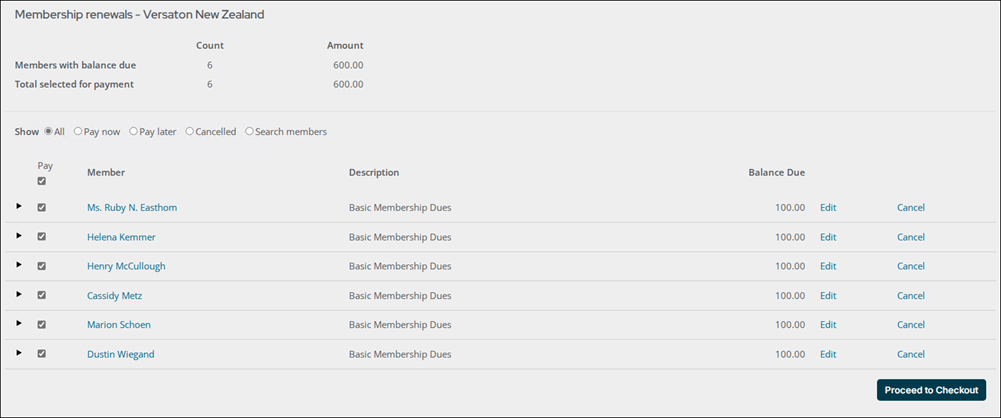
- Begin making any necessary modifications to the returned list of members. Any adjustments will appear in the Cart as separate line items before checking out:
- Deselect the Pay checkbox if you do not wish to pay membership renewal dues for a specific member at this time.
- Select the Edit link to modify the following items:
- (Staff only) The amount of a line item. If the line item is a nonmandatory product, you are able to delete the item from the renewal altogether. If the line item is a DUES or MISC item, it cannot be deselected from the renewal.
- (Staff only) The Term dates and Term length. See Overriding term dates on subscriptions for more information.
- Add or remove items that exist in the member's renewal. The only items available to be added are ones that already exist in the member's Customer type.
- Click Save and Return to save any edits and to return to the list billing page.
- Select Cancel to cancel a member's renewal. Upon checkout, the member's renewal will be cancelled. Their existing paid thru date remains but is not moved forward.
- Click Proceed to Checkout.
- Enter the Payment details, then click Submit Order.
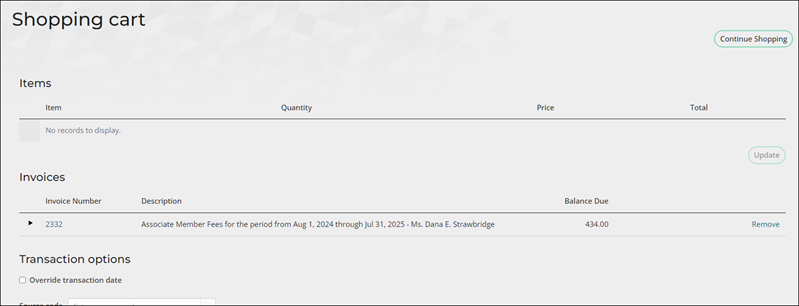
The cart displays with an Items and Invoices section. The Items section displays a line item per contact if there are adjustments to their renewal. The Invoices section displays a single renewal invoice for all items included in the list billing renewal.
Note: For accrual renewals, membership updates might not be reflected until the associated batch is posted.
The order confirmation email is sent to the email address associated with the organization. To review the order confirmation email, navigate to the organization profile page. From the Communications panel on the Participation tab, select the associated Order Confirmation email.