Last updated on: January 27, 2026
The process to change from one member type to another varies depending on whether or not the renewal invoice has already been generated, and if it has, if the invoice has already been paid or not.
In This Article
- Changing member types before renewals are generated
Changing member types after renewals are generated (not yet paid)
Changing member types after renewals are generated (already paid)
Changing member types before renewals are generated
Example: Amy is currently a Student Member, and she is graduating in May. Membership renewals are generated in July, so Amy informs your staff users that she can be upgraded to a Regular Member for the next membership term.
Do the following:
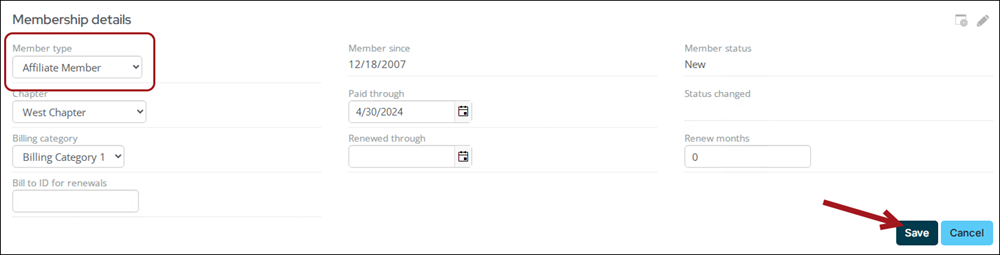
- Go to the member's account page.
- From the Overview tab, scroll down to the Membership details panel, then click the edit icon to update the Member type to Regular Member.
- Click Save. When mass renewals are generated for the Regular Members, Amy will be charged the Regular Member fees:
Changing member types after renewals are generated (not yet paid)
Example: Student member renewals were generated July 1, 2022. Kelly logs into the member portal to pay her fees, but notices she is still classified as a Student Member. She informs your staff users she graduated in May, so she should be upgraded to the Regular Member.
Do the following:
- Go to the member's account page.
- Click the Membership tab, then click Cancel Renewal.
- From the Cart, click Submit Order. The member’s Renewed through date is automatically cleared once the order is submitted.
- Go back to the member's account page and scroll down to the Membership details panel. Change the Member type to the new member type.
- Click Save.
- Generate the renewal for the member.
Changing member types after renewals are generated (already paid)
Example: Student member renewals were generated July 1, 2022. Anna logs into the member portal and pays her fees. After she pays her fees, she realizes she would like to be upgraded to a Regular Member instead of a Student Member.
Do the following:
- Go to Finance > Pay Central > Find payments.
- Locate the payment and select the Payment ID to open it.
- Click Adjust Payment.
- From the Adjustment type drop-down, select Unapply the payment.
- Click Submit. The member now has an open credit on their account. This will be used later when the new invoice is generated.
- Go to the member's account page and click Cancel Renewal.
- From the Cart, click Submit Order. The member’s Renewed through date is automatically cleared once the order is submitted.
- Go to the member's account page and scroll down to the Membership details panel. Update the following:
- Member type: Change the member type to the new member type.
- Paid through date: The Paid through date is automatically advanced when membership fees are paid. If the renewal is cancelled, the Paid through date is not automatically reversed to its previous value, so the date must be manually updated to its previous value. If the Paid through date is not updated, the renewal will not generate.
- Click Save.
- Generate the renewal for the member.
- Use the open credit balance from the previous invoice toward the new invoice. If there is a remaining balance, the member must login to pay the remaining balance.