Last updated on: January 27, 2026
Customer types define the categories to which you assign each customer record. These types designate the broad classification of customer categories. Assign a different type to each major customer class (Individual Member, Associate Member, Student Member, Hotel, and so forth) and at least one type to the Non-member category. These membership categories define the membership levels and amount charged for membership or dues and subscriptions.
Important! Do not delete or modify the M and NM customer types. These customer types are required for event pricing groups and various other default pricing areas throughout iMIS.

When you define a type through the table, be sure to indicate whether the type represents a customer and whether the type defines a company/entity or an individual. This helps iMIS differentiate between the different records.
Defining a customer type
Important! Do not delete or modify the M and NM customer types. These customer types are required for event pricing groups and various other default pricing areas throughout iMIS.
Do the following to define a customer type:
Note: Complete the following steps manually or use the Membership Configuration Wizard.
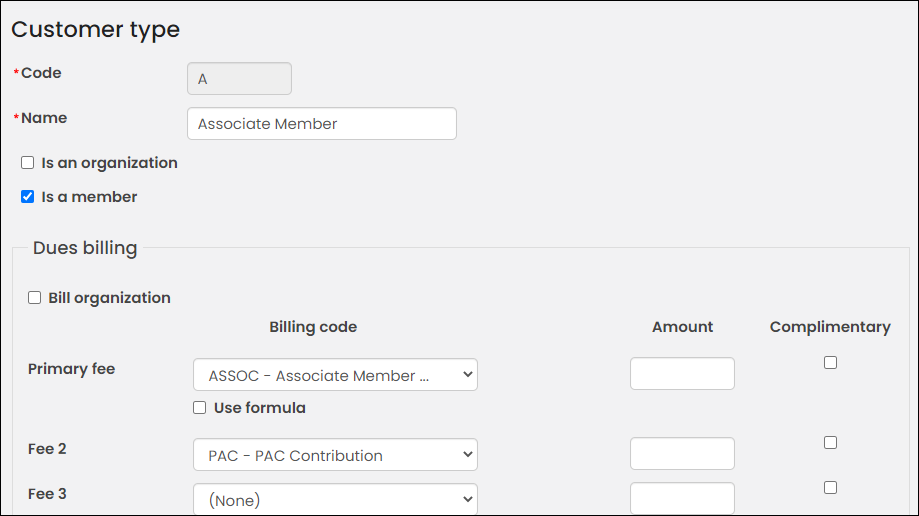
- Go to Settings > Contacts > Customer types.
- Select Add new customer type.
- Enter a meaningful, unique Code to represent a specific grouping. This field allows a maximum of five characters.
- In the Name field, enter the descriptive, full name of the customer type.
- (optional) If the customer type you are defining represents an organization or is a company, enable Is an organization. By enabling this option, iMIS will be able to maintain relationships between organizations and individuals for the purpose of maintaining current organization rosters and other related lists.
- (optional) If the customer type you are defining represents a member rather than a nonmember category, enable Is a member. By enabling this option, iMIS can distinguish between members and nonmembers regardless of how many types or categories you maintain. This provision lets you produce quick lists, reports, and counts by members or nonmembers.
- (optional) Configure the Dues billing (membership fees) options:
- Enable Bill organization if the parent is to receive the bill for customers of this customer type that are linked to it.
- Select the Billing codes. These entries dictate the membership fees that will be automatically billed for each customer type. Do not select optional products, or products that vary from customer-to-customer. All codes selected here display as membership fees for this customer type unless the line item bills at zero dollars, and the renewal notice option to suppress the printing of zero balance line items is active.
- From the Primary fee drop-down, select the primary membership fee product. The Primary fee product controls the advancing of the overall membership, and controls the advancing of the overall membership Paid Thru date.
- (optional) Select Use formula to allow the Primary fee of this customer type to be associated with multiple dues products. See Creating flexible membership terms for more information.
- Enter the fixed Amount if a rate applies to all or most customers of this type.
- Enable Complimentary if the dues product will be provided at no charge for this customer type.
Warning!
Unless all line items for the type are complimentary or are to be billed zero dollars, do not choose a Primary fee product that will have a zero price amount. When a product line item is billed and a zero amount has been set, the Paid Thru date will automatically advance. - Click Save & Exit. If you modified either the Is an organization or the Is a member options, confirm you want to change the company status and the membership status for all customers of this type.
Note: You cannot add a customer type Name that is the same as an existing customer type Code when adding a new customer type.
Note: If you modify either the Is an organization or the Is a member options for a customer type (excluding the M and NM customer types), and contacts currently exist for that customer type, the modification will change the company status and the membership status for all customers of this type. You will be asked to confirm you want to make this change when you click Save & Exit.