Last updated on: June 23, 2026
Go to Settings > Contacts > System options. The configuration options in this window allow you to set a variety of contact settings.
In This Article
Basic options
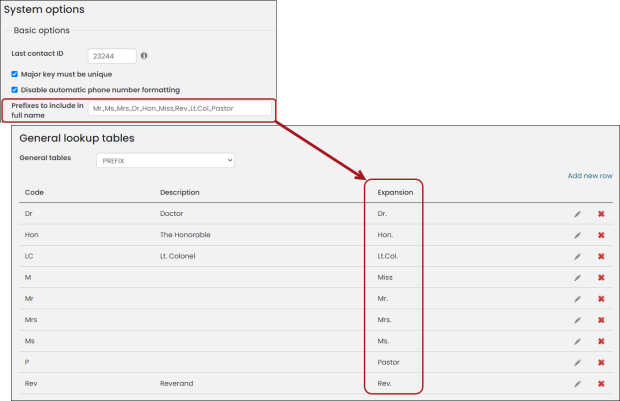
- The Last contact ID displays the most recent iMIS ID that was last assigned. If you need to have the first assigned ID be other than one, you can enter a value of one less than what you want the first number to be. You can only enter a value between 0 and 2147483647; otherwise, an error will occur. If this field is left blank, the default value will be set to 0.
- When Major key must be unique is enabled, the Major key field is validated for uniqueness during data entry. The Major key field can be populated, for example, when importing contacts from a different database using the Workbook Converter. This can be an old contact ID, or something similar. When Major key must be unique is enabled, iMIS checks to make sure that each value in the Major key field is unique. The Major key field can be found in the Membership panel on membership profile pages.
- Enable Disable automatic phone number formatting when you do not want phone numbers to automatically conform to the U.S. format of (xxx) xxx-xxxx. When this option is selected, no formatting is applied, and the phone number is displayed as typed.
- The Prefix to include in full name field allows you to specify which prefixes from the PREFIX general lookup table are included in Name.FULL_NAME. The prefixes you enter in this field must match either the Code or the Expansion for the corresponding prefix entered in the PREFIX general lookup table.
Note: iMIS uses the Expansion values. If there are no Expansion values, iMIS uses the Code.
When entering a list of prefixes, values must be separated by commas.
Note: If the Prefix to include in full name field does not contain a prefix listed in the PREFIX general lookup table, users will see the prefix in a Prefix drop-down, but will not be able to use and apply the prefix.
Chapters
The following configuration options apply to chapters created from Membership > Chapters:
- Group 1 label, Group 2 label, Group 3 label - The group labels appear when creating or editing a chapter, and allow you to define additional information about the chapter.
- Group 1 label - Use this field to specify the Region a chapter is in. For example, a country or region such as Western or Central.
- Group 2 label - Use this field to specify the Division a chapter is in, and to further define the information entered in the Group 1 label. For example, states.
- Group 3 label - Use this field to specify the Area a chapter is in, and to further define the information entered in the Group 2 label. For example, counties and cities.
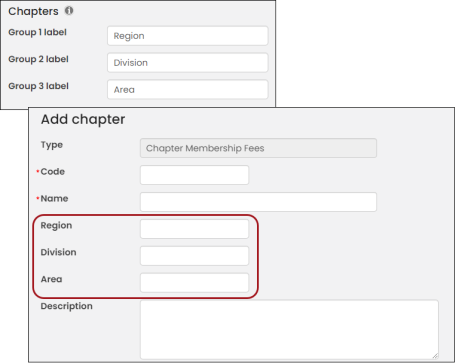
The content you put in these fields will appear as their own field labels when creating or editing a chapter. The following are suggestions for the group labels:
Address purpose
The following fields are found in the Address purpose section of the System options page:
- Main address label - The main address. Specifies the label for the main address block of the customer, such as Main Address.
- Second address label - Use this field to define a label for the second address, such as Home Address or Work Address.
- Third address label - Use this field to define a label for the third address, such as PO Box Address or School Address.
- Automatically set chapter based on zip code (US only) - Enable this checkbox to allow the system to automatically update the chapter when adding or editing an address.
- Address to use for chapter selection – Select the address purpose that the system will use to associate the zip code with the chapter.
- Edit zip codes – Click this link to open the Zip codes window. From the Zip codes window, you can do the following:
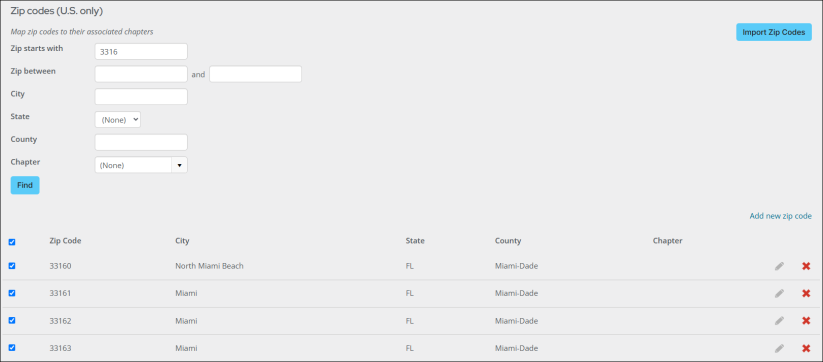
- Filter zip code results – Use the provided parameters to narrow search results.
- Add a new zip code – Use the Add new zip code link to enter the zip code and other information, including the Chapter. Save to add to the list of available zip codes.
- Set Chapter - Select one or more of the Zip codes results and assign to a chapter with the Set Chapter button.
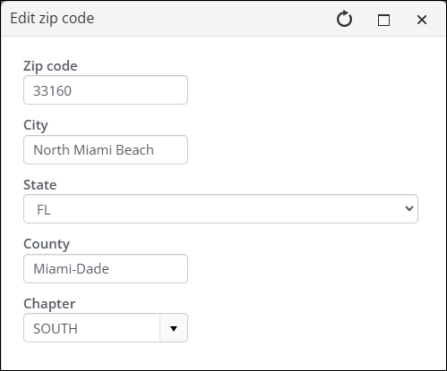
Choose all the available zip code results by selecting the first checkbox at the top. You can also assign a chapter by editing a zip code entry and selected a chapter from the Chapter drop-down. - Edit and delete zip codes - Select a zip code entry and edit or delete it.
- Edit zip codes – Click this link to open the Zip codes window. From the Zip codes window, you can do the following:
- Automatically set congressional district based on address (US only) -When enabled, the Address Verification Service associates a congressional district based on the contact's address, and the congressional district property is surfaced in business objects. When using business addresses, make sure to include a suite number if applicable for the US congress field to populate. The CsContact.US Congress property can be manually updated through Panel Editor, but if the contact's address is modified, the US Congress field is overwritten when the address is updated. The county field is also automatically populated when this option is enabled.
- Address to use for congress - The address that is used to determine a contact's congressional district.
Note: When a contact is added, and the Automatically set chapter based on zip code (US only) setting is enabled, the contact's chapter will be automatically assigned. However, when editing an existing contact's address, the system will send a prompt to confirm the chapter update.
Note: After this option is enabled, newly entered or updated addresses are matched with the appropriate congressional district. Existing addresses must be resaved in order for the congressional district field to be populated.
Synchronize primary phone numbers and email
Note: When adding phone and email fields to a custom panel, you must use the CsContact business object for synchronization to occur between the panel and the mapped address purpose.
- Work phone - Select the address purpose whose phone number field you want to map to the Work phone field on the Personal details panel.
- Home phone - Select the address purpose whose phone number field you want to map to the Home phone field on the Personal details panel.
- Fax number - Select the address purpose whose fax number field you want to map to the Fax field on the Personal details panel.
- Email address - Select the address purpose whose email address field you want to map to the Email field on the Personal details panel.
- Notes:
- When creating a new account, regardless of the Email address setting you selected in the Synchronize primary phone numbers and email field, the email address used to create the account will be saved to both the selected address type record and the Personal details panel.
- Depending on how OIDC is configured, the Email address field is overruled by external directory synchronization. See Implementing OpenID Connect for more information.
- Notes:
Note: The Work and Home phone flow cannot be mapped to the same address purpose.