Last updated on: January 27, 2026
Note: OpenID Connect is a licensed feature. For more information, contact your AiSP or CPIL.
With iMIS OpenID Connect (OIDC), users can use their company’s external directory to log in to iMIS. Entra ID and Okta are currently the only supported external directories. When enabled, users are required to use the configured external directory to authenticate and log in to iMIS and cannot use their iMIS username and password to gain access. Depending on your OIDC configuration, this feature is available to System Administrators, regular Staff users, and public users.
Example: Your organization has specific credentials assigned to each employee to gain access to various systems. With the configuration of OpenID Connect in iMIS, those same credentials can be used to log in to iMIS without requiring a separate iMIS username and password.
In This Article
- Understanding how OIDC works
Important information
Entra ID setup
Okta setup
Configuring OIDC in iMIS
Reviewing the OIDC logs
Troubleshooting
Understanding how OIDC works
When OIDC is enabled or in test mode, users are presented with a sign-in screen that only displays an email field.
Figure 1: Staff site view
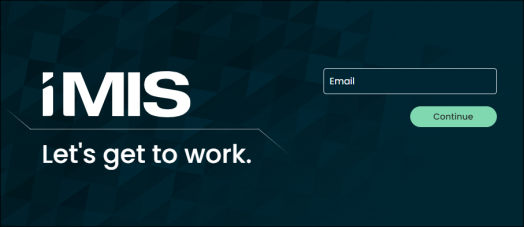
Figure 2: Public site view

When they enter their email, they are redirected to the OIDC provider to enter their remaining credentials. The external directory verifies their credentials and redirects the user back to iMIS after they have successfully logged in. If the user did not have an iMIS account, one is created for them at this time and the following information is added to iMIS from the OIDC provider:
- First and Last name
- Email address: The email address is also used as their username
Figure 3: System administrator view
System administrators have the option to use their iMIS credentials or OIDC credentials. Staff and public users only have the option to their OIDC credentials.

Important information
Review the following before you begin configuring OIDC:
- To avoid disruption for staff users, it is recommended to test and configure OIDC during non-business hours.
- Depending on how OIDC is configured, the Email address field in the Synchronize primary phone numbers and email section (Settings > Contacts > System options) is overruled by the email address used by the external directory:
- Staff users only: OIDC syncs staff user email addresses from the external directory, while public user email addresses continue to sync according to the Email address setting.
- Staff and public users: All email addresses synchronization comes from the external directory.
- OIDC cannot be used with multi-factor authentication (MFA). If OIDC is enabled or in test mode, then MFA is automatically disabled. Similarly, if MFA is enabled, then OIDC is disabled.
- When OIDC is enabled, staff users who are not system administrators are unable to access the iMIS Staff site through the API, which means they cannot request a new token from the token endpoint using the password grant_type. System administrators can still receive their token with a password. External SSO applications can still receive staff users’ token and use the refresh_token grant type.
- Before you begin, ensure all iMIS staff and public users are properly configured with a first and last name in either Entra ID or Okta. After OIDC is enabled, the users’ first and last names and email in iMIS are synchronized with the external directory. If the External ID Claim is set up, then the user’s email in iMIS will also be synchronized with the external directory; therefore, the users’ first and last names and email can no longer be updated in iMIS. The synchronization will happen the next time the user logs into iMIS through OIDC
- OIDC for public user authentication supports only a single external provider in an all-or-nothing configuration. This means all public users must be authenticated through the chosen external directory, with no option for mixed authentication methods.
- When using OIDC authentication, users sign in to iMIS through their organization’s external identity provider (IdP), such as Microsoft Entra ID (Azure AD) or Okta. The authentication session is managed by the IdP, while iMIS maintains its own session for the user’s interaction with iMIS. iMIS does not implement OpenID Connect back-channel logout. Logging out of iMIS ends the user’s iMIS session only. The user remains signed in to their external identity provider and any other connected services (such as Teams or Outlook) that rely on that same login session.
Note: MFA is still recommended for the external directory sign in.
Entra ID setup
Review and complete the following sections before configuring the iMIS OIDC settings.
Ensure each staff user has a first and last name in Entra ID
Each user must have a first and last name in the external directory. This is the name that is synchronized with iMIS after OIDC is enabled. The user’s first and last names cannot be updated in iMIS after OIDC is enabled, since the name is being pulled from the external directory.
Before you begin, ensure all iMIS staff users are properly configured with a first and last name in the Entra ID.
(New apps only) Add a platform
If you created a new app registration, you must populate the Redirect URI:
- From the navigation, select App registrations then choose the application.
- From the navigation, select Authentication.
- Click Add a platform.
- Click Web.
- Redirect URIs - Enter the iMIS website (e.g. https://example.imiscloud.com/staff).
- From-channel logout URL - Enter the iMIS website (e.g. https://example.imiscloud.com/staff).
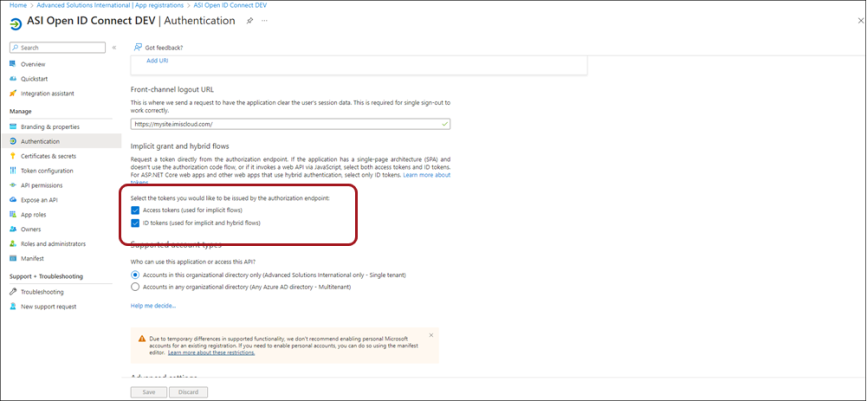
- Enable Access tokens (used for implicit flows) and ID tokens (used for implicit flows and hybrid flows).
- Click Configure.
(Existing Apps only) Ensure Access Tokens & ID tokens are enabled for the application
If you are using an existing app registration and did not create a new one, ensure the application has Access tokens and ID tokens enabled:
- From the navigation, select App registrations then choose the application.
- From the navigation, select Authentication.
- Scroll down to the Implicit grant and hybrid flows section.
- Enable Access tokens (used for implicit flows) and ID tokens (used for implicit flows and hybrid flows).
- Click Save.
Note: These options will not appear if there is no platform defined. See Add a platform.
Create a new role & assign the role to users
The iMIS setup requires a Claim value, which is a Role defined in Entra ID. You can use any role, but ASI recommends creating a new role for the iMIS OIDC connection.
Create the app role
Do the following to create the role:
- From the navigation, select App registrations then choose the application.
- From the navigation, select App roles.
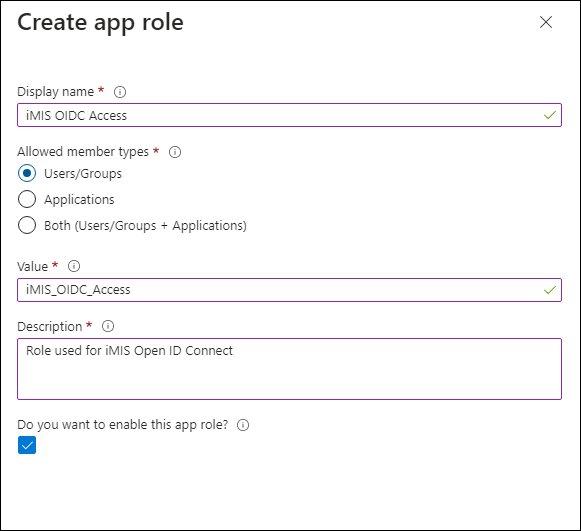
- Click Create app role:
- Display name - iMIS OIDC Access
- Allowed member types - Users/Groups
- Value - iMIS_OIDC_Access
- Description - Role used for iMIS Open ID Connect
- Do you want to enable this app role - Checked
- Click Apply.
Assigning the role
Do the following to assign the role to the required users or groups:
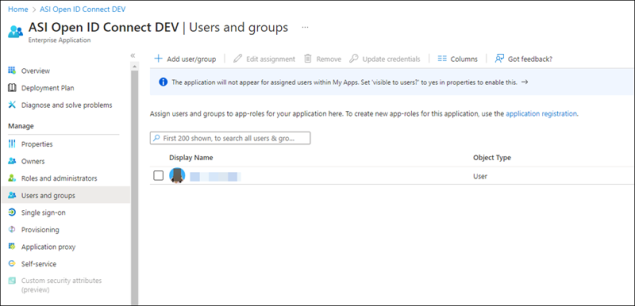
- From the navigation, select Enterprise applications then choose the application.
- Select Users and groups.
- Select the checkbox next to the users and/or groups.
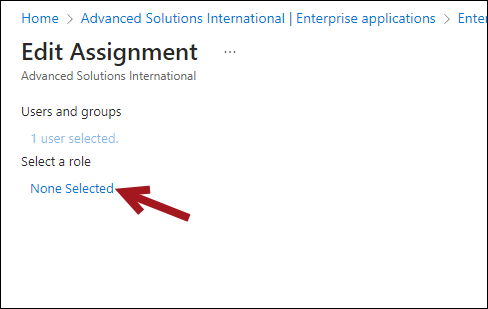
- Click Edit assignment.
- Under Select a role, click None Selected.
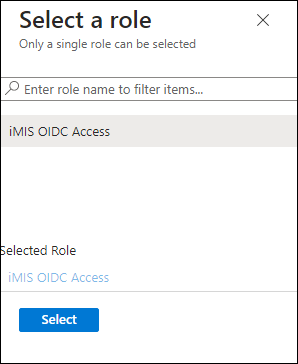
- Choose the iMIS OIDC Access role, then click Select.
- Click Assign.
Tip: Make sure you are working in the Enterprise applications navigation and not the App registrations navigation.
Adding the Required Claims
Do the following to add the required claims:
- From the navigation, select App registrations then choose the application.
- From the navigation, select Token configuration.
- Click Add optional claim.
- From the Token type, choose ID.
- Enable the required tokens:
- family_name
- given_name
- login_hint(only required if Set login hint is enabled in the iMIS OIDC settings)
- upn (only required if Set login hint is enabled in the iMIS OIDC settings)
- Click Add.
Note: Be sure to create claims for System Administrators, regular Staff users, and public users. For more information, see Configure optional claims.
Updating the API permissions
Do the following to add the required API permissions:
- From the navigation, select App registrations then choose the application.
- From the navigation, select API permissions.
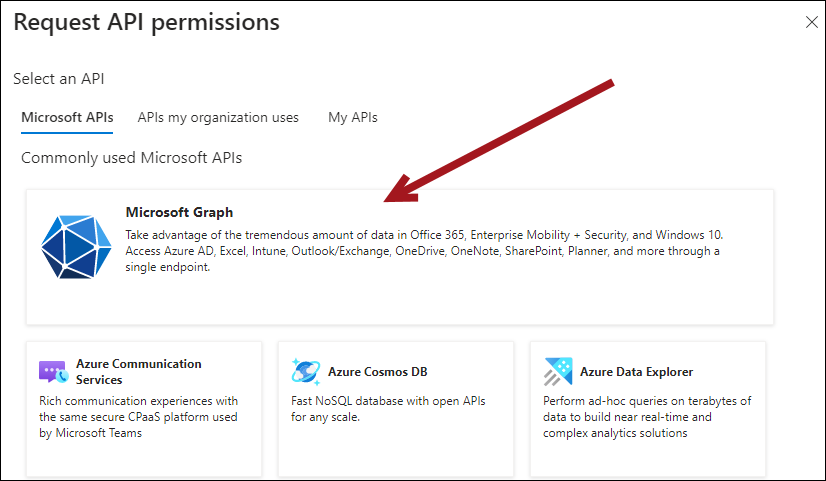
- Click Add a permission.
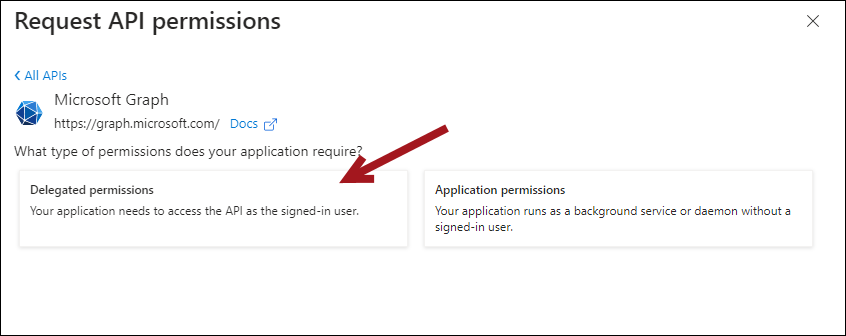
- Click Microsoft Graph.
- Click Delegated permissions.
- Enable the following:
- openid
- profile
- User.Read.
- Click Add permissions.
Obtaining the Client ID and Tenant
iMIS requires a Client ID and Tenant from Entra ID. Do the following to obtain these values from Entra ID:
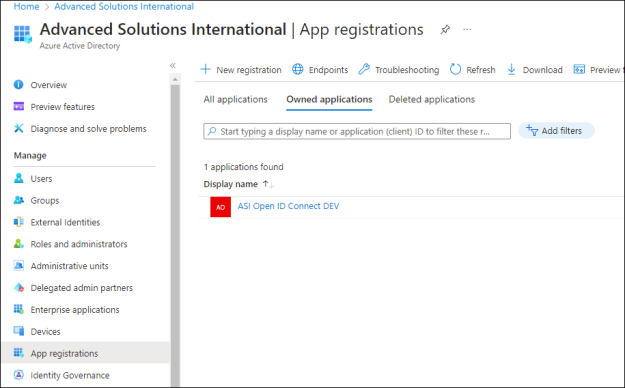
- From the navigation, select App registrations then choose the application.
- From Overview, copy the following:
- Application (client) ID - The Client ID required for the iMIS configuration.
- Directory (tenant) ID - The Tenant required for the iMIS configuration.

- Paste the values in iMIS or in a safe location where you will have access to them later when you configure iMIS.
Okta setup
Review and complete the following sections before configuring the iMIS OIDC settings.
Creating an Okta application
In the Okta admin, create an application by doing the following:
- Navigate to the Okta admin console.
- Click the Admin button to navigate to the developer portal.
- From the navigation, go to Applications > Applications.
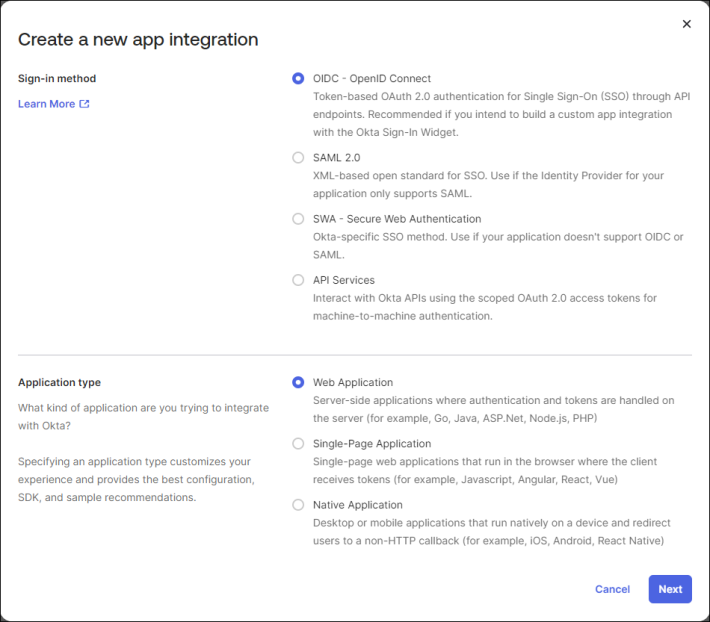
- Click Create App Integration.
- Select OIDC - OpenID Connect, and then select Web Application.
- Click Next.
- Enter an App Integration Name. Optionally, upload a Logo.
- Enable the following settings:
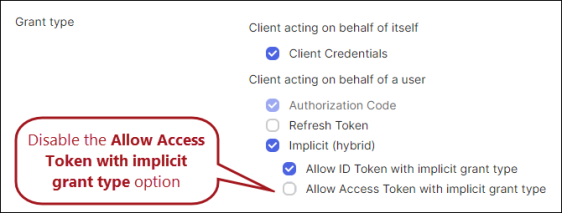
- Grant type:
- Client acting on behalf of itself - Client Credentials
- Client acting on behalf of a user - Implicit (hybrid)
Note: The Authorization Code setting is enabled by default.

- Sign-in redirect URLS:
- Enter the URL to your iMIS sign-in page, for example https://example/sign-in.org/
- Grant type:
- From the Assignments section, enable Skip group assignment for now.
- Click Save. Once the app has been created, disable the Allow Access Token with implicit grant type option in the Grant type area of the General tab.
- Click Save.

Adding users
Each staff user must have a first and last name in the external directory.
Note: Review existing Staff users accounts to ensure they have first and last name fields populated.
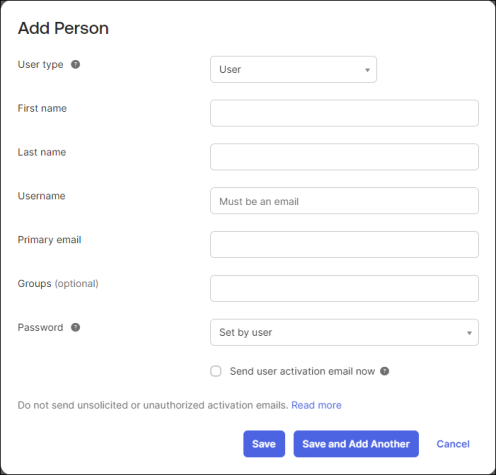
To add users to your directory, do the following:
- From the navigation, go to Directory > People.
- Click Add person.
- Enter the required information.
- Click Save or Save and Add Another to continue adding users.
Adding groups
Groups allow you to differentiate between System administrators (SysAdmins), regular Staff users, and public users. To add a group and assign users, do the following:
- From the navigation, go to Directory > Groups.
- Click Add Group.
- Enter a Name and optional Description, then click Save.
- Click the name link, then click Assign people.
- Add your staff users by clicking the plus (+) icon next to their name.
- Continue adding users, then click Done when you are finished.
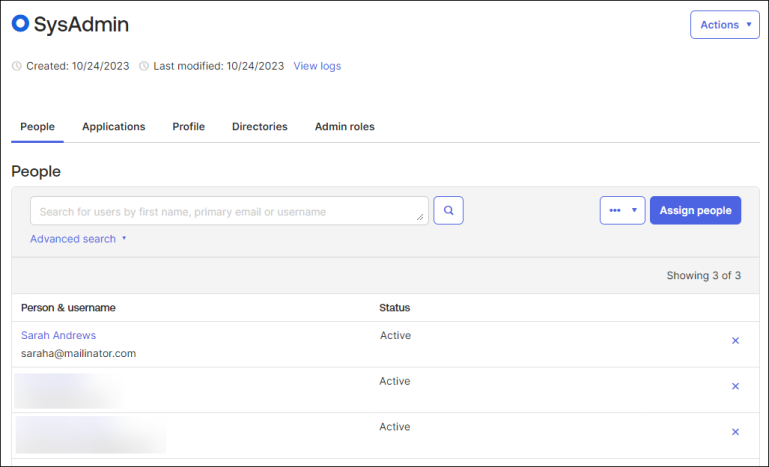
Important! Be sure to add separate groups for System Administrators, regular Staff users, and public users.
Adding claims
Claims allow you to add specific identifiers, such as an email address, to access tokens.
Important! In order to use OIDC for both staff and public users, you must have claims for each group.
To add a claim for System administrators, do the following:
- From the developer portal, go to Security > API.
- Click the name link of your Authorization server.
- Go to the Claims tab.
- Click Add Claim.
- Enter a unique name.
- Select ID Token from the Include in token type drop-down.
- Select Groups from the Value type drop-down.
- From the Filter drop-down, select Equals, and enter SysAdmin.
- Click Create.
- Repeat steps 1-5.
- Select Access Token from the Include in token type drop-down.
- Repeat steps 7-9.
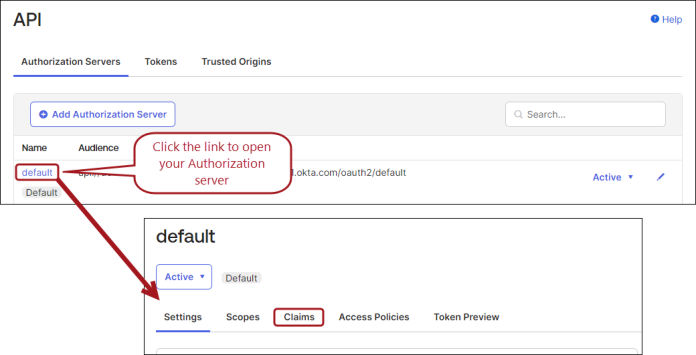
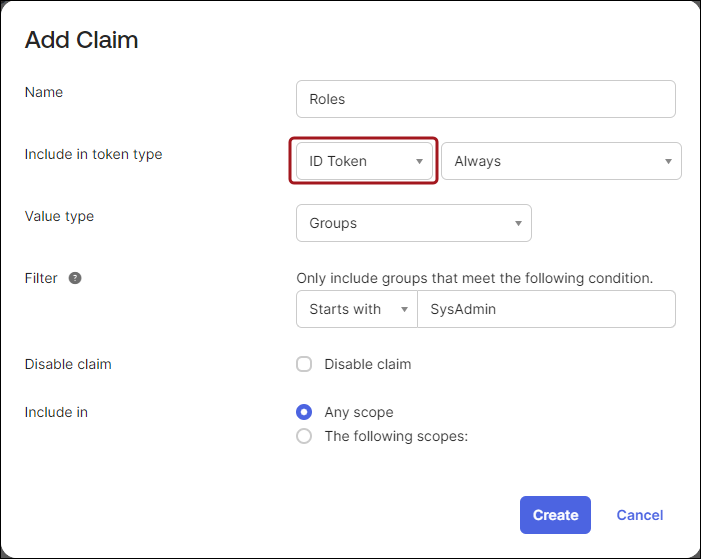
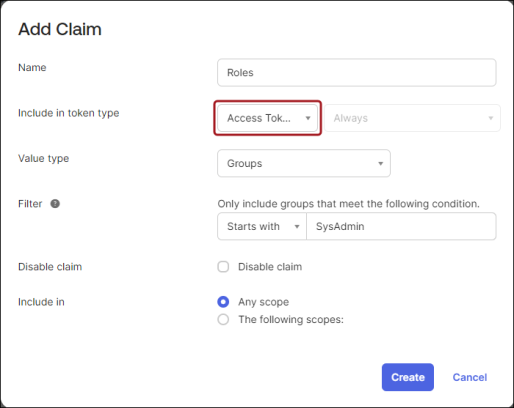
To add additional claims for staff and public users, repeat the previous steps, and filter on the corresponding group. Be sure to click Create when you finish configuring each claim. For more information regarding claims, see Add custom claims.
Assigning users to the application
You must add your users to the application for access to be granted to each individual user:
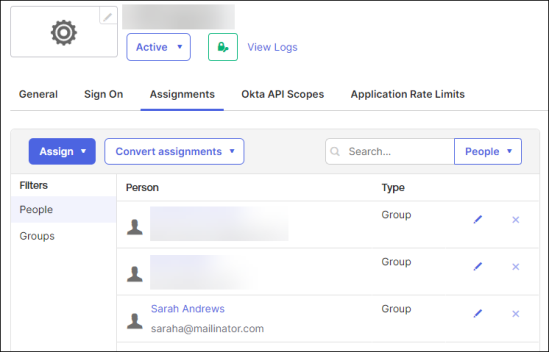
- From your application, go to the Assignments tab.
- From the Assign drop-down, click Assign to Groups.
- Add your Staff users and SysAdmin groups. Alternatively, you can assign individual users using the People button.
Testing the token sent to iMIS
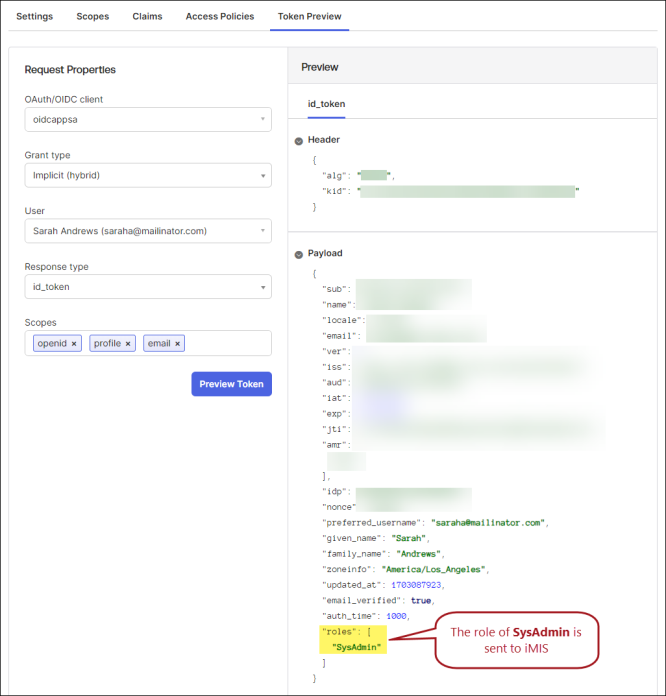
The Okta developer portal allows you to preview the token that is sent to iMIS to ensure that the roles are being sent correctly. For example, to preview the SysAdmin token, do the folowing:
- From the developer portal, go to Security > API.
- Click the name link of your Authorization server.
- Go to the Token Preview tab.
- Enter your OAuth/OIDC client name. This is the name of your application.
- Select Implicit (hybrid) from the Grant type drop-down.
- Enter a User.
- Select id_token from the Response type drop-down.
- From the Scopes field, enter the following:
- openid
- profile
- Click Preview Token.
Configuring OIDC in iMIS
iMIS prerequisites
Before configuring OIDC, confirm the following are configured in iMIS:
- Ensure the OpenID Connect license appears in Settings > About iMIS. If you do not see the license, contact ASI Technical Support.
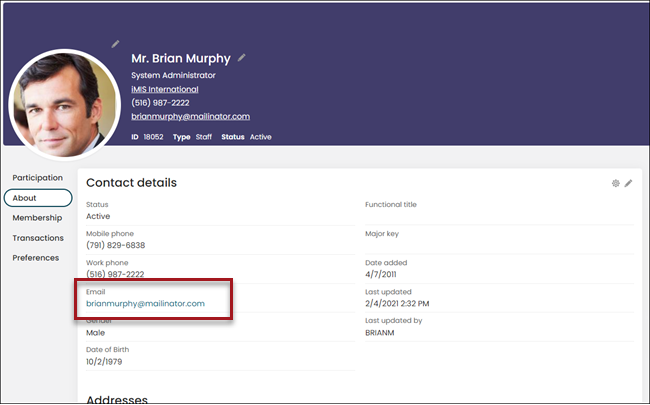
- OIDC does not update the staff user’s iMIS username and instead uses their email address. Verify staff users have their OIDC email address on their iMIS account page.
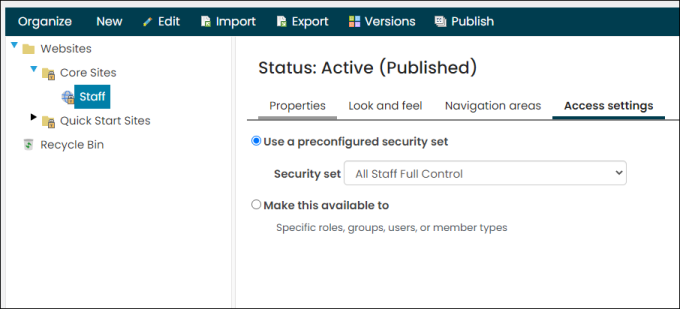
- To use the website with OIDC, the site Access settings must be set to All Staff Full Control.
Configuring OIDC
You must be a system administrator to configure OIDC.
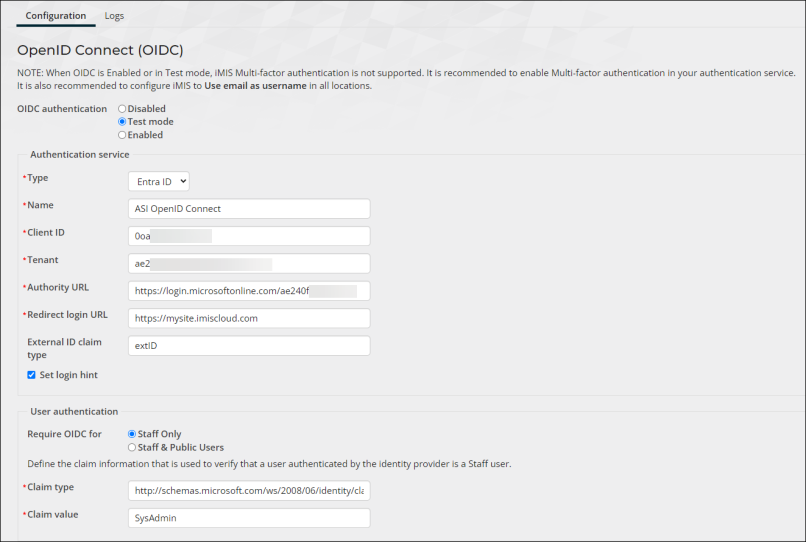
Entra ID
Okta
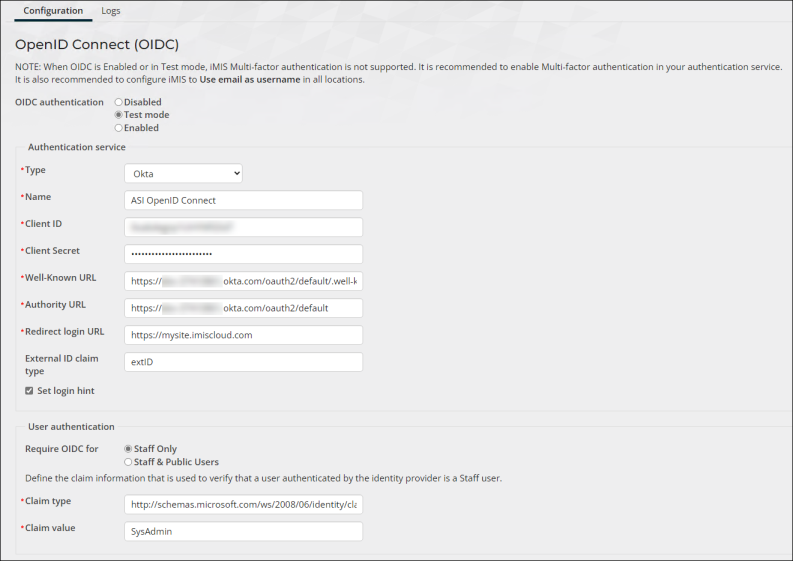
Do the following to configure iMIS with your external directory:
- Go to Settings > Contacts > Open ID Connect.
- Select one of the following OIDC authentication options:
- Disabled – Select to disable OIDC. When selected, users can only log in with their iMIS credentials.
- Test mode – Select when testing the connection with iMIS and the external directory. When selected, staff users can sign in with their iMIS or external directory credentials.
- Enabled – Select to enable the external directory. When selected, the external directory is the only sign in option for staff users. System administrators can still sign in with their iMIS credentials.
Note: To avoid disruption for staff users, it is recommended to test and configure OIDC during non-business hours.
- Enter the Authentication service:
- Type – Select your directory provider. Currently, Entra ID and Okta are supported.
- Name – Enter the Name of your external directory; for example, ASI OpenID Connect. This can be any name, as it currently does not appear anywhere.
- Client ID – The Client ID assigned to your app. For Entra ID users, this is the Application (client) ID. For Okta users, this is the Client ID.
- (Okta only) Client Secret - The Client Secret is located on the General tab of your Application.
- (Okta only) Well-Known URL - This is the Metadata URI located on the Settings tab of the default Authorization Server. See below for more information.
- (Entra ID only) Tenant - The Tenant assigned to your app is the Directory (tenant) ID.
- Authority URL:
Entra ID - Enter https://login.microsoftonline.com/<tenant>/, where <tenant> is the string entered in the Tenant field.
- Okta - The Authority URL is the Okta URL that is used for authentication with iMIS:
- From the Okta developer portal, go to Security > API.
- From the Authorization Servers tab, click the default link. This is the server generated by Okta.
- From the Settings tab, locate the Metadata URI and Issuer fields. The Metadata URI is the Well-Known URL field in your iMIS OIDC configuration. The Issuer (or Okta URL) is your Authority URL in your iMIS OIDC configuration.
There are common authority URLs defined in the Microsoft Documentation.
Example: https://login.microsoftonline.com/ae2d240f-abc1-def2-ghi3-jklmnop45678
- External ID Claim - When set, this custom claim enables you to assign a unique identifier to users that is not their email address. The value entered in this field must correspond to your active directory configuration. See Configure optional claims for Entra ID, and Add custom claims for Okta.
- Redirect login URL – The redirect URL of your app, where authentication responses can be sent and received by your app. A redirect URI is the location where the authorization server sends the user once the app has been successfully authorized and granted an authorization code or access token. For many users, this will be their iMIS URL, such as https://example.imiscloud.com/. This URL must match exactly with the Redirect URI defined in your external directory. More information about the Redirect URI is in the Microsoft Documentation.
- Set login hint – When enabled, the staff user only needs to enter their email address in iMIS. When they are redirected to the OIDC provider, their email address is automatically populated in the OIDC authentication interface.
Note: Some of the Authentication service values are in your organization’s external directory portal (such as, Azure portal). You must have access to the specific tenant to find these values. See the Microsoft Documentation for more information.
- In the User autentication section, define the claim information that is used to verify that a user authenticated by the identify provider is a staff user:
- Require OIDC for - Select Staff Only or Staff & Public Users to restrict OIDC logins for specific users. If Staff & Public Users is selected, all users are authenticated by the external provider, with no exception.
- Entra ID:
- Claim type - The URI (Claim type) for the associated Claim value. The instructions above use the app Role as the Claim value, so the Claim type URI is the following: http://schemas.microsoft.com/ws/2008/06/identity/claims/role
- Claim value - Enter the Value of the app role you created. The instructions above suggested the following value: iMIS_OIDC_Access
Important! If you are not using the app Role to verify the user's authentication, you must review the Microsoft list of claim types to determine which claim type URI is right for you. It is important that the URI is copied exactly as it appears in the Microsoft list of claim types. The URI must begin with http and cannot begin with https.
Note: See the Microsoft Documentation for more information about custom claims.
- Okta:
- Claim type - This field is not required for Okta configuration but is required to have a value. Enter http://schemas.microsoft.com/ws/2008/06/identity/claims/role to populate the field. For more information on Okta claims, see the Okta documentation.
- Claim value - Enter SysAdmin.
Note: When Staff Only is enabled, OIDC syncs staff user email addresses from the external directory, while public user email addresses continue to sync according to the Email address setting. If Staff & Public Users is enabled, all synchronization comes from the external directory.
- Under the Forgot username or password email section, enter the Email body that is sent to a staff user when they use the Forgot my username or Forgot my password forms in a website other than the Staff site. It is important that the Email body indicates that the staff user must sign in to iMIS using the Staff site with a link to your organization’s Staff site.
- Click Save. If the OIDC authentication is set to Enabled, a confirmation displays after clicking Save. You must confirm that signing in with a standard iMIS username and password will no longer work for the specified user types, except for system administrators.
Reviewing the OIDC logs
Any activity through the OIDC service is logged and only available to system administrators. The logs contain detailed information about requests that are sent or received through the service or any error messages.
Do the following to review the OIDC logs:
- Go to Settings > Contacts > Open ID Connect.
- Click the Logs tab.
- Use the Level drop-down to filter the logs based on the type of message.
- Use the Message contains field to filter the logs based on a part of a message.
- Use the Occurred between fields to filter the logs based on the date the log occurred.
- Click Find.
Troubleshooting
Use the following troubleshooting tips while configuring OIDC.
Cannot log into the Staff site
If you've enabled OpenID Connect and can no longer log into the Staff site, do the following:
- Navigate to a RiSE website that is not the Staff site, such as a public member site.
- Log into that site.
- Once logged in, update the URL to the staff site URL.
You should now have access to the Staff site.
Error messages
| Error message | Try this |
|---|---|
| Error: response_type id_token is not enabled for the application | Ensure the Access tokens and ID tokens are enabled on the application. |
| Is not a staff user in the OpenID provider, according to the staff claim configured in the settings. | Ensure the role is properly assigned to the users and groups. |
