Last updated on: April 23, 2026
Special pricing allows you to define a unique set of pricing rules that the Standard and Discount prices do not account for. For example, special pricing can be used to do the following:
- Base billing on customer type or billing category
- Calculate billing based on data in demographic fields
- Enter product rates individually if there is no pattern to the rates
Note: To determine a price for a given product, iMIS looks on the special pricing window. If no price is set on the special pricing window, iMIS checks the Customer type. If no price is defined, or the Complimentary option is not enabled in the Customer type, iMIS then looks at the price defined in Billing products.
In This Article
- Understanding special pricing and billing priorities
Understanding special pricing configuration options
Using a flat amount
Using the value of a numeric property as the price
Mapping exact property values to prices
Mapping numeric ranges to prices
Understanding special pricing and billing priorities
If a contact is eligible for several special pricing rules, the contact will be charged the lowest defined price. If a contact does not qualify for any of the special pricing rules, then the following hierarchy is evaluated:
- Customer type – After special pricing, the customer type is reviewed for a fixed Amount, or an overall Complimentary offer. Customer type pricing is defined at Settings > Contacts > Customer types. See Customer types for more information.
- Billing products – If there is no special price or customer type pricing defined, then the Standard and Discount prices defined in the billing product are used to charge the member.
There is no limit to the number of special pricing rules you can define for a particular billing product.
Note: You can use an Expression Builder business object with special pricing. See Using an Expression Builder business object in dues special pricing.
Understanding special pricing configuration options
Do the following to create special pricing for a billing product:
- Go to Membership > Billing products.
- Click a billing product Name to edit the product or select to create a new billing product.
- Select Use special pricing.
- Click Add new price rule:
- Enter a Description for the special price.
- Choose a Customer type to which the special price applies.
- (optional) Choose a Billing category to which the special pricing applies. This allows you to narrow the pricing even further. See Setting up billing categories for more information.
- Select a Calculation type:
Note: See the examples to learn more about how to use the calculation types.
- Use a flat amount - This option allows you to define a single price for the rule.
- Use the value of a numeric property as the price - This value is defined by a user-defined panel property. If a contact has a price defined in the selected panel property, that price is used here.
- Source - Select the special pricing source panel. All sources with Decimal and Currency properties are displayed. To define a new panel source (RiSE > Panel Designer > Panel sources), see Creating panel sources.
- Add source – Select from a list of applicable business objects. You must select a business object with a property that can be identified as an ID or ContactKey and have only one row per contact. The chosen business object will be available as the active selection in the Source drop-down.
Note: When using custom panel sources or expression builder business objects, ensure the property names are unique across iMIS and do not match any existing iMIS data or SQL Reserved Words. If property names match other product codes or reserved words, special pricing will not properly compute.
- Property - Decimal and Currency properties in the selected source panel are displayed. Choose a field in the source panel that contains the special price.
- (optional) Additional calculation - Enter an additional calculation to be performed against the numeric property when it is evaluated. This two-part field allows you to select the type of calculation (+, -, x, or /) followed by a decimal value. For example, to add $5.00 to the selected property, you would select the plus (+) symbol, then enter 5.
If a business object is chosen as the Source, the Property drop-down offers applicable business object properties.
- Source - Select the special pricing source panel. All sources with Decimal and Currency properties are displayed. To define a new panel source (RiSE > Panel Designer > Panel sources), see Creating panel sources.
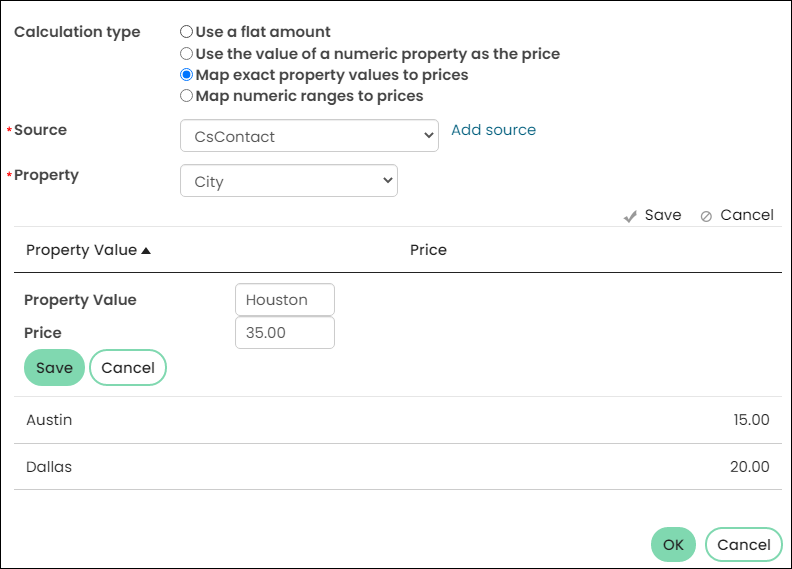
- Map exact property values to prices - Select this option to create rates based on values matched to character fields.
- Source - Select the source panel. To define a new panel source (RiSE > Panel Designer > Panel sources), see Creating new panel sources.
- Add source – Select from a list of applicable business objects.
Note: You must select a business object with a property that can be identified as an ID or ContactKey and have only one row per contact. The chosen business object will be available as the active selection in the Source drop-down.
- Property - Choose a property in the source panel that contains the value that you are mapping to a special price.
- (optional) Additional calculation - This option only appears if the Property is a numerical (Decimal or Currency) property. Enter an additional calculation to be performed against the property when it is evaluated. This two-part field allows you to select the type of calculation (+, -, x, or /) followed by a decimal value. For example, to add $5.00 to the selected property, you would select the plus (+) symbol, then enter 5.
- Click Add new to create the mapping rules:
- Property value - Enter the exact property value to which you are mapping. For example, you want to offer a special price to Texas residents, but need the prices to vary depending on city. For the Property value, enter the exact name of the various cities for which you are offering the special price.
- Price - Enter the special price value.
If a business object is chosen as the Source, the Property drop-down offers applicable business object properties.
Important! This option supports a maximum of 20 rows.
- Source - Select the source panel. To define a new panel source (RiSE > Panel Designer > Panel sources), see Creating new panel sources.
- Map numeric ranges to prices - Select this option to determine the price based on a range of possible values for user-defined panel properties.
- Source - Select the source panel. All source panels with Decimal, Integer, and Currency properties are displayed.
- Add source – Select from a list of applicable business objects.
Note: You must select a business object with a property that can be identified as an ID or ContactKey and have only one row per contact. The chosen business object will be available as the active selection in the Source drop-down.
- Property - Choose a field in the source panel that contains the value that you are mapping to a special price value range.
- (optional) Additional calculation - This option only appears if the Property is a numerical (Decimal or Currency) property. Enter an additional calculation to be performed against the property when the property is evaluated. This two-part field allows you to select the type of calculation (+, -, x, or /) followed by a decimal value. For example, to add $5.00 to the selected property, you would select the plus (+) symbol, then enter 5.
- Create the mapping rules by selecting Add new:
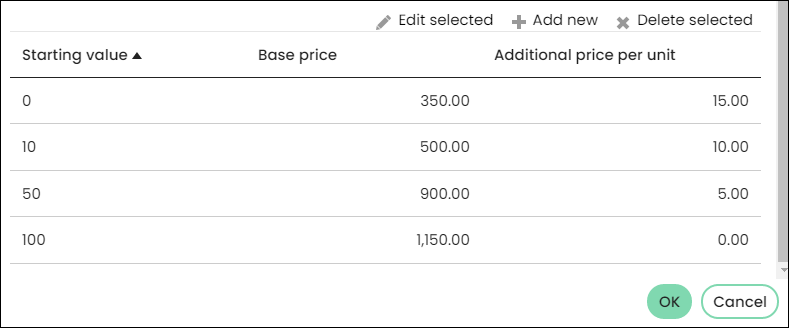
- Starting value - Enter the first value in your price range. If you are offering a special price to those with a staff size of zero through ten, enter 0 as it is the starting value in that specific range. If your next range is eleven through twenty, the next Starting value you enter is 11.
- Base price - Enter the Base price for the values that fall within this specific range. For example, you are offering a base price of $350.00 to organizations with a staff size of zero through ten, and a base price of $500.00 to organizations with a staff size of eleven through twenty.
- Price per unit - Enter a price for additional units beyond the base price. For example, although you are offering a base price of $350.00 to organizations with a staff size of zero through ten, it is an additional $15.00 per staff user. That way, an organization with nine staff users will pay more in fees than an organization with two staff users. In the Price per unit field, enter 15.
If a business object is chosen as the Source, the Property drop-down offers applicable business object properties.
Important! This option supports a maximum of 20 rows.
- Source - Select the source panel. All source panels with Decimal, Integer, and Currency properties are displayed.
- Click OK.
- Save the billing product.
Note: Receiving an error after attempting to save a special price may be due to the selected Billing category. Make sure that the billing category's Expansion field is empty (Go to Settings > General lookup tables, then choose the CATEGORY table).
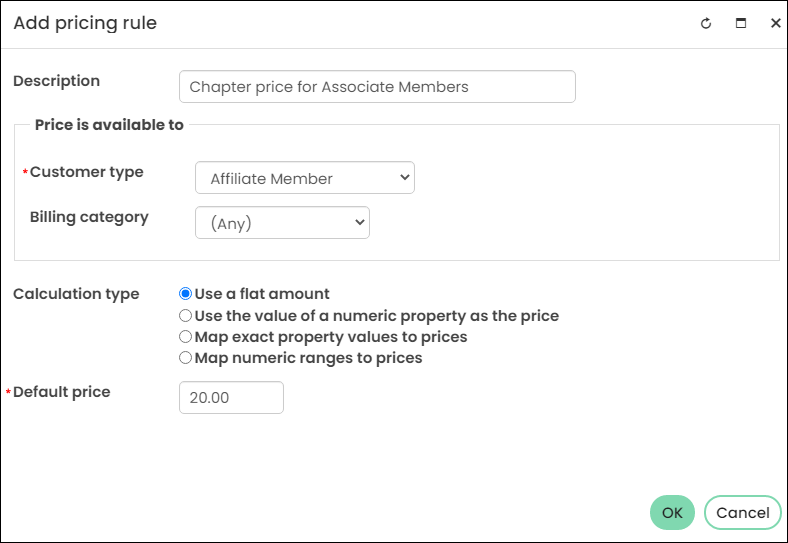
Using a flat amount
You have a chapter membership product that is $30.00; however, for Associate Members, the price is $20.00. Instead of creating a new chapter membership product specifically for Associate Members, you can create a special price in the chapter membership product with the following information:
- Customer type - Associate Member
- Calculation type - Use a flat amount
- Default price - 20.00
Using the value of a numeric property as the price
For the Use the value of a numeric property as the price option, you first need to make sure you have the appropriate panel configured with the desired properties.
For this example, a Special Prices panel was created and added to staff account pages (only staff users will see this panel). The panel has fields (properties) for Membership Fee, Chapter Fee, and Subscription Fee. In this example, you want Lindsay Aaron to have a special chapter price of $10.00, so you entered that value in her panel.
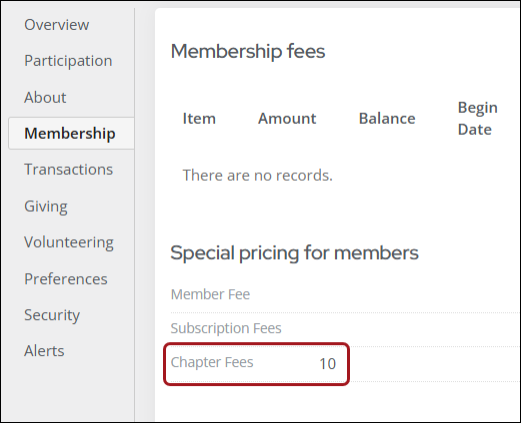
A chapter fee for the East Chapter is usually $25.00; however, you want to charge only $10.00 to Lindsay because she is highly involved in your organization. To ensure Lindsay receives this $10.00 special price when she goes to register for the East Chapter, you would set the following options within the East Chapter billing product:
- Customer type – Regular Member (since that is Lindsay's member type)
- Calculation type – Use the value of a numeric property as the price
- Source – SpecialMemberPrices
- Property – Chapter_Fee
When there is a numerical value found in the Chapter_Fee property, it is automatically used as the price for the product.

Mapping exact property values to prices
Important! This option supports a maximum of 20 rows.
The Map exact property values to prices option is similar to that of Use the value of a numeric property as the price option in the sense that the special price must be related to a user-defined panel source. The difference between the options are that this option looks for an exact match instead of using the numerical price defined in the specified field.
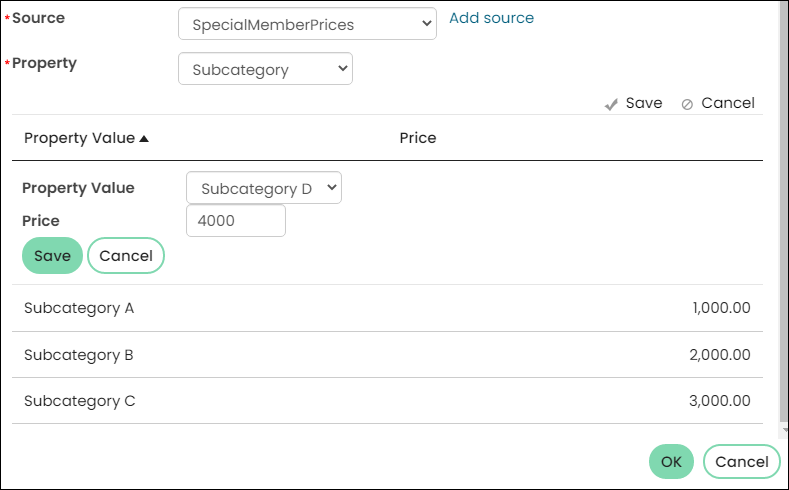
For example, a professional association bases membership fees for Associate Members on an assigned subcategory:
- SubcategoryA - $1000.00
- SubcategoryB - $2000.00
- SubcategoryC - $3000.00
- SubcategoryD - $4000.00
Associate Members not assigned to a subcategory are billed the default price defined in the billing product of $500.00.
In this example, there was a Subcategory property created on the SpecialMemberPrices source with values of A-D.
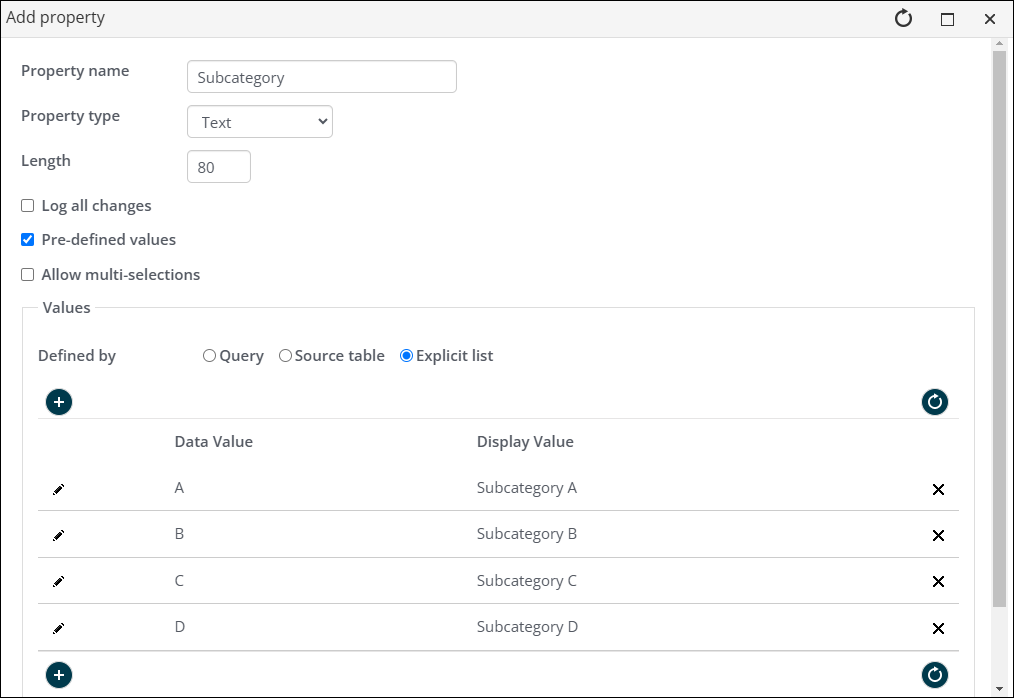
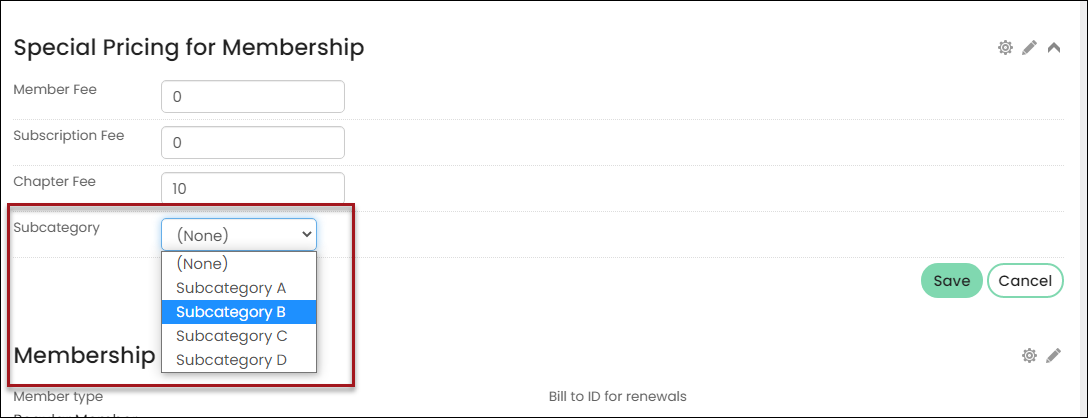
The source property was added to the Membership panel. When edited, the subcategories appear in a drop-down.
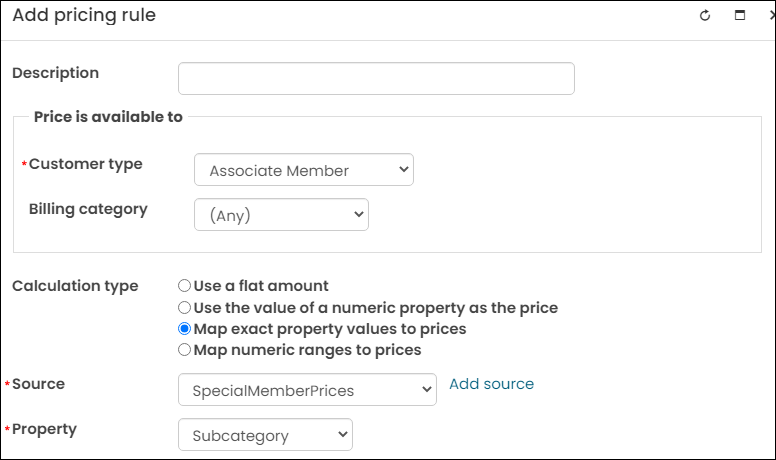
To make sure these subcategories are applied to the Associate Membership billing product, configure the pricing rules with the following options:
- Customer type – Associate Member
- Calculation type – Map exact property values to prices
- Source – SpecialMemberPrices
- Property – Subcategory
Next, select Add new, and begin defining the various prices for the A through D subcategories.
Mapping numeric ranges to prices
Important! This option supports a maximum of 20 rows.
You are a trade association who charges membership fees based on the staff size of an organization:
- For staff sizes from 0 through 9, the base fees are $350 plus $15 per employee
- For staff sizes of 10 through 49, the base rate increases to $500 plus $10 per employee
- For staff sizes of 50 through 99, the base rate increases to $900 plus $5 per employee
- The maximum fees charged for an employee count of 100 or more is $1,150.
For example, an organization with two staff members would be charged $380 ($350 base rate +[2*$15]). A company with 15 employees would be charged $550 ($500 + [5*$10]).
To charge this special price, you required that the organization define their staff size before being taken to the membership fees page.
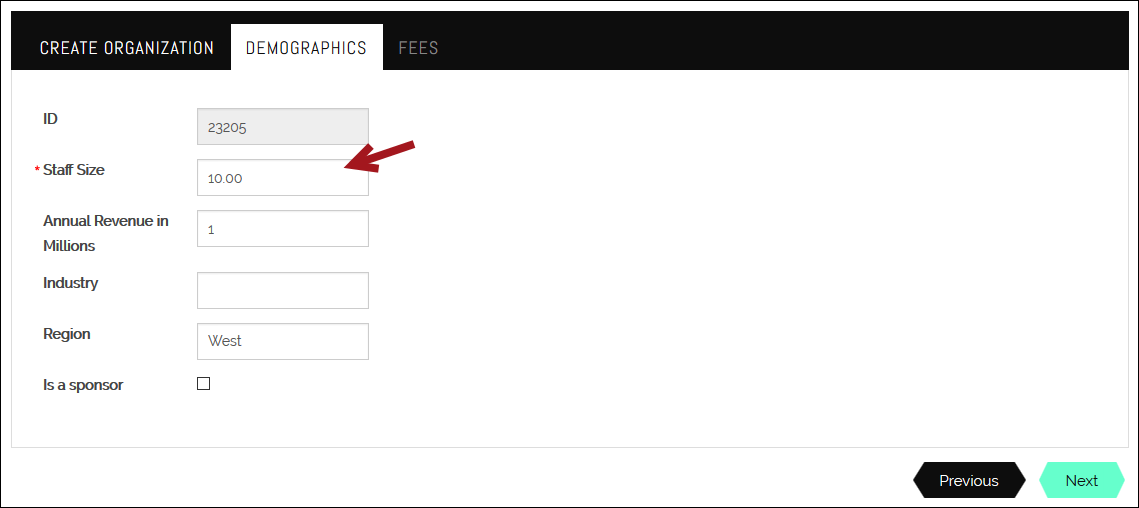
To create a special price with these rules, select the following information on the special pricing window:
- Customer type – The customer type organizations are assigned upon joining
- Calculation type – Map numeric ranges to prices
- Source – The source that the Staff Size property is located in
- Property – Staff Size
Next, in the panel, select Add new and add the following:
- For staff size of 0 through 9:
- Starting value - 0
- Base price - 350
- Price per unit – 15
- For staff size of 10 through 49:
- Starting value – 10
- Base price – 500
- Price per unit – 10
- For staff sizes 50 through 99:
- Starting value – 50
- Base price – 900
- Price per unit – 5
- For staff sizes of 100 or more:
- Starting value – 100
- Base price – 1,150
- Additional price per unit – 0