Last updated on: June 08, 2026
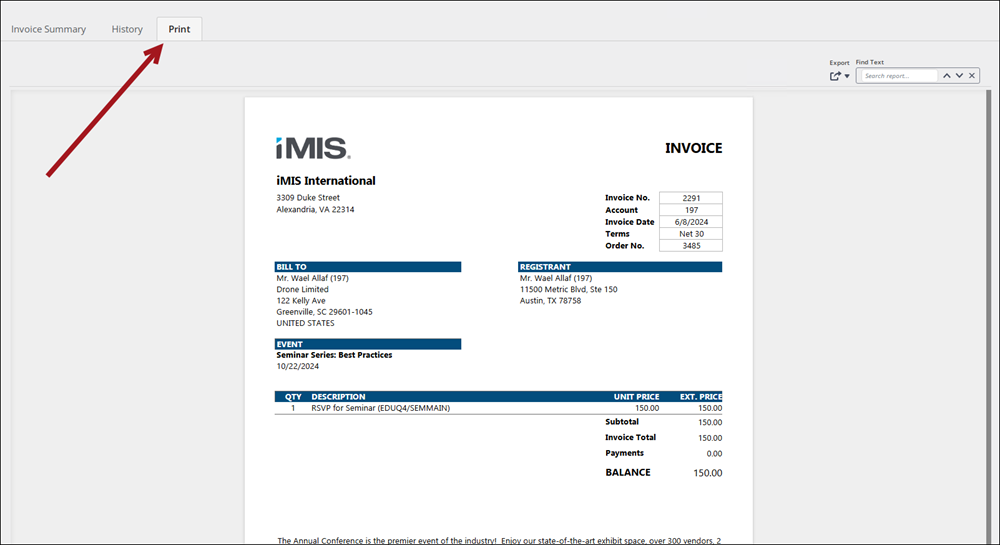
Out-of-the-box, the invoice Print tab displays the Report Writer version of the invoice report. With the Report Writer - Premium license, the Report Writer invoice can be copied, tailored, and displayed as desired. Contact your CPIL or AiSP for more information.
Note: For clients who are currently using the SSRS version of the invoice report, the Print tab will not automatically use the Report Writer version. To start using the Report Writer version, follow the process below.
In This Article
Using out-of-the-box Report Writer invoices
To use the out-of-the-box Report Writer invoices, update the following shortcuts to point to the following content records.
| Invoice type | Shortcut | Content record |
|---|---|---|
| Cash billing | InvoiceDetailCash | @/iCore/Finance/Report-Writer-Invoices/Cash-Invoice-Detail-Report-Writer |
| Event (source system of MEETING) | InvoiceDetailEvent | @/iCore/Finance/Report-Writer-Invoices/Event-Invoice-Detail-Report-Writer |
| EventInvoiceReport |
@/iCore/Staff_Dashboards/Specific_Event/Event_invoice_report-Report-writer Note: Print Invoice button in an event registration. |
|
| Commerce (source system of ORDERS) | InvoiceDetailOrder | @/iCore/Finance/Report-Writer-Invoices/Order-Invoice-Detail-Report-Writer |
| Fundraising Pledge | InvoiceDetailPledge | @/iCore/Finance/Report-Writer-Invoices/Pledge-Invoice-Detail-Report-Writer |
| All others, including membership invoices and non-pledge gifts | InvoiceDetail | @/iCore/Finance/Report-Writer-Invoices/Invoice-Detail-Report-Writer |
Example: Updating the Print tab for event invoices to use the out-of-the-box Report Writer invoice
Do the following to use the out-of-the-box Report Writer invoice for all event invoices:
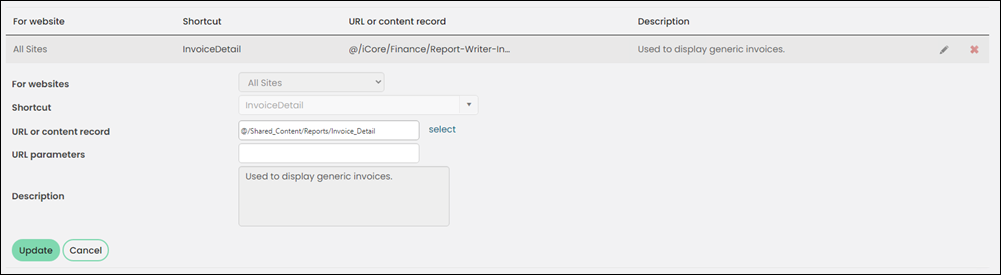
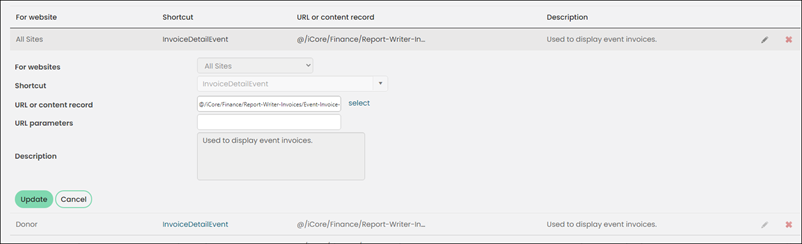
- Go to RiSE > Site Builder > Manage shortcuts.
- Search for the InvoiceDetailEvent shortcut.
- From the All Sites InvoiceDetailEvent shortcut, click the edit icon.
- From the URL or content record field, paste the following: @/iCore/Finance/Report-Writer-Invoices/Event-Invoice-Detail-Report-Writer
- Click Update.
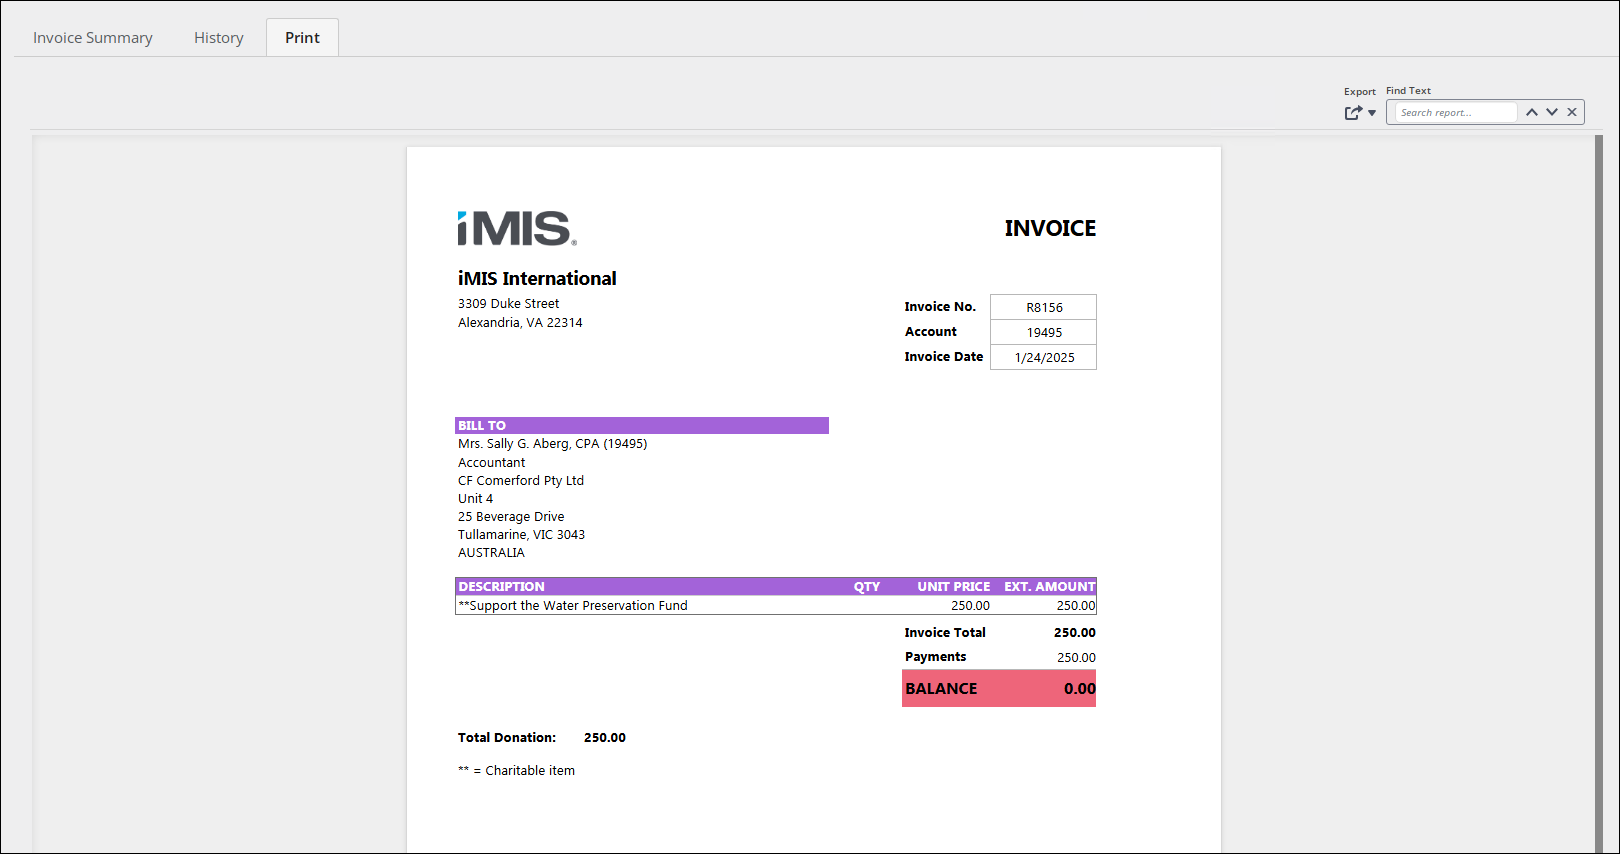
- Navigate to an event invoice (source system = MEETING) and click the Print tab to confirm the Report Writer version is appearing.
Customizing the Report Writer invoices
With the Report Writer - Premium license, you can customize the out-of-the-box Report Writer invoices and display the invoice on the Print tab of the invoice detail. The following outlines the process to display a custom report on the Print tab of the invoice display:
- Customize the invoice
- Add the custom invoice to the Print content record
- Update the invoice detail to use the new Print content record
- Update the related invoice shortcut
1) Customizing the invoice
Do the following to customize the Report Writer invoice:
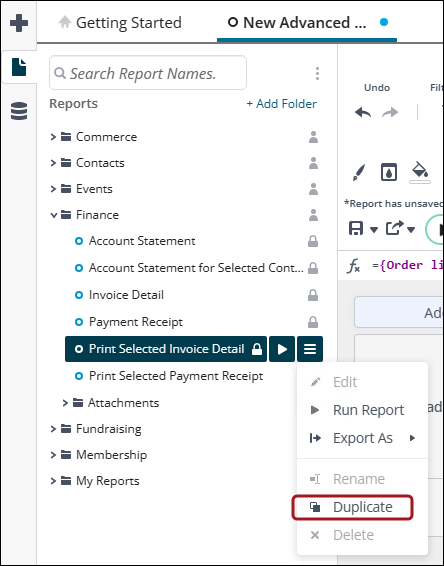
- Go to Reports > Report Writer.
- Locate the invoice report to customize:
- Print Selected Order Invoice: Commerce folder
- Print Selected Event Invoice: Event folder
- Print Selected Invoice Detail: Finance folder
- Click the menu icon for the report, then click Duplicate.
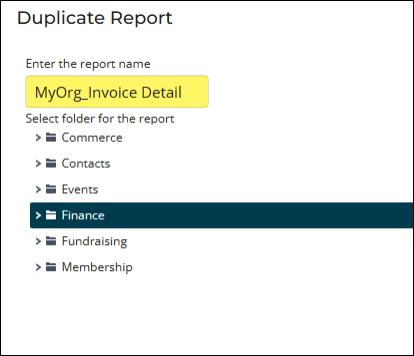
- Enter a name for the report and choose a folder, then click Ok.
- Make the desired customizations to the invoice, then Save.
Note: Use the Print Selected Invoice Detail report for cash dues, accrual dues, and pledges.
2) Adding the invoice report to the Print tab
Do the following to add the new report to the Print tab:
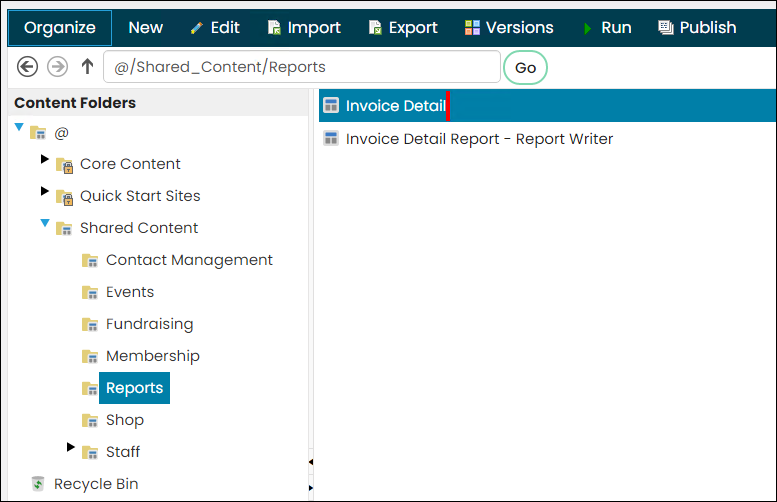
- Go to RiSE > Page Builder > Manage content.
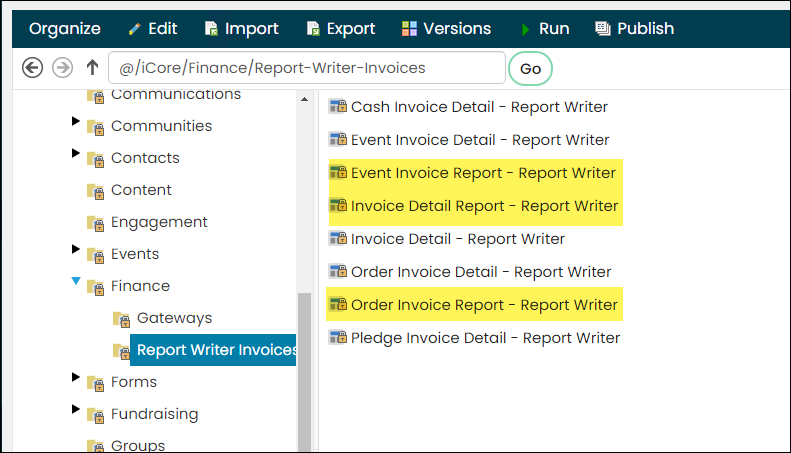
- Navigate through the following folder path: @/iCore/Finance/Report-Writer-Invoices
- Choose one of the following content records, depending on the invoice you are editing:
- Order Invoice: Order Invoice Report – Report Writer
- Event Invoice: Event Invoice Report – Report-Writer
- Invoice Detail: Invoice Detail Report – Report Writer
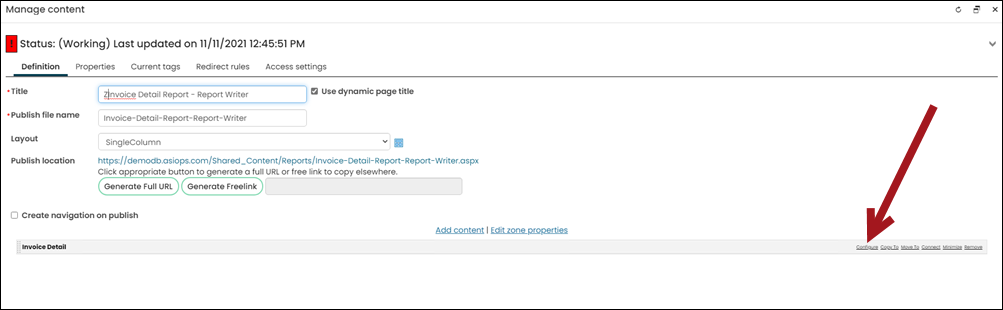
- Copy the content record and paste it in a non-system folder.
- Open the content record for edit.
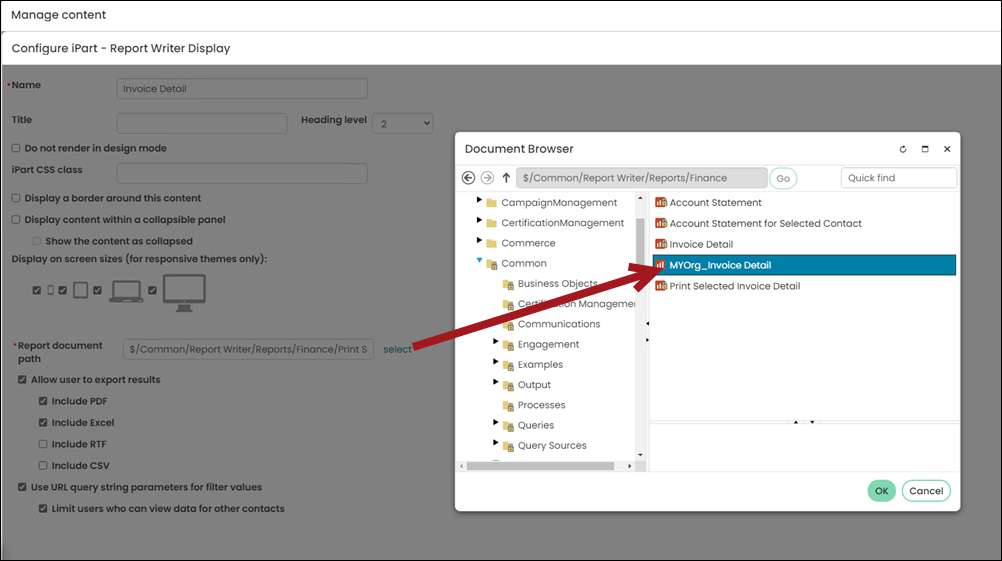
- From the content item configuration, select Configure.
- From the Report document path, select the report you created. Report Writer reports are in the following folder: $/Common/Report Writer/Reports
- Click OK, then click Save & Publish.
3) Updating the invoice detail to use the new Print tab
Do the following to update the Invoice detail to use the new Print tab:
- Go to RiSE > Page Builder > Mange content, and navigate through the following folder path:@/iCore/Finance/Report-Writer-Invoices
- Depending on the report you customized, choose one of the following content records to copy:
- Paste the content record in a non-system folder.
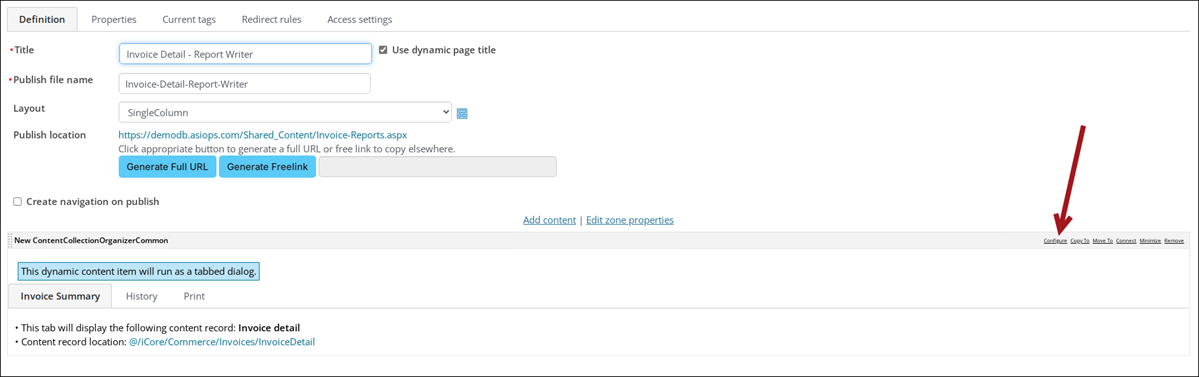
- Open the content for edit, then click Configure.
- Click the Print tab, then from the Content to display field, select the page you created as the new Print tab in the above section.
- Click OK, then click Save & Publish.
- Go to RiSE > Site Builder > Manage shortcuts.
- Depending on the invoice you are editing, update the shortcut to point to the content record you copied in step 3:
- InvoiceDetail
- InvoiceDetailEvent
- InvoiceDetailOrder
- InvoiceDetailPledge
- Click Update.
- Verify the update by going to Finance > Invoices and opening an invoice you are expecting to see with the change.
| Report | Content Record |
|---|---|
| Order Invoice | Order Invoice Detail |
| Event Invoice | Event Invoice Detail |