Last updated on: January 27, 2026
Pre-upgrade checklist
Tip: To assist with completing the pre-upgrade checklist, use the Upgrade Dashboard.
Understanding when to perform each checklist item
The tasks outlined in the pre-upgrade checklist fall into one of the following categories:
- Category 1: Tasks that should be completed in the live 2017 site before the 2017 DB backup is created for the staging site. If not performed in the live 2017 site first, these tasks must be completed in both staging EMS and live 2017 site before the final upgrade.
- Category 2: Tasks that should be completed in the EMS staging site and then again in the live EMS site after the live upgrade.
- Category 3: Tasks that should be completed in the staging site, then again in the live 2017 site right before the live EMS upgrade. Some Category 1 tasks may fall into this category if they are not performed before the staging upgrade.
Upgrade tasks
Review the following pre-upgrade tasks, ensuring to make note of the related category.
File Storage
- (Category 2) Files (e.g., images, PDFs) stored in non-standard locations must be identified and sent to Cloud Services. If content on the site references these files using hard-coded paths rather than relative paths, this will require content to be updated post-upgrade. To minimize post-upgrade content updates, ensure that all file references use relative paths or path variables. See Images and files testing for full details.
Database
- (Category 2) Review the iMIS reserved words article. There are several areas throughout iMIS where certain Codes and Names should not be used. If any of these reserved words are used, there will be errors after the upgrade. If you find that there are Codes or Names that are using reserved words, contact ASI Technical Support for next steps.
- (Category 3)For those upgrading from on-premise or Advance 20/20 Direct SQL Program to cloud, you must ensure the database is has the correct collation. The following collation is required: SQL_Latin1_General_CP1_CI_AS. To review or change the collation, see the Microsoft Documentation.
Contacts
- (Category 1) Ensure there are no addresses without a Country defined.
- Go to RiSE > Intelligent Query Architect > New > Query.
- Enter a Name, such as Contact Addresses without a Country.
- (Sources tab) Click Add Source, then choose the CsAddress business object.
- (Filters tab) Add the filters:
- From the Property drop-down, choose Country:
- From the Comparison drop-down, choose Empty.
- Add (+) the filter.
- From the Property drop-down, choose Full Address
- From the Comparison drop-down, choose Not Empty.
- Add (+) the filter.
- From the Property drop-down, choose Country:
- (Display tab) Choose View all columns from the drop-down, then add the following properties:
- Id
- Full Address
- Click Run. The addresses of the contacts returned must be updated, so that there is a Country defined.
If you have access to SQL the database, use the following SQL to identify the addresses without a country:
SELECT * FROM Name_Address
WHERE COUNTRY = '' AND FULL_ADDRESS != ''
ORDER BY ID
If you do not have access to SQL the database, do the following in the iMIS 2017 Staff site:
Next Steps
If there are only 1-30 contact addresses returned, manually update the contact addresses from the account page. If there are more than 30 contact addresses returned, enter a ticket with ASI Technical Support, so they can assist you with correctly updating the data.
Membership
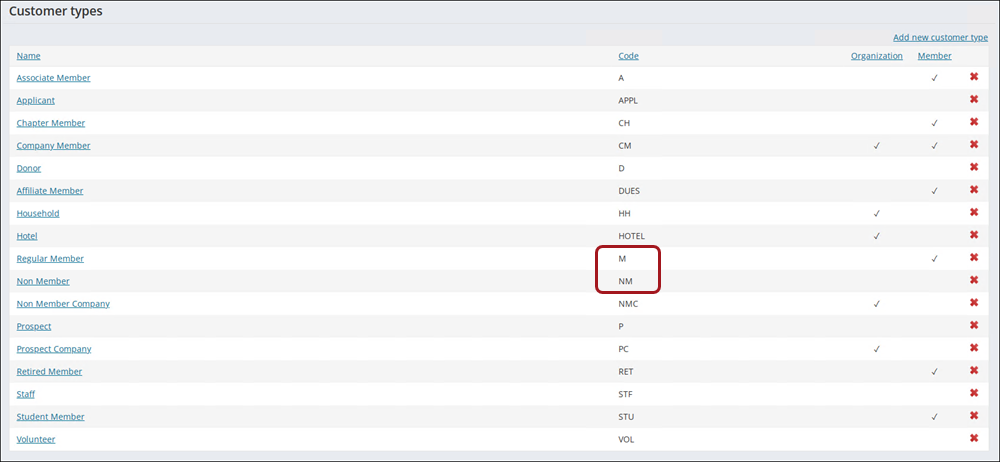
- (Category 1) Ensure the M and NM customer types are defined.
- Go to Settings > Contacts > Customer types.
- Review the customer type Code field to verify the M and NM codes are in the list.
- Select Add new customer type.
- Code - Enter either M or NM, depending on which is missing.
- Name - Enter Member, Non member, or any name you wish. If you do not want to use this customer type, you can enter a name such as z_DoNotUse.
- Click Save & Exit.
- If both customer types are missing, repeat the process for the next customer type.
- (Category 1) Ensure no billing cycle names match billing product codes.
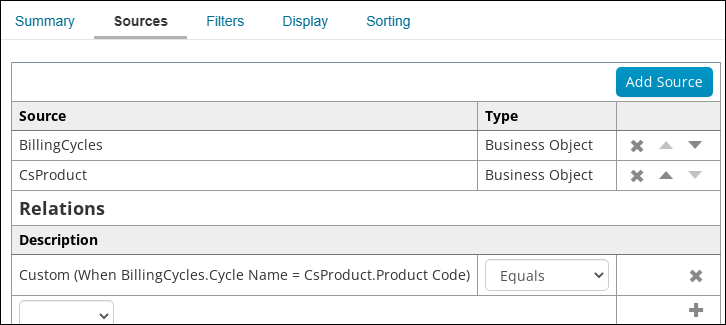
- Create a new query using the BillingCycles and CsProduct business objects.
- Add the following relation: BillingCycles.Cycle Name = CsProduct.Product Code
- Click the Display tab, then add the following:
- CsProduct.Product Code
- CsProduct.Title
- BillingCycles.Cycle Name
- Run the query and make note of the results returned, specifically the Cycle Name.
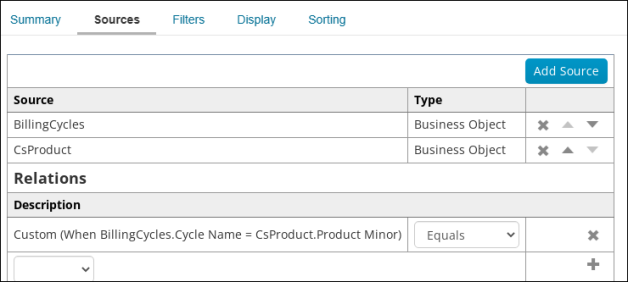
- Delete the current relation, then add the following relation: BillingCycles.Cycle Name = CsProduct.Product Minor
- Click Run. Make note of the results returned, specifically the Cycle Name.
- Review the billing cycles that were returned (Membership > Billing cycles) and make note of the configuration options defined.
- Delete the billing cycle.
- Recreate the cycle using a different Cycle Name. Members can see the cycle name when they are joining or renewing from the public website, so make sure it is a clear and descriptive name.
- Repeat for all billing cycles that were returned in the query results.
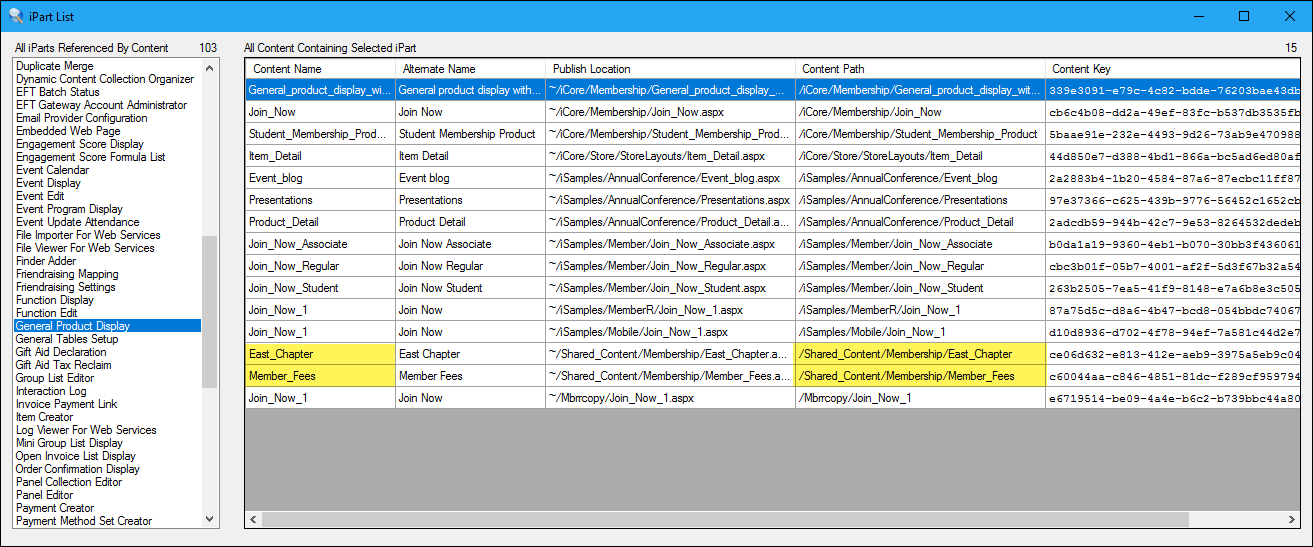
- Run the ContentBrowser.exe: C:\Program Files (x86)\ASI\iMIS\net\bin
- Click the iParts button.
- From the list of iParts, choose the General Product Display.
- Make note of the Content Name and Content Path for the returned content that is not system content. System content will begin with a Content Path of iCore, iSamples, and Mbrr.
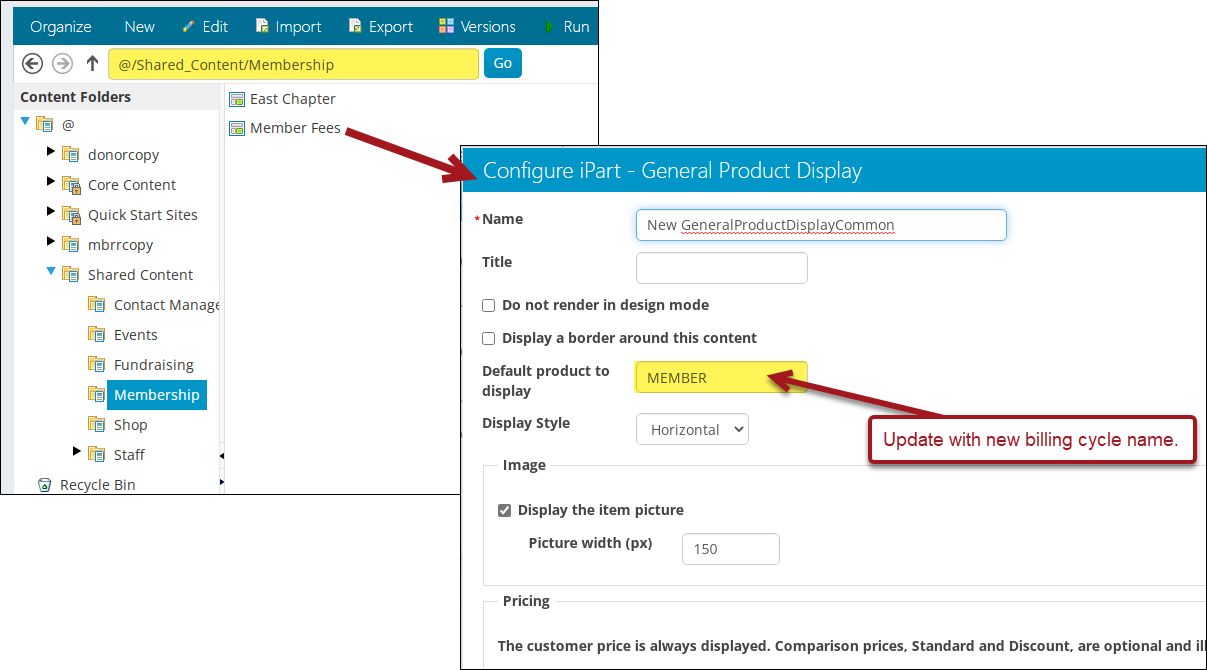
- From the iMIS Staff site, locate each of the returned content records and determine if any of the replaced billing cycles are being used in the General Product Display. If this billing cycle matches any of the replaced billing cycles, update it with the new cycle name.
- (Category 2) Ensure no billing product codes contain spaces.
- (Category 1) Open cash non-dues invoices must be reversed and generated again if itemized renewals are used. Prior to upgrading, confirm whether there are open cash non-dues invoices that are using itemized renewals. If there are, you must perform the associated post-upgrade step.
- (Category 1) Create an IQA query to identify contact records with AVAIL_CREDIT balances. After upgrading, the identified AVAIL_CREDIT balances will automatically offset the balance of dues products when cash dues renewals are generated. However, generating these renewals will create an open batch that must be posted to complete the credit application. For more information, see the post-upgrade step.
- Go to RiSE > Intelligent Query Architect > New > Query.
- (Summary tab) Name the query.
- (Sources tab) Select Add Source, choose the Subscriptions business object, then click OK.
- (Filters tab) Add the following filters:
- Select the PRODUCT_CODE property:
- Leave the Comparison as Equals.
- From the drop-down in the Value column, enter AVAIL_CREDIT.
- Click the plus + button.
- Select the BALANCE property:
- Set the Comparison to less than (<).
- From the drop-down in the Value column, enter 0.
- Click the plus + button.
- Select the PRODUCT_CODE property:
- (Display tab) Add the properties you would like to display.
- Save and run the query.
Steps to take
Do the following in the iMIS 2017 Staff site:
Next steps
If the M and/or NM codes are missing, do the following:
Confirming billing cycle names do not match billing product codes can be done manually by opening two browser tabs, one with Membership > Billing cycles displaying and the other with Membership > Billing products displaying, and then reviewing the two lists to confirm no billing cycle names match billing product codes.
However, if the list of billing cycles and/or billing products is too long to review manually, you can create a query to determine if billing cycle names match product codes.
Steps to take
Do the following in the iMIS 2017 Staff site:

Chapter product codes are stored in the Product Minor property, so do the following to confirm no chapter codes match billing cycle names:

Next steps
If there were any results returned, do the following:
If any of the affected billing cycles are being referenced in a General Product Display, the content must be updated to point to the new cycle name. Although there is no way to know which content records a billing cycle may be used, you can use the Content Browser to identify all content records that contain the General Product Display content item:
Tip: See Running the Content Browser for full steps.
The iMIS Desktop allowed you to create billing product codes with spaces; however, iMIS EMS no longer supports spaces in code properties.
To review the billing product codes, go to Membership > Billing products. Review the values in the Code column and verify there are no spaces. If there are billing product codes that contain spaces, contact your AiSP to help you clean up the data.
Do the following to query contacts with AVAIL_CREDIT balances:
This query helps track AVAIL_CREDIT balances, identifying which renewals may create an open batch when renewals are generated after the upgrade. No further action is required before upgrading. To manage these credits after the upgrade, see the post-upgrade step.
Websites
- (Category 1) Ensure you are not using a deprecated website template or theme on any website. See Updating deprecated templates and themes in websites.
- (Category 1) Ensure the Constellations template changes do not affect your custom websites.
- A collapsible navigation, allowing staff users to utilize more horizontal space on the screen.
- Updated icons that are powered by out-of-the-box CSS classes. These CSS classes, in addition to several other new classes, are only available with the Orion theme.
- Go to RiSE > Site Builder > Manage websites.
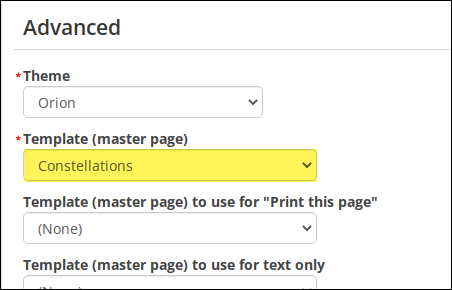
- Select a custom website. A custom website is any website that is not an out-of-the-box website, for example, if you have made a copy of the Staff site and are using the copied Staff site instead of the out-of-the-box Staff site.
- Click the Look and feel tab.
- Expand the Advanced section.
- Review the template selected in the Template (master page) drop-down. If the selected template is Constellations, then this change affects the selected website.
- Continue that process for each custom website.
- (Category 1) Multiple publishing servers are no longer supported and must be removed before upgrading. The only publishing server that should be defined prior to upgrading is Publish Server Code A with Is Default set to Yes.
- Go to RiSE > Maintenance > Publishing servers.
- Confirm there is a publishing server defined with the following:
- Publish Server Code - A
- Is Default - Yes
- Delete any other publishing servers by clicking the delete (x) icon.
- Save any changes.
The iMIS EMS Staff site navigation was enhanced in February 2023 with the following:
These enhancements required many changes to the Constellations template; therefore, to accommodate those using the Constellations template with a custom website, the Constellations_Classic template was created.
Custom websites using the Constellations template must be updated to use the Constellations_Classic template to avoid upgrade issues.
Steps to take
Do the following in the iMIS 2017 Staff site:
Next steps
If this change affects your websites, see Upgrading custom websites that are using the Constellations template.
From the iMIS 2017 Staff site, do the following:

Panels & Tables
Note: While testing panels and tables, it may be useful to review what panel sources are used in each panel definition. Use the ListPanelDefinitionSources.sql script to generate one row for every source included in a panel.
- (Category 1) After an upgrade to iMIS EMS, there may be panels and/or panel sources that are missing. This may be because the panel source was not correctly added to the ObjectMetaData table when it was initially created. For full details, see Ensuring panels and panel sources are not missing after an upgrade.
- (Category 1) Confirm every table and/or business object you need accessible as a panel source is properly defined as such. This step is to ensure any table you may need to use as a panel source is converted properly and added to the ObjectMetaData table (as compared to the next pre-upgrade check that is specifically referencing customizer tables). If this action is not performed before upgrading, the tables only appear as business objects and you cannot use them in Panel Designer.
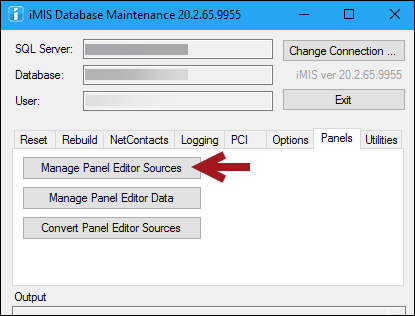
- Run the DBMaintenance.exe: C:\Program Files (x86)\ASI\iMIS\net\IMISDBUpgrade
- From the Connect to Database window, login as a system administrator.
- Click the Panels tab.
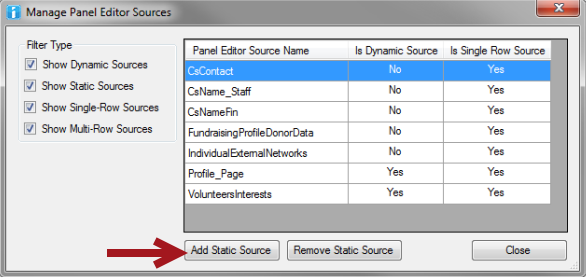
- Click the Manage Panel Editor Sources button.
- Review the list of Panel Editor Source Names to confirm all desired sources and tables are listed. These are the sources that will be accessible as panel sources after upgrade.
- (Category 1) Import customizer tables that were never configured as panels.
- Go to RiSE > Page Builder > Manage content.
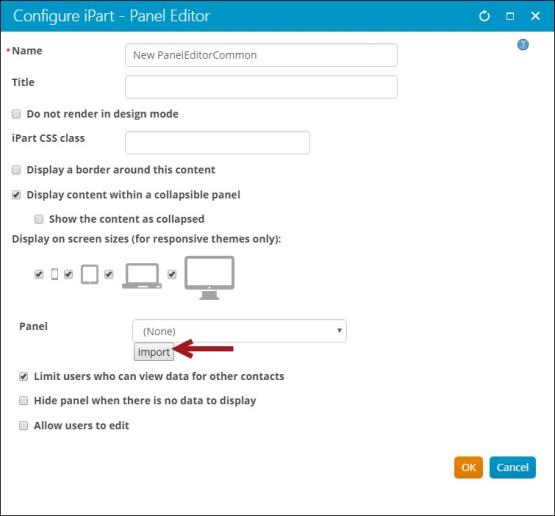
- Create a new content record and add the Panel Editor content item to the page.
- From the Panel Editor content item, click Import.
- The necessary business objects are created for the Customizer tables.
- The business objects are named after the physical tables.
- Post-upgrade, the business object is accessible to the Panel created from during the pre-upgrade import.
- Use the QueriesByBOFor2017GA script. See the iMIS Support site for script details.
- Use the Query Browser utility.
- Open the Query Browser: C:\Program Files (x86)\ASI\iMIS\net\bin
- Click Search Queries.
- Click the Query Sources tab.
- Enter the business object name in the Business Object Name #1 field.
- Click Search. Make note of the returned query paths.
- Repeat steps 5 and 6 for each business object.
- (Category 1) Update Panel Collection Editor content items that are configured to Use all available panels.
- Run the ContentBrowser.exe: C:\Program Files (x86)\ASI\iMIS\net\bin
- Click the iParts button.
- From the list of iParts, choose the Panel Collection Editor.
- Make note of the returned list, specifically the Content Name and Publish Location.
- From iMIS, go to RiSE > Page Builder > Manage content.
- Navigate through the first Publish Location, then double-click the Content Name.
- Update the Panel Collection Editor to no longer use the Use all available panel option.
- (Category 1) Ensure that the pay_number property is correct in the Orders table to allow changes to payments.
Steps to take
Do the following:
Tip: See Running the DB Maintenance for full steps.
Next steps
If there is a table and/or business object missing, you must add the source to this list by clicking Add Static Source. To learn how to add a source and the relevant required details, review Managing Panel Editor sources with DB Maintenance.
The tables that were used to store additional information about the Customizer tables (UD_Table, UD_Field, UD_WindowHeader, and UD_WindowFields) are deleted, as they are no longer used.
If there are Customizer tables that were never configured as Panels in iMIS 2017, then the panel should be imported so that a Panel Definition is created for each table prior to the upgrade. This time-saving effort prevents you from having to create a panel for each Customizer table post-upgrade.
Steps to take
Do the following in the iMIS 2017 Staff site:
Note: If you do not see an Import button, there are no updates to import. Continue to the NEXT STEPS below.
During the upgrade migration process, the following occurs:
Next steps
If you have created panels for Customizer tables in iMIS 2017, the business objects used as sources for these panels must be verified to confirm the business object name is not the same name as the UD_Table. If there are business objects created for the Customizer tables (i.e. being used in IQA queries) using the same name as the physical table, the business object should be renamed; otherwise, the upgrade process will overwrite the business object.
Identifying UD Tables and BOs with the same name
Run the following SQL to determine if there are UD Tables with the same name as a BO:
SELECT [DocumentName] FROM [dbo].[DocumentMain]
 WHERE [DocumentTypeCode] = 'BOD' AND [DocumentName] IN (
SELECT [TABLE_NAME] FROM [dbo].[UD_Table])
If there are results returned, you should identify whether the BO is being using in a query before changing the name. You have two options to accomplish this:
Using the Query Browser Utility
Use the Query Browser utility to determine if the BOs are being used in any queries:
Tip: For full instructions on how to use the Query Browser, see Query Browser Utility.
Updating the BOs and queries
The next steps are to update the BO names, then update the related queries that the BOs are being used in.
The Use all available panels option in the Panel Collection Editor content item has been removed in iMIS EMS. Prior to upgrading, it is recommended that all Panel Collection Editor content items that are configured to Use all available panels are updated to reference specific panels.
If this is not done prior to upgrading, the collection of panels appears with an error that reads, “This dynamic content item is not configured.”
Do the following to locate all Panel Collection Editor content items:
Tip: See Running the Content Browser for full steps.
The pay_number property in the Orders table should contain 12 asterisks.
To validate that the Orders table has a pay_number property with any number of asterisks that is not 12, run the following SQL script:
SELECT [ORDER_NUMBER], [ORDER_TYPE_CODE], [SOURCE_SYSTEM], [BATCH_NUM], [ORDER_DATE], [BT_ID], [PAY_NUMBER]
  FROM [Orders]
WHERE [PAY_NUMBER] LIKE '*%'
  AND [PAY_NUMBER] NOT LIKE REPLICATE('*', 12) + '%'
If the script returns results, use the following SQL script to ensure the pay_number property is correct:
UPDATE [dbo].[Orders]
SET [PAY_NUMBER] = REPLICATE('*', 12) + RIGHT(RTRIM(LTRIM([PAY_NUMBER])), 4)
WHERE [PAY_NUMBER] IS NOT NULL
  AND [PAY_NUMBER] <> ''
  AND (
    LEN(RTRIM(LTRIM([PAY_NUMBER]))) < 16
    OR LEFT(RTRIM(LTRIM([PAY_NUMBER])), 12) NOT LIKE REPLICATE('*', 12)
  )
Business Objects & Queries
- (Category 3) Before upgrading, remove the TIME_STAMP property from all custom business objects and panel sources.
- (Category 1) Identify queries that are accessing the REST API. These queries must be explicitly granted API access post-upgrade, so it is important that they are identified during the pre-upgrade stage. See IQA Security Update and Updating queries that must access the REST API for more information.
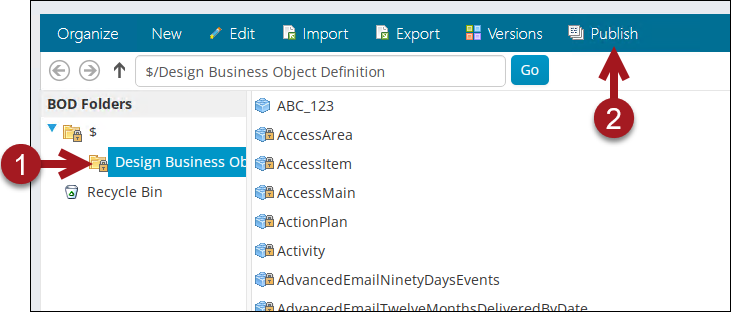
- (Category 1) Publish all working business objects.
- Go to RiSE > Business Object Designer.
- Click Publish to publish all business objects in the Design Business Object Definition folder.
- Click OK.
- (Category 1) Update business objects that are built from unsupported internal tables or views.
- UserDefinedSingleInstanceProperty
- UserDefinedMultiInstanceProperty
- UserDefinedTableStorage
- Any vUDBO* view
- Any vUDMBO* view
- Go to RiSE > Business Object Designer.
- Locate and open the identified sources.
- Click the Database tab.
- Review the Tables section. If and of the previously stated tables or views are listed, then the BO must be updated.
- From the Tables section, click Add.
- Locate the appropriate replacement table.
- Save and Publish the changes.
Run the below to locate all business objects that contain a TIME_STAMP property.
-- Grab all BOD documents that have a TIME_STAMP property
WITH BODDocumentXml AS (
SELECT [DocumentName],
[DocumentKey],
[DocumentVersionKey],
CAST(REPLACE(CAST(CAST([Blob] AS varbinary(max)) AS varchar(max)) COLLATE Latin1_General_BIN, CHAR(0) COLLATE Latin1_General_BIN, '' COLLATE Latin1_General_BIN) AS xml) AS [BlobXml]
FROM [dbo].[DocumentMain]
WHERE [DocumentTypeCode] = 'BOD'
AND [DocumentStatusCode] = 40
), BOsWithTimeStampProperty AS (
SELECT [DocumentName],
[DocumentKey],
[DocumentVersionKey],
[BlobXml]
FROM BODDocumentXml
WHERE [BlobXml].exist('((/*/BranchProperty[DBColumnName/text()="TIME_STAMP"])[1])') = 1
)
SELECT DocumentName, DocumentKey, DocumentVersionKey, BlobXML
FROM BOsWithTimeStampProperty;
Run the below to find the TIME_STAMP property in panel sources.
SELECT *
  FROM ObjectMetaData omd
       INNER JOIN INFORMATION_SCHEMA.COLUMNS isc ON omd.ObjectName = isc.TABLE_NAME
WHERE isc.DATA_TYPE = 'timestamp' OR isc.COLUMN_NAME = 'TIME_STAMP'
ORDER BY omd.ObjectName
From the iMIS 2017 Staff site, do the following:
There are specific iMIS tables and views that Business Objects (BOs) should never be built from; specifically, a custom BO should never be built from the underlying table implementations created by Panel Editor. If you have ever created a new BO using a low-level table or view from a custom panel data source, as identified below, then this applies to you.
Building BOs from these tables and views are problematic for those who are upgrading, because those tables and views are changing or going away entirely.
Tables
The following are tables that BOs should never be built from:
Views
The following are views that BOs should never be built from:
Any BO that relies on one of the above tables or views must be modified and corrected before upgrading.
Steps to take
Run the following SQL to locate business objects using any of the unsupported tables.
SELECT DocumentMain.DocumentName, DocumentMain.DocumentTypeCode, DocumentMain.DocumentStatusCode
            , DocumentStatusRef.DocumentStatusDesc
            , [Path] = [dbo].[asi_DocumentPathFromHierarchyKey](Hierarchy.HierarchyKey)
            , o.[name] AS ObjectName, s.[definition] As ObjectDefinition
FROM Hierarchy
            INNER JOIN HierarchyRoot ON Hierarchy.RootHierarchyKey = HierarchyRoot.RootHierarchyKey
            INNER JOIN DocumentMain ON Hierarchy.UniformKey = DocumentMain.DocumentVersionKey
            INNER JOIN DocumentStatusRef ON DocumentMain.DocumentStatusCode = DocumentStatusRef.DocumentStatusCode
            INNER JOIN sys.objects o ON 'vBo' + DocumentMain.DocumentName = o.[name]
            INNER JOIN sys.sql_modules s ON o.[object_id] = s.[object_id]
WHERE DocumentMain.DocumentStatusCode = 40 AND DocumentMain.DocumentTypeCode = 'BOD' AND DocumentMain.IsSystem = 0
AND(       s.[definition] LIKE '%UserDefinedSingleInstanceProperty%'
OR         s.[definition] LIKE '%UserDefinedMultiInstanceProperty%'
OR         s.[definition] LIKE '%UserDefinedTableStorage%'
OR         s.[definition] LIKE '%vUDBO%'
OR         s.[definition] LIKE '%vUDMBO%'
)
Order by DocumentMain.DocumentName
After the SQL is run, do the following in the iMIS 2017 Staff site:
Note: The replacement for BOs that rely on one of the above tables or views is any vBO* view. Each Panel Editor source has an associated BO and a vBO* view that you can safely use and will survive upgrades intact.
RiSE & Settings
- (Category 1) Ensure no content folders under the root folder (@) are named iMIS.
- Go to RiSE > Page Builder > Manage content.
- Select the root folder (@).
- Scan for a folder named iMIS. If there is a folder named iMIS, rename it to something else.
- Save the name change.
- (Category 1) Publish all working content.
- Go to RiSE > Page Builder > Manage content.
- Click the top-level @ folder.
- Click Publish.
- Leave Publish Working Items Only selected.
- Click OK.
- Close the window when complete.
- (Category 1) Rename Tagged List Formats that contain characters other than letters, numbers, and underscores.
- Go to RiSE > Tagging > Tagged list formats.
- Review the list and identify tags that contain characters other than letters, numbers, and underscores; for example, if the tag has spaces.
- Click the identified tag, then click Edit.
- Remove the invalid character from the Name field.
- Click Save.
- Repeat the process for each identified tag.
- (Category 1) Remove the Expansion value from general look up tables, with the exception of the DESIGNATION, PREFIX, SUFFIX, and FUNC_TITLE tables.
- Go to Settings > Utilities > General lookup tables.
- From the General tables drop-down, choose All.
- If there is a value in the Expansion column, do the following:
- Click the edit icon.
- Delete the Expansion value.
- Click Update.
- Repeat that process each time the Expansion value is populated, with the exception of Expansion values in the DESIGNATION, PREFIX, SUFFIX, and FUNC_TITLE tables.
- (Category 1) Update custom system icons. iMIS system icons have been updated from PNG to SVG (.svg) for the enhanced scalability, smaller file size, and customization options that the SVG file format offers. Custom themes may require adjustments because of this enhancement. See Updating custom system icons for full details.
If there are folders named iMIS under the root folder (@), they must be renamed. Folders named iMIS that are not under the root folder do not need to be renamed.
Do the following:
Do the following in the iMIS 2017 Staff site:
Do the following in the iMIS 2017 Staff site:
Do the following in the iMIS 2017 Staff site:
Finance
- (Category 1) Ensure payment methods are defined with a specific Type. If no Type is selected, such as Cash or Credit Card, the payment method will become an Open Credit payment method after the upgrade.
- Go to Settings > Finance > Cash accounts.
- Select an account.
- Ensure there is a Type selected. If there is not, choose one now.
- Click Save.
- Repeat that process for all payment methods.
- (Category 1) Post open batches.
- Open the iMIS Desktop.
- Go to AR/Cash, and select Manage batches.
- Select the open batch you need to post.
- Click Post Selected.
- A warning window asks you to confirm that you want to post the batch. Agree to post the batch.
- (Category 1) Process all premium transactions.
- Open the iMIS Desktop.
- Click Fundraising.
- Click Process premiums.
- Select one or more transactions, then click Convert.
- Click Yes to confirm.
To review payment methods in iMIS 2017, do the following:
Be aware that after any batch is posted, you cannot add, modify, or delete any transactions in the batch. Do the following to post a batch:
Previously, gift premium transactions were manually processed to an order. After upgrading, all gift premium transactions are automatically processed to the order stage. Before upgrading, all premium orders must be processed in the iMIS Desktop.
When the premium is processed in the iMIS Desktop, it is converted into the order type specified in the Set up module window (from Fundraising, select Set up module and enter the Premium Order Type in the Premiums as Products area).
Do the following to process premium transactions:
Commerce
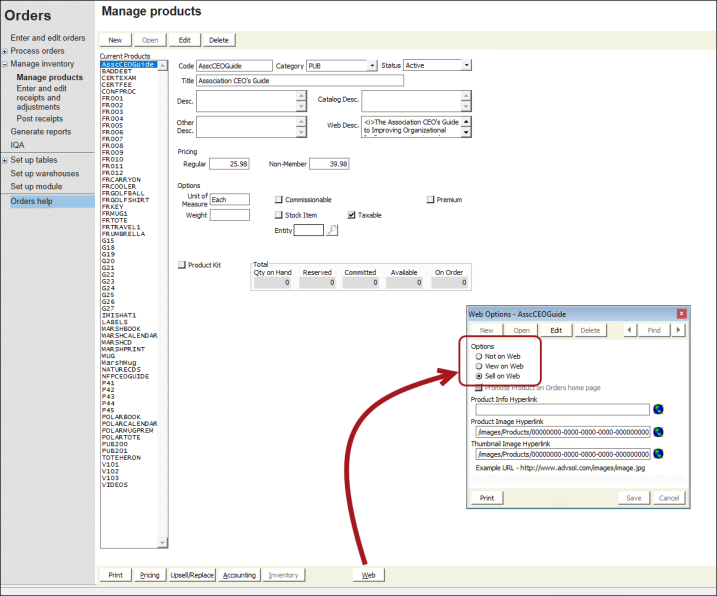
- (Category 1) To ensure all necessary products are available for public users to purchase, you must confirm the product's Web Option is correctly configured prior to upgrading.
- From the iMIS Desktop, go to Orders > Manage inventory > Manage products.
- Select a product from the Current Products list.
- If the product must be available post-upgrade, ensure the Status is Active.
- Click Web.The Web Option determines who can view the product and how the product is configured after the upgrade:
- The product setting Only staff can purchase is enabled.
- The Show in Search is populated with an End date in the past.
- The product only appears in search results when Include inactive results is enabled.
- If the product must be available to public users, ensure the Web Option is set to Sell on Web.
- Save the changes.
- Continue this process for all products.
- (Category 3 ) Product special pricing rules cannot be edited after the upgrade, so you must delete the rules prior to upgrading.
- Run the following to identify each product that contains special pricing:
- Make note of each product code identified.
- Review each product (Commerce > Find products) and make note of the pricing rule set up, so that you may easily recreate the rule in iMIS EMS.
- Update the following SQL, where xxx, yyy, and zzz are the product codes identified in step 1. Continue adding new UPDATE statements for each product code identified. When ready, run the SQL.
- Update the following SQL, where xxx, yyy, and zzz are the product codes identified in step 1. Continue adding new DELETE statements for each product code identified. When ready, run the SQL.
- (Post upgrade) Update each product (Commerce > Find products) and recreate the special pricing rules using the out-of-the-box settings.
- (Category 1) iMIS EMS does not support multiple warehouses, so you must designate all inventory to the default warehouse before upgrading. If you do not have multiple warehouses enabled, this does not apply to you.
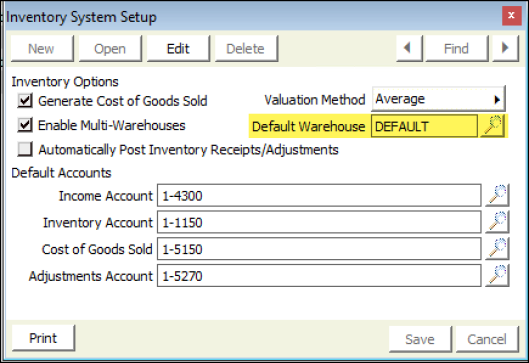
- From the iMIS Desktop, go to Orders > Set up tables > Set up module.
- Click Inventory.
- Make note of the warehouse defined in the Default Warehouse field.
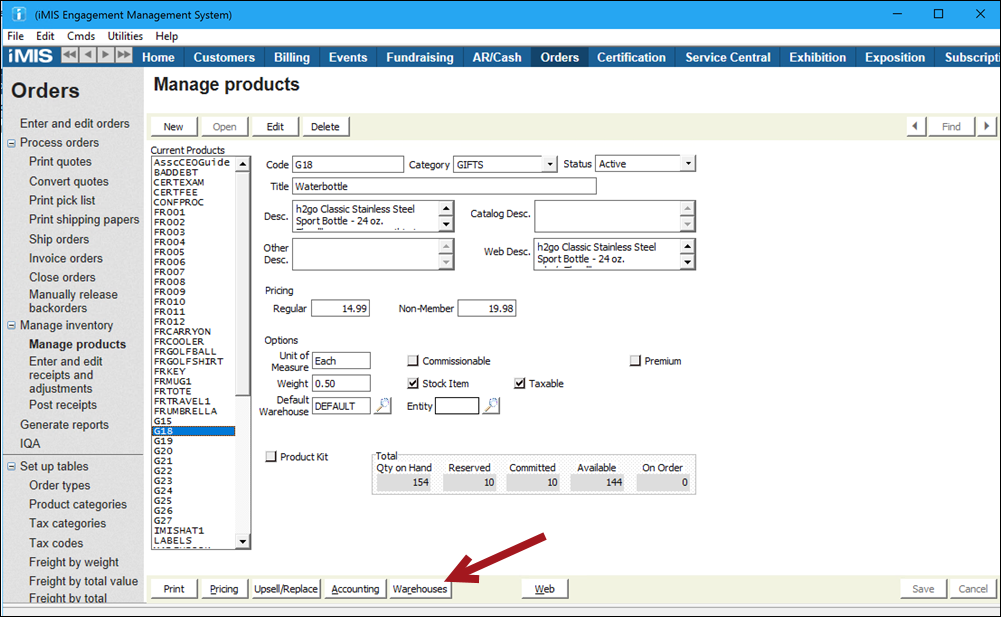
- Close the Inventory System Setup window, then go to Orders > Manage Inventory > Manage products.
- Select a product. If there is inventory defined for the product, the Warehouse button is enabled.
- Click the Warehouses button.
- Confirm the selected Warehouse is the default warehouse. Update the Warehouse to the default warehouse if the default is not already selected.
- Repeat steps 5-7 for each product.
For each product that you want to continue using post-upgrade, you must confirm the Web Option is correctly configured:
| Web Option | Who can view the product post upgrade | Post-upgrade configuration |
|---|---|---|
| Not on Web | Staff users |
|
| View on Web | Staff users | The product setting Only staff can purchase is enabled. |
| Sell on Web | Public and staff users |
Do the following to delete the special pricing rules and recreate them using the out-of-the-box implementation:
SELECT * FROM Product WHERE PRICE_RULES_EXIST = 1 AND PROD_TYPE = 'SALES'
UPDATE Product SET PRICE_RULES_EXIST = 0 WHERE PRODUCT_CODE = 'xxx'
UPDATE Product SET PRICE_RULES_EXIST = 0 WHERE PRODUCT_CODE = 'yyy'
UPDATE Product SET PRICE_RULES_EXIST = 0 WHERE PRODUCT_CODE = 'zzz'
DELETE FROM Product_Price WHERE PRODUCT_CODE = 'xxx'
DELETE FROM Product_Price WHERE PRODUCT_CODE = 'yyy'
DELETE FROM Product_Price WHERE PRODUCT_CODE = 'zzz'Do the following:
Events
- (Category 2) Update events that used the Desktop EXPO module.
- (Category 3) Update events that are using stored procedures for price evaluation.
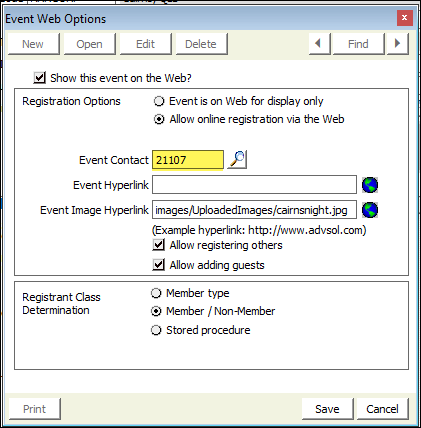
- (Category 1) Update the Show on Web option for events.
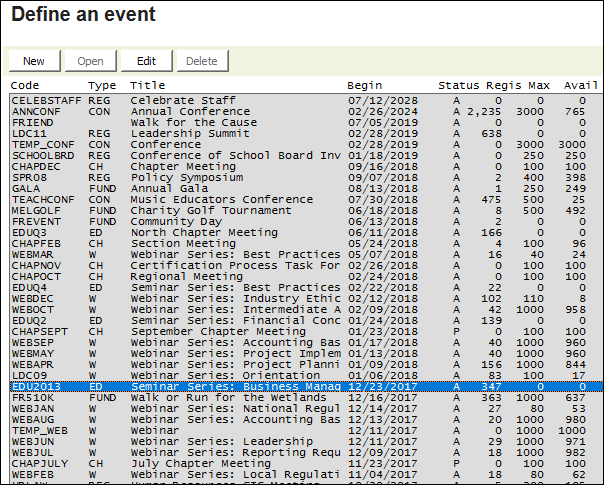
- From the iMIS Desktop, go to Events > Define an event.
- Select the first event, then click Edit.
- Click More, then choose Web Options.
- Click Edit.
- Enable Show this event on the Web?
- Click Save.
- Repeat for each event.
- (Category 1) Contacts that have been deleted from iMIS that were once defined as the Event Contact will still have their iMIS IDs recorded in the event definition, which causes errors when editing the event post-upgrade.To prevent these errors, it is important that these IDs are removed from the event definition.
- Go to RiSE > Intelligent Query Architect > New > Query.
- Enter a Name, then click the Sources tab:
- Click Add Source.
- Choose the CsEvent and CsContact business objects.
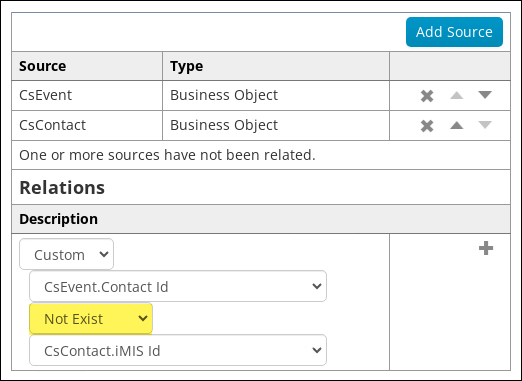
- Add the following relation: CsEvent.Contact Id Not Exist CsContact.iMIS Id
- Click the Filters tab.
- From the Property drop-down, choose CsEvent.Contact Id.
- From the Comparison drop-down, choose Not Empty.
- Add (+) the filter.

- Click the Display tab:
- From the drop-down, select View all columns.
- Select the CsEvent.Title property.
- Select the CsEvent.Contact Id property.

- Click Run.
- From the iMIS Desktop, go to Events > Define an event.
- From the list of events, double-click one of the events returned in the above query.
- Click More > Web Options.
- Click Edit.
- Delete the ID from the Event Contact field.
- Click Save.
- Repeat the process for each event returned in the query.
- (Category 1) Contacts that have been deleted from iMIS that were once defined as an event function resource (speaker or staff) will still have their iMIS IDs recorded in the event definition, which causes errors when editing the event post-upgrade. To prevent these errors, it is important that these IDs are removed from the event definition.
- Go to RiSE > Business Object Designer > New > Design Business Definition.
- Enter a Name (EventSpeakers).
- Click Create Object.
- Click the Database tab.
- From Tables, click Add.
- Select the Meet_Resources table, then click OK.
- Click Add All as Properties.
- Click Save, then click Publish.
- Go to RiSE > Intelligent Query Architect > New > Query.
- Enter a Name, then click the Sources tab:
- Click Add Source.
- Choose the business object you created above (EventSpeakers) and the CsContact business object.
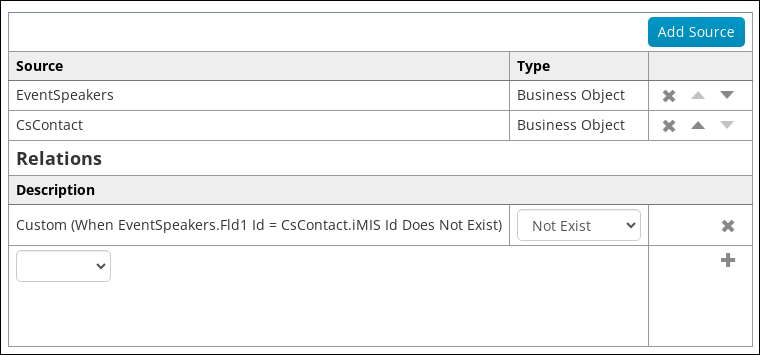
- Add the following relation: EventSpeakers.Fld1 Id Not Exist CsContact.iMIS Id
- Click the Display tab:
- From the drop-down, select View all columns.
- Select the following properties:
- EventSpeakers.Fld1 Id
- EventSpeakers.Product Code
- EventSpeakers.Resource Type
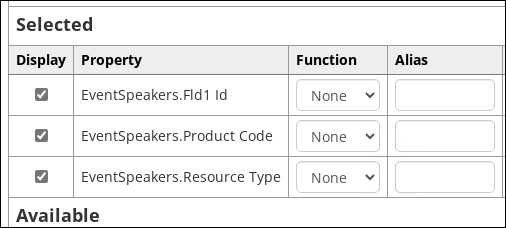
- Click Run. The first half of the Product Code is the code of the event. The second half of the Product Code is the code of the event function where the ID currently exists.
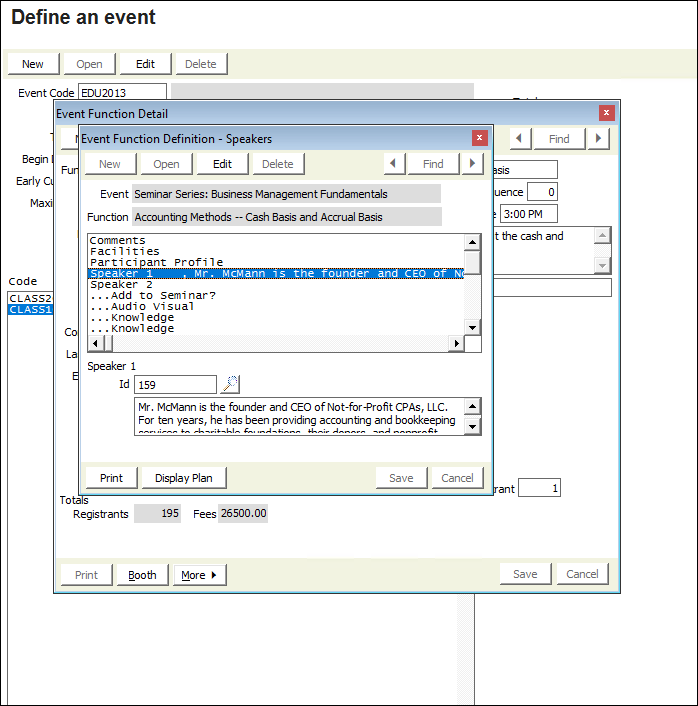
- From the iMIS Desktop, go to Events > Define an event.
- From the list of events, double-click one of the events returned in the above query.
- From the list of functions, double-click the associated function.
- Click More > Speakers or More > Staff.
- Click the row that contains the speaker or staff ID details.
- Click Edit.
- Delete the Id or select a new Id.
- Click Save.
- Repeat the process for each Event/Function returned by the query.
- (Category 1) Images added to an event through the iMIS Desktop are not added to the Image Manager during the upgrade, which causes errors when editing the event post-upgrade. To prevent these errors, it is important that these images are removed from the event.
- Go to RiSE > Intelligent Query Architect > New > Query.
- Enter a Name, then click the Sources tab:
- Click Add Source.
- Choose the CsEvent business object.
- Click the Filters tab:
- From the Property drop-down, select Meeting Image Name.
- From the Comparison drop-down, select Contains.
- From the Value field, enter http.
- Add (+) the filter.

- Click the Display tab:
- From the drop-down, select View all columns.
- Select the Title property.
- Select the Meeting Image Name property.
- Click Run.
- From the iMIS Desktop, go to Events > Define an event.
- From the list of events, double-click one of the events returned in the above query.
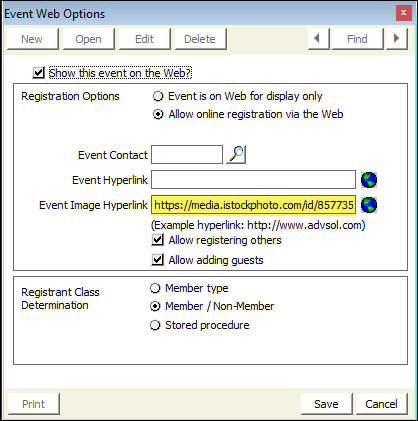
- Click More > Web Options.
- Click Edit.
- Delete the URL from the Event Image Hyperlink field.
- Click Save.
- Repeat the steps for each event returned by the query. To replace the image, see Defining an event.
If your organization previously used the EXPO module in iMIS 2017 Desktop, some iMIS EMS events may upgrade with issues, such as missing program items, registration options, or active registrants post-upgrade.
Clients familiar with their use of EXPO may already be aware of this, but running the following SQL provides confirmation and helps avoid event registration issues in EMS. Run the following to confirm the use of the EXPO module:
SELECT * FROM Product_Function
WHERE FUNCTION_TYPE = 'EXPO';
SELECT * FROM Orders
WHERE Order_Type_Code = 'EXPO'
AND Source_System = 'EXPO';If results are returned, your organization has used the EXPO module and you must convert the records after upgrading to EMS.
To convert the events, run the following:
INSERT INTO dbo.[Order_Badge] ([ORDER_NUMBER],
[BADGE_NUMBER],
[BADGE_TYPE],
[FULL_NAME],
[TITLE],
[COMPANY],
[FULL_ADDRESS],
[PREFIX],
[FIRST_NAME],
[MIDDLE_NAME],
[LAST_NAME],
[SUFFIX],
[DESIGNATION],
[INFORMAL],
[ADDRESS_1],
[ADDRESS_2],
[CITY],
[STATE_PROVINCE],
[ZIP],
[COUNTRY],
[BAR_CODE],
[DELEGATE],
[ST_PRINT_COMPANY],
[ST_PRINT_TITLE],
[ADDRESS_3],
[ADDRESS_NUM])
SELECT [ORDER_NUMBER],
1,
'PRIMARY',
[FULL_NAME],
[TITLE],
[COMPANY],
[FULL_ADDRESS],
[PREFIX],
[FIRST_NAME],
[MIDDLE_NAME],
[LAST_NAME],
[SUFFIX],
[DESIGNATION],
[INFORMAL],
[ADDRESS_1],
[ADDRESS_2],
[CITY],
[STATE_PROVINCE],
[ZIP],
[COUNTRY],
[BAR_CODE],
NULL,
[ST_PRINT_COMPANY],
[ST_PRINT_TITLE],
[ADDRESS_3],
[ST_ADDRESS_NUM]
FROM dbo.[Orders]
WHERE [ORDER_TYPE_CODE] = 'EXPO';
UPDATE dbo.[Orders]
SET [ORDER_TYPE_CODE] = 'MEETING',
[SOURCE_SYSTEM] = 'MEETING'
WHERE [ORDER_TYPE_CODE] = 'EXPO'
AND [SOURCE_SYSTEM] = 'EXPO';
UPDATE dbo.[Product_Function]
SET [FUNCTION_TYPE] = 'REG'
WHERE [FUNCTION_TYPE] = 'EXPO';Before upgrading, ensure no events are configured to use a stored procedure for price evaluation.
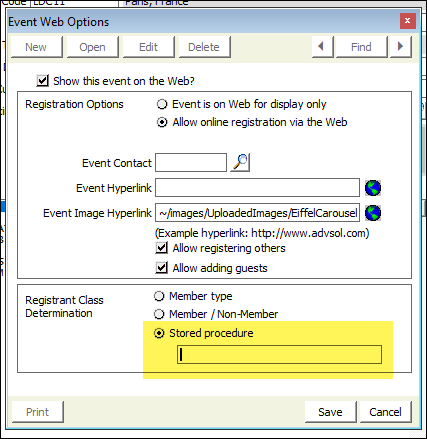
Run the following to determine if any events are using stored procedures:
Select * from Meet_master
Where REG_CLASS_STORED_PROC <> ''
If the above returns results, use the following to clear the stored procedure pricing from all events:
Update Meet_Master
set REG_CLASS_STORED_PROC = '',
WEB_REG_CLASS_METHOD = '1'
where REG_CLASS_STORED_PROC <> '' Before you upgrade, confirm that all desired events have the Show this event on the Web? checkbox enabled. If this is not enabled before you upgrade, the event will not appear on your public-facing website.
Do the following:
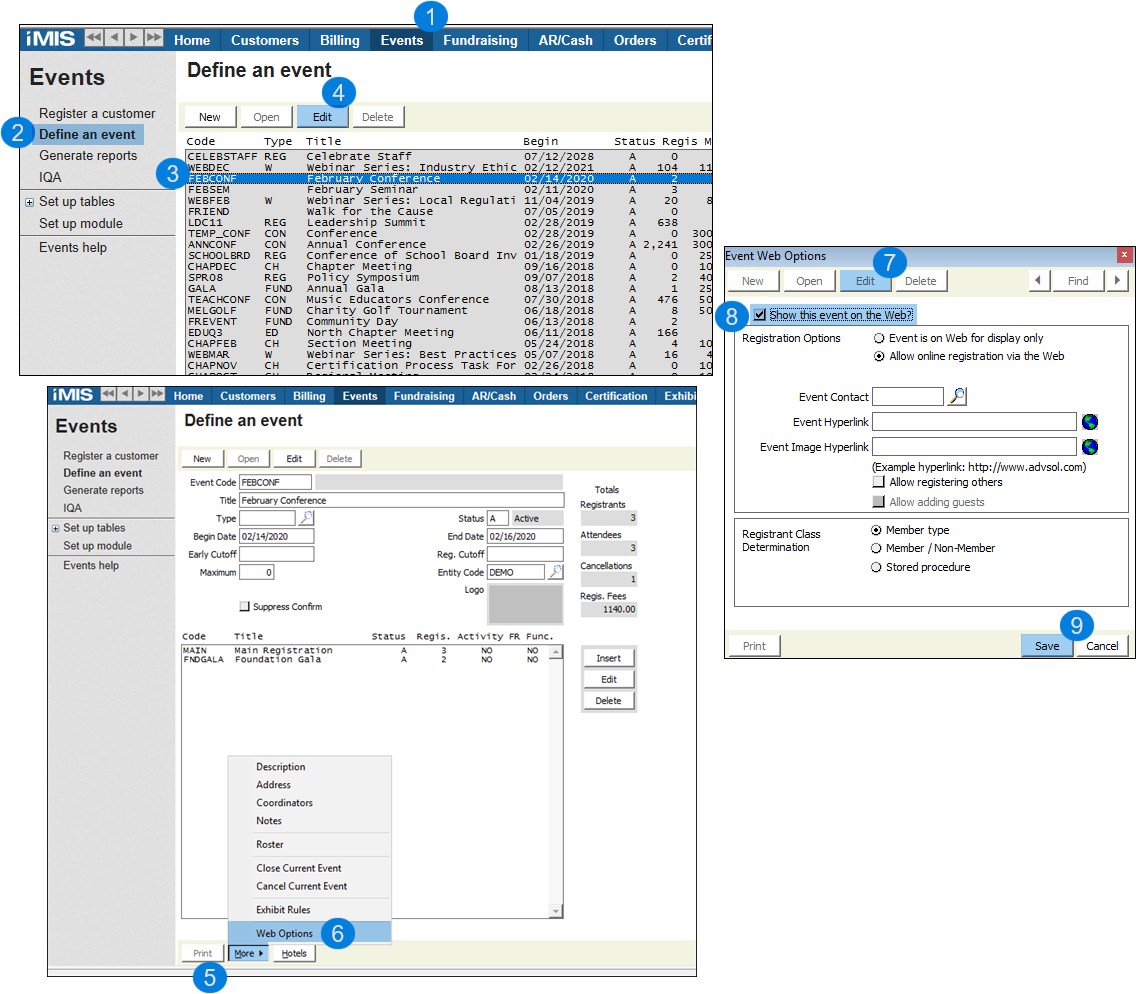
From the iMIS 2017 Staff site, determine whether any events need updating:

Next Steps to take
If the query returns any results, do the following:
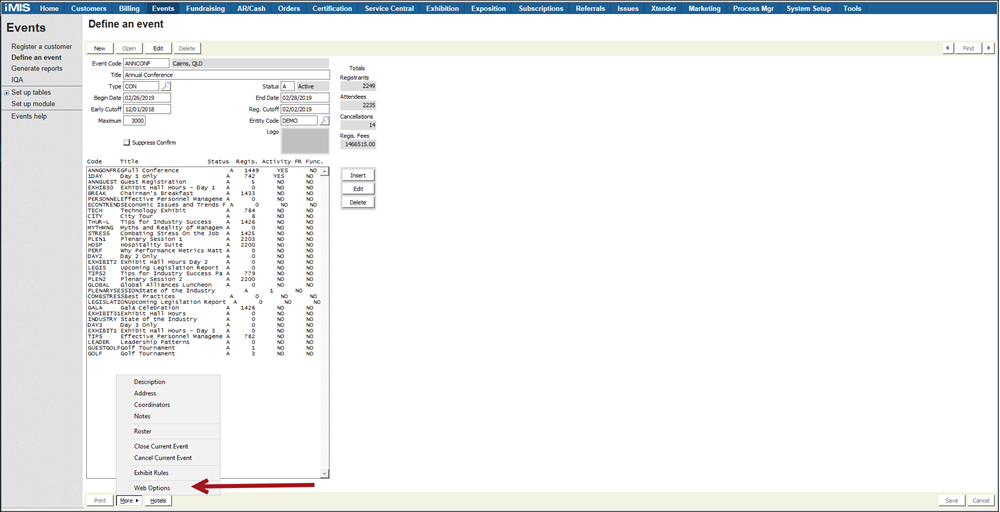
There is not an out-of-the-box business object in iMIS 2017 that returns event resource data, but you can quickly create a business object:
Next, create the query:

Next Steps to take
If the query returns any results, do the following:
From the iMIS 2017 Staff site, do the following:

Next Steps to take
If the query returns any results, do the following:
