Last updated on: January 27, 2026
Orders provides you with an established and integrated tool for recording, processing, and tracking your organization's product orders. This article reviews how to locate an order in iMIS, understand order stages, and print an order using an out-of-the-box report.
In This ArticleIn this article
Finding orders
Go to Commerce > Find orders to locate all orders that have been placed. You can search for all orders using Find orders, or narrow the search to only Find premium orders.
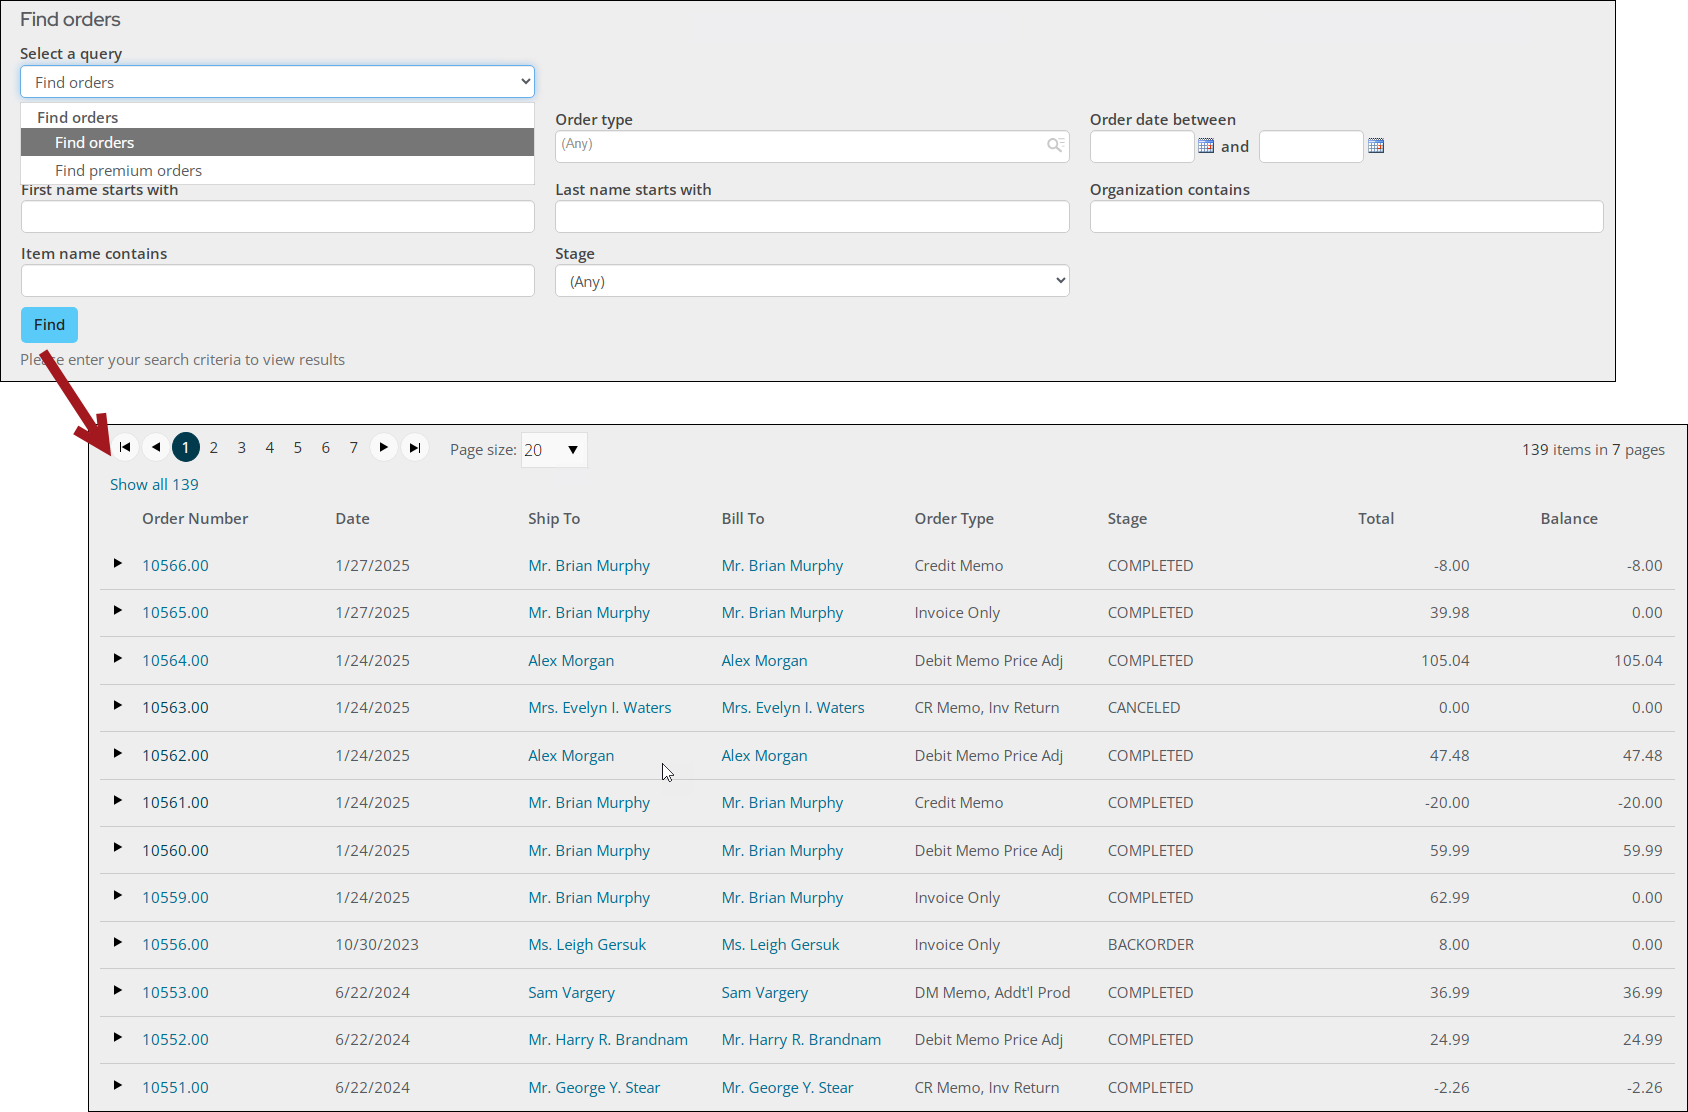
Staff users can find orders by entering values for one or more of the provided parameters. This tool is especially useful when specific order information is unavailable.
The queries are located at $/OrderManagement/DefaultSystem/Queries/Find orders. To modify any of the query parameters, you can make changes to a copy of the queries, or you can make a new query using the system query as a template.
Add new or modified queries to the Find orders folder.
Warning! Do not modify a system query. Instead make a copy of the query and apply the changes to the copy. Any system query that is modified will be overwritten on upgrade.
To modify any of the query parameters, you can make changes to a copy of the queries, or you can make a new query using the system query as a template.
Note: You cannot select a single order from this result set to be exported. All the order results from your query are exported when you select an Export format.

When a premium order is viewed using the Find orders query, the Total and Balance are 0.00. See Premiums for more information.
Reviewing orders
Note: Only users with access to the order can view the order details.
Review the order details:
- Go to Commerce > Find orders.
- Search for the order.
- Select the Order Number to review detailed order information. An Order Detail window is displayed:
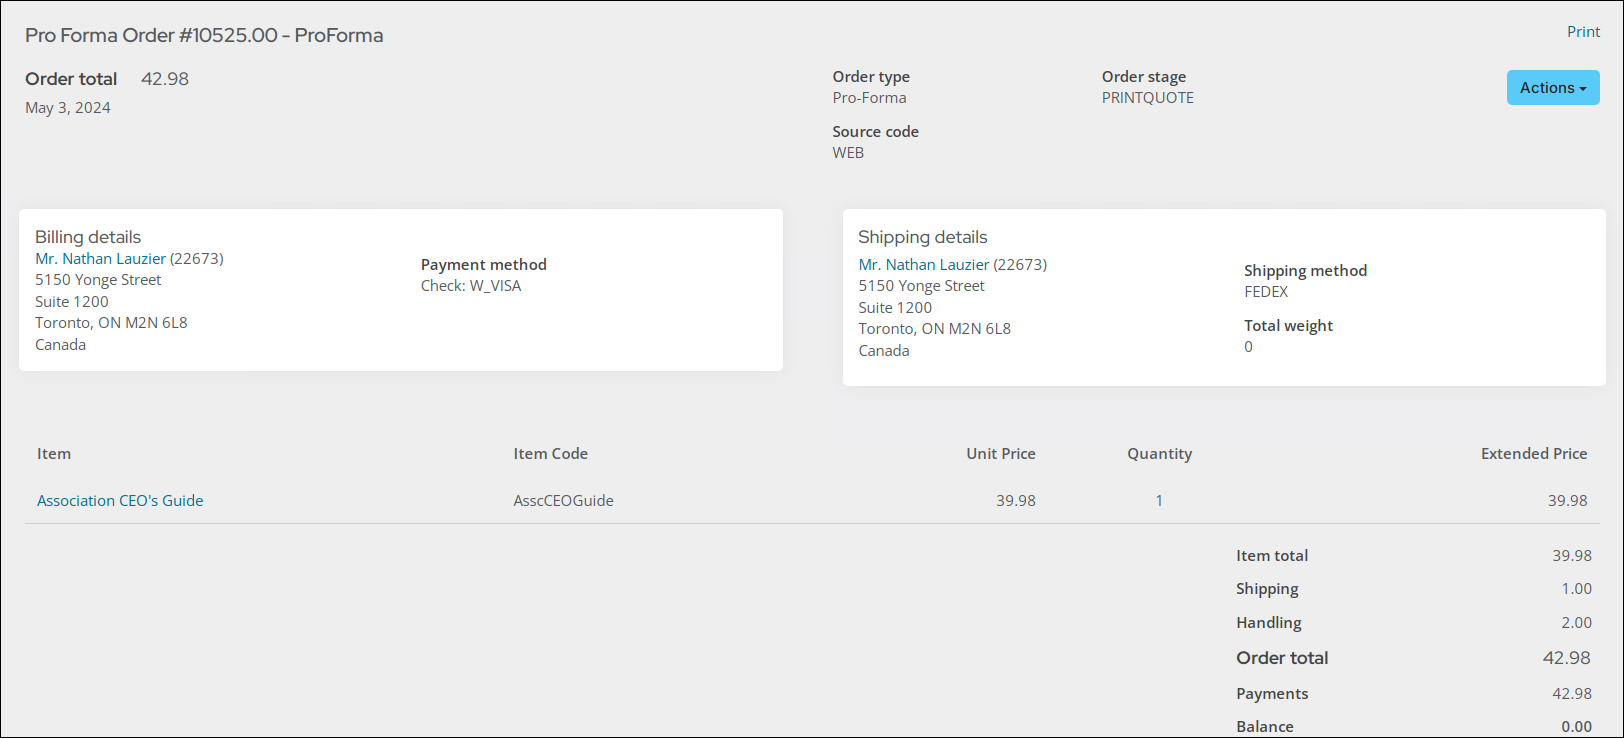
Note: The Order type, Source code, Order stage, Promo code fields, as well as the Actions button, are visible to staff users only.
From the Actions drop-down, authorized staff users have the option to cancel orders that have not yet been invoiced (status is not COMPLETED). All otherActions available on the Order Detail window vary based on the current Order stage:
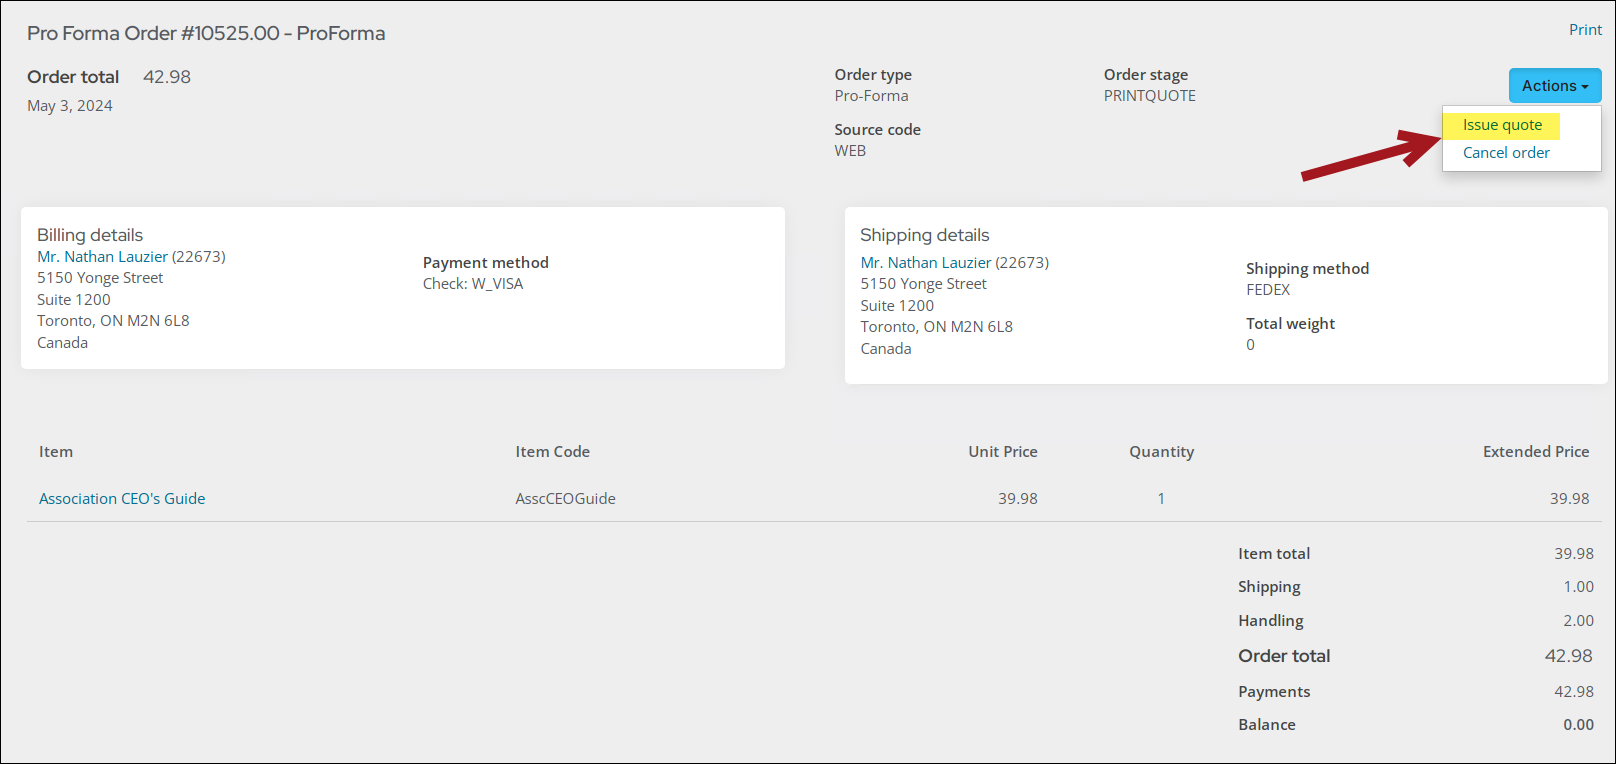
- PRINTQUOTE (Issue quotes) – Click Actions to Issue quote. An Issue quote dialog window is displayed. Issue quote is used for generating sales quotes for pro forma orders only, allowing sales quotes to be generated without affecting product inventory or account status:
- Select one of the Send options:
- Email – Sends an email communication with a sales quote when you click Issue Quotes to advance the order to the next stage.
- Print – Prints a PDF of the sales quote when you click Issue Quotes to advance the order to the next stage.
- Select a Quote template. You can customize the sample communication template or create a new template to use without needing to copy the staff site content.
- (optional if Print is selected and the selected template includes an attachment) Deselect Print the template attachment only to print the body of the email in addition to the attachment. By default, this option is selected.
- Click Issue Quotes. The order is advanced to the next stage, QUOTEREADY.
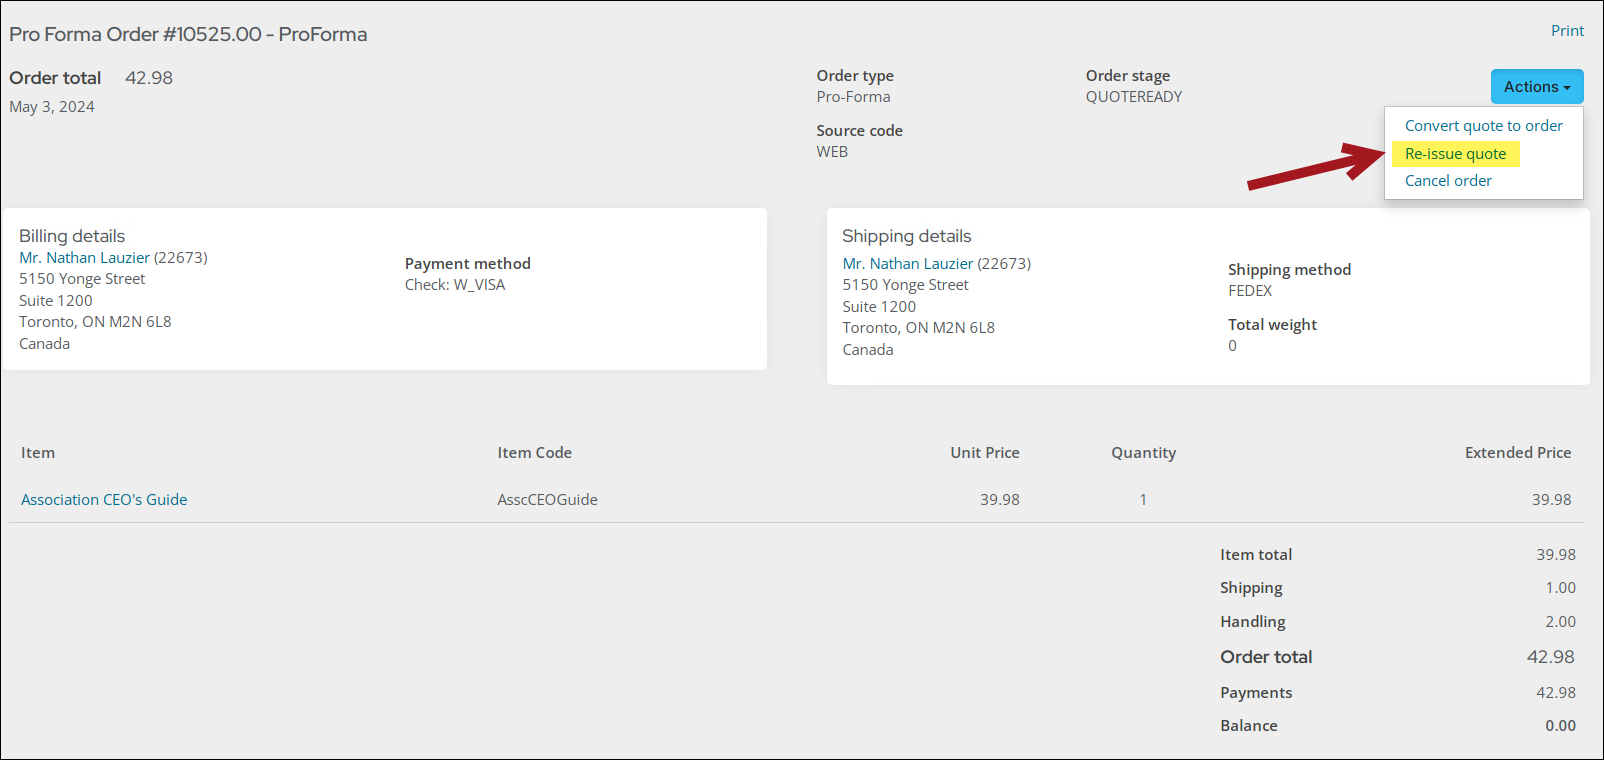
- QUOTEREADY (Convert quotes) – Click Actions to Convert quote to order and Re-issue quote:
- The Convert quote to order option is used only with pro forma orders. This option converts pro forma orders to actual orders. Select Convert quote to order to advance the order to the SHIPPAPER stage.
- Click Re-issue quote to regenerate a sales quote and issue a new communication. The new communication can be found in the communication log and on the contact’s interaction log. The Issue quote dialog window is displayed again, and you can regenerate sales quotes. The order is not advanced beyond the QUOTEREADY stage.
Note: If you are using a custom quote, it is possible for the re-issued quote to contain information different from the quote's original issuing.
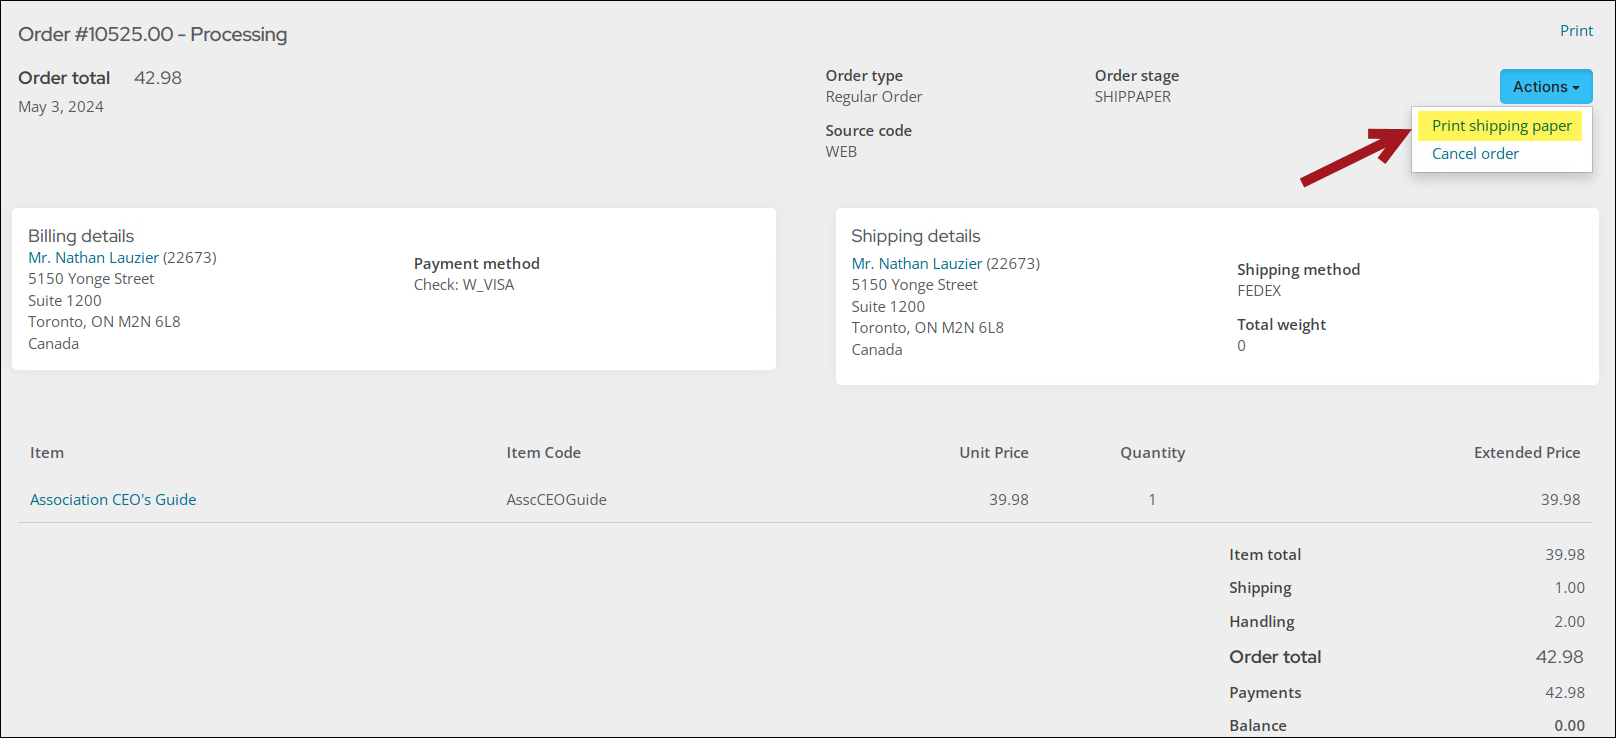
- SHIPPAPER (Print shipping papers) – Click Actions to Print shipping paper.
- The Print shipping paper option generates a shipping paper known as a Packing Slip. Select Print shipping paper to advance the order to the SHIPMENT stage.
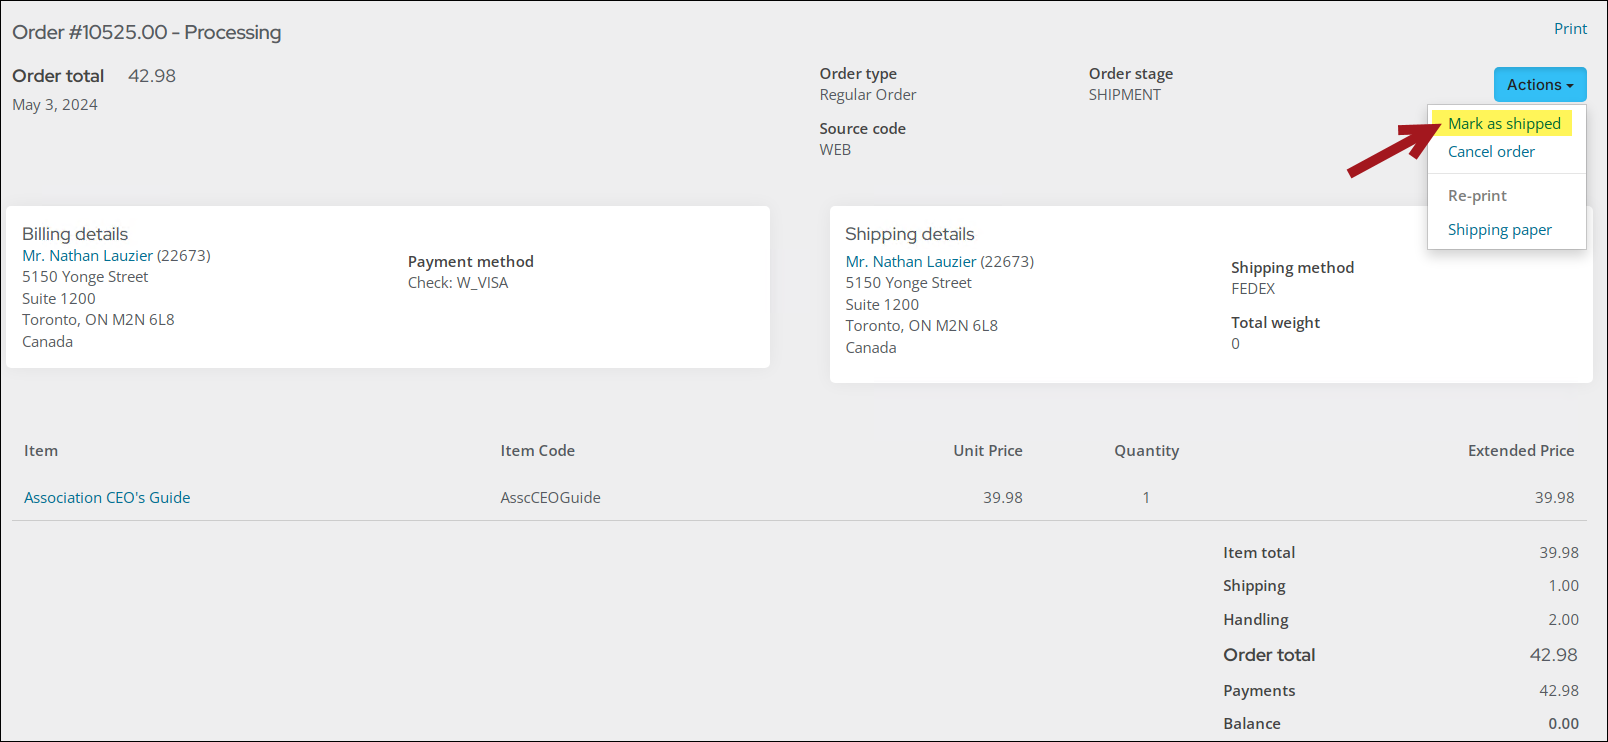
- SHIPMENT (Ship orders) – Click Actions to Mark as shipped or Re-print Shipping paper:
- Click Mark as shipped. The Mark as shipped dialog window is displayed:
- Enter the Ship date for the order. Defaults to today's date.
- Select the Shipping method by which the order was shipped. Defaults to the shipping method specified in the order.
- Click Mark as Shipped to advance the order to the INVOICE stage.
- Click Re-print Shipping paper to regenerate the packing slip. The order is not advanced beyond the SHIPMENT stage.
- Click Mark as shipped. The Mark as shipped dialog window is displayed:
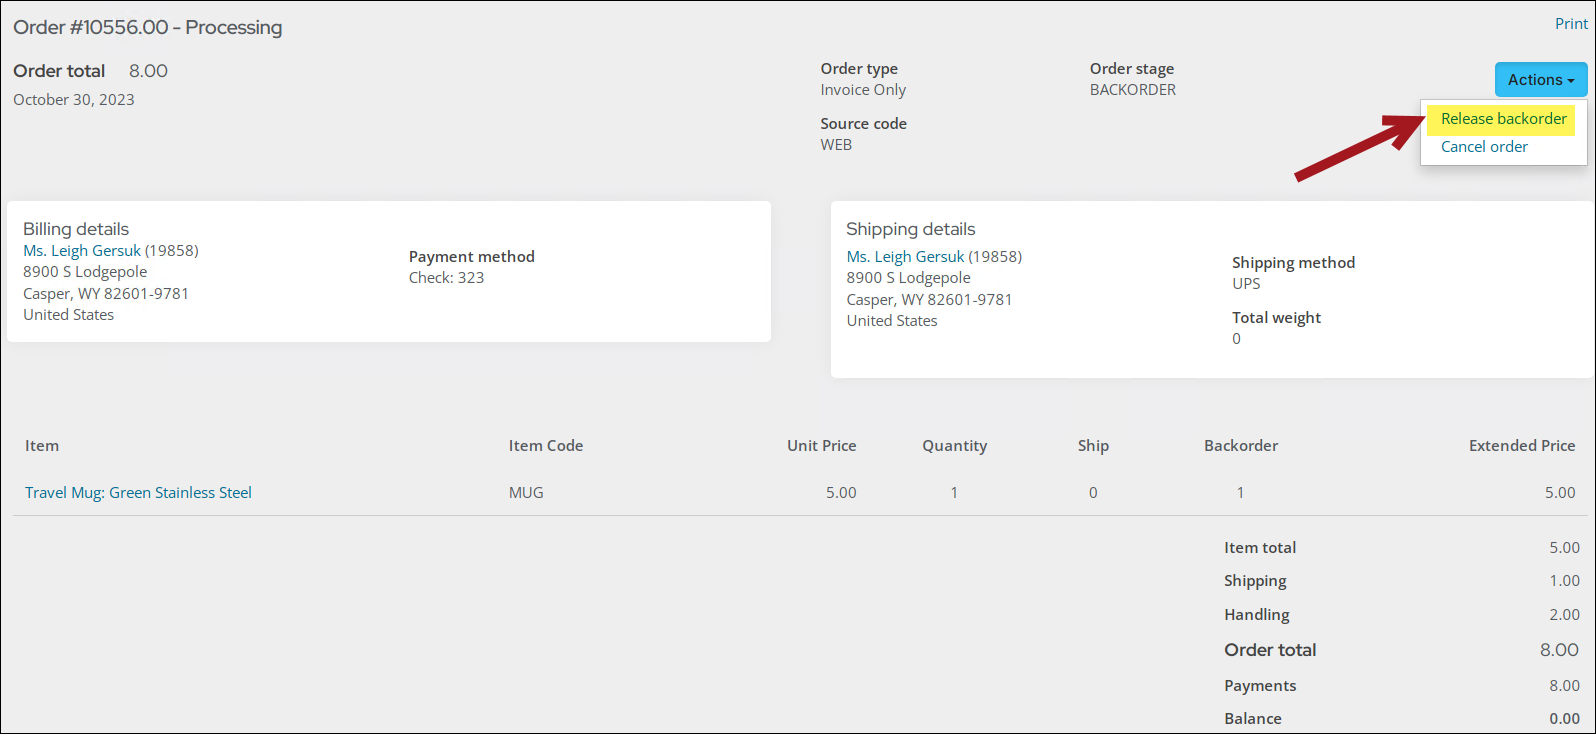
- BACKORDER (Release backorders) – Click Actions to Release Backorder. The order is advanced to the default order stage.
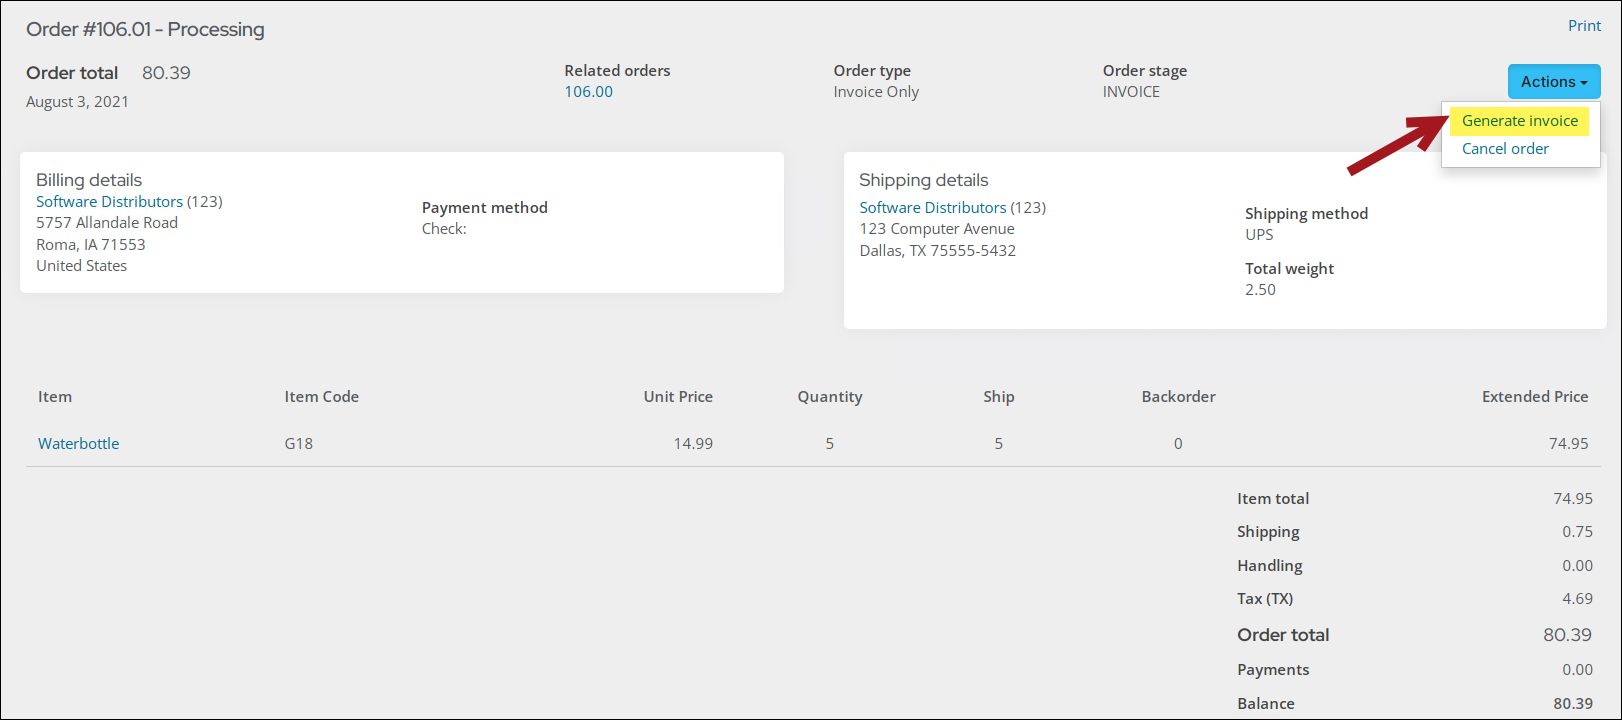
- INVOICE (Generate invoices) – Click Actions to Generate invoice or Re-print Shipping paper:
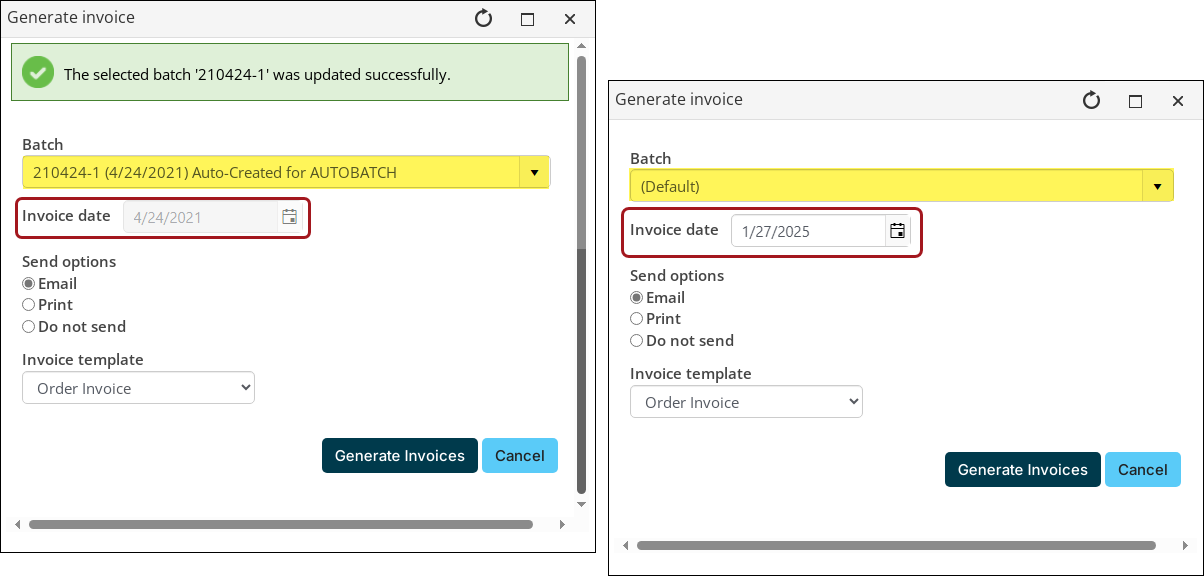
- Click Generate invoice. A Generate invoice dialog window is displayed:
Note: Once invoiced, orders cannot be cancelled.
- Select an Invoice date.
- (Manual batches only) If Manual batches is enabled as the batch mode, select a Batch from the drop-down. When a batch is selected, the Invoice date defaults to the Batch date and cannot be modified. Choosing the Default batch or adding a new batch will enable the Invoice date field and staff users can choose any Invoice date.
- (All other batch modes) For batch modes other than manual, enter an Invoice date. The Invoice date determines the Batch date.
- Select from the list of Send options:
- Email – Communications are sent to the Bill To contact for the order with the Order Invoice report attached, filtered to that order. The email includes a PDF attachment of the generated invoice, unless a custom Invoice template without an attachment is selected.
- Print – A PDF containing the generated invoice is downloaded. If the selected Invoice template does not have an attachment, the body of the template is printed for each order and Bill to contact.
- Do not send – No email is sent, and no PDF is downloaded to the browser.
Note: If you selected either Email or Print, the resulting communication can be found in the communication log and on the contact’s interaction log.
- (unavailable if Do not send is selected) Select an Invoice template. You can customize our sample communication template with an existing Order Invoice report attached. The sample template can be found at $/Common/Communications/Templates/Samples/Order invoices.
- (optional if Print is selected and the selected template includes an attachment) Deselect Print the template attachment only to print the body of the email in addition to the attachment. By default, this option is selected.
- Click Generate Invoices to advance the order to the COMPLETED stage.
Note: Regardless of the selected batch mode, if there is an existing batch that matches the Invoice Date and applies to the current user, then that batch is used. If there is no matching batch, then one is created. Batches are assigned to a user based on the batch settings (Configuring the batch mode).
- Click Re-print Shipping paper to regenerate the packing slip. The order is not advanced beyond the INVOICE stage.
- Click Generate invoice. A Generate invoice dialog window is displayed:
Note: The Shipping method and Total weight fields are visible only if there are values for these fields.
Printing orders
Do the following to print an order invoice:
- Go to Commerce > Find orders.
- Search for the order.
- Select the Order Number to review more detailed information in the Order Detail screen.
- Click the Print link. Details about the selected order are provided in the Print Order Details report.
- Export the invoice report to PDF or Excel.
- Print the report.
Note: The Print link uses a shortcut named PrintOrderDetails. You can modify the shortcut to point to different content or edit the Print Order Details content to point to a different report.
Note: When printing order invoices that contain adjustments, the adjustments appear on a separate page. Each adjustment made to an order invoice will appear on its own page.
