Last updated on: January 27, 2026
With iMIS you can manage inventory, product sales, invoicing and other financial transactions, all from one centralized system. The following tutorial outlines how to get started with Commerce and best practices for using it effectively.
- Creating products and product categories
- Setting up the shopping cart
- Defining order types
- Creating an online store
- Recording, processing, and tracking commerce orders
- Working with promotions and pricing groups
Products
Your organization can define and display commerce products in a virtual store, allowing members to purchase any of your offered items.
When creating your online store, the basic workflow is as follows:
- Defining product categories
- Defining products
- (optional) Defining a collection of items (product kits)
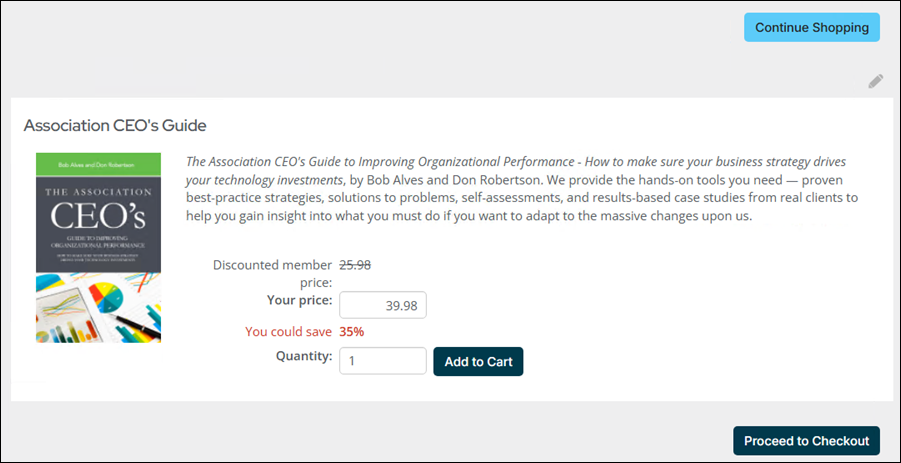
Product categories allow you to classify your products. You must define your product categories before defining your individual products. Each time you define a product, you must assign it to one of your product categories.
Warning! Do not delete a product category if you intend to create products associated with that category. For example, do not delete the Gifts category if you intend to create gift items.
Product categories are used to assign default accounts and to enable category options for groups of products. Define the product categories:
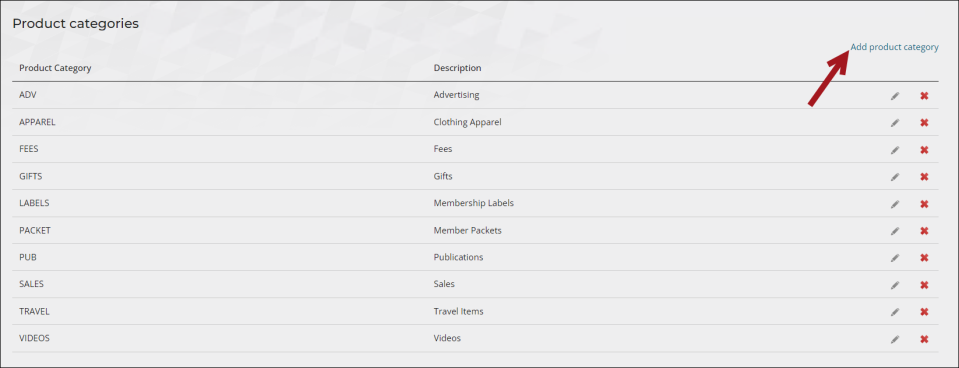
- Go to Settings > Commerce > Product categories.
- Click Add product category.
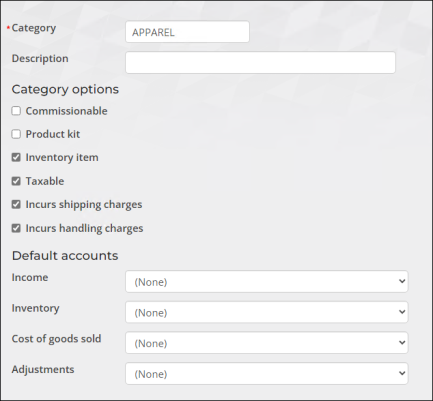
- Enter a code for the product category in the Category field.
- (optional) Enter a Description of the product category.
- Enable the applicable Category options. Select the options that you want enabled by default when defining new products. You can override all settings at the product level:
- Commissionable – Currently not operational. Contact the ASI Product Managers for more information.
- Commissionable % - Currently not operational. Contact the ASI Product Managers for more information.
- Product kit – Enable to indicate that the product category consists of product kits. To continue setting up your product kit, see Defining a collection of items.
- (unavailable when Product kit selected) Inventory item - Enable to indicate that products belonging to this category have physical inventory. You can track inventory only for items stocked in inventory.
- Taxable – Enable to indicate that the product category is taxable.
- Incurs shipping charges – Enable this option to add shipping charges when the user checks out.
- Incurs handling charges – Enable this option to add handling charges when the user checks out.
Note: Individual kit components are not identified under Recent transactions (Transactions tab) on an account page. Only the Name of the kit is displayed.
- Commissionable – Currently not operational. Contact the ASI Product Managers for more information.
- Enter any applicable Default accounts. These accounts allow you to define the default accounts for products within this category.
- Click Save.
Note: If the product category you are defining is a non-inventory (virtual) item or an inventory item without defined shipping or handling charges, public users will not be presented with line items for shipping or handling.
When defining product-level accounts, the most specific accounting information takes precedence. iMIS looks for product-level accounts. If you have not defined product-level accounts, iMIS uses the default product category accounts.
Products make up your inventory and power your online store. Review the following notes before creating products:
- Once created, products cannot be deleted. Exercise caution when creating products.
- To create a kit, you must select a category that is defined as a Product kit.
- If you are creating a collection of items (kit), you must define the components of the collection.
- The Inventory, Cost of goods sold, and Adjustments accounts do not appear unless Generate transactions for cost of goods sold is enabled.
To add a product, go to Commerce > Add product, and do the following:
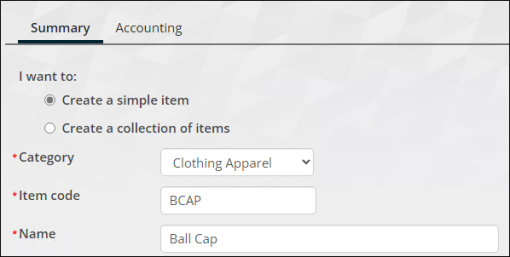
- From the Summary tab, select Create a simple item. To create a collection of items, see Defining a collection of items.
- Select a product Category. For more information, see Defining product categories.
- Enter an Item code. For example, if you are adding a new coffee mug, the code could be MUG123.
- Enter a Name and a brief Description for the item.
- Select an image for the product.
- (optional) Enter the Weight to help calculate shipping costs.
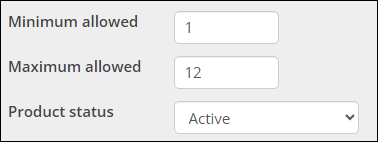
- (optional) Enter the Minimum allowed. Users cannot purchase less than the specified number of items.
- (optional) Enter the Maximum allowed. Users cannot purchase more than the specified number of items.
- Select a Product status.
- Active (A) - Always available, unless the product has insufficient inventory, in which case the product is backordered.
- Inactive (I) - Temporarily unavailable for sale to customers.
- Not Available (N) - No longer available for sale to your customers and can include discontinued and recalled items; has the same functional characteristics as Inactive (I) products.
- Marked For Deletion (D) - No longer available for sale to your customers, and the inventory has been sold, returned, or destroyed.
- Out Of Production (O) - Cannot be reordered from suppliers and are available for sale to your customers only up to the current inventory level.
- (optional) Enter dates and times for Show in search to provide a date range during which your product will show up in searches. If no date is entered, the product will always show in search results. Staff users can choose to show inactive products in their search results.
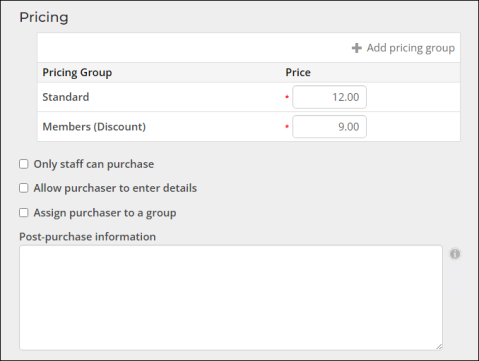
- Enter the Standard price (non-member) and Discount price (member).
- The Add pricing group option is available once the product is saved. To add pricing groups, see Adding pricing groups to products.
- (optional) Only staff can purchase - Select this option to restrict the ability of public users to select this item:
- If enabled, public users can view the product but not add the product to the cart. The Show in search dates still determine whether the item can be found in search.
- If disabled, public users can add the item to their cart. The Show in search dates still determine whether the item can be found in search.
- (optional) Allow purchaser to enter details - Select this option to enable adding specific details about an item at the time the order is being placed.
- (optional) Assign purchaser to a group - Select this option to automatically add all purchasers of this item to a group. You can create products that offer group-based access to post-purchase information or content based on a group membership. For more information, see Granting access to secure website content.
- (optional) Post-purchase information - Information to be displayed to a user following purchase of this item. Post-purchase information is included in the order confirmation message and can be used to indicate how to retrieve downloadable content.
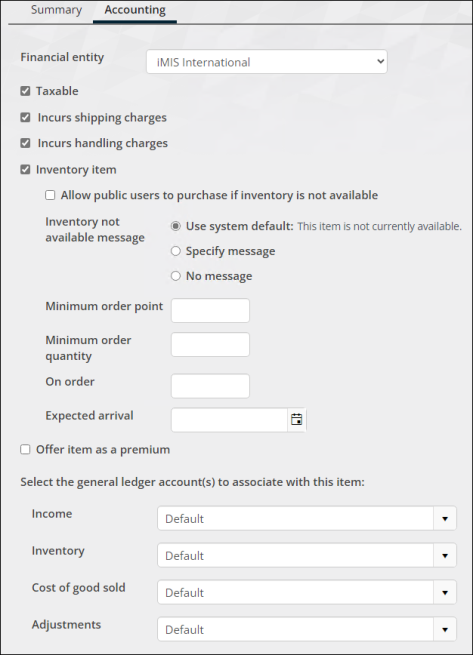
- From the Accounting tab, review the default settings and make any required changes for the item. The options available depend on the taxation method set up for your default organization:
- Financial entity - Select a Financial entity to which the product purchase amount is deposited. If this option is left blank, the product purchase amount is deposited to the Default financial entity (Default organization).
- Taxable:
- If your organization uses the default taxation method, select Taxable.
- If the product is non-taxable, deselect Taxable.
- If your organization uses the VAT taxation method and the product is taxable, select Taxable and enter the VAT Tax Code you want to apply.
- Incurs shipping charges - Select this option to add shipping charges when the user checks out.
- Incurs handling charges - Select this option to add handling charges when the user checks out.
- Inventory item - Enable Inventory item if this product is stored in inventory. If the selected Category is defined as an Inventory item, this option is automatically enabled. When enabled, the following options are displayed:
- Allow public users to purchase if inventory is not available (disabled by default):
- If enabled, public users can add any quantity of the product to the cart. The Inventory not available message defined for that product is displayed in the cart.
- If disabled, public users cannot add the item to the cart.
- If an out-of-stock item was added to a public user’s cart before going out-of-stock, the Inventory not available message is displayed in the cart. Public users cannot submit the cart.
- If enabled, public users can add any quantity of the item to the cart.
- If disabled, public users cannot exceed the available quantity when adding items to the cart. They are informed how many items are available to add to the cart.
- If an item was added to a public user’s cart with a quantity exceeding the quantity available, the public user is informed of quantity available, enabling the user to adjust the quantity in the cart.
- Inventory not available message - Select the message that is to be displayed to users if there is no available inventory:
- Use system default – iMIS will use the Default out of stock message.
- Specify message - You can add a product-specific message if inventory is not available. This value will be cleared if you decide not to specify a message. This field allows a maximum of 150 characters.
- No message - No message is displayed.
- Minimum order point - Enter a reorder point for a product's inventory. The Product Reorder List report notifies you when the product has dropped to the reorder point. The quantity on hand is compared to the Minimum order point to determine if the product should be printed on the report.
- Minimum order quantity - Enter a minimum amount of a product to reorder. Often, the quantity entered depends on the order quantity required for receiving a vendor discount.
- On order - Enter the number of products currently on order. The value entered in the On order field is the value that appears in the product display. As products are ordered and invoiced, this number is automatically updated.
- Expected arrival - Enter the date a reordered product is expected to arrive.
When the product is out-of-stock:
Staff users can add any quantity of the product to the cart. The Inventory not available message defined for that product is displayed in the cart.
When the inventory for a product is decreasing:
Staff users can specify in the cart a quantity greater than the quantity of the product available. Staff users are informed of the available quantity when viewing the product or the cart.
If an item is added to the cart for which the quantity ordered exceeds the quantity available, a message is displayed indicating the entire order is placed on backorder.
- Offer item as a premium - Enable to offer this product as a premium gift that donors are eligible to receive after donating to a gift item:
- Enter a Listed minimum gift amount. This is the minimum gift amount a donor must give in order to be eligible for this premium.
- Provide a Fair market value. This is the price that the donor must pay if the donor is not receiving the product in exchange for their donation. For premiums, the tax-deductible amount is often calculated as the amount of your donation minus the Fair market value of any premium you receive for that donation. Currently, this value is not included in any of the receipting logic.
- From Include in premium sets, select an existing premium set to which the product will belong. Click Add new to create a new premium set to which the product will be added.
- Select the general ledger account(s) to associate with this item - To override the default general ledger accounts specified for the product Category, start entering the desired account name or code to select from a filtered list.
See Taxation for more information on setting up Canadian and European (VAT) taxation methods in iMIS.
- Click Save. The item detail page is displayed as it will appear to users. In addition, the item will display in the list of product items. The user can click the item name to view details.

For full definitions of the various product statuses, see Defining products.
Product kits, also referred to as a collection of items, are product bundles you can offer to shoppers.
Review the following notes before creating product kits:
- Components of a product kit cannot be Gift items.
- Individual kit components are not identified under Recent transactions (Transactions tab) on an account page. Only the Name of the kit is displayed.
- Price is total of components uses the pricing groups defined for each item in the collection.
- To save a collection, you must choose at least one component.
- If you make changes to the components in a collection after a shopper has added it to their cart, a message will prompt the shopper to delete the collection from their cart and add the collection again. At that time, the revisions to the collection are displayed.
To define a product kit, do the following:
- Go to Commerce > Add product.
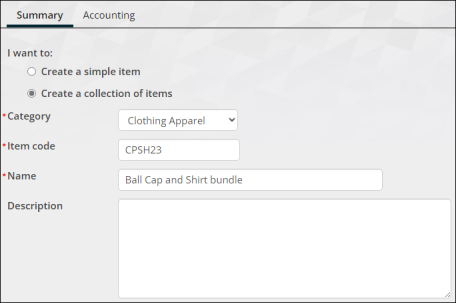
- Select Create a collection of items to define a set of individual items sold as a single item with a single price. Individual items in a kit are not displayed to shoppers unless entered in the Description field. This kind of set is useful to display multiple items as a bundle, or to distribute the costs of individual items among multiple income areas for accounting purposes. Each collection must have at least one component. Components cannot be Gift items.
- Select the Category for this collection. This specifies the default GL accounts, tax schedule, standard discount percentage, and other financial settings to be used for the item. You can override the defaults later in the definition process.
- Enter the Item code.
- Enter the Name and optional Description of the item.
- Define the Product status. For full definitions of the various product statuses, see Defining products.
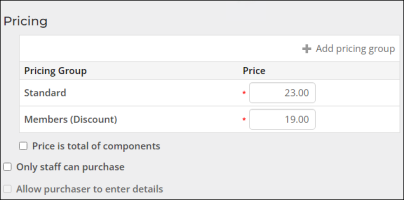
- Enter the Standard price or select Price is total of components. For example, you can set up a kit containing two items and specify that the price is the total of the two individual items. In this case, the system assigns each item to its individual GL account. Alternatively, you can enter a different standard price (typically less than the total of the individual items) and the kit as a whole will be assigned to the kit's designated GL account.
- The Add pricing group option is available once the product is saved if Price is total of components is not enabled. To add pricing groups, see Adding pricing groups to products.
- Define the components of the collection:
- In the Item set components area, click Add item.
- Browse to select an item to include in the collection. Only commerce items that are valid for addition to the collection can be selected.
- (optional) Set the Quantity for each item. This lets you enforce the number of each particular item that can be purchased in this set.
- (optional) To make changes to the default item class settings (accounting settings), click the Accounting tab.
- Click Save.
Note: Price is total of components uses the pricing groups defined for each item in the collection.
Note: To save a collection, you must choose at least one component.

If you change the item type (simple, collection) after selecting the item set components, the components are cleared. You can then select the components for the new item type, if appropriate.
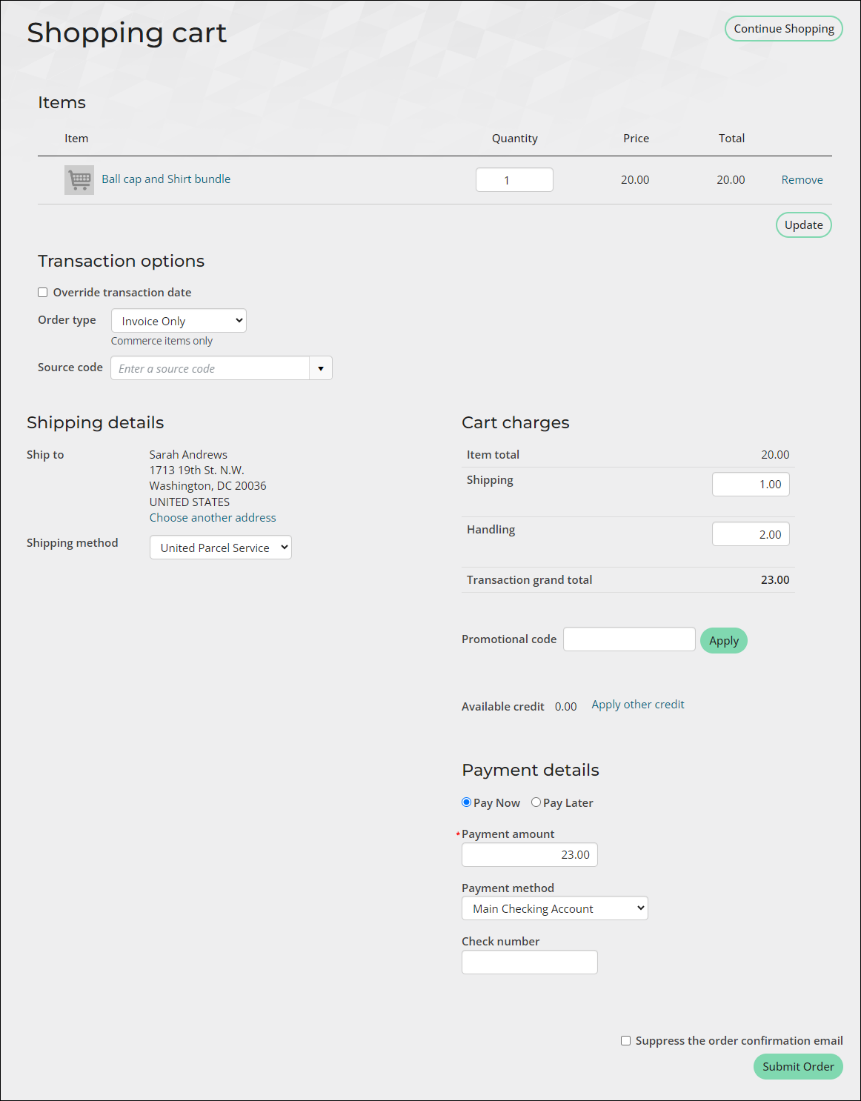
Product kit purchases display as one line item in the cart.
To edit existing products, do the following:
- Go to Commerce > Find products.
- Select the product you want to edit.
- Click Edit.
Important! Products cannot be edited while the product is in the cart.
Shopping cart
iMIS offers an enhanced checkout process on your website, allowing you to customize the shopping cart to align with your organization's requirements. Users can conveniently review invoice details for the items in their cart, understand shipping costs associated with their order, and select from the approved payment methods established by your organization. Once users make payments, they receive an order confirmation.
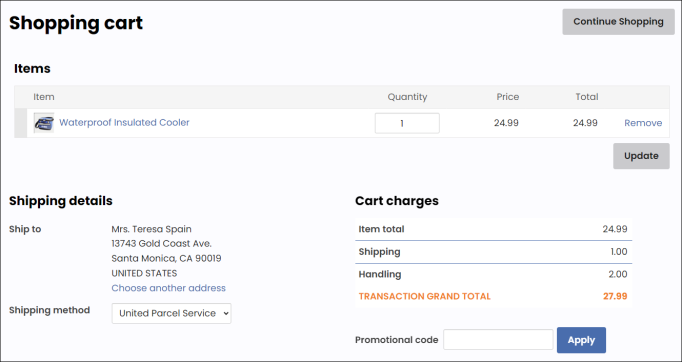
Define the following cart settings from Settings > Commerce > General:
- Allow users to see line item details for items and invoices in the cart - Enable this option to allow users to see an itemized list in the shopping cart when checking out.
- Label for Shopping Cart (only applies to the Product Display content item) - When using the Product Display, a button appears for you to add the product to the shopping cart. This label allows you to define what text appears on that button.
- Default out of stock message - This is the default message iMIS displays to users if there is no available inventory for a product.
- Purchase order value used for no charge checkout - Enter a value to populate the Purchase Order field when a purchase does not incur charges. The default value is NOCHARGE.
For more information, see Commerce Settings: General.
Shipping charges are applicable for orders that involve delivery by some type of transportation.
Important! Products must have Incurs shipping charges and Incurs handling charges for shipping and handling charges to apply. From the product definition, click the Accounting tab. See Defining products.
Staff users with an Orders: 5 module authorization level can define Shipping options from Settings > Commerce > Shipping based on Weight, Value, or Quantity. Review the following:
- Weight - The total weight of the shipment . When calculating shipping charges by weight, an order's shipping method, shipping postal code, and weight are factors in calculating the charges. To calculate shipping by weight, do the following:
- Define shipping methods from the SHIP_METHOD general lookup table.
- Define shipping zones (Settings > Commerce > Zones).
- Define shipping rates by weight (Settings > Commerce > Shipping).
- Enable automatic calculation of shipping charges by weight (Settings > Commerce > System options)
- Value - The total pre-tax value of an order (excluding handling and restocking charge). To calculate shipping by charges by total order value, do the following:
- Define shipping rates by value (Settings > Commerce > Shipping).
- Enable automatic calculation of shipping charges by total value (Settings > Commerce > System options).
- Quantity - The total product quantity ordered. To calculate shipping rates by order quantity, do the following:
- Define shipping rates by quantity (Settings > Commerce > Shipping).
- Enable automatic calculation of shipping charges by quantity (Settings > Commerce > System options).
See Calculating shipping charges for more information.
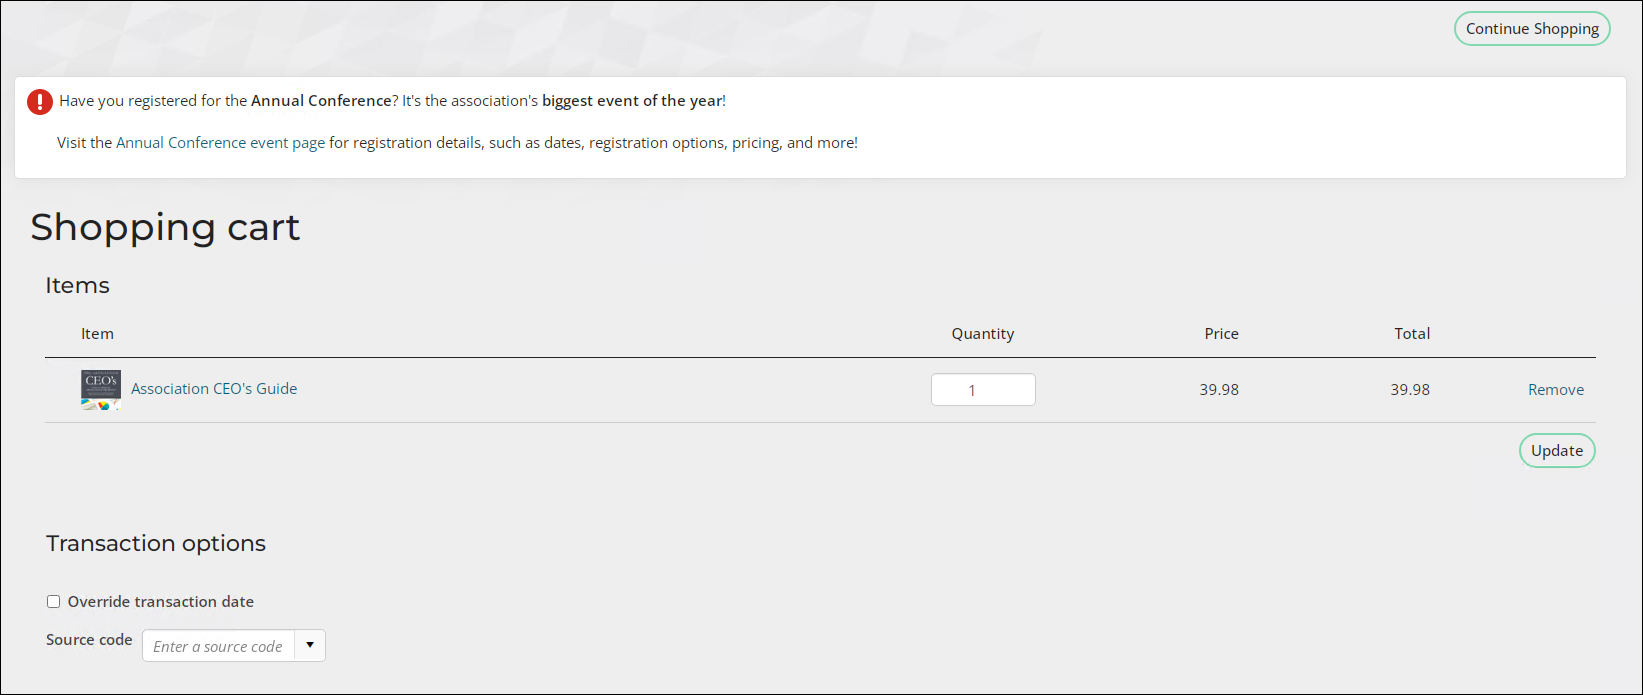
The shopping cart (Cart) is a versatile content record that manages your users’ financial interactions with your website. The shopping cart enables users to pay for products, memberships, event registrations, and to make donations.
Staff users can either use the out-of-the-box shopping cart or create their own custom shopping cart.
Note: To use a custom cart or add additional content or configurations to the out-of-the-box shopping cart, you must copy the existing Cart content record, add content or make changes to the copied content, and then update the shortcut (RiSE > Site Builder > Manage shortcuts).
Do the follwing to copy the Cart content record:
- Go to RiSE > Page Builder > Manage content.
- Navigate through the following folder path: Core Content > Shop > Store Layouts
- Select the Cart content record.
- Select Organize > Copy.
- Paste the content record in a non-system folder, for example, the Shared Content > Shop folder.
- Double-click the content record to open it for edit.
- Make the desired changes to the content record.
- Click Save & Publish.
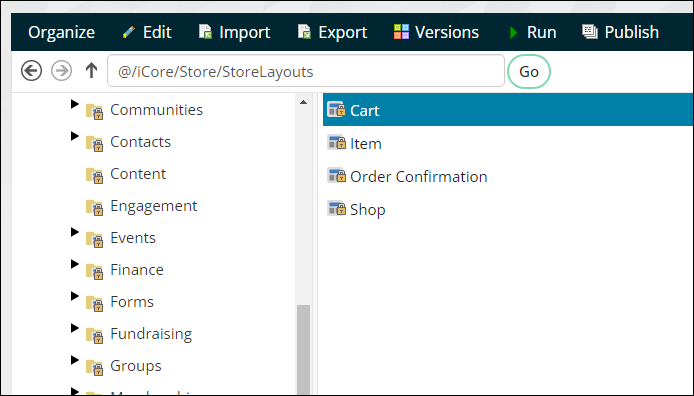
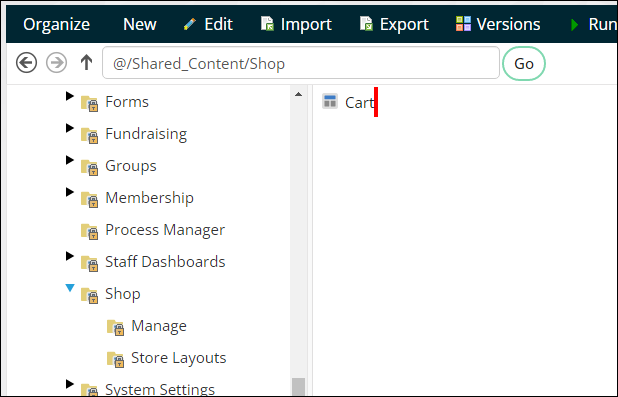
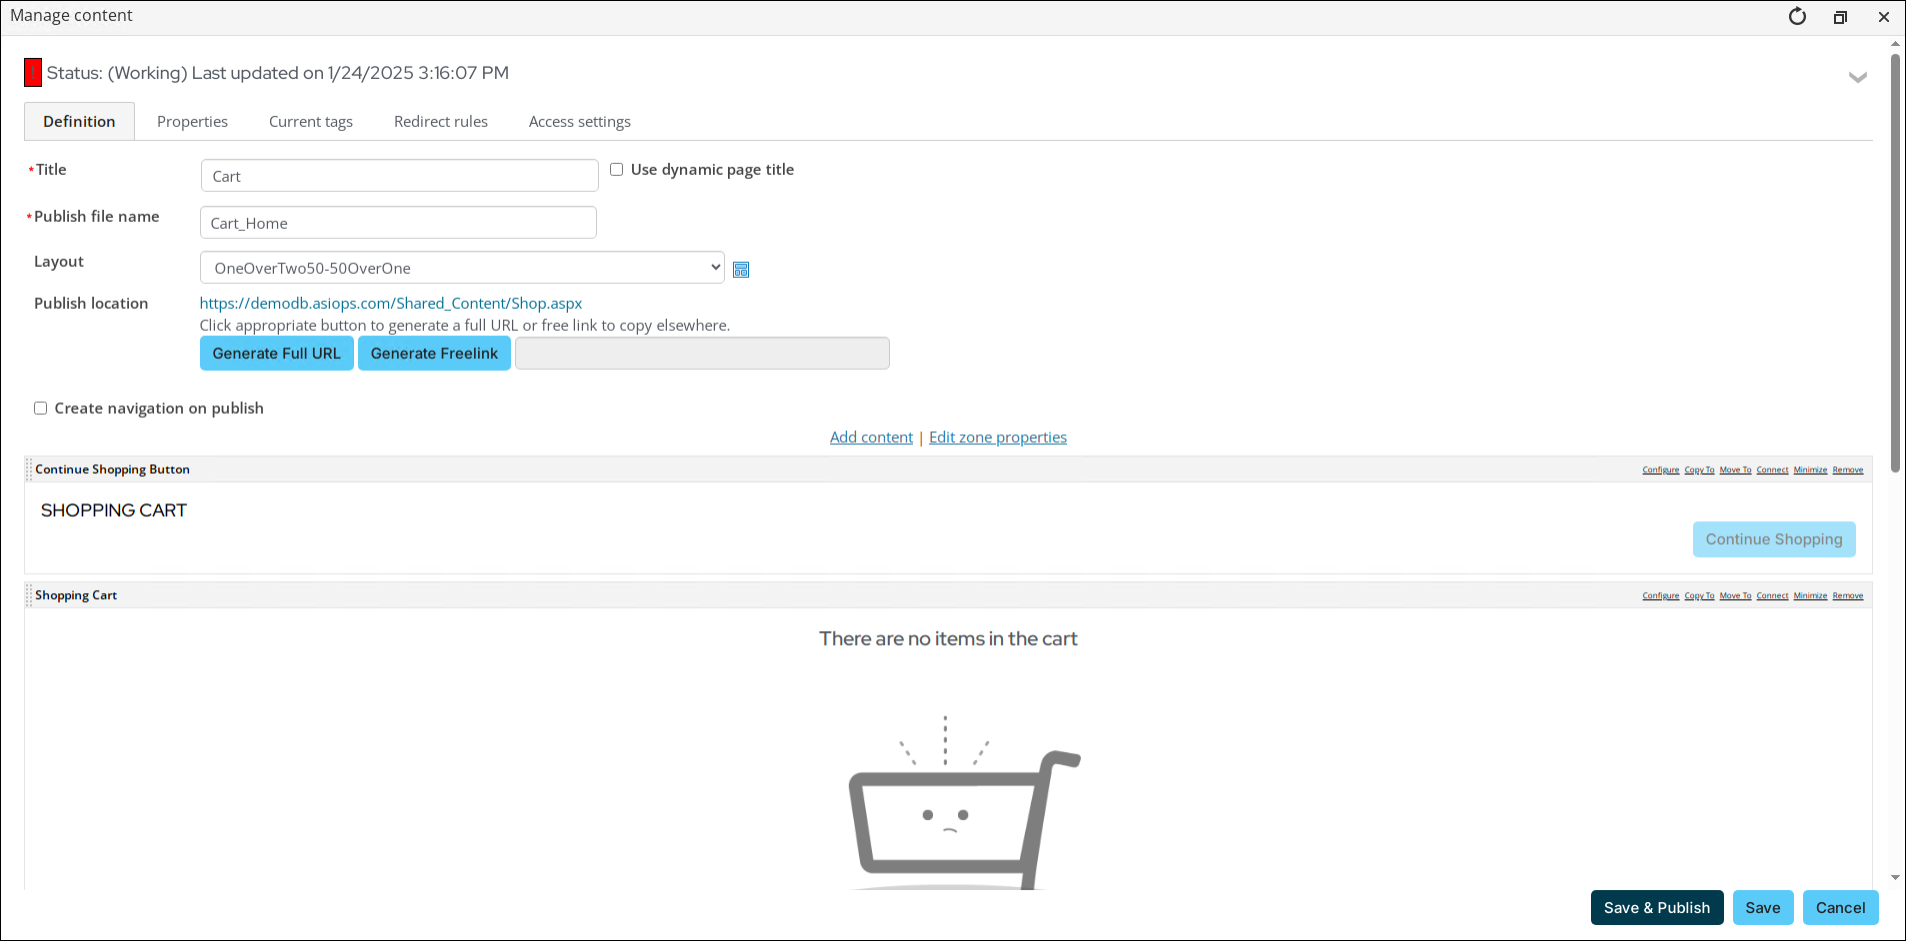
Once you have copied the shopping cart and made changes, you must add the custom content record to your website. To add the copied content record to your website, do the following:
- Go to RiSE > Site Builder > Manage shortcuts.
- Search for the Cart shortcut for the All Sites website. If you only want this cart to display for a specific public site, choose the Cart shortcut for that website.
- Click the edit icon.
- From the URL or content record field, select the custom Cart content record.
- Click Update.
- Go to Settings > About iMIS, then click Purge System Cache.
- Navigate to the Cart to confirm the changes.

An order confirmation email is automatically sent from iMIS to the purchaser any time a purchase is made through the Cart, which includes any time a staff user makes a purchase on behalf of a contact. The email address associated with the purchaser’s account receives the order confirmation email.
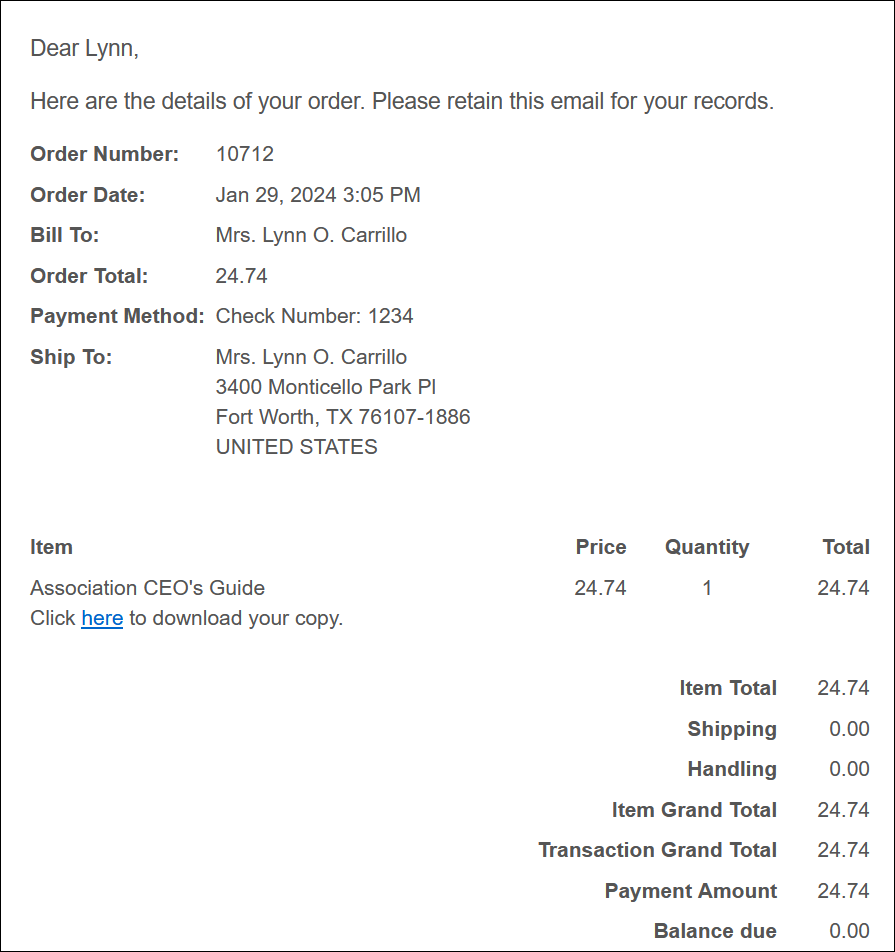
You have the following options for the order confirmation:
- Send a single order confirmation template to purchasers from all RiSE websites
- Send custom order confirmation templates for specific RiSE websites
- Send a custom order confirmation template specifically for Give Now donations
- Suppressing the order confirmation:
- Suppressing the order confirmations entirely for all purchases
- Suppressing the order confirmation for Give Now donations
- (staff users only) Suppressing the order confirmation on a purchase-by-purchase basis
- (staff users only) Resending the order confirmation
The default order confirmation template is defined at Settings > Commerce > General. The out-of-the-box order confirmation template must be tailored to fit your association’s needs before any purchases are made from your RiSE website or on behalf of your members or donors. Once the order confirmation is tailored to fit your association’s needs, you need to define the template as your default order confirmation template in the Commerce settings.
Orders
iMIS Orders provides you with an established and integrated tool for recording, processing, and tracking your organization's product orders. Each order represents a customer request to purchase one or more products and contains details such as the items or services requested, quantities, prices, and the buyer's information.
Setting up order processing
Complete the following before any purchases are made from your RiSE website or on behalf of your members or donors:
Order types are user-defined classifications that determine the number and types of stages an order goes through in processing. Order types fall into one of the following system-defined categories:
- Standard– Regular sales transactions involving the exchange of goods or services for payment.
- Debit memo– Increases the amount a customer owes, typically used for billing adjustments or corrections.
- Credit memo– Decreases the amount a customer owes, often issued for refunds, returns, or billing overcharges.
- Pro forma– Preliminary invoice or estimate provided before the finalization of a sale, mainly used for quotes or proposals.
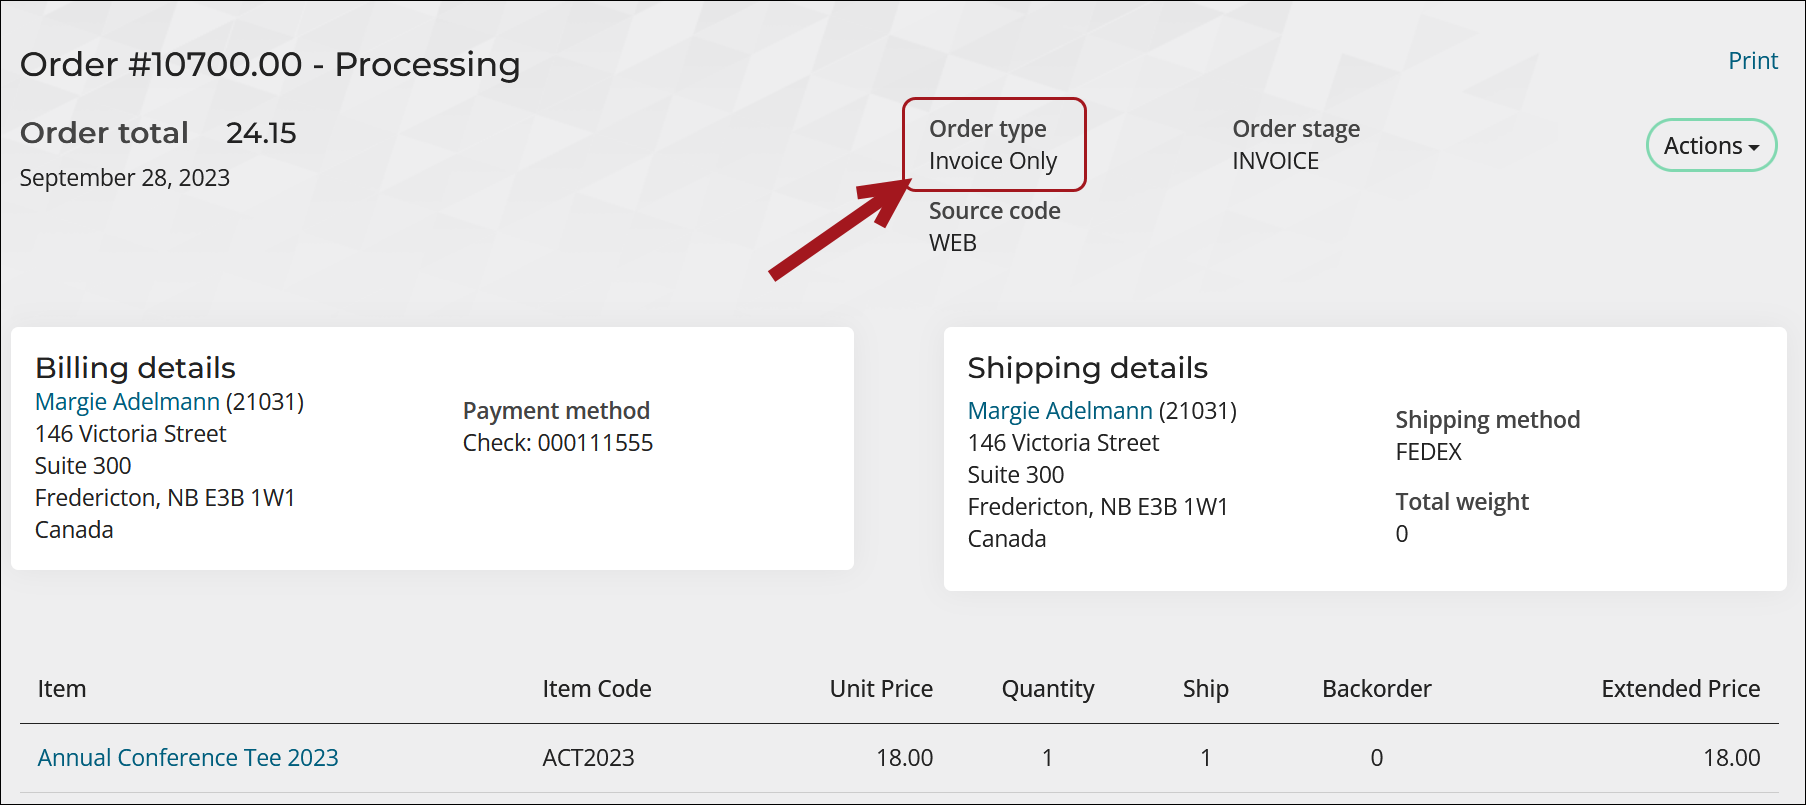
To define order types, do the following:
- Go to Settings > Commerce > Order types.
- Select Add new order type.
- Enter a Code for the order type.
- Enter a full-name Description for the order type. The Description entered here is the name displayed in the Order type drop-down.
- (optional) Enter an Invoice description. This description will be printed on invoices.
- Select a category for the order type:
- Standard – Enable to classify an order type as standard, which is a regular sales transaction involving the exchange of goods or services for payment.
- Debit memo – Enable to classify an order type as a debit memo order, which increases the amount the customer owes. This is typically used for billing adjustments or corrections.
- Credit memo – Enable to classify an order type as a credit memo order, which decreases the amount the customer owes. This is often issued for refunds, returns, or billing overcharges.
- Pro forma – Enable to classify an order type as a pro forma order. A pro former order is a preliminary invoice or estimate provided before the finalization of a sale. This is mainly used for quotes or proposals.
Note: Create pro forma order types only after defining standard order types. This allows you to select a valid standard order type from the Convert to order type drop-down.
-
The category selected determines which Order stage options are displayed:
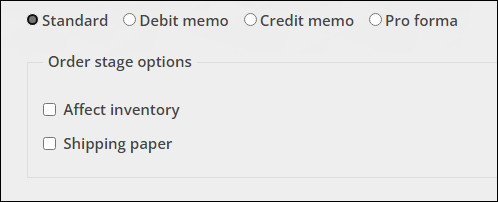
- Standard:
- Affect inventory – Enable if you want the order type to affect product inventory. For example, a standard order will reduce a product's physical inventory, and a credit memo order will increase a product's physical inventory if the Affect inventory option is enabled.
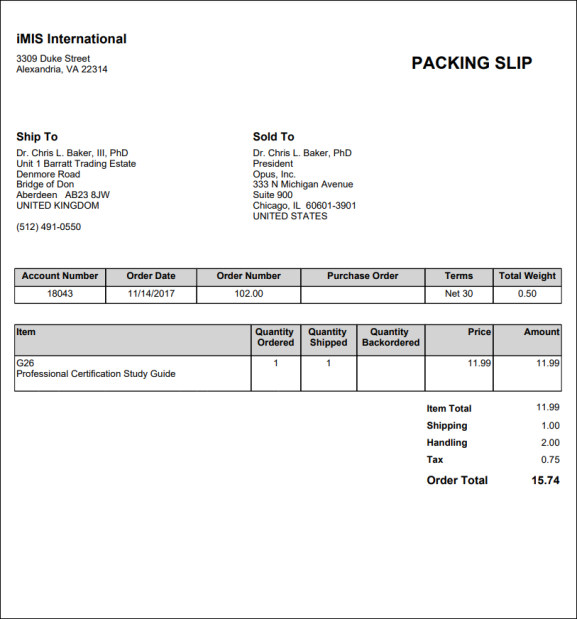
- Shipping paper – Enable to process the order type through the SHIPPAPER order processing stage. Shipping papers (packing slips) will be printed for the order type.
Note: If this option is not selected, the order is advanced directly to the INVOICE stage.
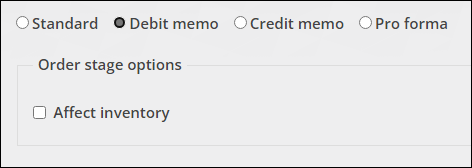
- Debit memo and Credit memo:
- Affect inventory
- Pro forma:
- Print a quote – Enable to process the order type through the PRINTQUOTE order processing stage. An order quotation is printed for the order type. The quote can be printed in hardcopy or emailed directly to the customer.
- Convert to order type – Before a pro forma order can progress to the next stage, it must first be converted to a standard order type. Options include:
- Order with All Steps
- Invoice Only
- Regular Order
- Walk-in Order
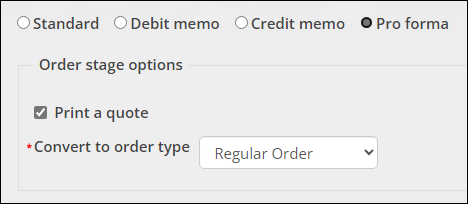
Note: If this option is not selected, the order is advanced directly to the QUOTEREADY stage.
- Standard:
- Click Save & Exit.
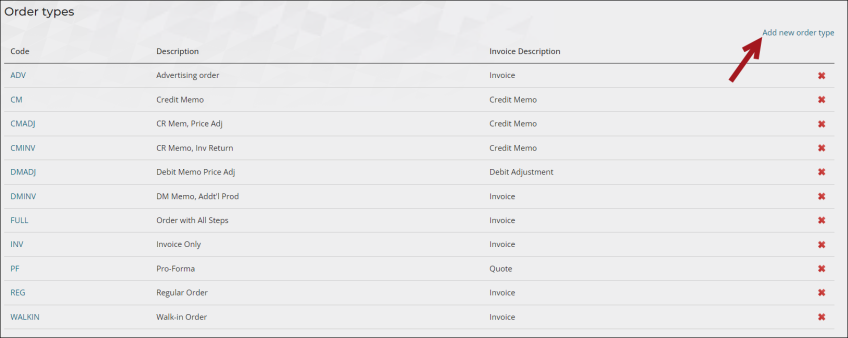
Order types that have been assigned orders cannot be deleted.
Before sending order-related communications to customers, ensure you first copy and modify the default communication templates. This is necessary to prevent the unintentional sending of ASI and iMIS materials. At the very least, update the logo and footer content in the copied templates to align with your association's branding.
Go to Marketing > Communication templates > Templates > Samples and customize the following templates before accepting orders from your site:
- Order confirmation - Sent automatically from iMIS to the purchaser after a purchase is made, including purchases by staff on behalf of a contact. For more information, see Tailoring the default order confirmation template.
- Quote template – Used for issuing quotes for pro forma orders. The sample template can be found at $/Common/Communications/Templates/Samples/Pro forma quotes. Create a custom Quote template in $/Common/Communications/Templates/Processes/Pro forma quotes. For more information, see Issuing quotes.
- Packing slip - A document generated during the Print shipping papers order stage, used to provide a detailed list of items in a shipment. To use a custom packing slip, you should work with a copy of the out-of-the-box SSRS Shipping Paper report (Reports > Commerce reports). For more information, see Printing shipping papers.
- Order invoice - Generated to document the financial transaction of an order, detailing the products or services sold and the amount due. Before emailing invoices, you must create an Invoice template or make a copy of the out-of-the-box Order Invoice template and apply customizations. The sample templates are located at $/Common/Communications/Templates/Samples/Order invoices. For more information, see Generating invoices.



Define the default order confirmation template, order types, and order stage at Settings > Commerce > General:
- Communication Template to use for Order Confirmations - Specify the communication template used to send order confirmation emails. You can edit the default template or define a new one.
- Default order type - Select the default order type that populates the Order type field each time a new order is placed. Options include:
- Invoice Only
- Order with All Steps
- Pro-Forma
- Regular Order
- Walk-in Order
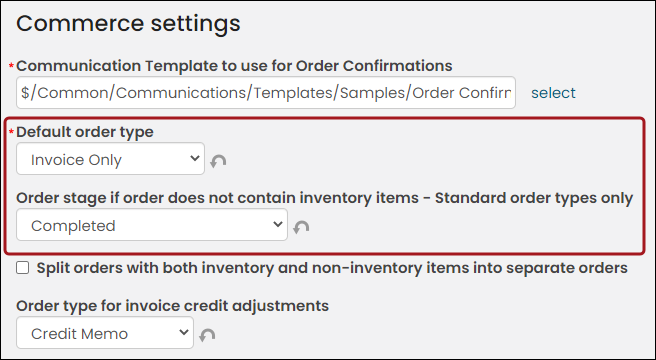
- Order stage if order does not contain inventory items - Standard order types only - Select the stage that standard, non-inventory orders placed over the web will be advanced to:
- Default per order type settings - The stage is determined based on the configuration of the selected Default order type.
- Ready for invoice printing - The order will be advanced to the invoice stage ready for the invoice to be printed.
- Completed - The order will be automatically invoiced and advanced to the completed stage. Invoice and Activity records are automatically generated.
Note: This option only applies when the Default order type is set to a Standard order type.
- Split orders with both inventory and non-inventory items into separate orders - Enable this option if you wish for orders that contain inventory items and non-inventory items to be split into separate orders. Only enable this option when the following are true:
- Default order type is set to a Standard order type.
- Order stage if order does not contain inventory items is set to Ready for invoice printing or Completed.
- Order type for invoice credit adjustments - Select the order type to be assigned to credit memo orders which are generated when an order invoice is reversed or credited. Order types with Affect inventory enabled will not appear as an available option.
- Order type for invoice debit adjustments - Select the order type to be assigned to debit memo orders which are generated when items are added to an order invoice or there is a price increase. Order types with Affect inventory enabled will not appear as an available option.
- Order type for inventory item returns – Select the order type to be assigned to credit memo orders which are generated when items are returned. This setting is used if the invoice adjustment affects inventory.
- Order type for adjustments containing additional inventory items – Select the order type to be assigned to debit memo orders which are generated when inventory items are added to an existing invoice. This setting is used if the invoice adjustment affects inventory.
Order type settings explained
The order type settings are used when order invoices are adjusted (Finance > Invoices > Adjust invoice). The following table outlines when each order type is used.
| Order type setting | When the setting is used |
|---|---|
| Order type for invoice credit adjustments |
|
| Order type for invoice debit adjustments |
|
| Order type for inventory item returns |
|
| Order type for adjustments containing additional inventory items |
|
Creating an online store
Once you have configured the commerce settings and prepared your products for sale, you can make them available to customers via an online store on your public website.
If the public website is a copy of an out-of-the-box iMIS site, there may already be a Store or Shop navigation item configured on the public website. To check, go to RiSE > Site Builder > Manage sitemaps and review the website’s sitemap.
You can use the out-of-the-box store page to showcase and offer products to customers, or you can customize the page. If you would like to use the out-of-the-box page and customize it later, continue to the Adding the products page to the public website drop-down.
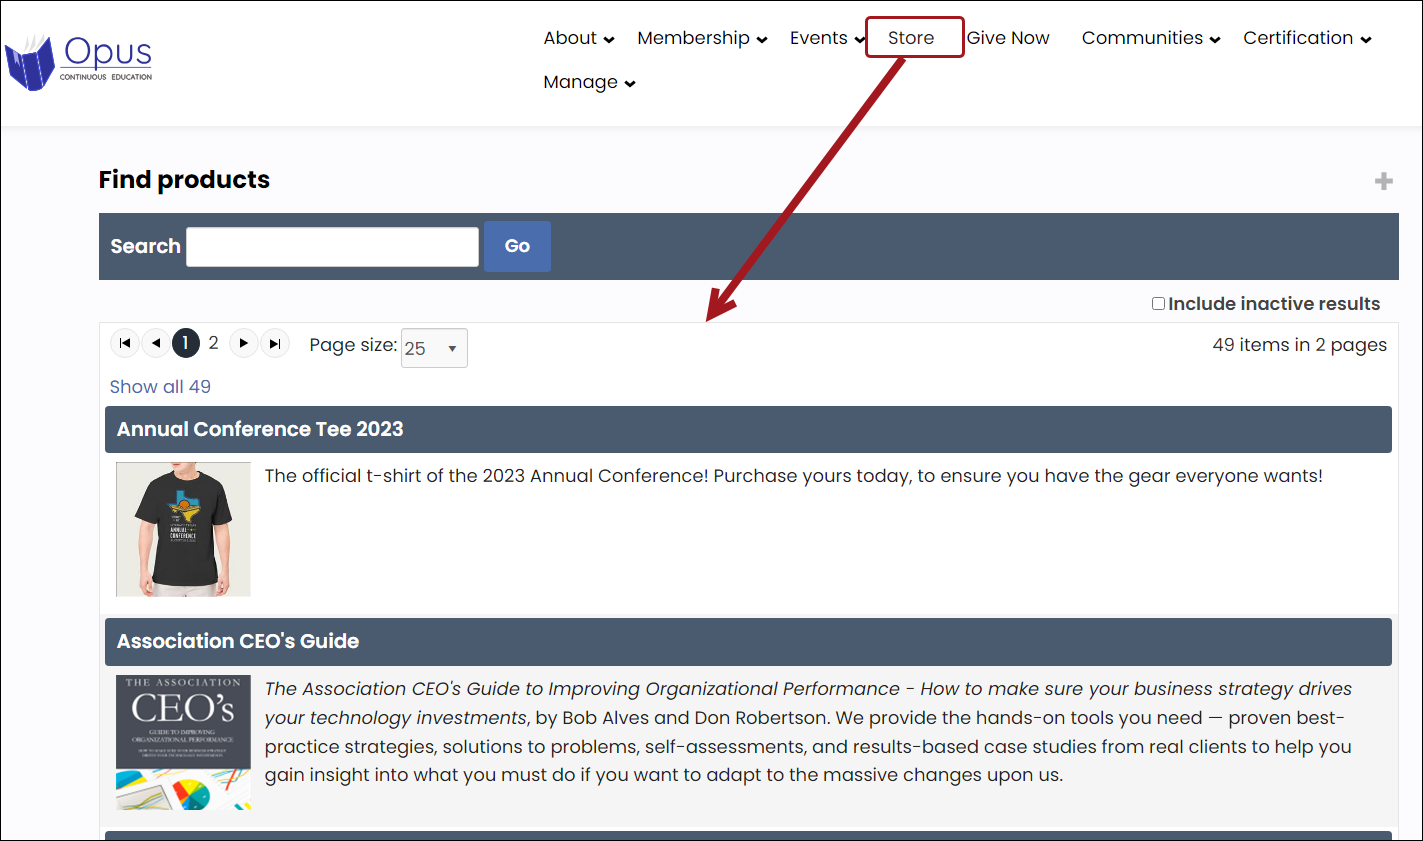
To create a custom store page, do the following:
- Go to RiSE > Page Builder > Manage content.
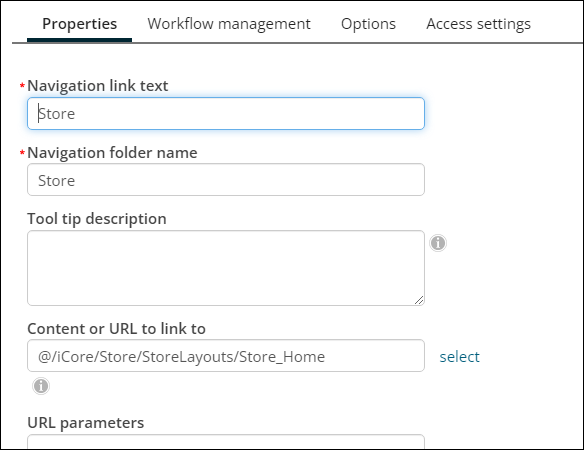
- Navigate through the following folder path: @/iCore/Store/StoreLayouts/Store_Home
- Copy the Shop content record.
- Paste the content record in a non-system folder.
- Make the desired changes to the copied content record.
- Click Save & Publish.

To add a store landing page to your website’s navigation, do the following:
- Go to RiSE > Site Builder > Manage sitemaps.
- From the drop-down, select the website.
- Click New > Website Navigation Item.
- Navigation link text – Enter Shop or Store.
- Content or URL to link to – Select the out-of-the-box content record (@/iCore/Store/StoreLayouts/Store_Home) or select the custom content record you created previously.
- Click Save.
- The new navigation item will be added to the bottom. Drag the navigation item to the desired location.
- Click Publish.
- Navigate to the website and verify the store content is now available for purchase.
Processing and managing orders
In iMIS, orders are processed through stages to completion. There are several possible order stages through which an order must be processed, but the number and type of stages through which an order is processed depends on the order's type. Different order types require different processing stages. In iMIS, orders are processed through stages to completion. There are several possible order stages through which an order must be processed, but the number and type of stages through which an order is processed depends on the order's type. Different order types require different processing stages.
Processing orders in iMIS involves converting each order through a series of defined stages. There are several possible order stages through which an order must be processed, but the number and type of stages through which an order is processed depends on the order's type. Different order types require different processing stages.
To process orders, go to Commerce > Process orders and select the desired stage:
- Issue quotes (PRINTQUOTE) - Generate sales quotes for pro forma orders.
- Convert quotes (QUOTEREADY) - Convert pro forma orders to standard orders.
- Print shipping papers (SHIPPAPER) - Generate shipping documents, such as Packing Slips, for selected orders.
- Ship orders (SHIPMENT) - Record the Ship date and Shipping method for selected orders. SHIPMENT is the only order processing stage that does notgenerate printed output.
- Generate invoices (INVOICE) - Generate order invoices for selected orders. Generating invoices creates an accounting entry, affects product inventory, generates an activity record for a customer, and completes the order.
- Release backorders (BACKORDER) - When inventory is adjusted, backorders are automatically released. The Release backorders option allows for releasing backorders manually without adjusting the inventory first, for example, to release a backorder even if inventory is not actually available in the system.
Each order stage lists any orders currently at that stage.
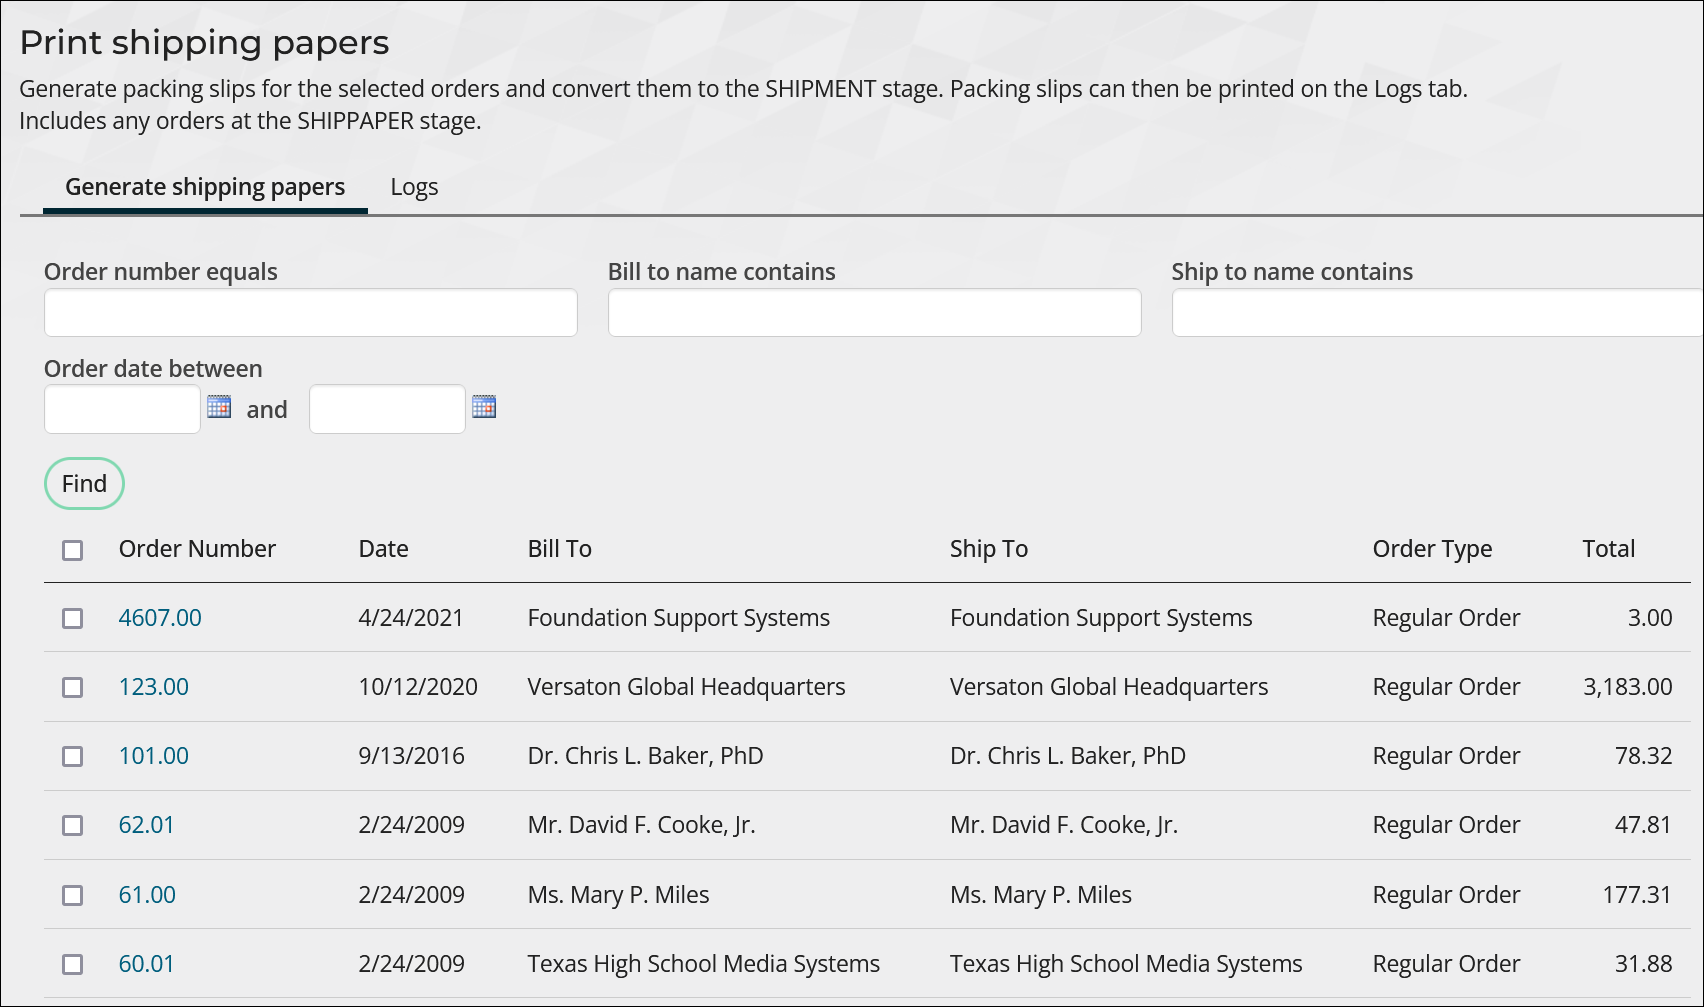
Each conversion process moves an order to its next succeeding order processing stage. Convert each order through its appropriate stages until the order is complete.
Orders are done processing once they reach the following stages:
- COMPLETED - All necessary processing steps are complete.
- CANCELED - Incomplete orders that have been cancelled. For more information, see Cancelling orders.
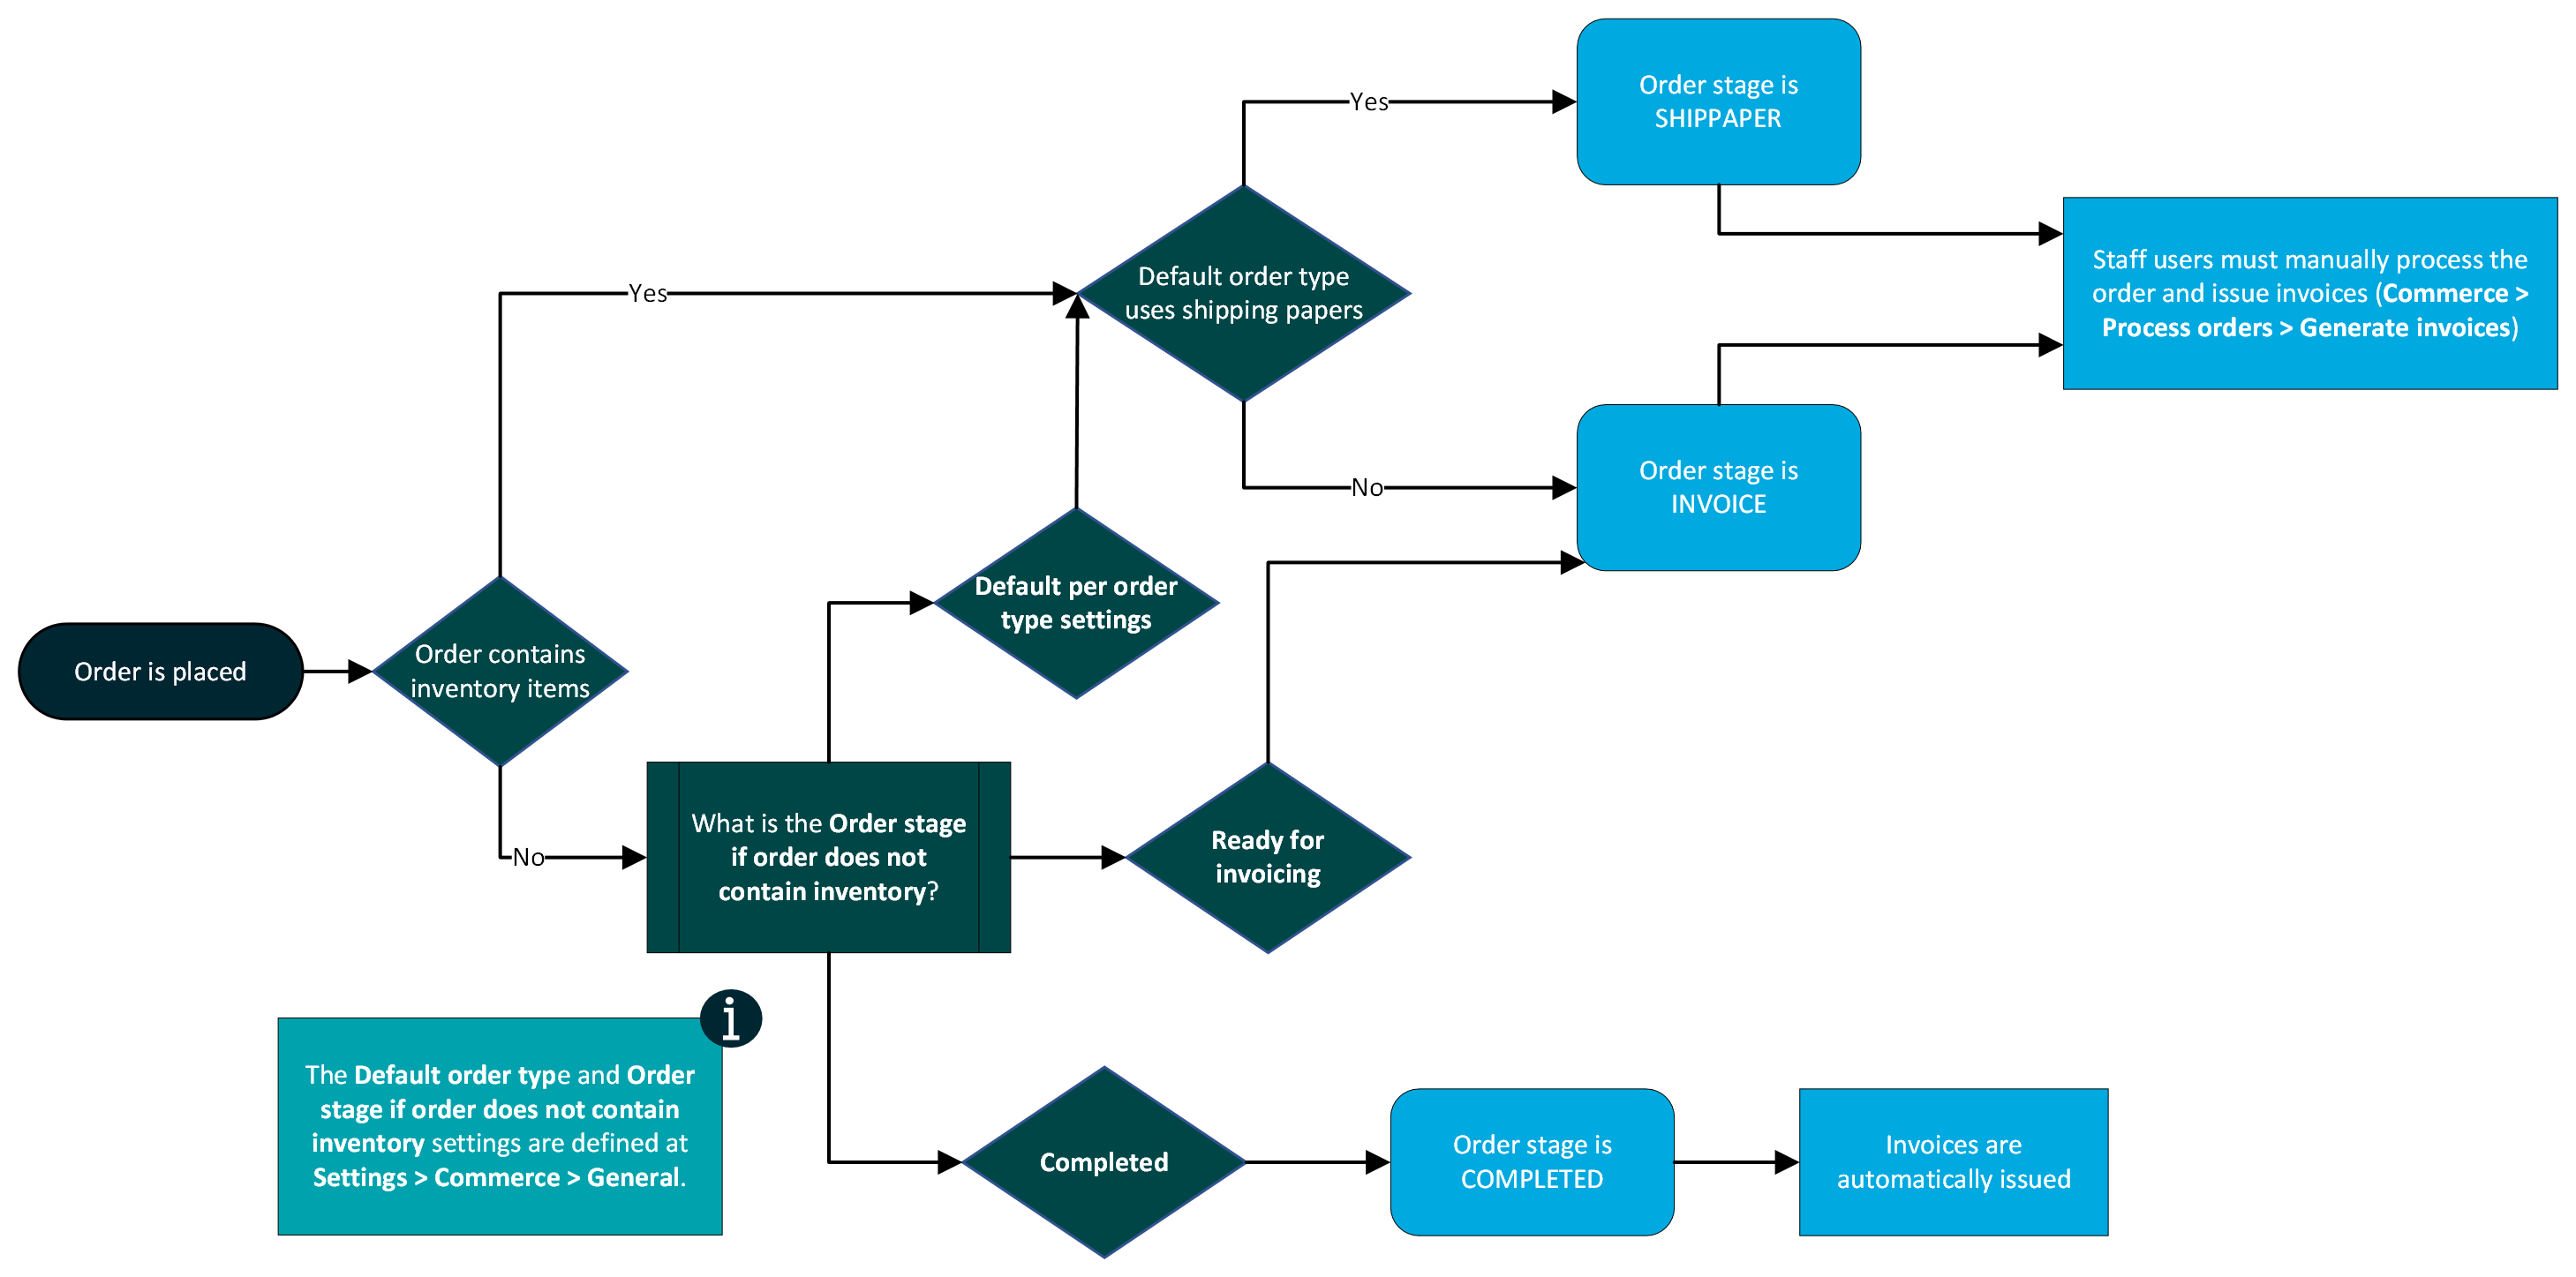
The initial stage of an order is determined by the following:
- Does the order contain an item that is marked as an Inventory item?
- If yes, does the default order type use Shipping papers?
- If yes again, then stage is SHIPPAPER.
- If no, then stage is INVOICE (ready for invoicing).
- If no items are Inventory items, use the setting Order stage if order does not contain inventory to determine the order stage.
- Default per order type settings: Either SHIPPAPER or INVOICE, depending on whether the order type uses Shipping papers.
- Ready for invoicing: Order stage is set to INVOICE. Manual shipping steps are skipped even if the order type uses it.
- Completed: Order is automatically invoiced and the stage is set to Completed. Manual shipping steps and manual invoicing steps are skipped.
The initial order stage may differ from the above in the following scenarios:
- If the default order type is a Pro-forma type, then it will use the PRINTQUOTE stages and must be manually converted to a standard order.
- If the option Split orders with both inventory and non-inventory items into separate orders is selected, and the order contains both inventory and non-inventory items, two separate orders are created. Each follows the rules above to determine the stage.
Go to Commerce > Find orders to locate all orders that have been placed. You can search for all orders using Find orders, or narrow the search to only Find premium orders.
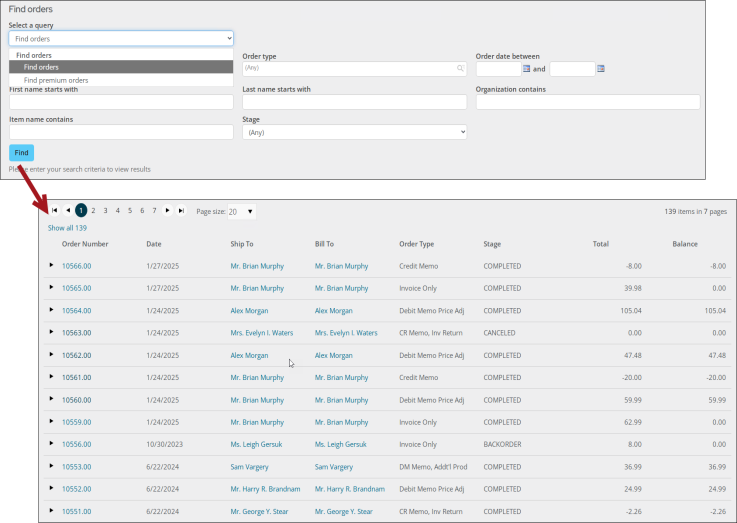
Select the Order Number to review detailed order information. An Order Detail window opens.
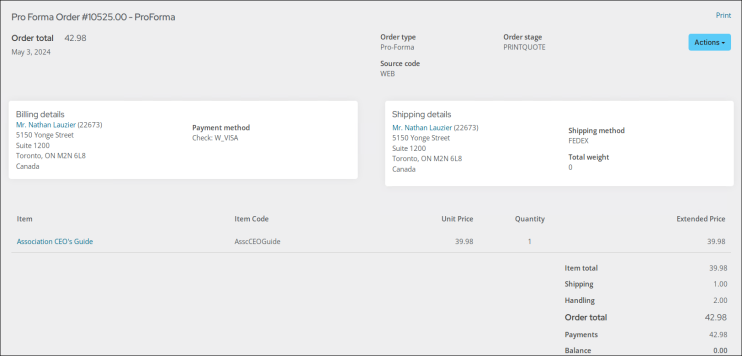
From the Actions drop-down, authorized staff users have the option to cancel orders that have not yet been invoiced (status is not COMPLETED).

All other Actions available on the Order Detail window vary based on the current Order stage. For more information, see Reviewing orders.
To print the order, click the Print link and choose to export the report to PDF or Excel. Details about the selected order are provided in the Print Order Details report.

The Print link uses a shortcut named PrintOrderDetails. You can modify the shortcut to point to different content or edit the Print Order Details content to point to a different report.
Order invoices are invoices which contain commerce products and have a source system of ORDER. These types of invoices can be adjusted by system administrators or staff users with Finance: 4 or Orders: 4 module-level authorization. Before adjusting or reversing an order invoice, you need to set the order types for debit and credit adjustments, as well as inventory returns and additions (Settings > Commerce > General). Depending on the type of adjustment, the new order will be assigned one of these order types. See the Commerce settings for more information.
To adjust or reverse an invoice open the invoice from Finance > Invoices, click Adjust Invoice, and select an Adjustment type.
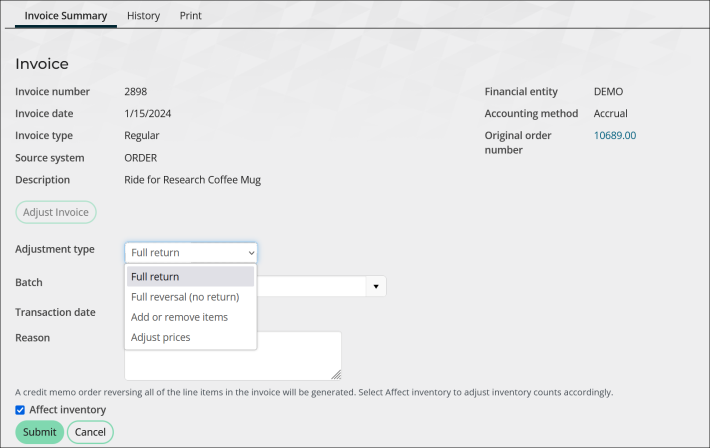
The following adjustment types allow you to adjust the price and quantity for order invoices, including the shipping, and/or handling charges:
- Add or remove items - Allows you to adjust the quantity for each individual line item in the invoice.
- Adjust prices - Allows you to adjust the price for each individual line item in the invoice.
The following adjustment types allow you to reverse an order invoice, including shipping/handling fees:
- Reverse the invoice - Only appears when the invoice contains no inventory items. Select this option to reverse the invoice. This is the only option for advertising invoices.
- Full return - Only appears when the invoice contains inventory items. Select this option to indicate that all items were returned, and optionally affect inventory counts. When an item is returned, the item can be added back into inventory.
- Full reversal (no return) - Only appears when the invoice contains inventory items. Select this option to credit all line items without affecting inventory.
On system order invoices, adjustments appear on the original invoice as subsequent pages that are Credit Memo or Debit Memo statements. If you do not see the adjustments in subsequent pages, make sure the credit memo or debit memo order that was generated from the adjustment is invoiced.
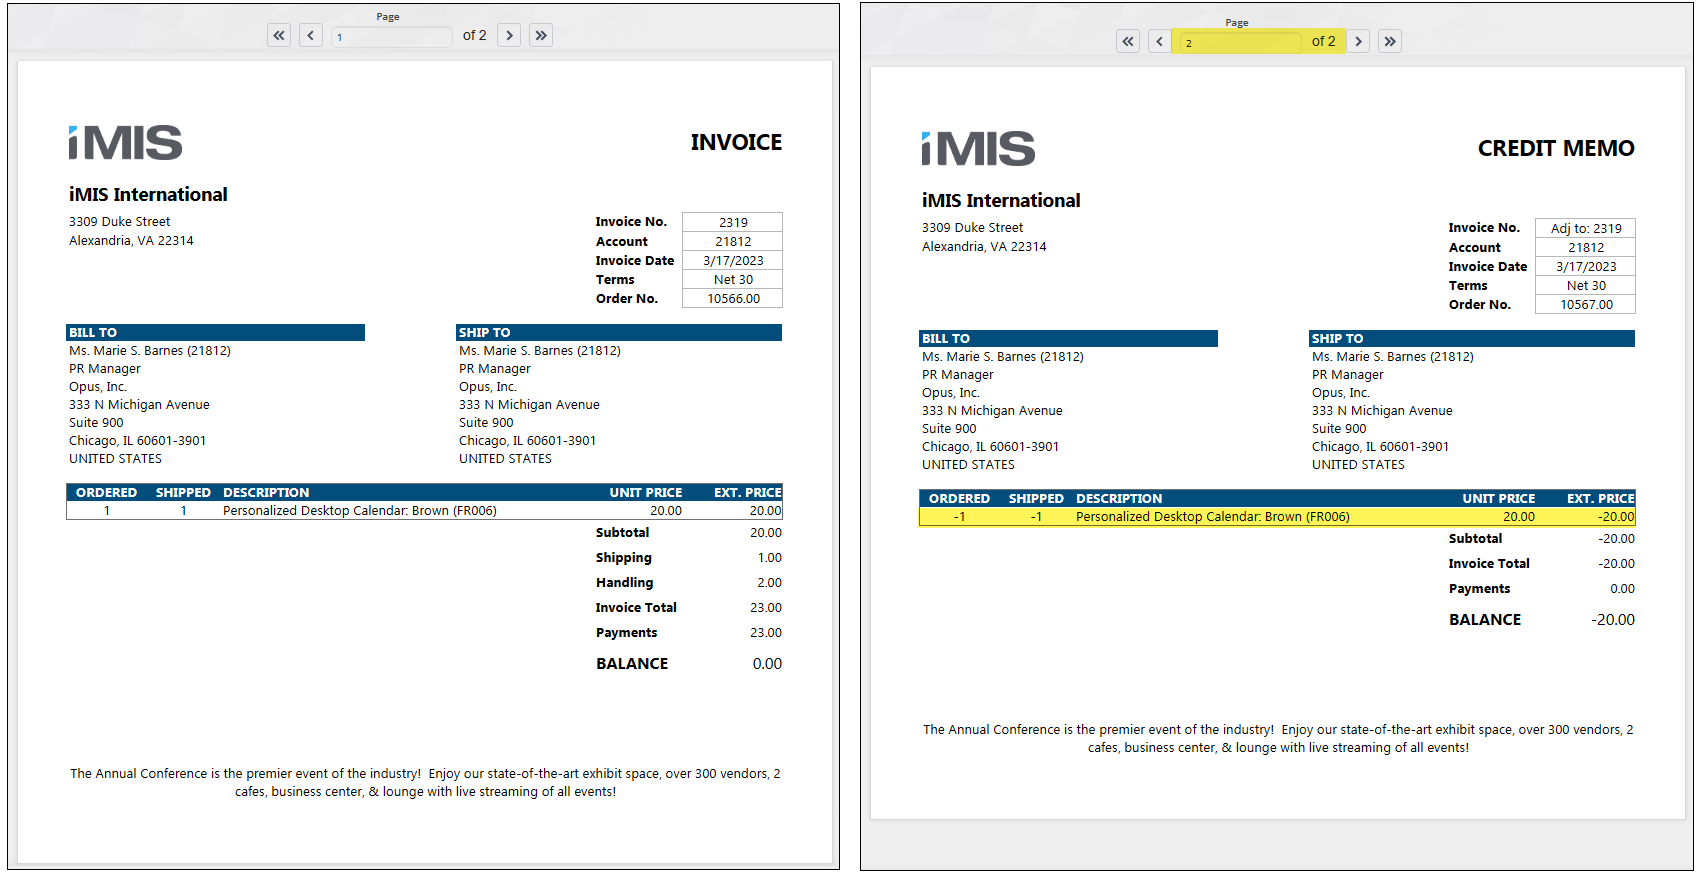
For more information, see Adjusting and reversing order invoices.
Advanced options
Review and configure the following optional areas:
Promotion codes, or coupons, can be applied to the entire order, specific items, or specific item categories. Review the following important information before you begin creating promotion codes:
- Only one promotion code can be applied per cart checkout.
- Promotion codes for new member joins or renew in advance are supported but are not yet supported for renewal invoices.
- Promotion codes cannot be applied to existing invoices, including those created using Pay Later.
- Promotional codes can be applied to charitable events and products but cannot be applied to donations (where donor selects or enters an amount).
You must be a staff user with an Orders: 5 module authorization level to create a promotion.
CREATING PROMOTIONS
Do the following to create and manage promotion codes:
- Go to Commerce > Promotions.
- Click the Add a new promotion icon (
 ).
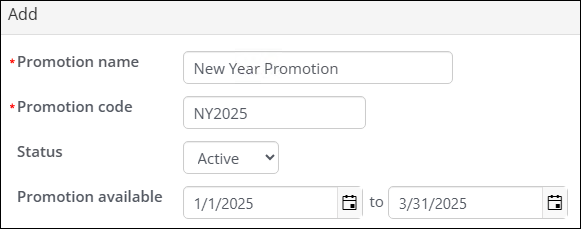
). - Enter a Promotion name. This name is for internal use and should use a naming convention that takes advantage of sorting group discounts together. This allows for simple promotion management.
- Enter a Promotion code. This is the code that will be shared externally with your customers to provide the discount.
-
From the Status drop-down, choose Active to make it an active promotion.
- Enter availability dates in the Promotion available fields, unless you want your code to never expire.
- For What kind of promotion is this?, decide whether the code will apply to the entire cart or to specific items or kinds of items that might be in the cart. Discounts can only apply to sales products, event registration options, and event program items.
- Discount applies to entire order: Currently, this percentage discounting applies to every order line in the cart to which discounts apply.
- Discount applies to specific item(s): The discount will only apply to the specific items you select. Click the Add item icon (
 ) to select an item and define a new item discount, either percentage or fixed amount.
 - Select the Item category from the drop-down, then choose the individual items to which you want the discount to apply.
- For event discounts, choose the Event Function category and select each individual registration option and program item to which the discount should apply.
- For promotions regarding membership products, choose the Chapter, Dues, Section, or Subscription categories. Promotion codes for new member joins or renew in advance are supported but are not yet supported for renewals.
- Discount applies to specific item categories: The discount will apply to the entire category. Click the Add item icon (
 ) to select an existing category and define a new category discount, either percentage or fixed amount.
- To apply the discount to event registration fees, choose the Event category. Your events must have registration options defined in order to apply this discount.
- To apply the discount to event program items, choose the Event Function category.
- To apply the discount to an entire registration including registration fees and program items, choose both the Event and the Event Function categories.
- To apply discount to membership products, choose the Chapter, Dues, Section, or Subscription categories. Promotion codes for new member joins or renew in advance are supported but are not yet supported for renewals.
- Discount based on quantity purchased: The discount applies to specified event registration options and program items when a defined number of these items are purchased.
- Required
purchase
- Make a selection from the Which purchases qualify? drop-down:
- Items in the same cart
- Items for the same registrant
- Items billed to the same customer
- Items billed to a customer in the same organization
- Enter a value to define the Quantity required to qualify.
- Add the program item or registration option to the Select event functions that qualify as a purchase for this discount table. These event items will count toward the quantity required to qualify. However, this does not apply to event program items and registration options that allow multiple quantities per registrant.
- Make a selection from the Which purchases qualify? drop-down:
- Discounted items:
- Enter a value for Quantity discounted. Leaving the field blank allows for unlimited discounts regardless of the quantity in the Cart.
- Add the registration options and program items that will receive a discount when the required purchase is met (Select event functions that receive a discount if the required purchase is met). Choose the Discount Type and Discount Amount.
Registration options and program items that allow multiple quantities per registrant do not qualify.
-
Limit usage (cannot be used with Apply promotion automatically): Enable this option to restrict usage of promotion codes to the following parameters:
- Maximum cart uses per customer: Enter a value to limit the number of times a customer can use the promotion during check out, not the quantity the code may be applied against. Also assign a maximum number of times that a given customer may apply this promotion in the cart.
- Maximum cart uses overall: Define a value to limit the number of times the promotion can be used by anyone. For example, a value of 20 means the promotion has a lifespan of 20 uses. This applies to the number of times a customer may check out using a promotion code, not the quantity the code may be applied against. Also assign a maximum number of times that this promotion may be applied in the cart across all customers.
- Minimum cart total: The number defined is the amount, equal or greater, that must be added to the cart before the promotion can be used.
- Qualified customers: Only customers in the chosen query are eligible to use this promotion. When using a query, keep the following in mind:
- This applies only to the Bill To contact in the cart. If the user making the purchase is not the Bill To contact, the promotion will not match to the qualified person. This does not apply to Register someone else.
- The Qualified customers query must be saved in the $/Commerce/DefaultSystem/Queries/Promotions folder. If the query is saved elsewhere, the promotion code will not function correctly in the cart, and an error will be logged indicating that the query could not be found.
- If you are using the query to identify a single contact, you must use an identifying filter that is not the ID (e.g., Full Name).
- The Qualified customers query must be configured with the following filter and display properties:
- Filter tab:
- Add only one ID property with In Search? set to Required.
- No optional filters.
- Additional filters are allowed, as long as In Search? is set to No.
- Display tab:
- An ID property with an Alias of ID.
- Filter tab:
Note: Each cart with a promotion applied may contain multiple line items, which counts as only one usage. If a cart contains both event registrations and commerce purchases, that is considered to be two usages of the promotion.
Tip: Assign a minimum line item total that must be included in the current cart (excluding discounts and additional charges) in order to apply the promotion.
Enable Limit usage to restrict the usage of promotion codes. This option cannot be used with Apply promotion automatically. When enabled, the following options are available:
- If no Qualified customers query is selected, eligibility is determined by the other limits. The promotion applies to any contact who meets the criteria of these limits.
- If a Qualified customers query is selected, but no additional limits are set, only the customers in the query are eligible for the promotion.
- If there is both a Qualified customers query selected and other limits are specified, the promotion applies only to customers in the query who also meet the additional limit conditions.
- This applies only to the Bill To contact in the cart. If the user making the purchase is not the Bill To contact, the promotion will not match the qualified person. This does not apply to Register someone else.
- The Qualified customers query must be saved in the $/Commerce/DefaultSystem/Queries/Promotions folder. If the query is saved elsewhere, the promotion code will not function correctly in the cart, and an error will be logged indicating that the query could not be found.
- If you are using the query to identify a single contact, you must use an identifying filter that is not the ID. For example, Full Name.
- The Qualified customers query must be configured with the following filter and display properties:
- Filter tab:
- Add only one ID property with In Search? set to Required.
- No optional filters.
- Additional filters are allowed, as long as In Search? is set to No.
- Display tab:
- An ID property with an Alias of ID.
- Filter tab:
Note: Billing product promotions are not supported by this option.
Note: By default, the cheapest item in the list of eligible items will be discounted.
MAXIMUM CART USES PER CUSTOMER
Set a limit on how many times a customer can use the promotion during checkout, regardless of how many times the code is applied to items in the cart. Additionally, define the maximum number of times a single customer can use the promotion within the cart.
Note: A cart with multiple line items using the promotion counts as one usage. A cart containing both event registrations and commerce purchases counts as two usages.
MINIMUM CART uses overall
Enter a value to limit the total number of times the promotion can be used by all customers. For example, a value of 20 allows the promotion to be used in 20 separate checkouts. This limit is based on the number of checkouts using the promotion code, not the quantity of items it is applied to. Additionally, specify the maximum number of times the promotion can be applied across all customers' carts.
Minimum cart total
Enter the minimum cart total required to use the promotion. The promotion is only valid when the cart total is equal to or greater than this amount.
Tip: Assign a minimum line item total that must be included in the current cart (excluding discounts and additional charges) in order to apply the promotion.
QUALIFIED CUSTOMERS
Qualified customers have the highest priority among the limit options. The prioritization of the Limit usage options is as follows:
Example: If the Minimum cart total is set to 100 and no Qualified customers query is selected, only customers with a minimum purchase of 100 are eligible for the promotion.
Example: If the Qualified customers query includes customers who are members of the Gold Membership tier and no other limits are defined, only customers with a Gold Membership are eligible for the promotion.
Example: If the Qualified customers query includes loyalty program members and the Minimum cart total is set to 100, only loyalty program members with at least $100 worth of eligible line items in their cart (excluding discounts and additional charges) can use the promotion. Other customers with a cart total of 100 are not eligible.
Qualified customers query best practices
When using a Qualified customers query, keep the following in mind:
For examples of promotions, see Using promotion codes: Examples.
Add pricing groups to products or event functions to define special pricing rules. Once you create a pricing group, you can reuse it for other products or event functions.
A pricing group can be defined as:
- Members of all committees or all chapters
- Members of all Committee groups who have certain roles
- Members of certain Committee groups who have certain roles
- Members of certain dynamic groups
- Contacts with certain member types
Adding pricing groups
To add pricing groups to products, do the following:
- Create a new product or edit an existing product.
- From the Pricing table, select Add pricing group.
- Pick one of the following options:
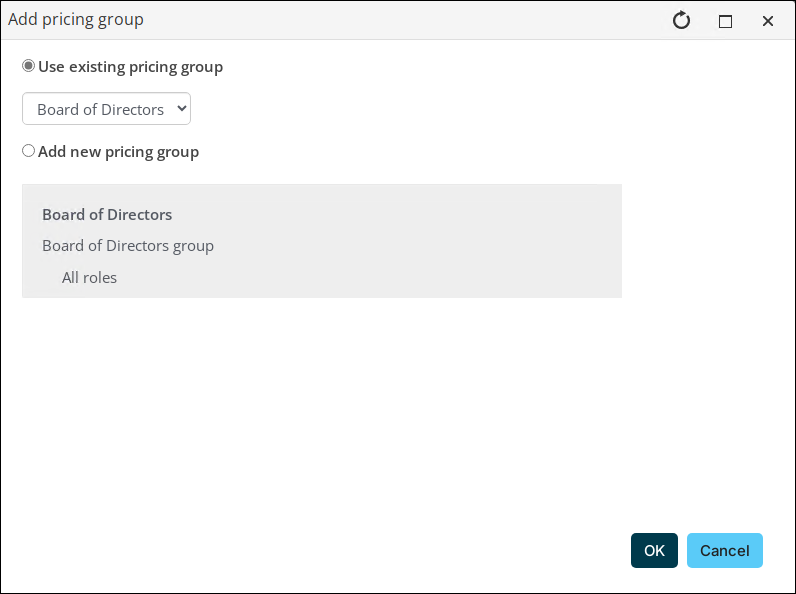
- Use existing pricing group
- Choose a pricing group from the drop-down.
- Click OK.
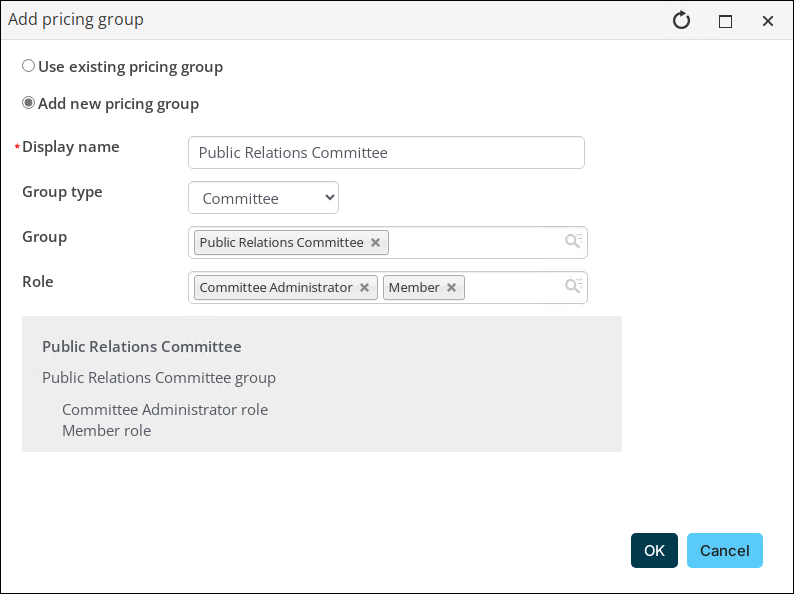
- Add new pricing group
- Enter a Display name for your new pricing group.
- Choose a Group type.
- Choose a Group. You can select multiple Groups.
- If you specify a Group type or Group, you can also choose a group member Role. You can select multiple Roles.
- View your selections in the preview area.
- Click OK.
Note: Enter a name that is descriptive of the pricing group and can be reused (for example, Board of Directors).
Note: You must select at least one of the options available (at least one Group type or Group) to create a pricing group. The options filter down to create a pricing option for a specific group or role. For instance, if you select a Group type, the groups available will reflect only that Group type. If you do not select a Group type, all groups will be available to select.
Note: The Use existing pricing group option is only available if you have previously defined at least one pricing group.
- In the Price column, enter the price to charge members of the group for this product.
- Save the changes.
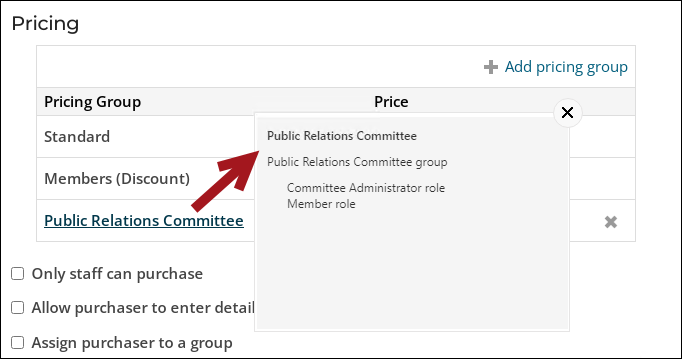
- Select the pricing group to view the group types, groups, and roles included in the pricing group. To review, edit, or delete the pricing group, see Managing pricing groups.
Note: To enable Add pricing group, you must Save new products.

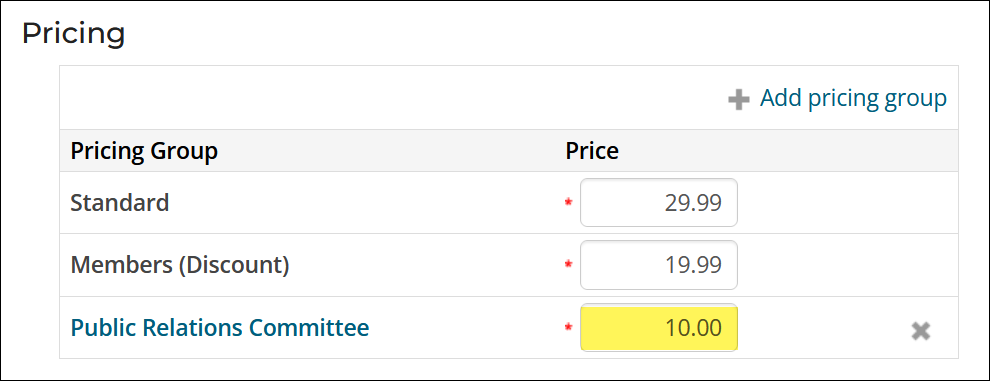
Note: If customers qualify for more than one of the pricing groups, they receive the lowest price among the groups they qualify for.
To view inventory levels for individual products, open the product and click Show inventory details.
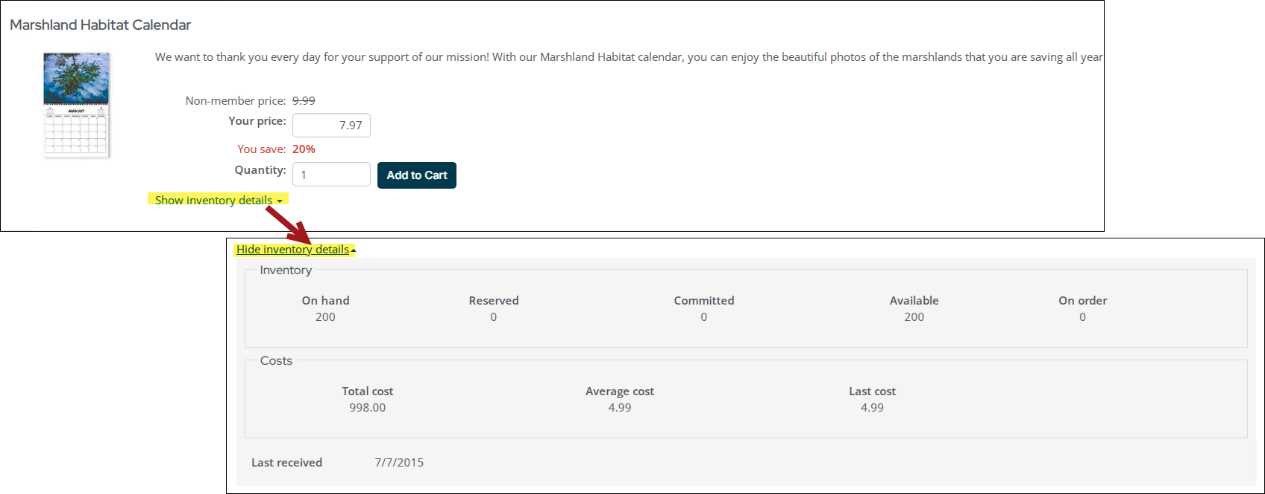
The following inventory details are displayed:
- Inventory:
- On hand - (read only) Displays the total number of products currently in inventory.
- Reserved - (read only) Displays the number of reserved products (pre-invoiced products in open order status) in inventory.
- Committed - (read only) Actual number of products committed to fill open orders or the number of products in inventory that are awaiting shipping.
- Available - (read only) Displays the number of products currently available in inventory (On hand products minus Reserved products).
- On order - Quantity of a product on order from a vendor or supplier.
- Open the product for edit.
- Select the Accounting tab.
- Update the On order value.
Do the following to update this field:
- Costs:
- Total cost - (read only) Displays the total cost of the products in inventory. The total cost is a cumulative running balance of receipts minus the cost of goods sold or inventory adjustments.
- Average cost - (read only) Displays the average or standard product cost on a per-unit basis.
- Last cost - (read only) Displays the last amount paid for a product on a per-unit basis. Only inventory receipts will update the Last cost field. Inventory adjustments will not update the Last cost field. The value displayed in the Last cost field is the value entered in the Unit cost field in the Inventory receipts window.
Product inventory receipts allow you to record and track your physical product inventory accurately and efficiently. Inventory receipts are recorded when a product is received in inventory. Receipts can be entered only for inventory items that have an Active, Inactive, or Out of Production status.
When an inventory receipt is entered, a transaction number is generated automatically as a reference for the receipt. The reference number typically represents the vendor invoice number.
Inventory receipts are automatically posted when submitted, and product inventory records are automatically updated. Only system administrators or staff users with Orders: 4 module-level permissions can enter inventory receipts.
For more information, see Entering and adjusting inventory.
Organizations can grant or restrict access to content available in iMIS based on a group membership, for example, downloadable and online products. Staff users can do the following:
- Define content, then restrict access to that content to a particular group.
- Define a product, and assign purchasers of that product to the group, which controls access to certain content.
- Create products that offer group-based access to post-purchase information, such as downloadable content.
To determine who has access to secure website content, do the following:
- Go to Community > Groups.
- From Select a query, choose Product purchase groups.
- Search for the group, then select the group name.
- Review the following information:
- Group Term span (months)
- Qualifying products available for download
- Post-purchase information
- Members of the group
- Effective and expiration dates for members
Note: Group members remain in the group until 12:00 a.m. on their expiration dates.
- (optional) Click Email to send a communication to group members. Filter the list of members using the Find members and Member name contains options.
For more information regarding group-based access, see Granting access to secure website content.
Best practices
Review the following best practices when working with iMIS Commerce:
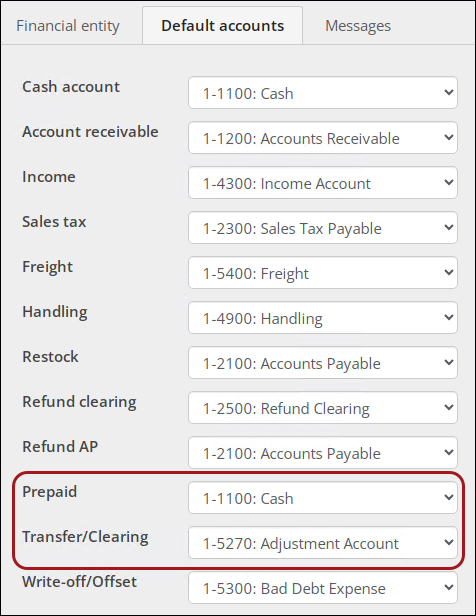
Certain default GL accounts must be configured when working with orders, whether you are using inventory or not. To define these accounts, do the following:
- Go to Settings > Finance > Financial entities.
- Open the default financial entity.
- Click the Default accounts tab.
- Make sure the following accounts have the appropriate GL accounts defined:
- Prepaid - Holds initial order payments until the order is invoiced.
- Transfer/Clearing - Temporarily holds funds that need to be transferred between different accounts.
- Click Save.
For more information, see Understanding order transactions in batches and reports.
The Related Items content item allows you to display a list of product pictures based on the results of an IQA query. This content item is used in the out-of-the-box Item detail content record. When customers view a product, several related products are suggested based on the out-of-the-box IQA query.
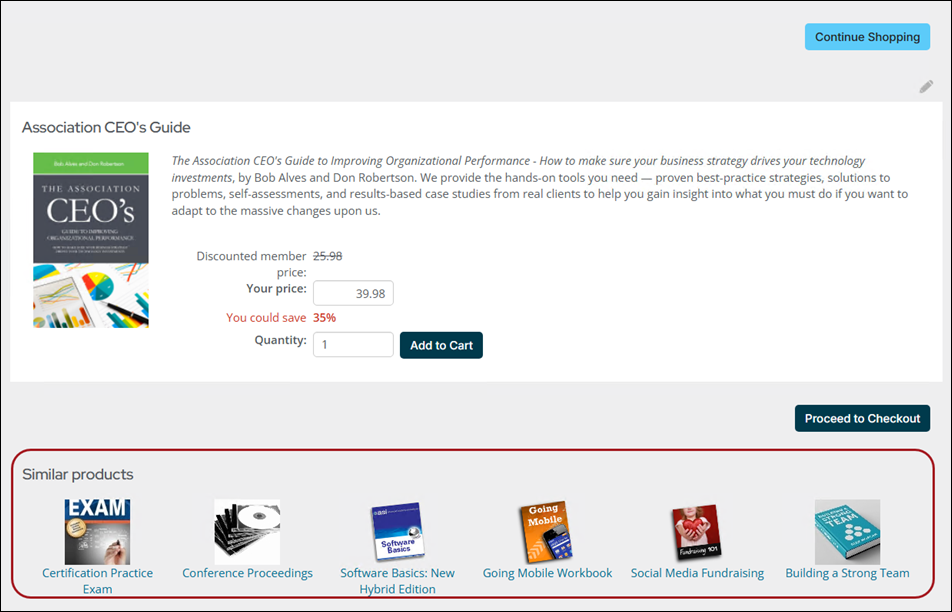
If you are using a custom item detail page, make sure to utilize the Related Products content item to enhance cross-selling opportunities. For more information, see Related items.
It is not recommended to create a Gift product from Commerce > Add product. To create a gift, go to Fundraising > Add gift item. See Defining gift items.
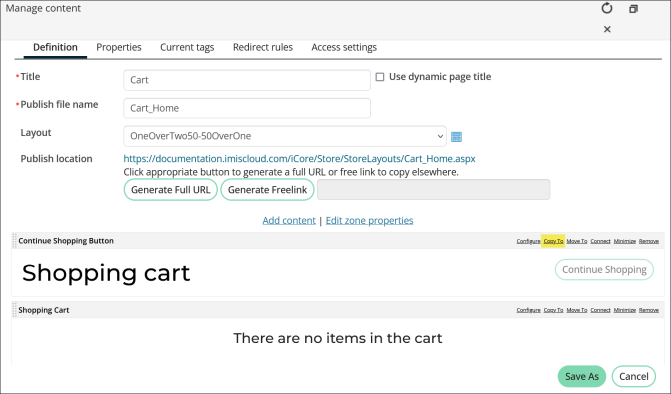
When using a custom cart content record, any new content added to the out-of-the-box cart is not automatically added to your custom account pages. Check the system Cart (@/iCore/Store/StoreLayouts/Cart) after upgrades for new features that you might want to include on your version of the page.

To add the new content to your custom cart, copy any content records on the out-of-box cart to your custom cart. For more information, see Copying or moving content items to another content record.
Note the following when searching for products from Commerce > Find products:
- Capitalization does not affect search results.
- Products are searched by name, the first 300 characters of the description, and attributes, such as color or size.
- Search terms must be at least three characters long.
- In some cases, searched terms might exist outside of your 300-character product description. To improve search results, enter additional terms.

If you have created a custom order confirmation template for a specific RiSE website and the website is not sending the custom order confirmation template, ensure the website's Cart page is using the OrderConfirmation shortcut:
- Navigate to the website that should be sending the custom order confirmation template.
- Click the Cart icon.
- Enable Easy Edit.
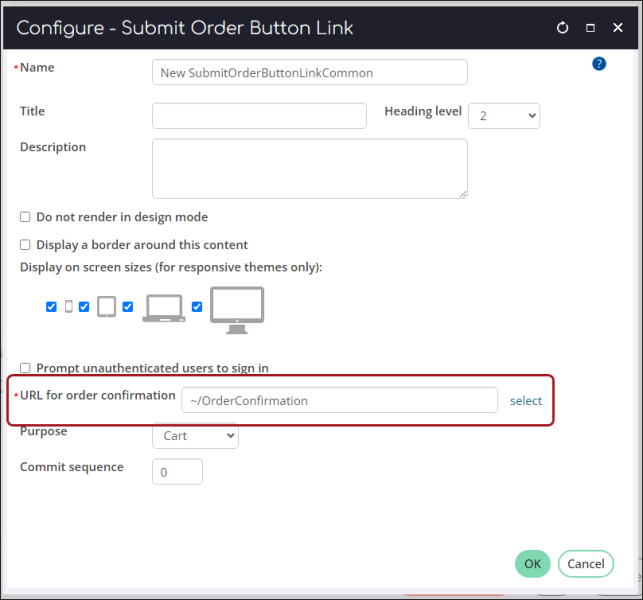
- Hover over the Submit Order Button Link content item, then click Configure.
- Review the URL for order confirmation field. If this field is not using the ~/OrderConfirmation shortcut, update it now to use the shortcut.
- Click Save & Publish.
- Repeat this process for all websites using a custom order confirmation shortcut.

When there is no inventory and the settings are in place to automatically invoice and set to complete (Settings > Commerce > General), all orders for non-inventory products are invoiced immediately and the payment is applied.
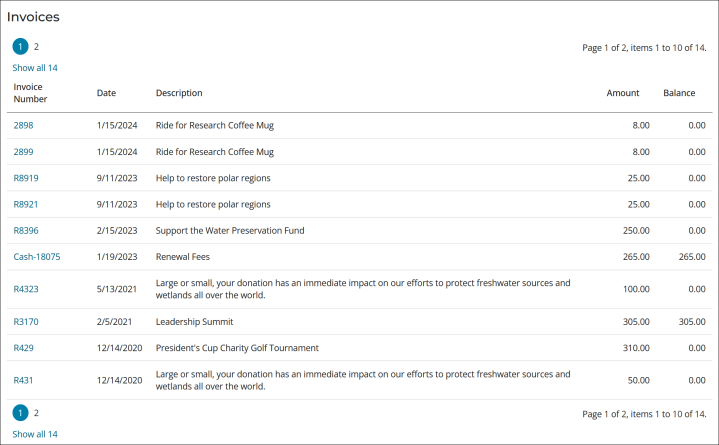
For example, a customer orders a non-inventory item and pays for the item at the time of purchase. Once the customer submits the order, the order is automatically invoiced and advanced to the completed stage. The invoice is immediately available on the Transactions tab of the customer’s account page.
To prevent invoices from being automatically issued for non-inventory orders, ensure the Order stage if order does not contain inventory items is not set to Completed (Settings > Commerce > General).
For more information, see Understanding how the initial order stage is assigned.
To refund shipping and handling charges, you must first reverse the charges on the order invoice, then adjust customer’s the payment to refund the amount:
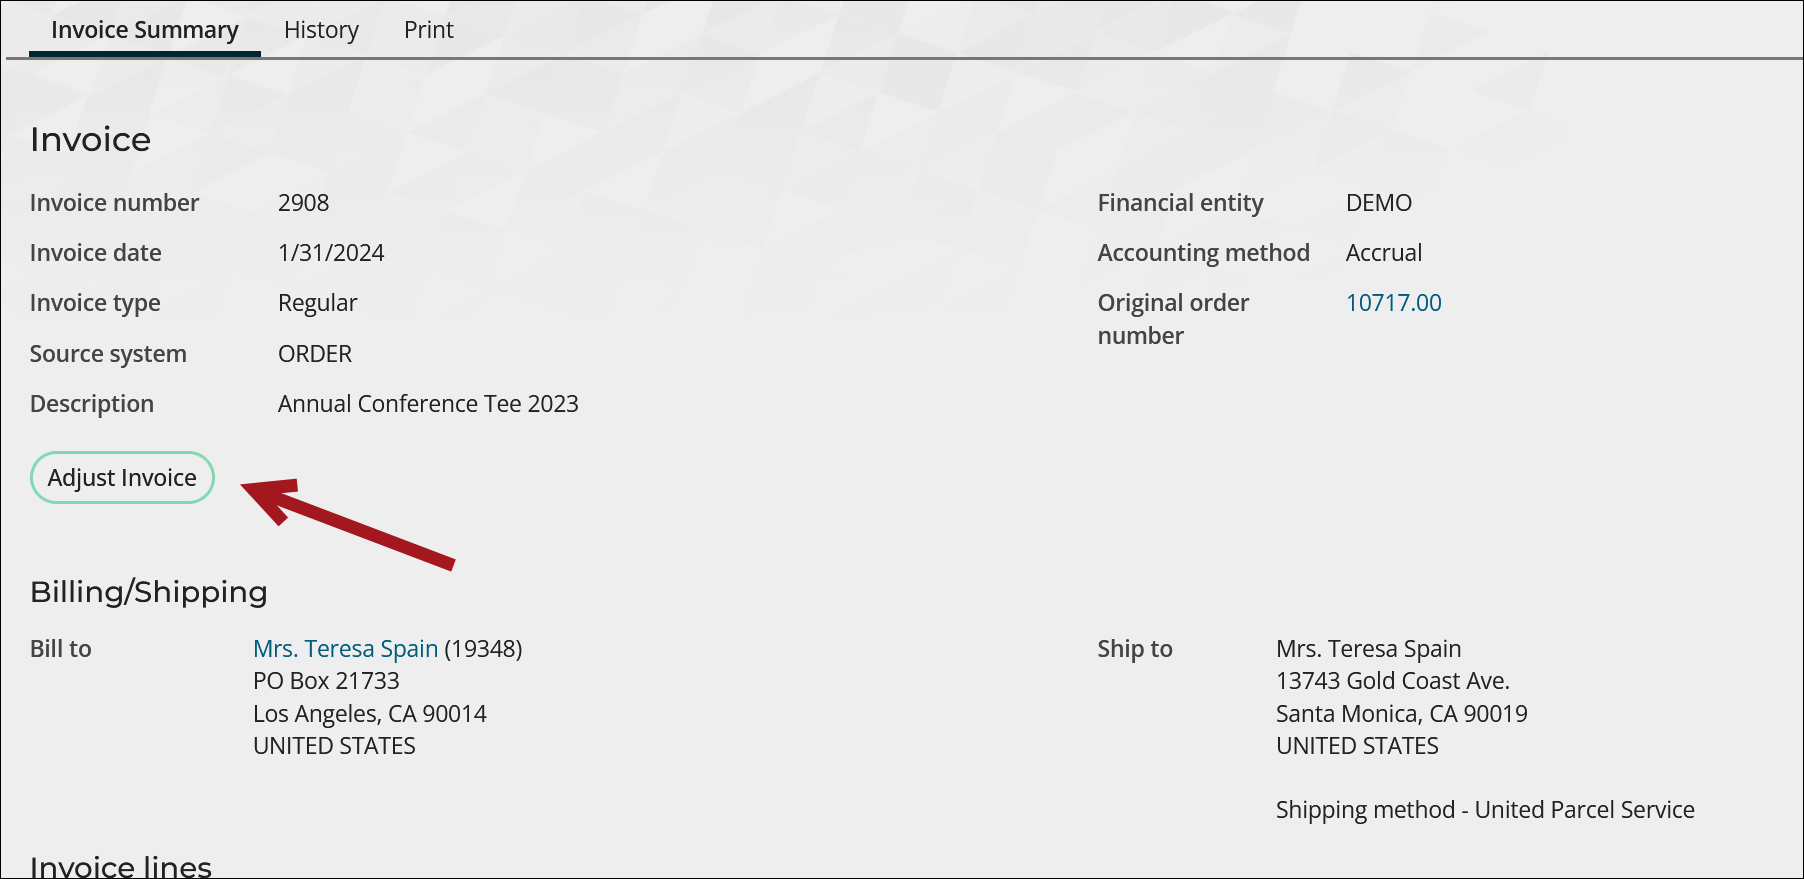
- Go to Finance > Invoices and select the invoice for the order.
- Click Adjust Invoice.
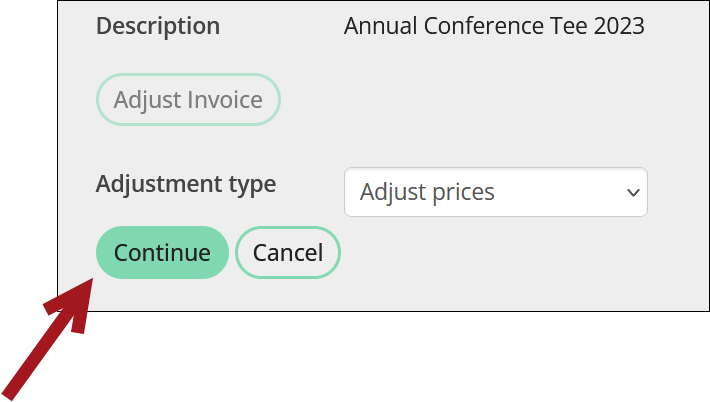
- From the Adjustment type drop-down, select Adjust prices, then click Continue.
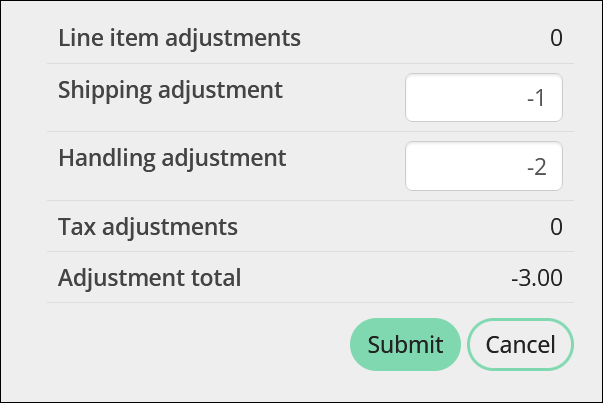
- Enter negative values in the Shipping adjustment and/or Handling adjustment fields to reverse the charges. For example, if the customer paid $1 for shipping, enter –1.
- Click Submit.
- The shipping/handling adjustments appear as a credit memo order. Credit memo order adjustments result in an open credit on the customer's account page. To refund the credit, select the Payment ID associated with the invoice.
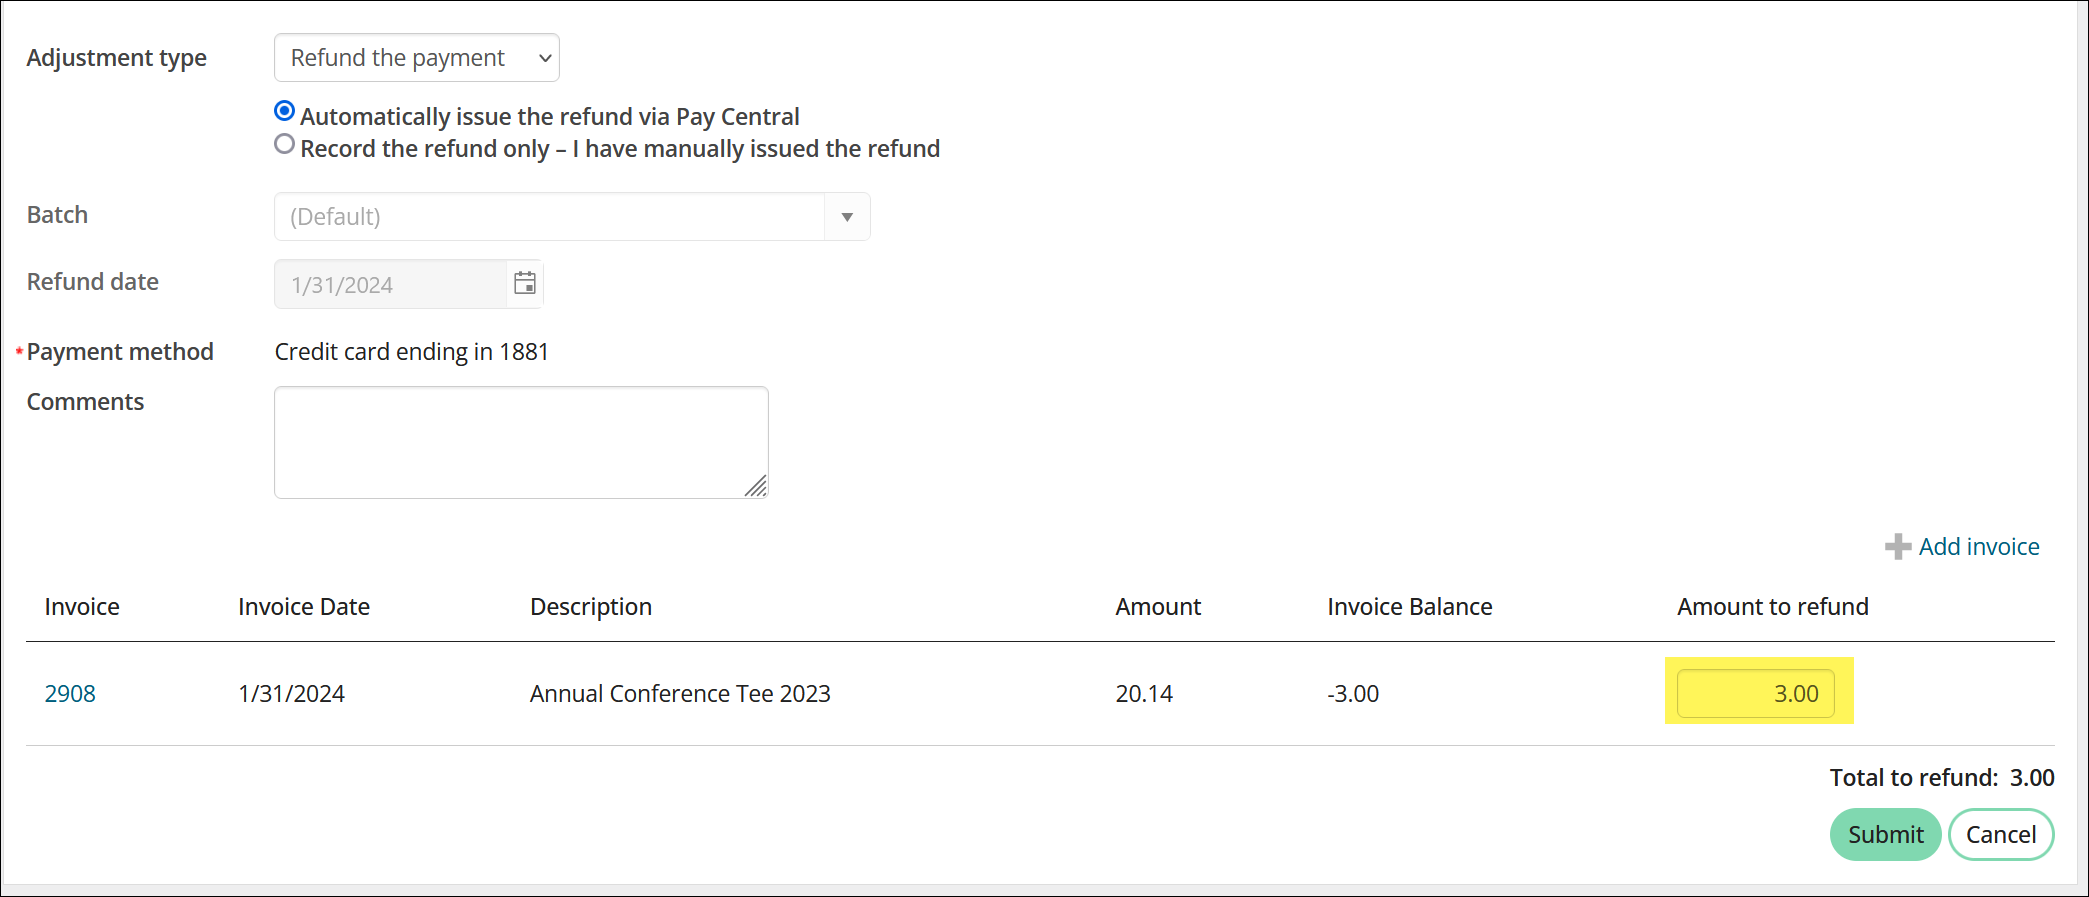
- Click Adjust Payment.
- By default, Refund the payment is selected as the Adjustment type, and the credited amount is populated in the Amount to refund. If the original payment was made through pay central, Automatically issue the refund via Pay Central is selected.
- Click Submit to issue the refund to the customer.
