Last updated on: January 27, 2026
The communication creator enables you to dispatch direct payment links for invoices via email. These links allow recipients, whether logged in or not, to view pertinent invoice details and pay the full invoice balance on a secure page. When a payment is submitted by an unauthenticated user, it is associated with the Bill to contact. For authenticated users, payments are linked to the account of the logged-in user, whether they are paying their own invoices or on behalf of someone else.
In This Article
- Before you begin
Sending the link to pay an invoice as a guest via the communication creator
Generating the Pay Invoice Link without the communication creator
Reviewing payer information for invoices paid via direct link
Customizing the payment confirmation email
Customizing the website content for guest invoice payments
Before you begin
Before allowing guest invoice payments, the following must be true:
- You have at least one active public-facing website.
- You have at least one Credit or PayPal Express payment method configured. ACH/direct Debit payments are only available for authenticated users, not guests.
- The Communication Template to use for Payment Confirmations (Settings > Commerce > General) is tailored for your organization. For more information, see Defining the default template used for payment confirmations.
- The PayInvoice shortcut is configured to point to either the out-of-box Invoice Payment content, or a copy of this content tailored for your organization. For more information, see Customizing the website content for guest invoice payments.
Additionally, the following are important to note before sending the pay invoice link:
- Only open invoices can be paid via the pay invoice link.
- Invoices must be paid in full; partial payments are not supported through this link.
- Logged-in users can pay invoices using the Credit, PayPal Express, or direct debit payment methods. Unauthenticated users are limited to Credit or PayPal Express.
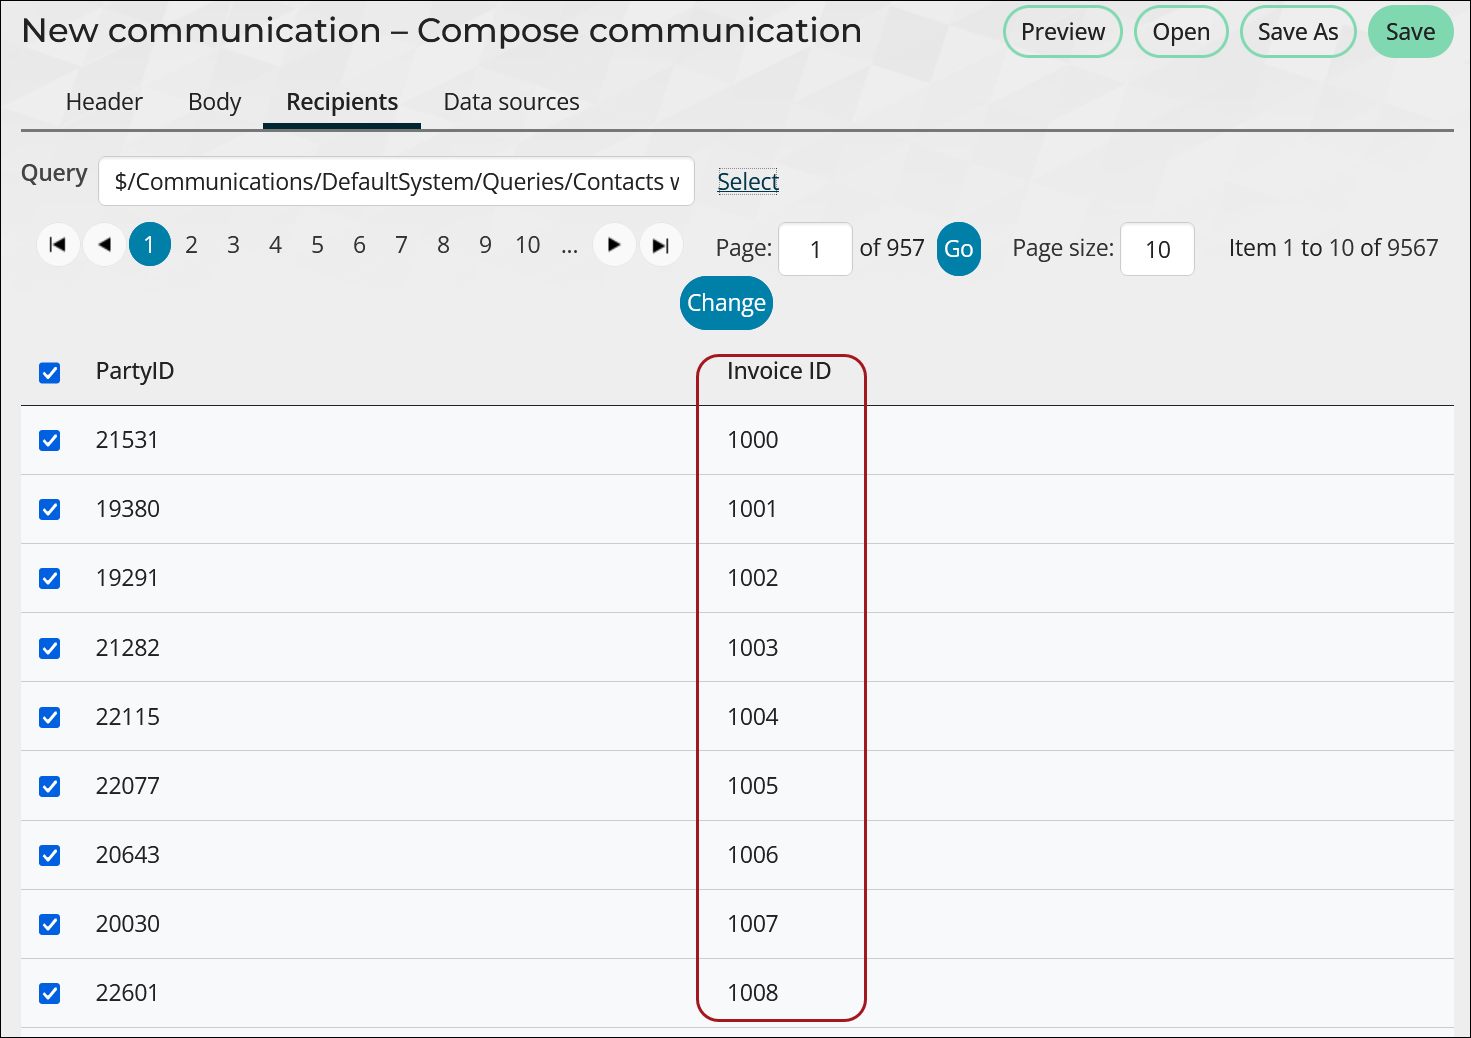
- The recipient query used in the communication template must include an InvoiceID column. This is necessary for the pay invoice link to function correctly, as it uses this ID to pull the correct invoice data.
- Only one invoice is supported per link; if there are multiple invoices, multiple links must be generated. Each link must include a unique InvoiceID.
Sending the link to pay an invoice as a guest via the communication creator
To include a pay invoice hyperlink in your email, select the Pay Invoice Link from the Body tab of the communication. This link enables users to pay an invoice directly, without logging in to your site.
To add the pay invoice link in a communication, do the following:
- Go to Marketing > Communication templates.
- Create a new template (New > Communication) or open an existing template for edit.
- Click the Recipients tab. Ensure the recipient query contains display columns for the contact’s ID and the InvoiceID. If the InvoiceID column is missing, a warning message displays when previewing or sending a communication with the Pay Invoice Link.
- Click the Body tab.
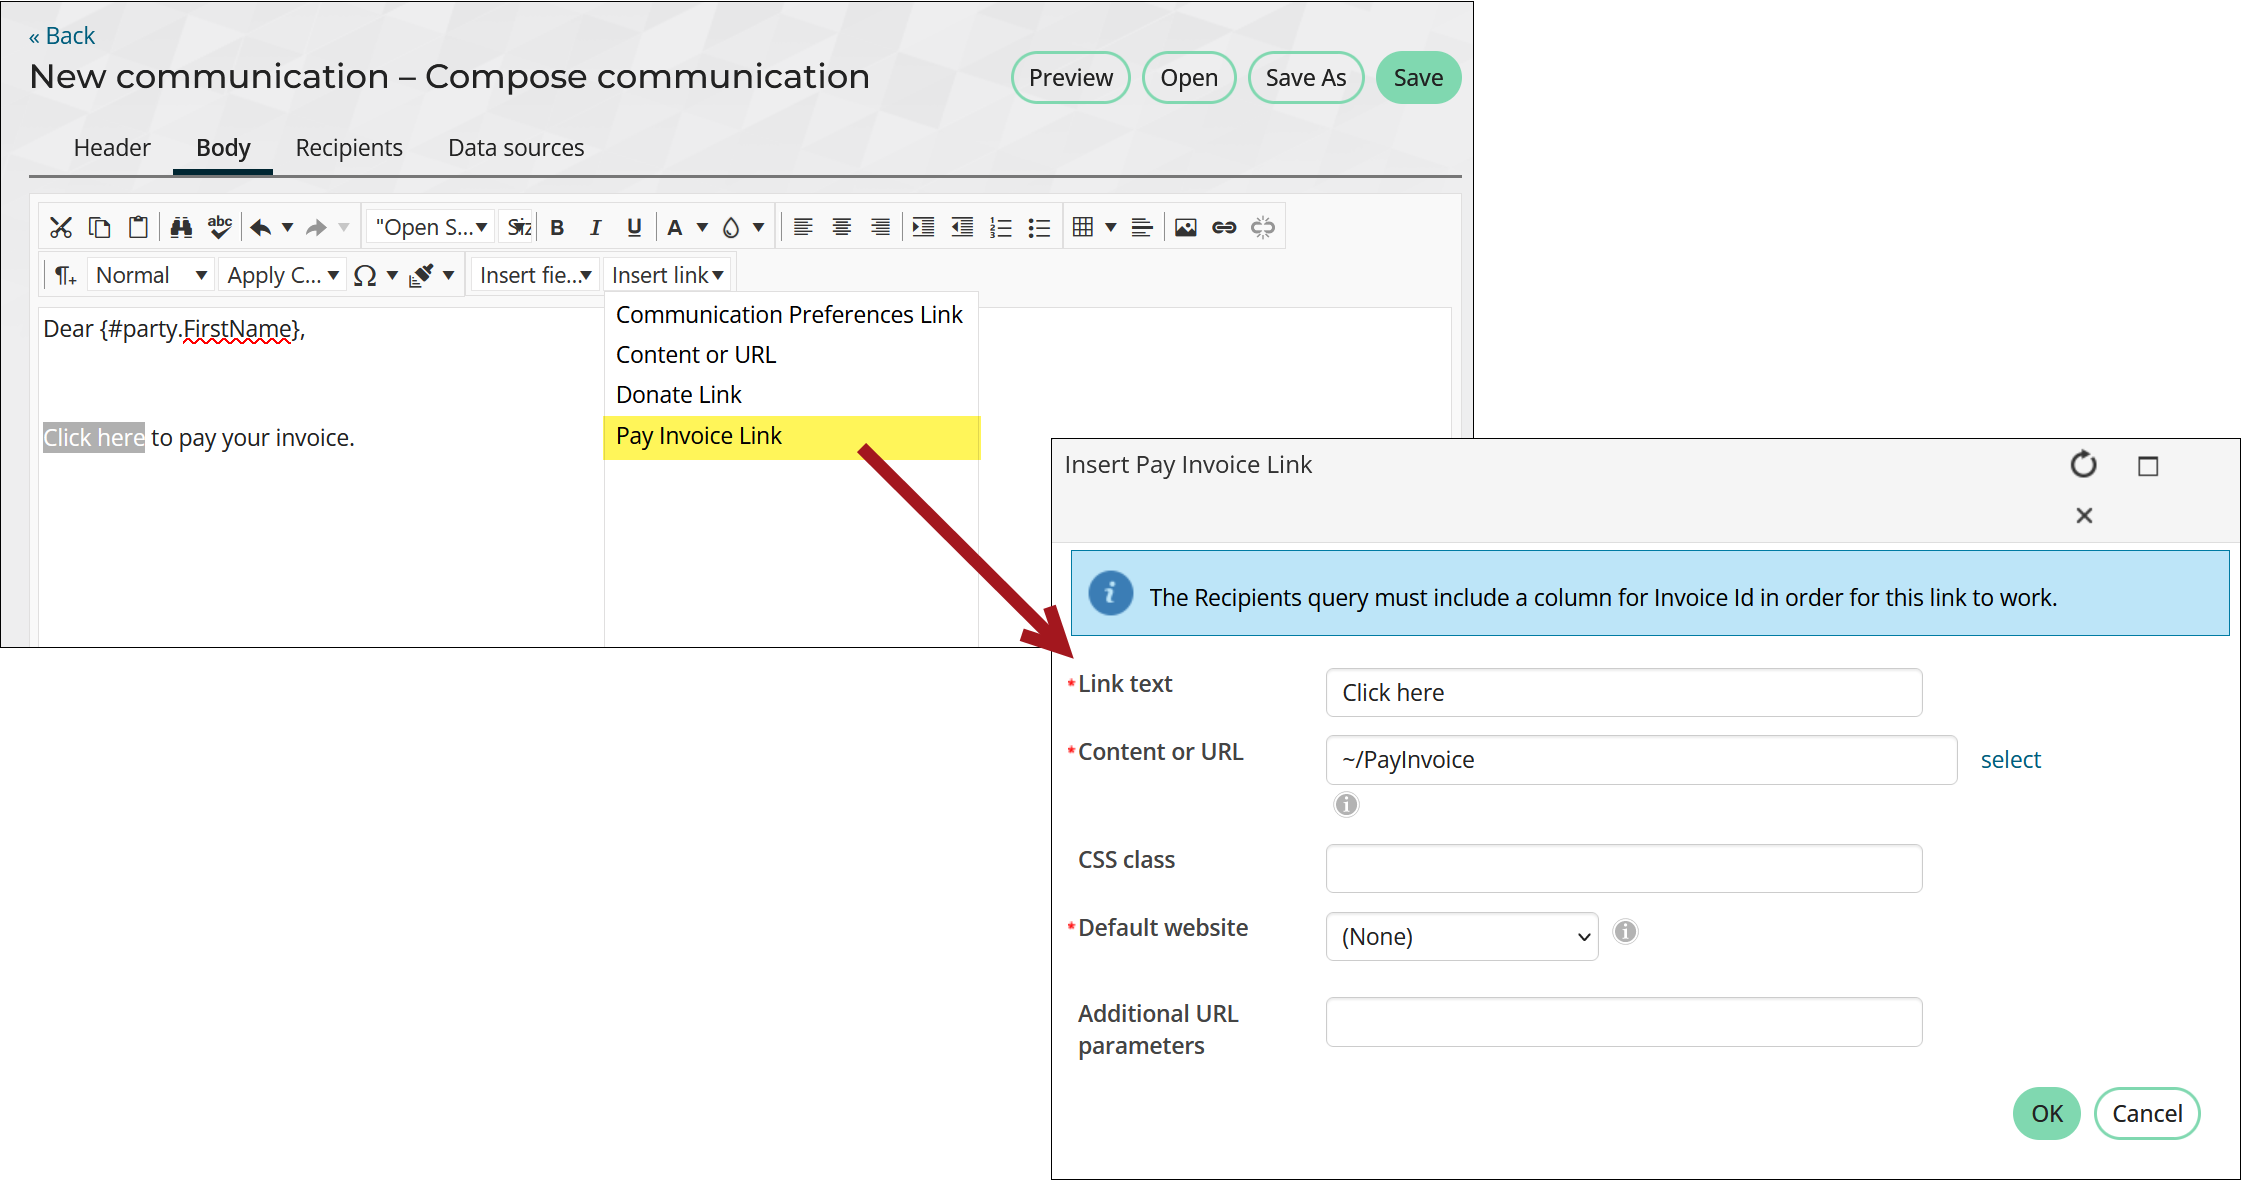
- From the Insert link drop-down, select Pay Invoice Link:
- Enter the Link text.
- Define the Content or URL. By default, the ~/PayInvoice shortcut is selected. Choose a different page or shortcut if you do not want to direct users to the page defined at the ~/PayInvoice shortcut.
- (optional) Enter a CSS Class that will be applied to the link.
- Select a Default website.
- (optional) Enter Additional URL parameters to include in the link. To add multiple URL parameters, follow this format: param1=value1¶m2=value2¶m3=value3
- Click OK.
- Continue configuring the communication.
- Preview, then Send the communication.
Tip: The sample Event Invoice, Event Invoice Report Writer, Invoice Notice, Invoice Notice Report Writer, Order Invoice, and Order Invoice Report Writer templates include the pay invoice link out-of-the-box. If you choose one of these templates, ensure the link correctly points to your website.
When the recipient clicks on the link emailed to them, they are taken to the PayInvoice shortcut and can pay an invoice without logging in to your website. Recipients also have the option to forward the email. Anyone with the link can pay the invoice.
Example: Sending the Pay Invoice Link to all members with outstanding dues balances
To email pay invoice links to all members with outstanding dues balances, do the following:
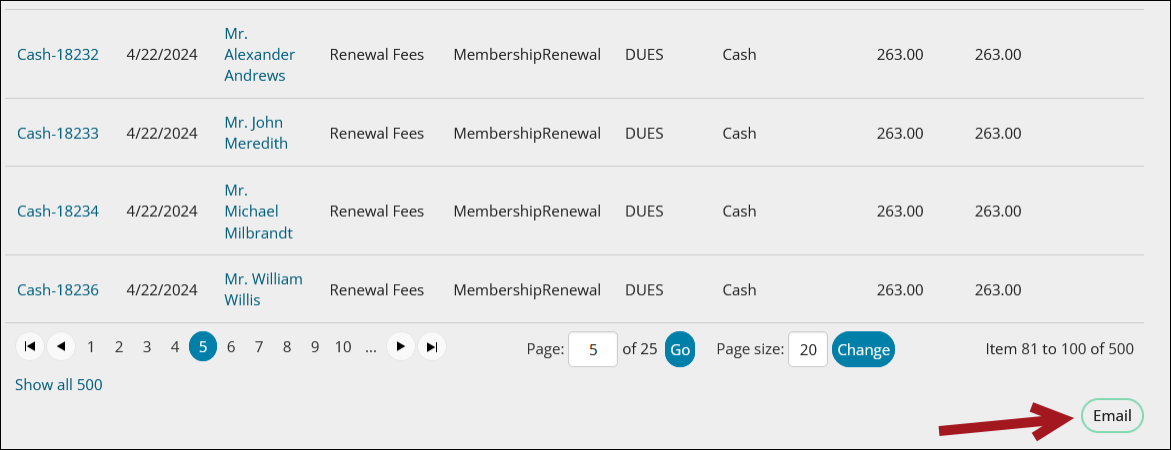
- Go to Finance > Invoices.
- Select the All open invoices query.
- From the Source System drop-down, select DUES.
- (optional) Specify the invoice dates to include. For example, you can choose to only include dues invoices generated in the last month.
- Click Find.
- Click Email.
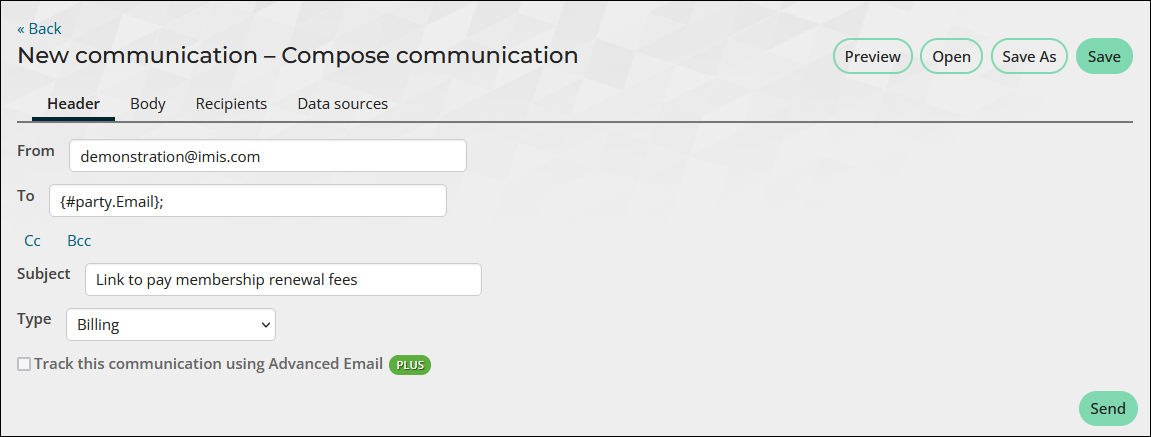
- Enter the From address, Subject, and select Billing as the communication type. Alternatively, open an existing template that is used to send invoices such as the Invoice Notice.
- Click the Body tab.
- From the Insert link drop-down, select Pay Invoice Link:
- Enter the Link text.
- Define the Content or URL. By default, the ~/PayInvoice shortcut is selected.
- Select a Default website.
- Click Ok.
- Continue configuring the communication as needed.
- Preview the email. Click Prev or Next to review the email for each recipient. Ensure that any merge fields in the email appear correctly.
- Send the communication.


Example: Paying the invoice as a guest
After sending the communication in the above section, recipients can follow the link in the communication to pay their outstanding dues without logging in. The following is an example of how a recipient can pay their invoice:
- The recipient selects the pay invoice link in the email message.
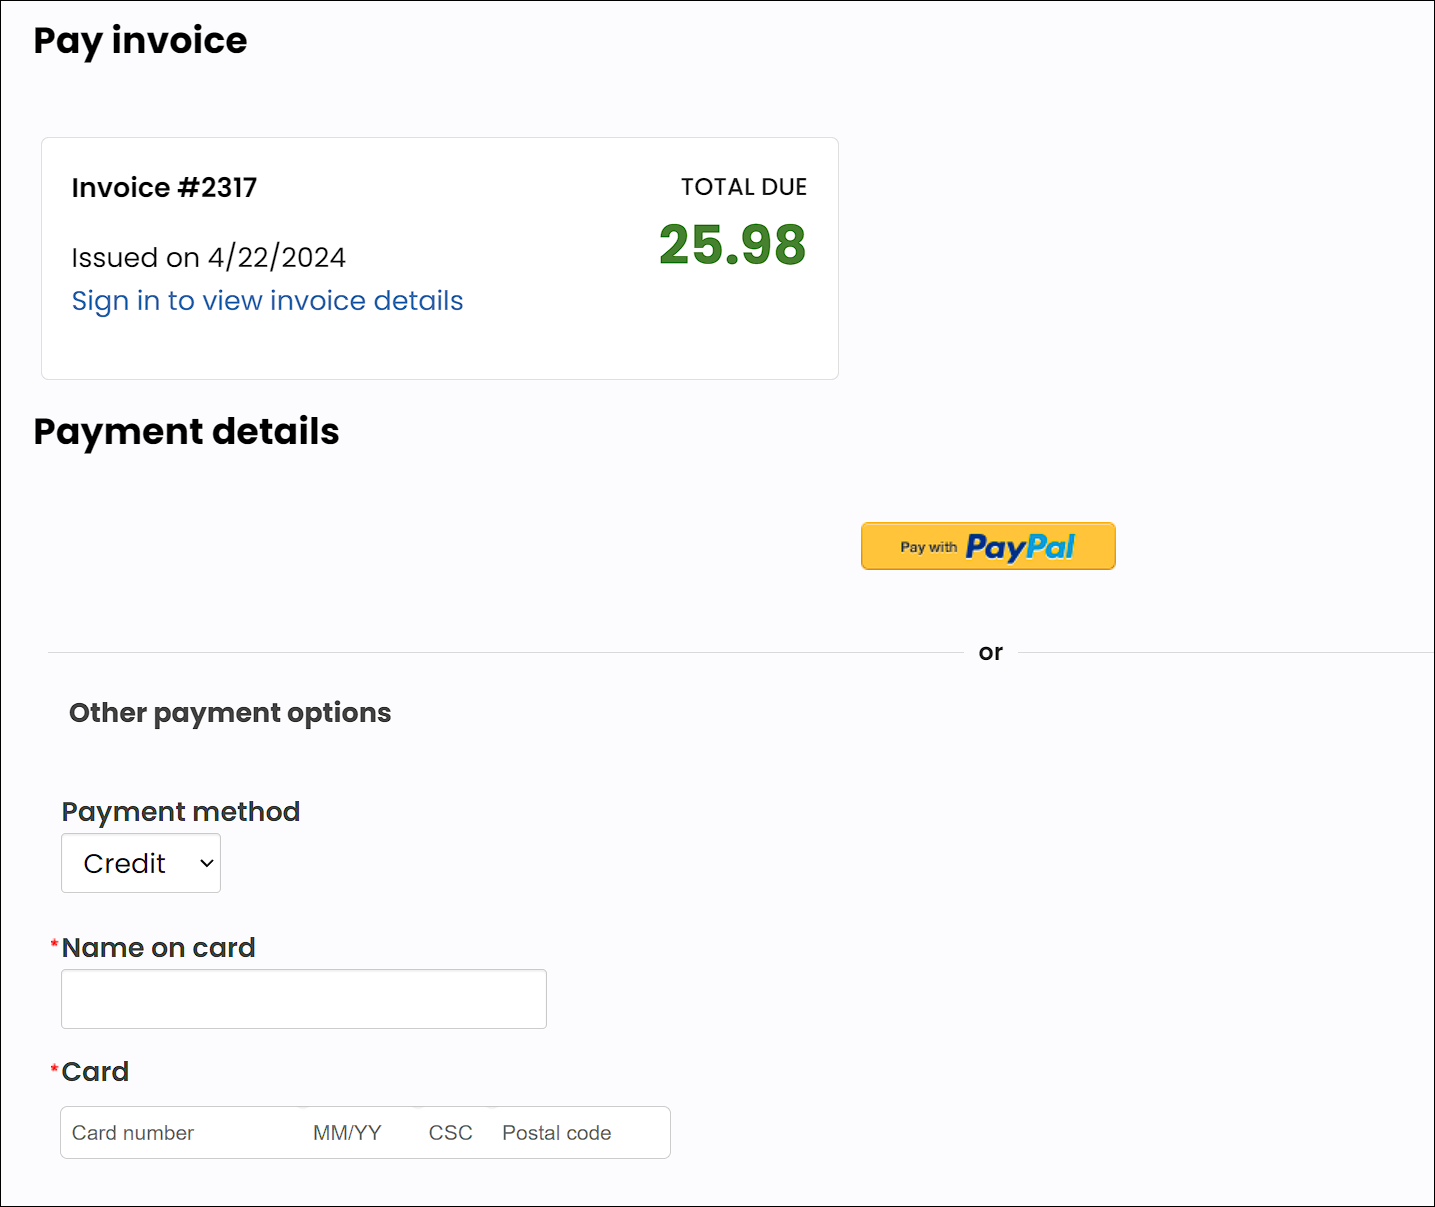
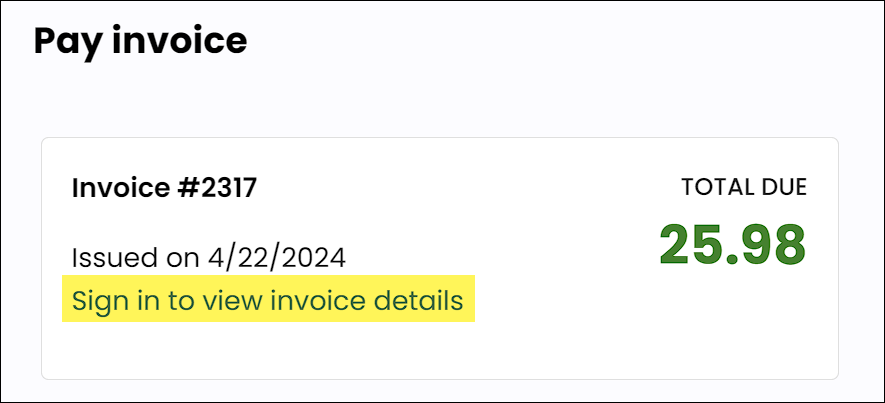
- They are taken to the Invoice Payment page, which presents the invoice defined in the recipients query.
- The guest enters the payment details and submits the payment without needing to log in. There is no option to partially pay the invoice, they can only pay in full. They can also choose to Sign in to view invoice details.
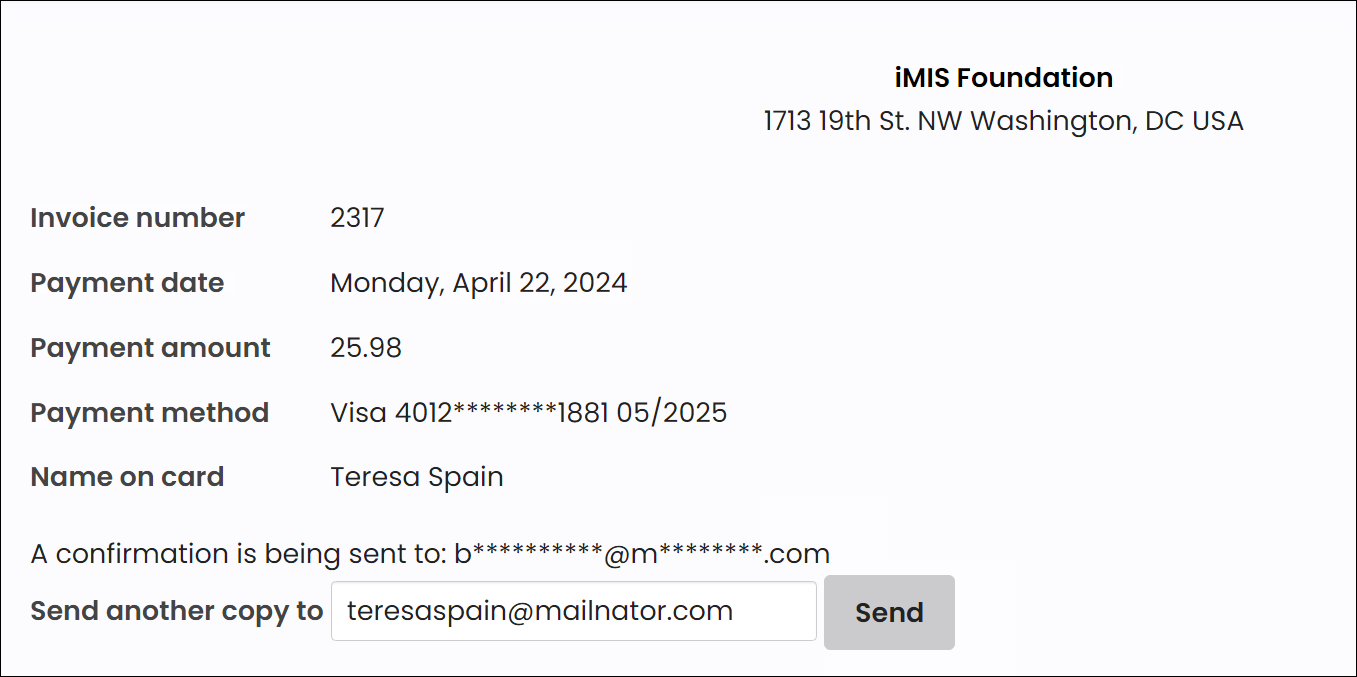
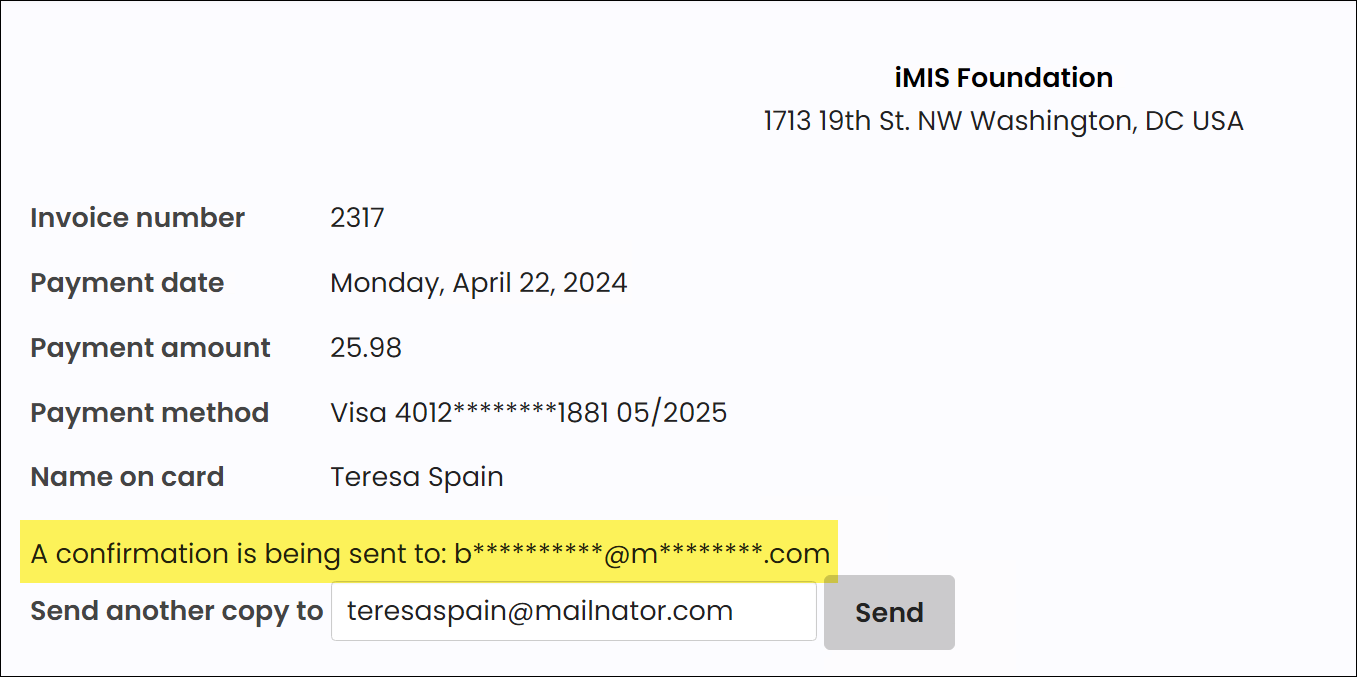
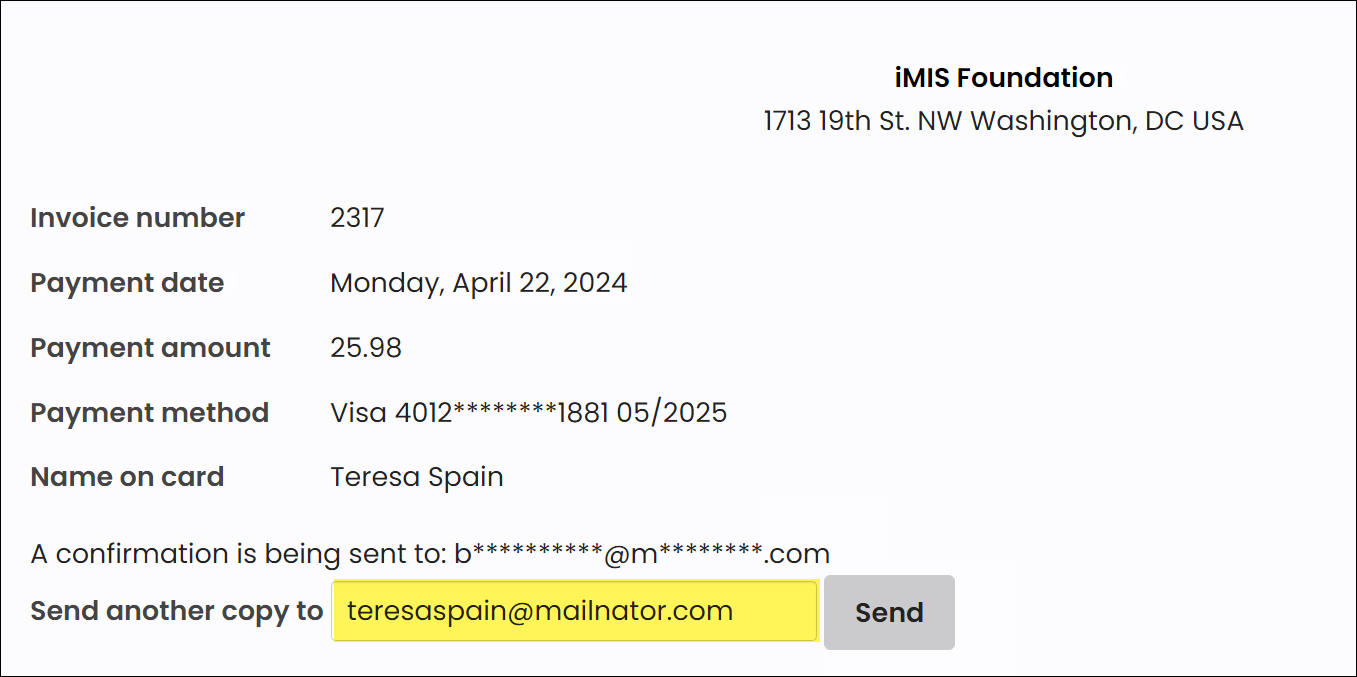
- Once they submit the payment, they see the payment confirmation screen, and a payment confirmation is sent to the Bill to contact associated with the invoice. If the guest has not logged in, the Payer ID is set to the Bill to ID.
- The guest specifies additional email addresses to send the confirmation to. For example, to send a copy to their own email address.
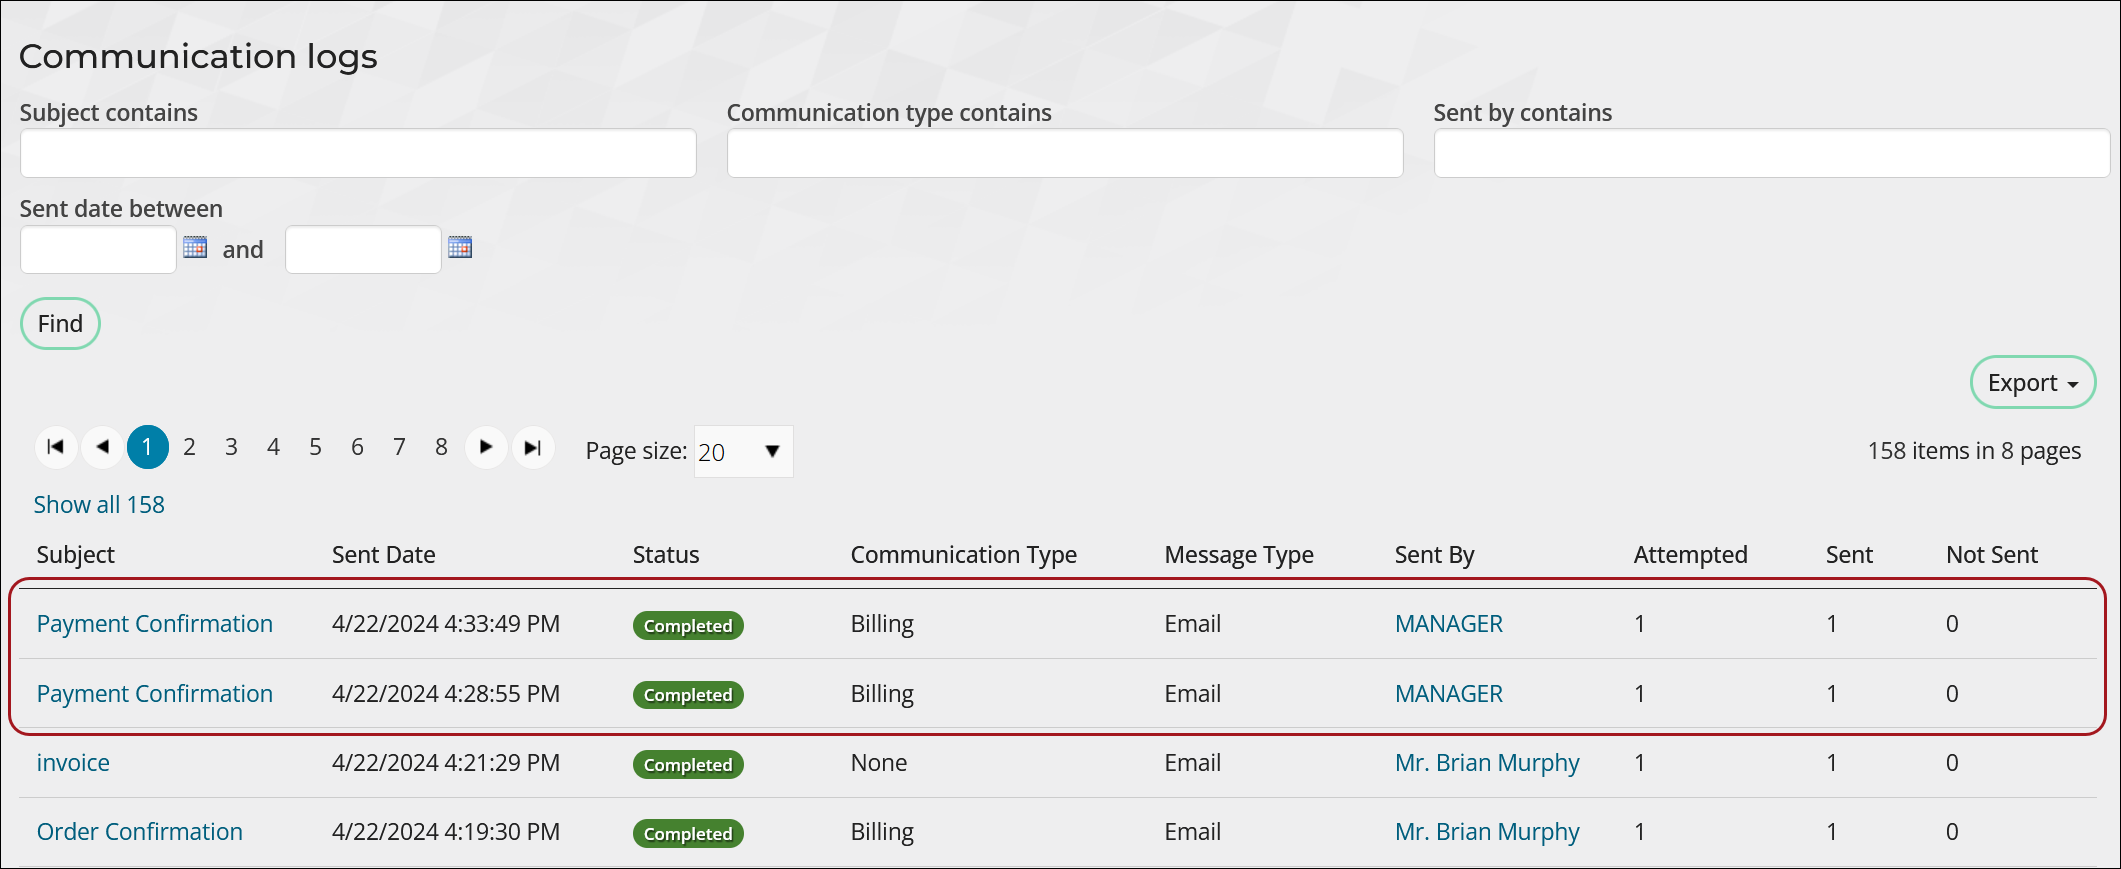
- All payment confirmations sent from this page appear in the communication logs.
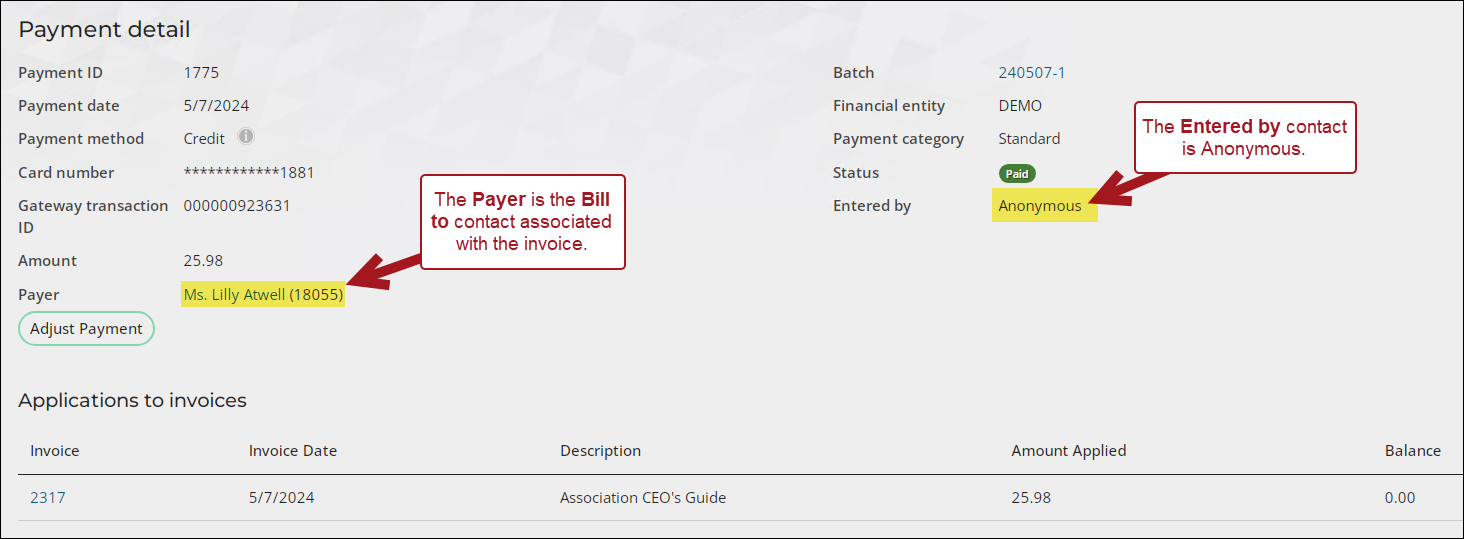
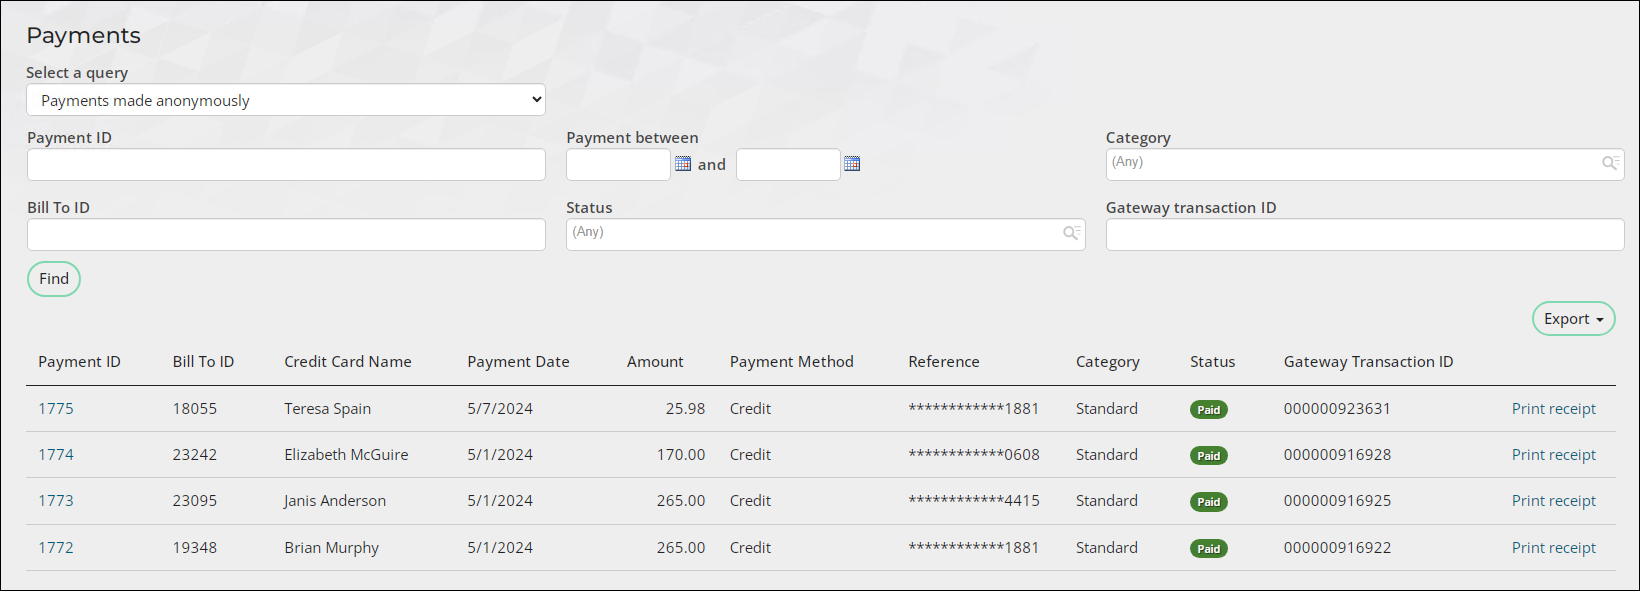
- If the guest did not log in, the payment details show the Payer is the Bill to contact and Entered by is Anonymous. For more information, see Reviewing payer information for invoices paid via direct link.

Generating the Pay Invoice Link without the communication creator
The Guest Invoice Payment content item is dynamically populated with an invoice based on the value of an InvoiceKey or InvoiceID parameter in a URL. Traditional non-persisted cash membership invoices that have an invoice number starting with "CASH-" use the InvoiceId; all other invoices, including persisted cash-based membership dues invoices use the InvoiceKey.
To manually generate a pay invoice link, include the following:
- Link to a content record that contains the Guest Invoice Payment content item. Out-of-the-box, the PayInvoice shortcut uses this content item.
- Add one of the following parameters to the URL:
- For traditional non-persisted cash membership invoices, add an InvoiceID URL parameter in this format: InvoiceID=ID.
- For all other invoices, including persisted cash-based membership dues invoices, add an InvoiceKey URL parameter in this format: InvoiceKey=KEY.
Note: These values can be found using the CsInvoice or InvoiceSummary business objects.
For example: http://example.com/PayInvoice?InvoiceKey=fe76d266-be5f-416a-b5dc-8f5d65874365
Reviewing payer information for invoices paid via direct link
Although guest invoice payments are associated with the Bill to contact, you can use the following to determine whether payments were made by logged-in users or anonymously:
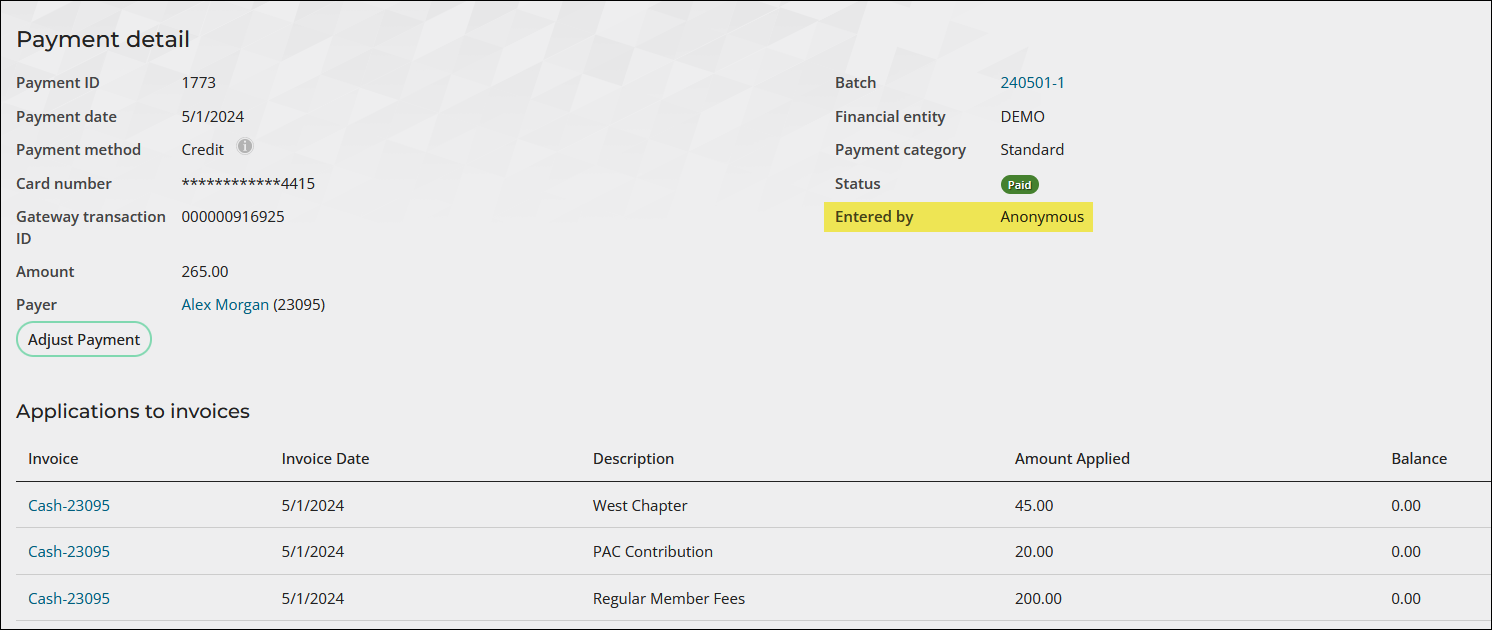
- The payment details screen contains the Entered by property, which indicates who made the payment:
- Anonymous - Payments made by unauthenticated users.
- MANAGER - Payments facilitated by system processes like AutoPay.
- User no longer exists - Payments made by users who have since been removed.
- Full name – For payments entered by authenticated users, the logged-in user’s full name along with their ID appears as a clickable link.
- The Payments created anonymously query (Finance > Pay central > Find payments) allows you to view details of all payments made anonymously, including details like the name on the credit card used, if provided during the transaction.
- The TransactionDetail business object contains the CC_Name property, which is useful for reporting on the names associated with credit card payments.
Customizing the payment confirmation email
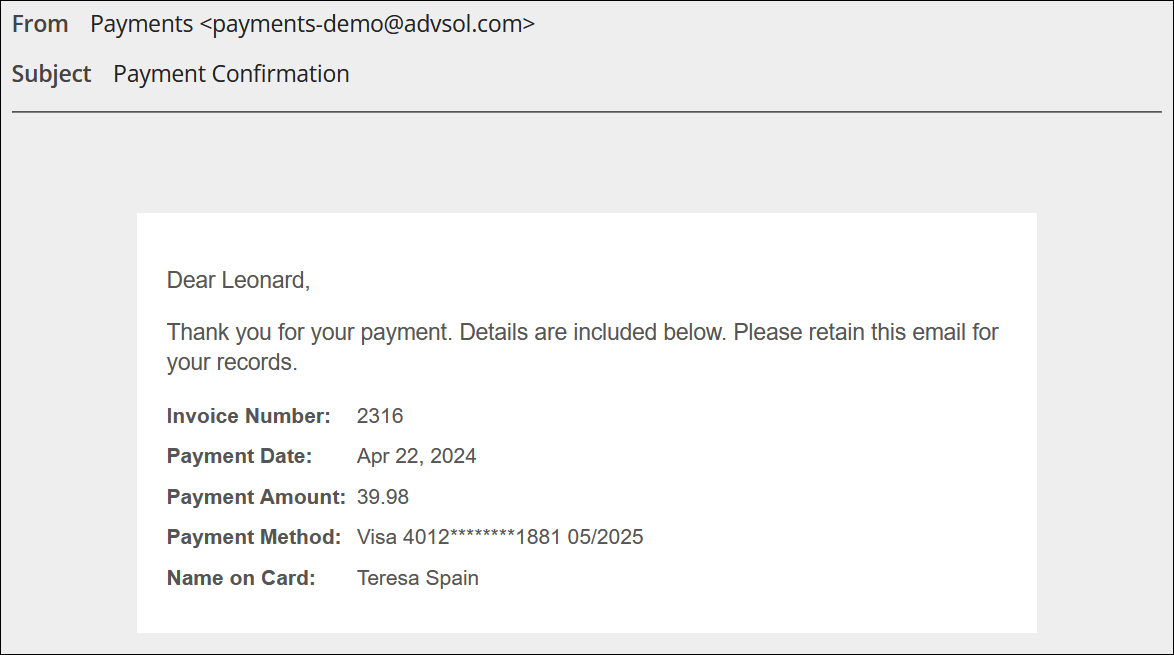
When a guest pays an invoice without logging in, a payment confirmation email is automatically sent to the Bill to contact associated with the invoice. The payment confirmation screen also provides the option to send the confirmation to additional email addresses. All payment confirmations are logged in the communication logs. The communication template used for payment confirmations can be customized to meet the needs of your organization.
Customizing the payment confirmation template
When creating a tailored Payment Confirmation template, you can copy the sample template or create a new template. Do the following to tailor the Payment Confirmation template:
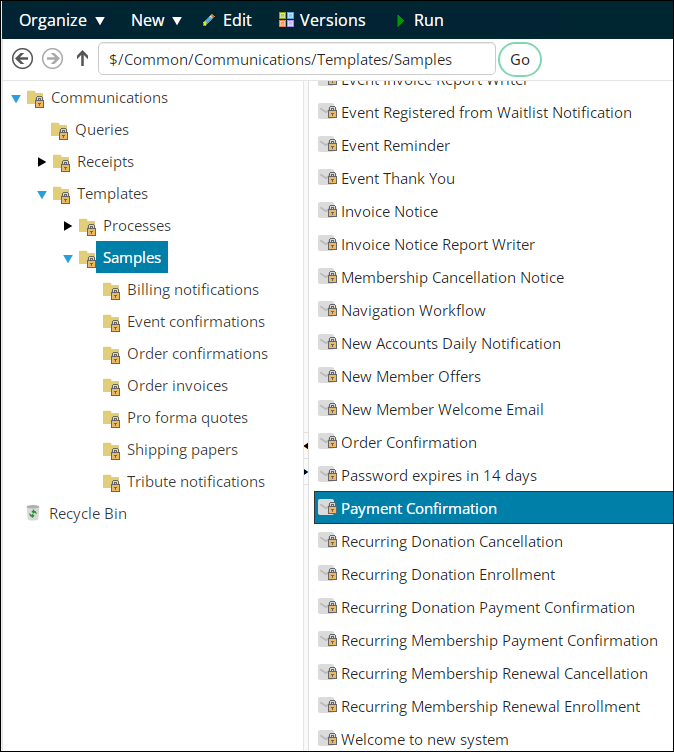
- Go to Marketing > Communication templates. Navigate to Templates > Samples.
- Select the Payment Confirmation template.
- Edit the template as needed. For example, ensure that the From address is the correct email address and the header and footer use your organization's information.
- Click Save As and enter a Name for the template. Be sure to save your template to the Templates folder.
When copying the sample Payment Confirmation template or creating a new template the following information must be configured in the template:
- The From address
- The To address defined as
{#party.Email} - Type = Billing
- The
{invoicepaymentdetailsblock}placed within the body. This placeholder will be replaced by a grid displaying the invoice number, payment date, payment amount, and payment method.
Defining the default template to use for payment confirmations
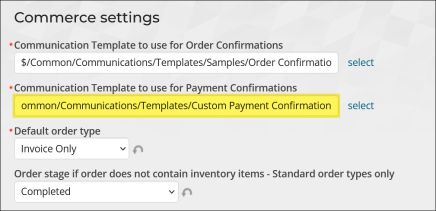
The Communication Template to use for Payment Confirmations setting (Settings > Commerce > General) determines the default communication template to use for payment confirmations. Before sending payment confirmations, ensure this template has been customized for your organization. This is necessary to prevent the unintentional sending of ASI and iMIS materials.
Do the following to define the default Payment Confirmation template:
- Create the custom template.
- Go to Settings > Commerce > General.
- Update the Communication Template to use for Payment Confirmations (Settings > Commerce > General) to point to your custom template.
- Click Save.
Customizing the payment confirmation for a specific RiSE website
All websites use the default payment confirmation template (Settings > Commerce > General) unless a custom template is defined. To choose a custom payment confirmation to use for a specific RiSE website, do the following:
Do the following to define the default Payment Confirmation template:
- (optional) Create a custom payment confirmation communication template to be used with this website.
- Go to RiSE > Page Builder > Manage content.
- If you already have a custom Payment Confirmation page, locate that page and open it for edit; otherwise, make a copy of the out-of-the-box Payment Confirmation page:
- Navigate through the following folder path: @/iCore/Finance/Payment-Confirmation
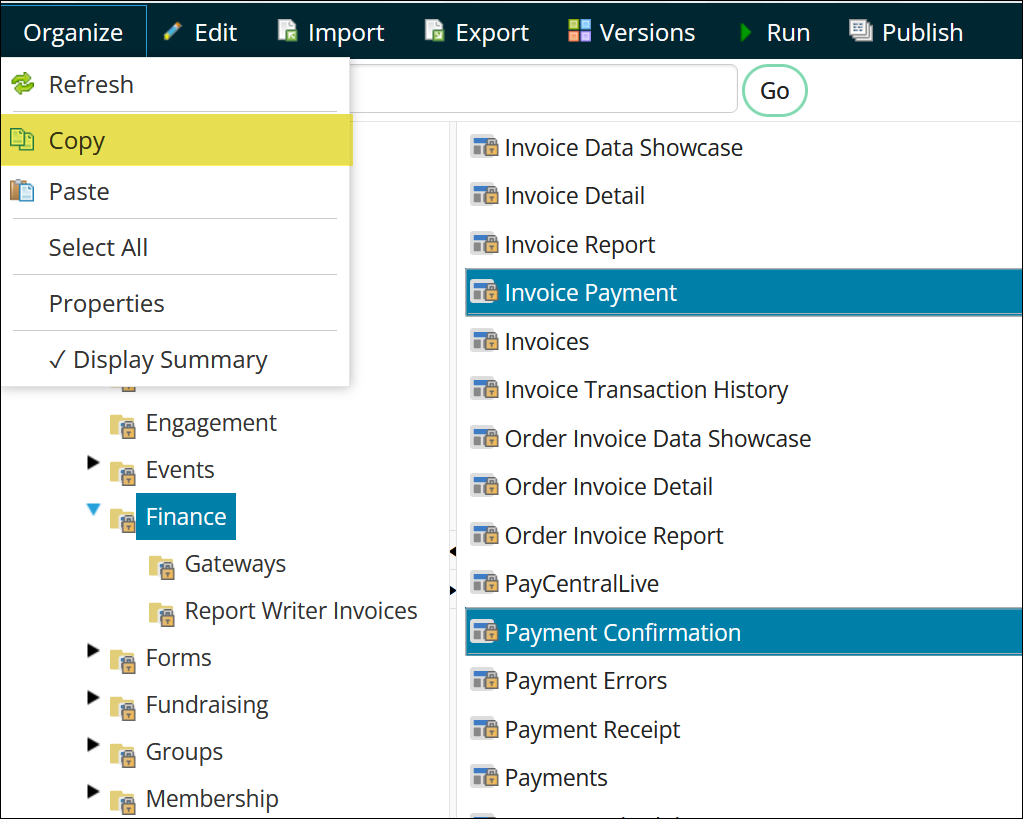
- Copy the Payment Confirmation content record (Organize > Copy).
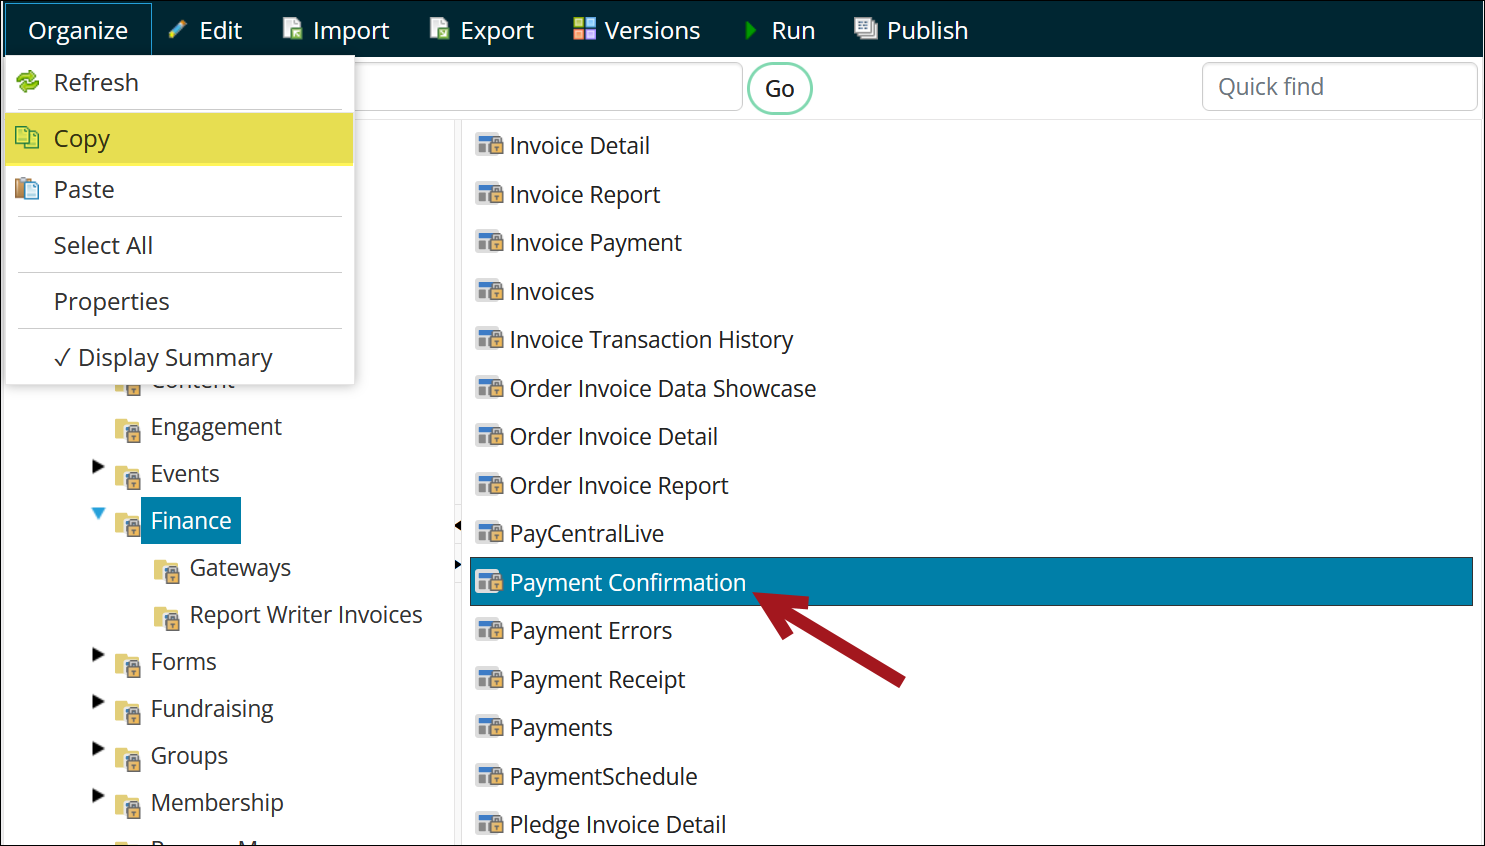
- Paste the content record in your website’s content folder (Organize > Paste).
- Open the Payment Confirmation page for edit.
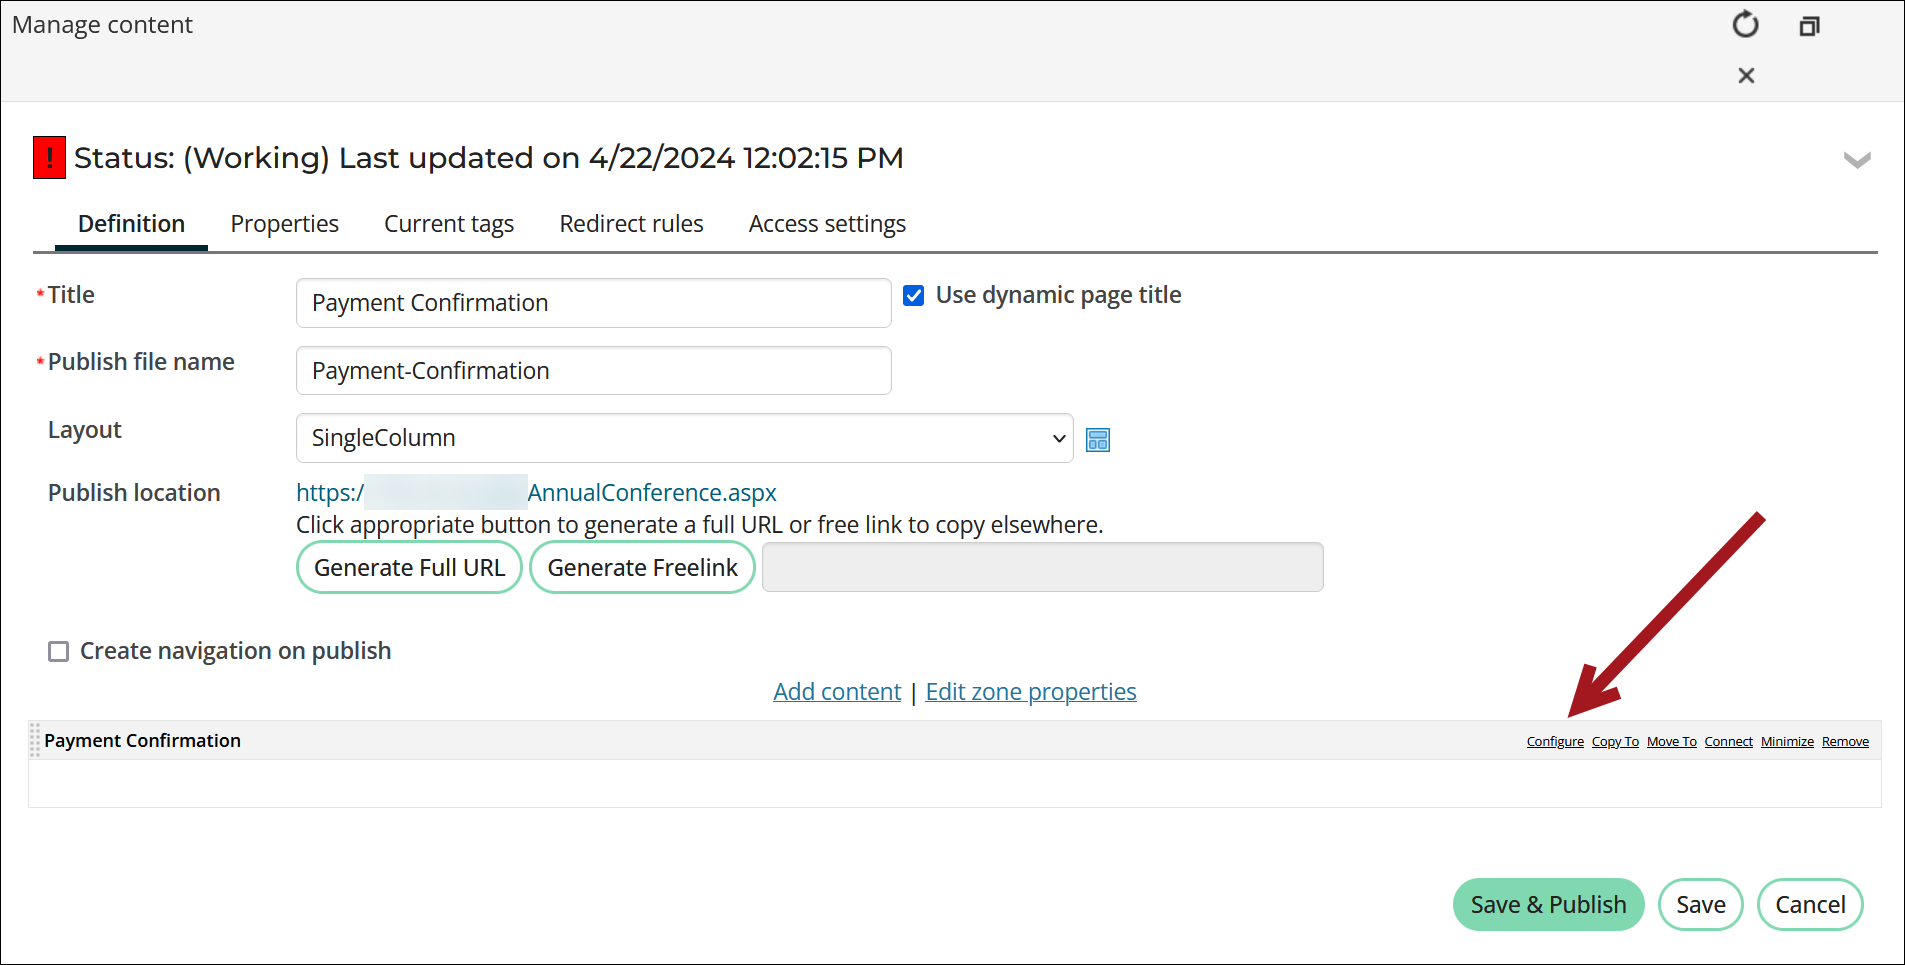
- Configure the Payment Confirmation content item.
- Define the Payment confirmation email:
- To use a specific payment confirmation email template different than the Default, choose Custom, then select the Custom payment confirmation template.
- To configure the payment confirmation to not send any email, choose None.
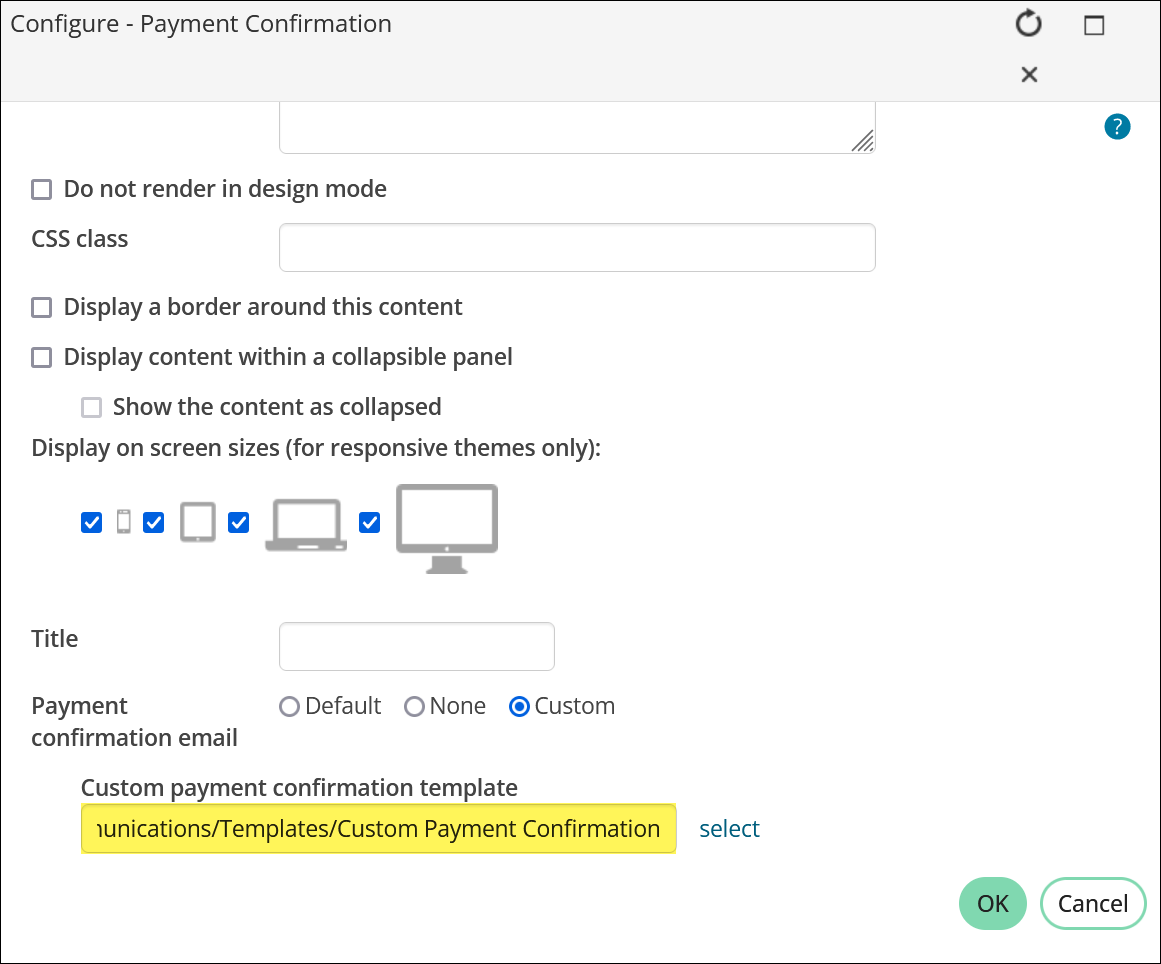
- Click OK, then click Save & Publish.
- Go to RiSE > Site Builder > Manage shortcuts.
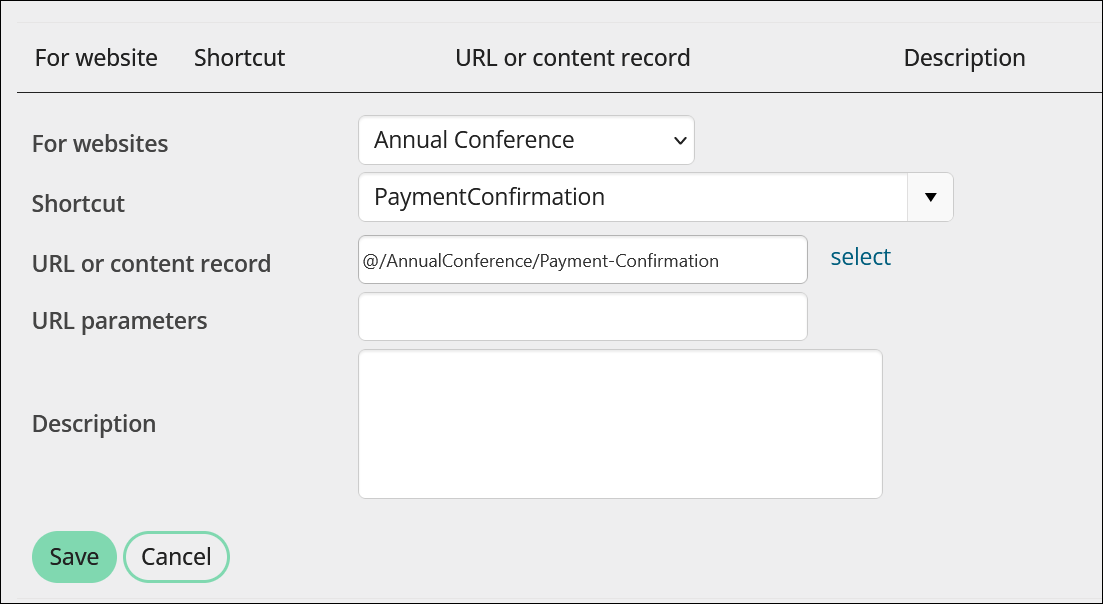
- Click Add shortcut.
- Define the shortcut:
- For websites – Choose the specific RiSE website you want the payment confirmation to be associated with.
- Shortcut – Choose PaymentConfirmation.
- URL or content record – Choose the Payment Confirmation content record you just edited.
- Click Save.
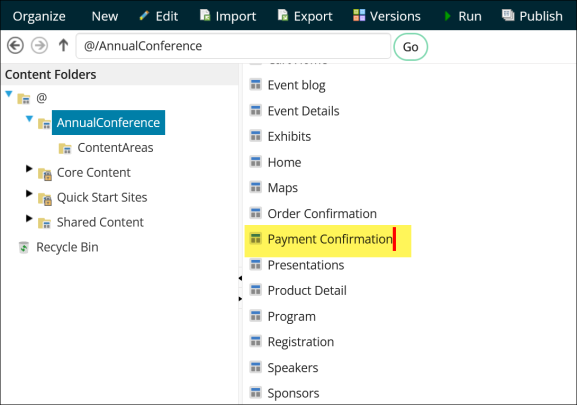

When any guest invoice payments are made from this specific RiSE website, they are sent the custom payment confirmation email you just added to the Payment Confirmation page. Other RiSE websites that do not have a custom template defined will use the default payment confirmation template (Settings > Commerce > General).
Customizing the website content for guest invoice payments
Out-of-the-box, guest invoice payments use the following two content records (stored in the @/iCore/Finance folder):
- Invoice Payment - When a guest clicks on the payment link sent via email, they are directed to the Invoice Payment page. This page displays the invoice's details and allows users to submit their payment.
- Payment Confirmation - After completing a payment, guests are redirected to the Payment Confirmation page, which automatically sends a confirmation email to the Bill to contact and provides the option to send the confirmation to additional email addresses.
To customize these pages, copy and paste the out-of-the-box content records into a shared content folder, then update the relevant shortcuts to point to your customized copies:
- Go to RiSE > Page Builder > Manage content.
- From the @/iCore/Finance folder, copy the Invoice Payment and Payment Confirmation content records.
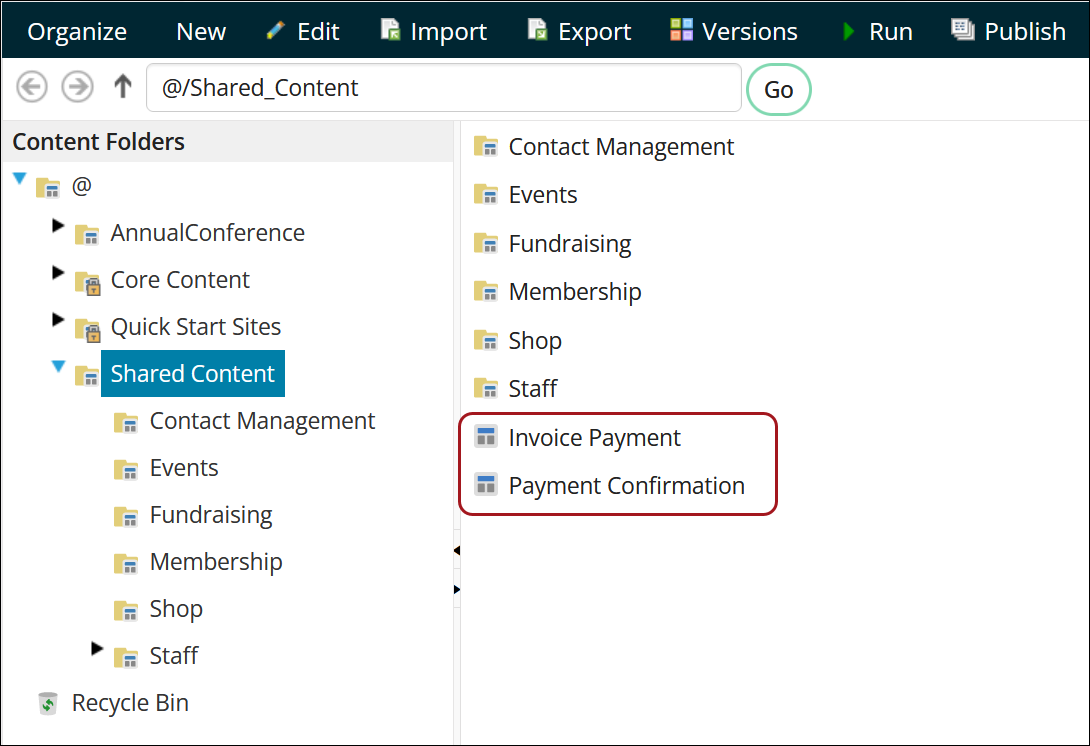
- Paste the content records into a Shared Content folder.
- Make any desired changes in your version of the content records. Do not remove the following content items from your custom copies:
- The Invoice Payment page must contain the Guest Invoice Payment content item.
- The Payment Confirmation page must include the Payment Confirmation content item.
- Save & Publish your changes.
- Go to RiSE > Site Builder > Manage shortcuts.
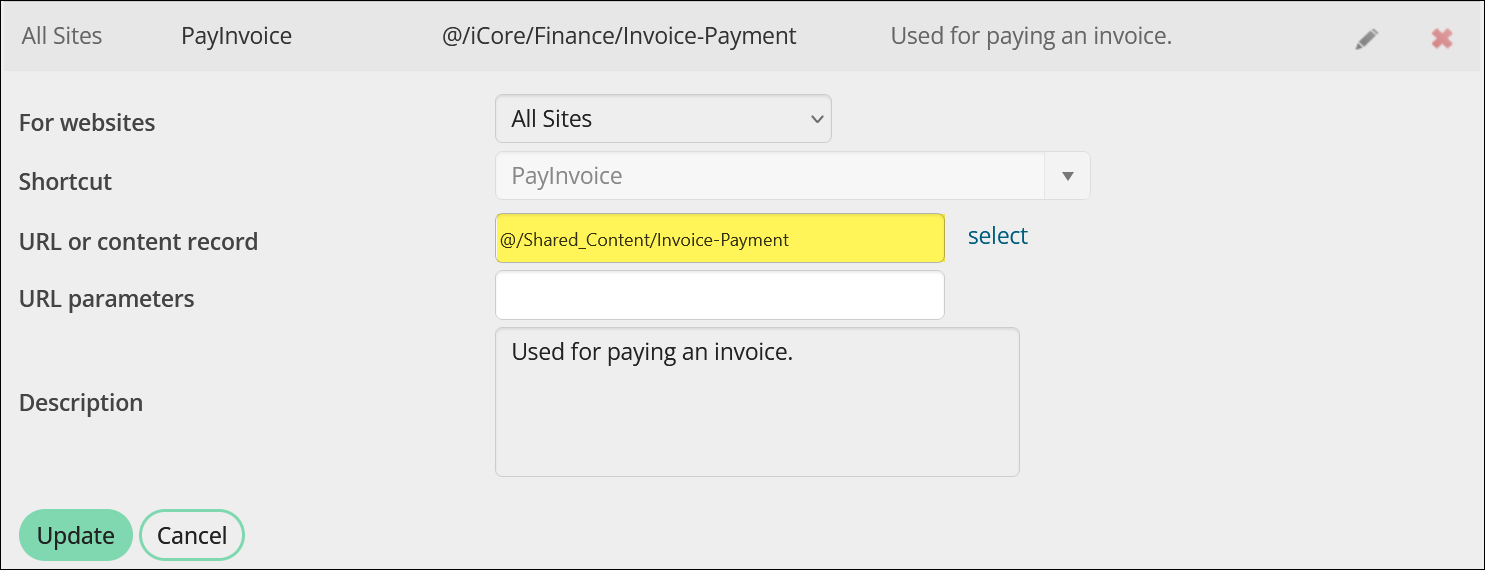
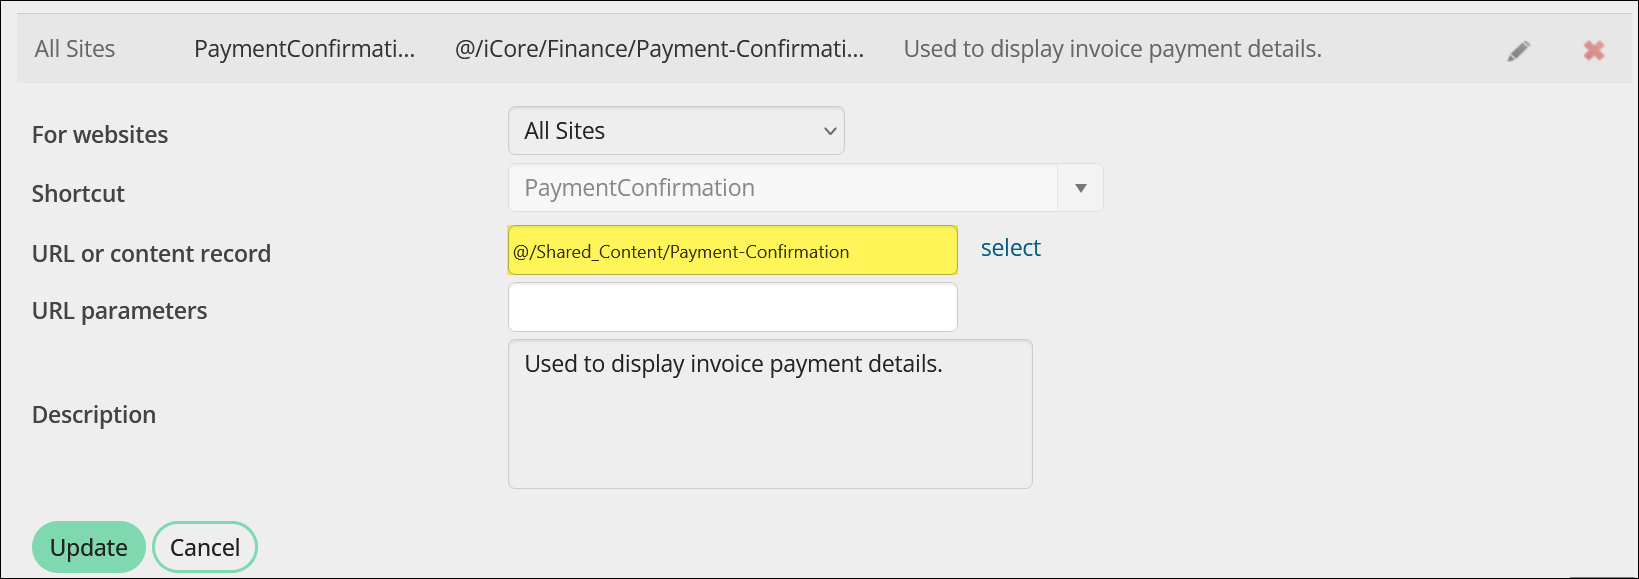
- Edit the following shortcuts to point to your modified content records:
- Update the PayInvoice shortcut to point to your modified Invoice Payment content record.
- Update the PaymentConfirmation shortcut to point to your modified Payment Confirmation content record.
For more details on each of the above steps, see Updating out-of-the-box content records.
