Last updated on: January 27, 2026
Related videos
Invoices can be emailed and printed directly from the iMIS Staff site.
In This Article
Emailing invoices
Before emailing invoices, you must first complete the following:
- Create a copy of the Invoice Notice communication template. This is the template that serves as the email to the contact. See Customizing the out-of-the-box templates to learn how to copy and customize these templates.
- Ensure that an invoice report is attached. By default Invoice Detail is the report attached to the Invoice Notice communication template. See Creating a communication with an attached report for more information.
To email invoices directly from the invoice detail page, do the following:
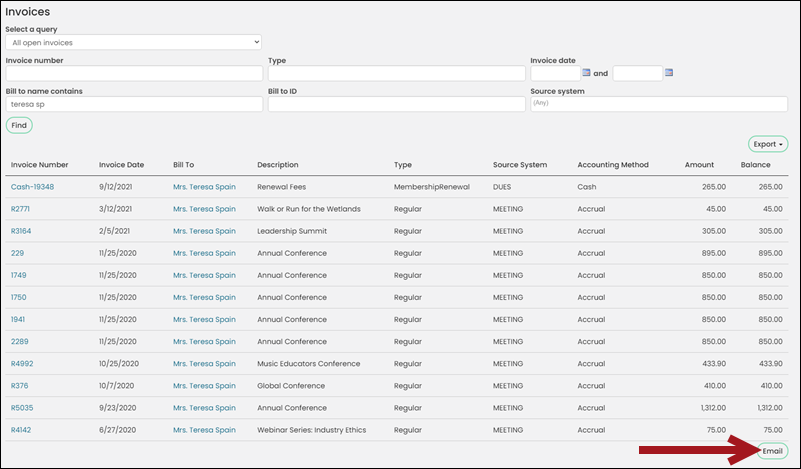
- Go to Finance > Invoices.
- Search for the invoice using the Select a query drop-down (All invoices or All open invoices) and enter invoice-specific information in the search fields.
- Click Find. If you simply need to send one invoice, you must narrow your search results for just that one invoice.
- Click Email.
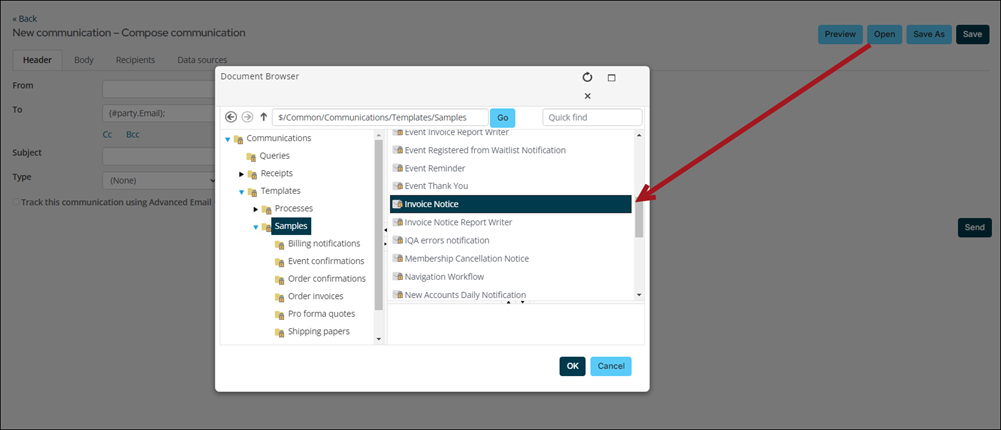
- Click Open, then select your copy of the Invoice Notice communication template.
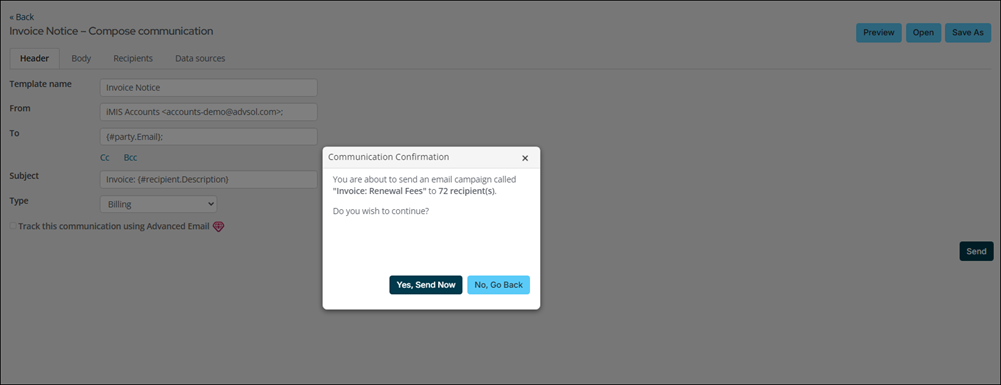
- Make any necessary changes. Ensure any links included in the template point to the correct website.
- Click Send. Review the Communication Confirmation, then click Yes, Send Now or No, Go Back to make additional changes.
Note: Additional queries added to the $/Accounting/DefaultSystem/Queries/Invoices folder will be displayed in the Select a query drop-down. Always use the InvoiceLineData business object (rather than the InvoiceLines business object) when creating invoice data queries.
The bottom of the communication should have Pass query values to matching report parameters enabled.
Note: If there are warnings after enabling Pass query values to matching report parameters, you may need to update the recipient query or report to ensure you resolve the warnings. See Resolving warnings when 'Pass query values to matching report parameters' is enabled for details.

The invoice will appear as an attachment to the email.
Printing invoices
Do the following to print an invoice:
- Go to Finance > Invoices.
- Search for the invoice using the Select a query drop-down (All invoices or All open invoices) and enter invoice-specific information in the search fields.
- Click Find.
- Select the Invoice Number to review more detailed information related to the invoice.
- Click the Print tab. Details about the selected invoice will be provided in one of the following reports:
- Export the invoice report to PDF or Excel.
- Print the report.
Note: Additional queries added to the $/Accounting/DefaultSystem/Queries/Invoices folder will be displayed in the Select a query drop-down. Always use the InvoiceLineData business object (rather than the InvoiceLines business object) when creating invoice data queries.
| REPORT | SOURCE SYSTEM |
|---|---|
| FR, AR, or DUES | |
| MEETING | |
| ORDERS |
To customize the invoice, you must update the correlating content and shortcut. See Customizing invoices for details.


