Last updated on: May 07, 2026
With the iMIS Report Writer, import a PDF, Word, or Excel document to have the layout of the report quickly prepared. Once the report is imported, you can map the properties of the imported report to iMIS data sources.
This feature is possible using Advanced Reports to dynamically fill out user-defined fields in forms and other documents. Placeholders or bookmarks in your document are linked to fields in the report, and when executed, merge with the report data, giving you a polished, data-driven report.
There are three document file types supported for use in templates:
- Word (.doc, .docx, and .rtf)
- Excel
- Template reports must be exported as the same file type as the template. For example, a PDF template report must be exported as a PDF file. Failing to export the report in the same file type as the template may cause errors in the exported file.
- Greek and Russian characters display correctly when running a report with a PDF template, but they are not supported when exporting the report to PDF — these characters will be omitted in the exported file.
For information regarding creating a template, see the Advanced Reports documentation.
In This Article
- Supported fonts for imported templates
Example: Creating a Word Template
Merging a Word document tempalte with a report
Supported fonts for imported templates
Avoid using custom fonts when creating templates; otherwise, errors may occur when exporting the template. It is not currently possible to add additional fonts. The following fonts are supported:
|
|
|
Example: Creating a Word Template
Word templates support three types of fields within templates:
- Static fields - Used once per template.
- Use any name for these fields, except for formats reserved for repeating and conditional cells.
- Limited-repeating fields - Mapped to consecutive values in a repeating cell.
- Use the following name format: FieldName_0, FieldName_1, … where Name is shared by the repeating fields, 0 maps to the first value, 1 maps to the next value, and so on.
- Unlimited-repeating fields - Mapped to all values in a repeating cell.
- Use the following name format: RepeatForEach_FieldName where FieldName is a unique name. Use this type of field when you wish to organize information under repeating groups within templates, arrange related information on the same page, and separating groups with page breaks.
- Open a document in Microsoft Word or a compatible document editor.
- Add text where you want to insert report data.
- Select the text, or in the case of repeating fields, a region of text, and insert a bookmark.
- (optional) To conditionally show or hide text, select the text and add a bookmark with the following naming format: KeepIF_FieldName where FieldName is a unique name. In the report, map this field to a cell with a formula that returns 1 if the text should be shown, and 0 if the text should be hidden. For example, =If({Products.ProductName} = "Chai", 1, 0).
- Save and close the document.
Important! Bookmark formatting for unlimited-repeating fields must follow specific spacing requirements. Place the opening bookmark bracket one line before the repeating field section begins, and the closing bracket should be placed one line after the repeating field section ends.

To create a Word template, do the following:
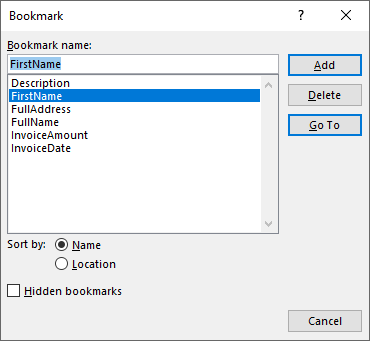
Important! The bookmark names must correspond to the fields within your report.
Tip: In order to avoid formatting errors upon export, make sure to highlight the text by clicking and dragging your curser instead of double-clicking.
Merging a Word document template with a report
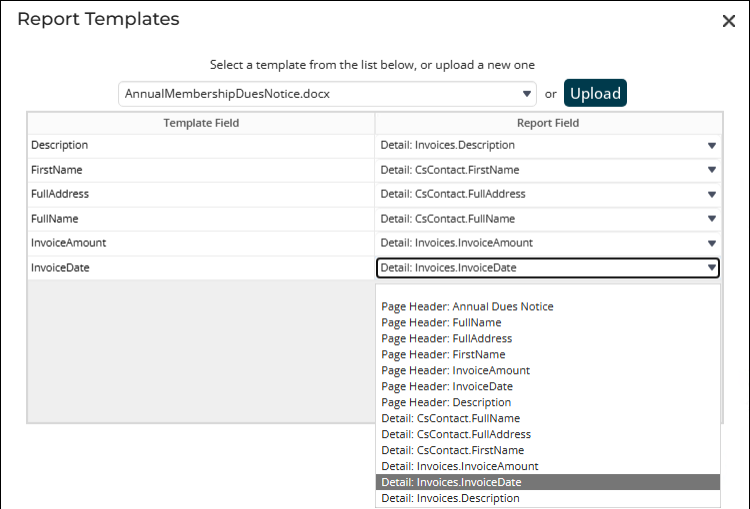
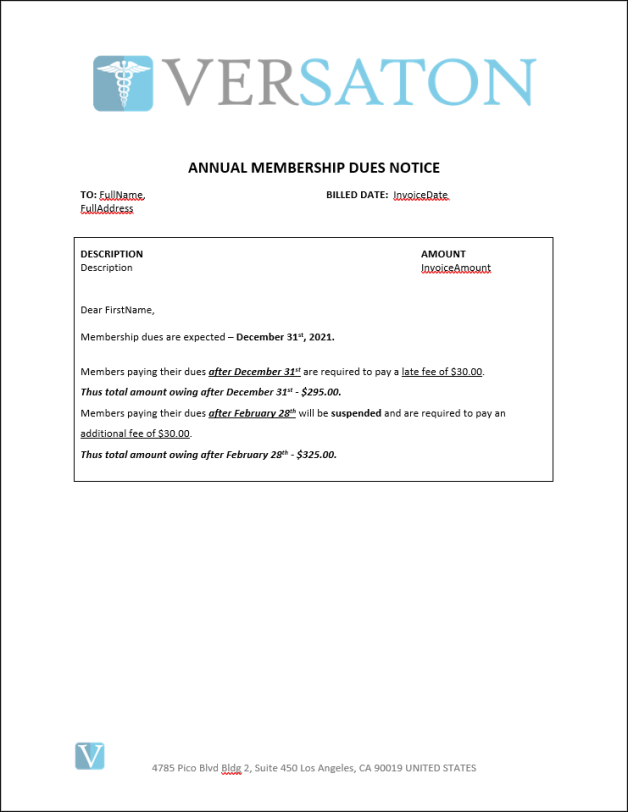
Let’s say that you want to create a report of Annual Dues Notices for your members. Some of the fields you want to include in your template are InvoiceAmount, FullName, and InvoiceDate.
Once you have created your document template, merging your report data to the template is simple. To merge your template to a report, do the following:
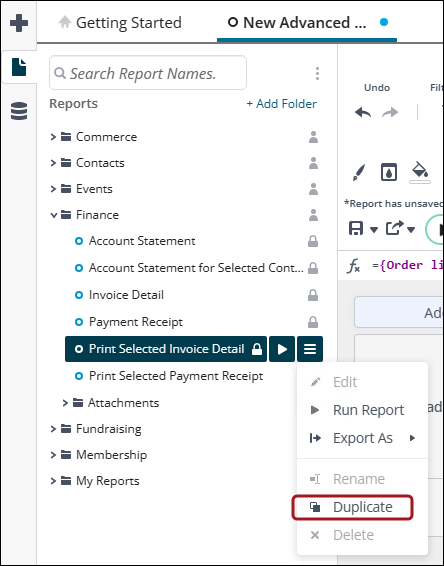
- Go to Reports > Report Writer.
- Do one of the following:
- Open the Advanced Report of your choosing and make a Duplicate copy for edit. Enter a Name and chose a folder for the new report.
- Click the Create New Report button (
 ) and select Advanced Report. Add the Categories, Sorts, Filters, and configure the Layout of the new report. See Creating an Advanced Report for more information.
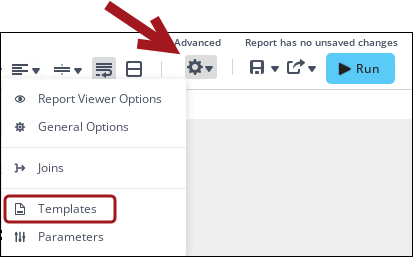
- From the Report Wizard, click the Advanced Options icon (
 ) and click Templates.
 - Select a template from the drop-down list, or upload a new one.
- From the Report Field drop-down, select the fields that corresponds to the Template fields.
- Click Okay.
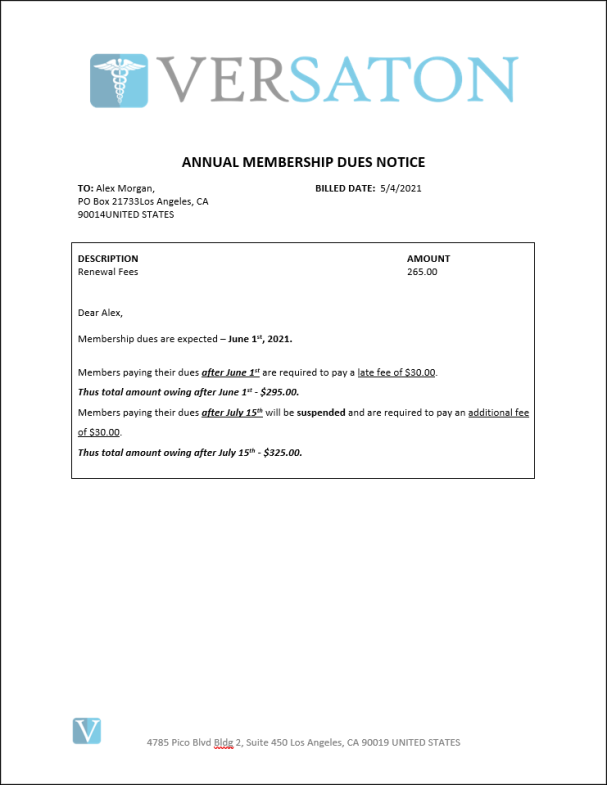
- From the Export drop-down, select the same format as the template file (for example, export a Word template as RTF).
- The merged report downloads locally as a Word file with merged data in the previously bookmarked fields.