Important! Poorly written queries can cause performance issues in iMIS. Review Best practices for writing IQA queries to ensure all queries are correctly created.
There are an infinite number of queries you can build using the Intelligent Query Architect (IQA). Once a query is built, staff users can use it to email the generated list of contacts, display the results on a content page, build a report to distribute to staff, and more.
The following examples show how to create unique queries using a variety of different business objects. These examples range from beginner to advanced in difficulty.
Before you begin
Review the following information before building a query:
- By default, queries are cached in iMIS for performance purposes. To refresh a query, go to Settings > About iMIS, then click Purge System Cache.
- Do not put slashes (/) in IQA names. Queries with slashes in their names will cause errors when importing. To avoid these errors, update all existing IQA queries with slashes in their name and update any content items or reports associated with the queries.
- We recommend using NetContactData for all queries requiring contact data.
- We recommend saving your query periodically while you create it. In the Intelligent Query Architect window, click the Save As button and select a save location for the query. You can then click the Save button to save the query.
- It is a best practice to test a query while building. To test a query while in Intelligent Query Architect, click the Run tab to review the query results.
- The default security setting for new queries is All Staff Full Control, which limits access only to staff members. Be sure to change this setting (New > Query > Security tab) when creating queries if you want the query available to public users.
Tip! Queries that contain sensitive information, such as names, email addresses, home addresses, or phone numbers, should always be restricted to staff users only.
Beginner
Queries can be built using only one business object. This example shows how to build a query that uses the NetContactData business object. Using the NetContactData business object as a source allows the query to find the full names, informal names, and email addresses of all contacts who live in a specific city and state. This example uses Austin, TX as the city and state.
Do the following:
- Go to RiSE > Intelligent Query Architect > New > Query.
- (Summary tab) Enter a Name and Description.
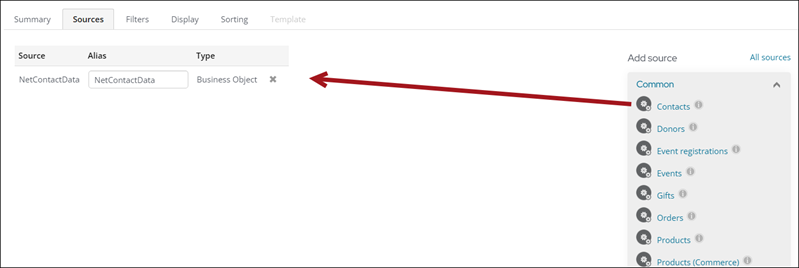
- (Sources tab) Under Add source in the Common section, select Contacts to add the NetContactData business object.
- (Filters tab) Select the query filters:
- From the Property (Add a filter) drop-down, select State Province to filter the query results by city:
- Select Equal from the Comparison drop-down.
- Select Texas from the Value drop-down.

- From the second Property (Add a filter) drop-down, select City to filter the query results by state:
- Select Equal from the Comparison drop-down.
- Select Austin from the Value drop-down.

The query results will show only contacts who have Austin listed as the city and Texas listed as the state in their default address.
- From the Property (Add a filter) drop-down, select State Province to filter the query results by city:
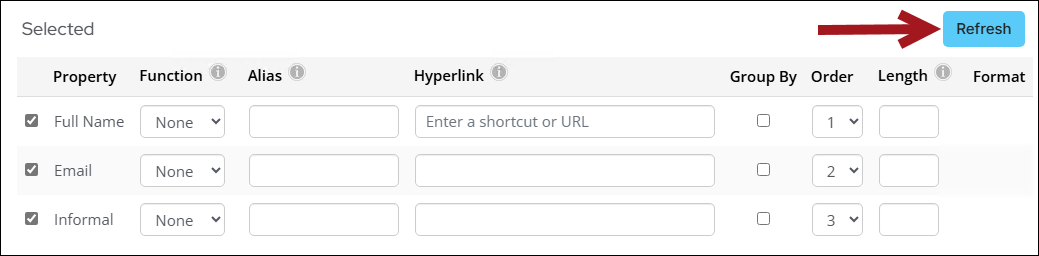
- (Display tab) Select the columns that you want to display when you run the query, such as:
- Full Name
- Informal
- Deselect any columns that you do not want to display when you run the query.
- If needed, change the order of the selected columns by selecting numbers from the drop-downs in the Order column.
- Click Refresh to refresh the query display columns.

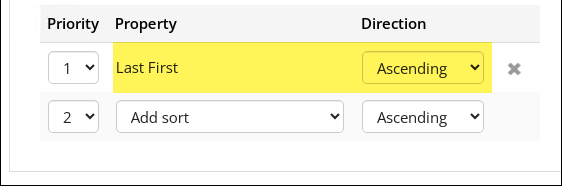
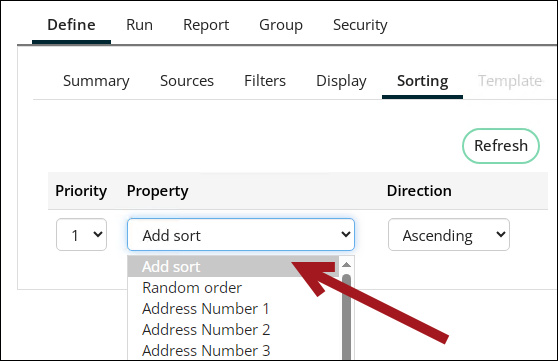
- (Sorting tab) Select preferred sorting options. For example, sort the results by last name in ascending alphabetical order:
- From the Property (Add sort) drop-down, select Last First.
- From the Direction drop-down, select Ascending.
- Click Run to display the query results.
- Click Save.
- Select the location where you want to save the query. Choose a non-system folder.
- Click OK.
Access and run your query from the Intelligent Query Architect or the Document system.
Western Australia shares the same code with the state of Washington, USA (WA). Because Western Australia and Washington state share the same code, you must use a few other business objects in the query to ensure you are correctly pulling data for Western Australia and not Washington, USA. This example shows how to build a query that finds all members in Western Australia by using the CsContactBasic, CsCountryNames, and CsStateProvinceCodes business objects.
Notes: The same situation occurs for Northern Territory, AU. If you are trying to use any of the CsContact business objects as standalone business objects, such as in billing special pricing, we recommend using NetContactData.StateProvinceId. See Creating special pricing rules for Northern Territory or Western Australia for details.
Do the following:
- Go to RiSE > Intelligent Query Architect > New > Query.
- (Summary tab) Enter a Name for the query.
- (Sources tab) Select All sources, then select CsContactBasic, CsCountryNames and CsStateProvinceCodes. Click OK.
- Set up the relationships between the business objects.
- From the Relations drop-down, select Custom. Add the following relations:
- CsContactBasic.State Province Equals CsStateProvinceCodes.State/Province
- CsContactBasic.Country Left Join CsCountryNames.Country
- CsCountryNames.Country Code Left Join CsStateProvinceCodes.Country Code
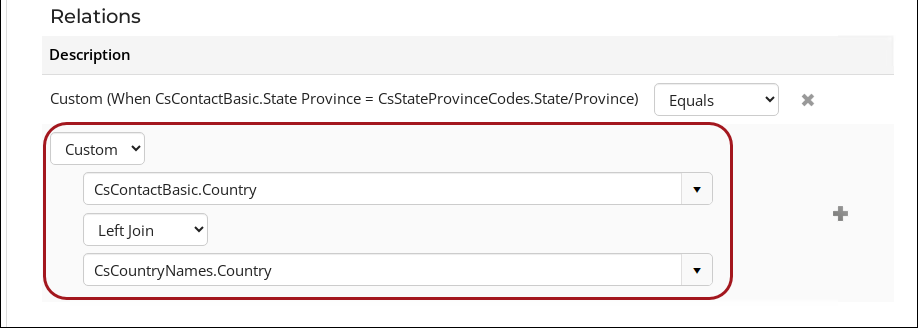 Click the plus (+) icon to add each join.
- From the Relations drop-down, select Custom. Add the following relations:
- (Filters tab) Select the query filters:
- From the Property (Add a filter) drop-down, select [CsContactBasic] State Province Id:
- From the Value drop-down, select Western Australia.
- From the Property (Add a filter) drop-down, select [CsCountryNames] Country Code:
- Property: [CsCountryNames] Country Code
- From the Value drop-down, select AU.
- From the Property (Add a filter) drop-down, select [CsContactBasic] Member Type
- From the Value drop-down, select Regular Member.
Notes: Western Australia has the same abbreviation as Washington (WA), which results in the query returning duplicate rows for Washington and Western Australia. Adding the Country Code property to the filters tab will resolve duplicates for state/provinces with the same abbreviation.
- From the Property (Add a filter) drop-down, select [CsContactBasic] State Province Id:
- (Display tab) Select the following display options:
- [CsContactBasic] Full Name
- [CsContactBasic] iMIS Id
- [CsContactBasic] Email
- [CsContactBasic] Informal
- [CsStateProvinceCodes] Title
- Click Run.
- Click Save.
Notes: You can use the Ctrl key to select multiple business objects at once. Use the Quick find field to filter the list.
This example query finds customers who have purchased more than $100 within a specific date range by using the CsContactBasic and CsActivityBasic business objects.
Do the following:
- Go to RiSE > Intelligent Query Architect > New > Query.
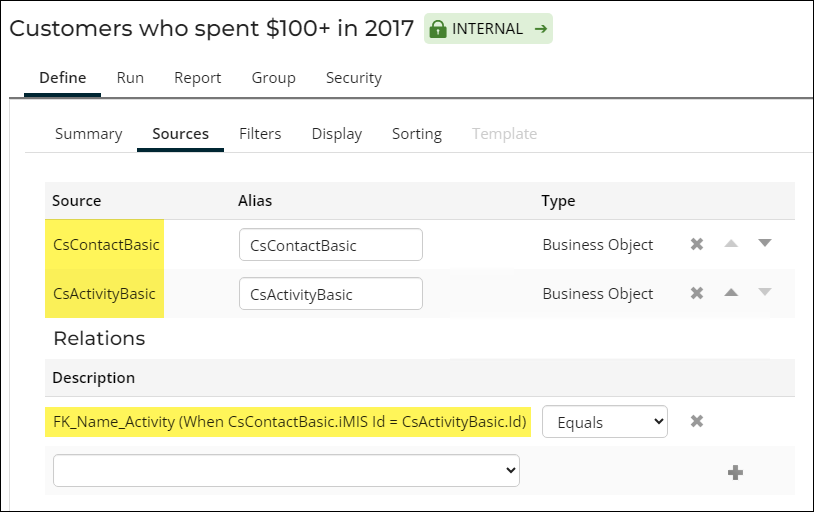
- (Summary tab) Name the query Customers who spent $100+ in 2017.
- (Sources tab) Click All sources, then select CsContactBasic and CsActivityBasic. Click OK.
- Use the default join in the Relations area: CsContactBasic.iMIS Id Equals CsActivityBasic.Id.
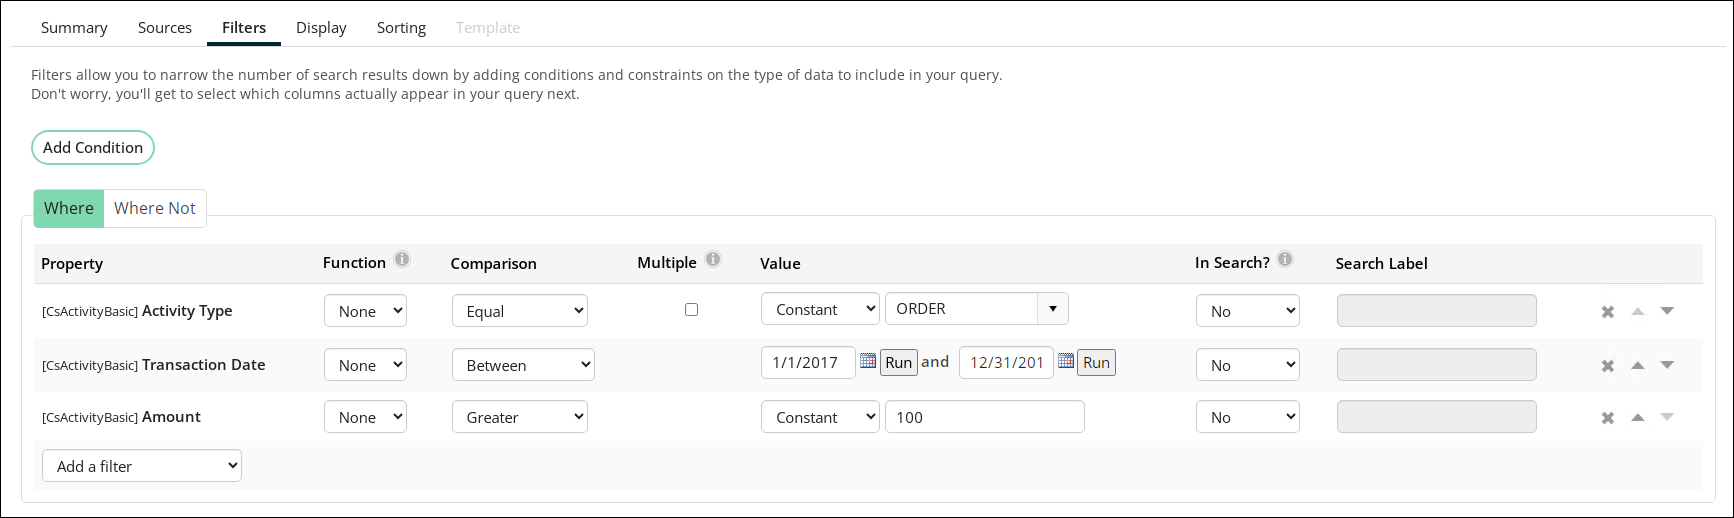
- (Filters tab) Select the query filters:
- From the Property (Add a filter) drop-down, select [CsActivityBasic] Activity Type:
- Select ORDER from the Value drop-down.
- From the Property (Add a filter) drop-down, select [CsActivityBasic] Transaction Date:
- Select Between from the Comparisondrop-down.
- Input 1/1/2017 and 12/31/2017 into the Value fields.
- From the Property (Add a filter) drop-down, select [CsActivityBasic] Amount:
- Select Greater from the Comparison drop-down.
- Input 100 into the Value field.
- (Display tab) Define the columns to display in the output:
- Choose [CsContactBasic] iMIS Id, [CsActivityBasic] Amount, and [CsContactBasic] Full Name.
- (Sorting tab) Specify the sorting priority.
- Sort the results by [CsContactBasic] Full Name.
- Click Save.
- Click Run to run the query.
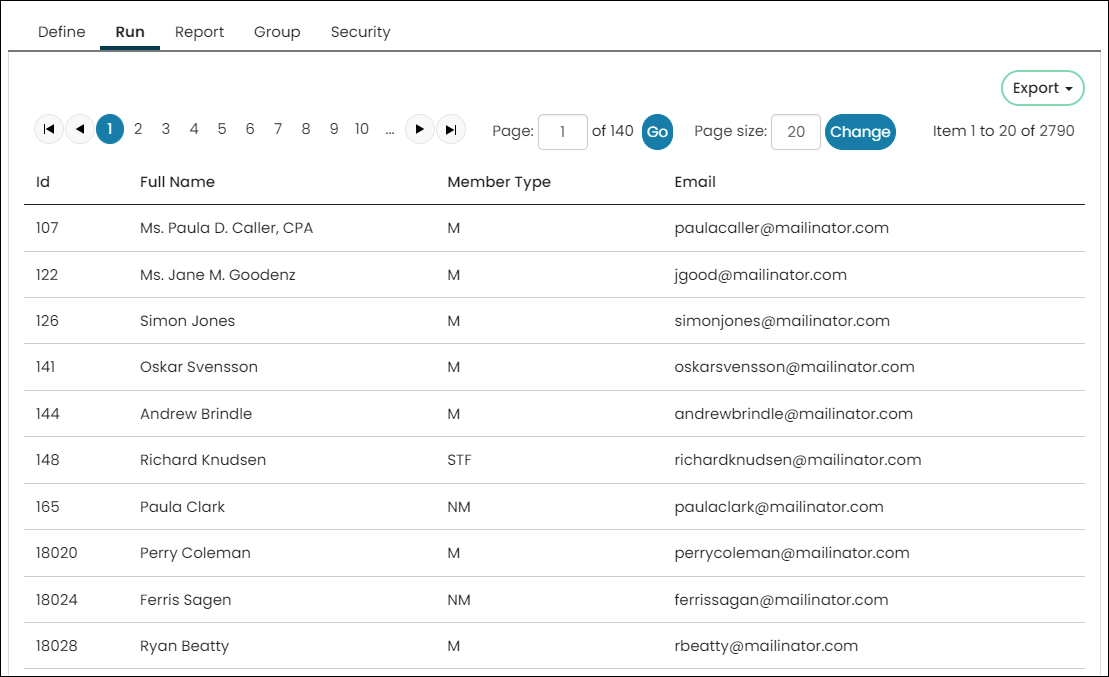
The following example describes how to build a query of members defined as anyone who is a member of a group with Is member selected. This query uses the NetContactData business object, and the Filters tab, the Display tab, and the Sorting tab (accessed through the Define tab) to filter and refine the query’s visual output. Using the Security tab to restrict access to the query makes the query’s output secure.
Do the following:
- Go to RiSE > Intelligent Query Architect > New > Query.
- (Summary tab) Enter a Name for the query. For example, My Members.
- (Sources tab) Under Add source in the Common section, select Contacts to add the NetContactData business object.
- (Filters tab) Filter the list to only members of Is member groups:
- From the Property (Add a filter) drop-down, select Is Member.
- Use the default Comparison selection: Equal.
- Select Yes from the Value drop-down.
- From the Property (Add a filter) drop-down, select Is Member.
- Click the Run tab. The results should show only people who are in Is member groups.
- (Display tab) Configure the look of the query results:
- From the Selected and Available lists, select the following properties to display:
- iMISId
- Full Name
- Member Type
- Company
- Country
- State Province
- City
Reorder the columns by selecting different numbers in the Order column.
Notes: The Property name search box dynamically filters available columns to display only the items searched for in the Property name box. For example, searching for .id brings up only items that contain .id.
- From the Selected and Available lists, select the following properties to display:
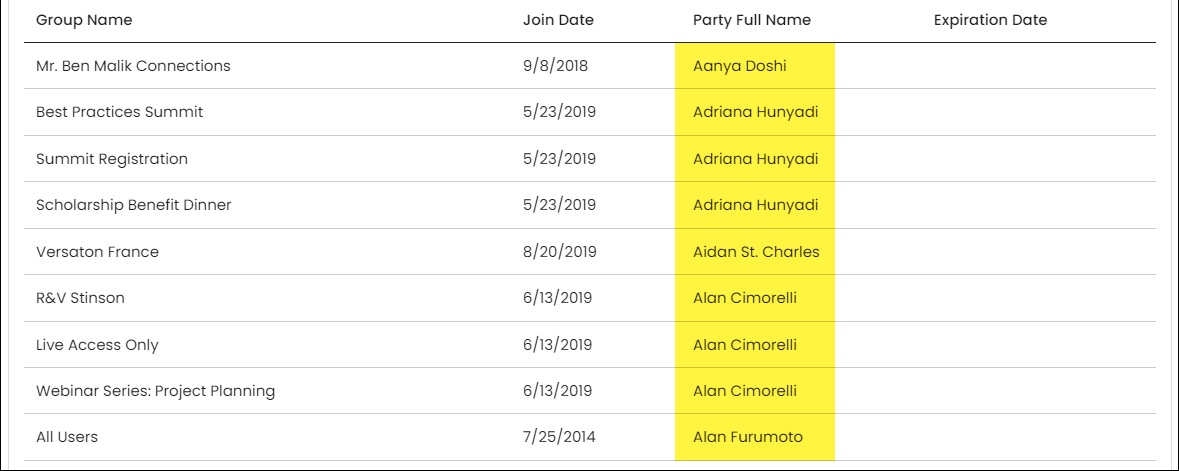
- (Sorting tab) Display the most recently joined members at the top of the list:
- From the Property drop-down, select Join Date.
- From the Direction drop-down, select Descending.
- Click Run. The results should show all members sorted by most recent join date first.
- Make sure that only Staff users have access to run this query:
- Click the Security tab.
- In Access Mode, select Advanced.
- Click Save.
Now you can use your new query in any area that queries can be used. Try adding a Query Menu content item to a page, and select your query for display.
The following example shows how to build a query of contacts with their associated chapters by using the Chapter and NetContactData business objects.
Do the following:
- Go to RiSE > Intelligent Query Architect > New > Query.
- (Summary tab) Enter a Name for the query.
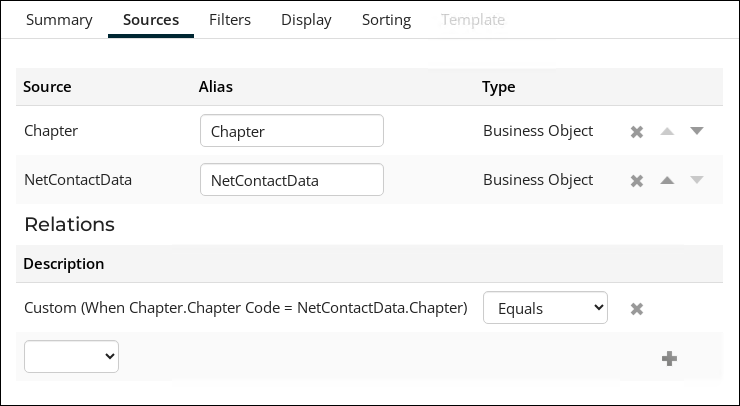
- (Sources tab) Click All sources, then select Chapter and NetContactData. Click OK.
- Join the sources:
- From the Relations drop-down, select Custom.
- From the drop-downs, select Chapter.Chapter Code Equals NetContactData.Chapter.
- Click the plus (+) icon to add the join.
- (Display tab) Select the following display properties:
- [NetContactData] Id
- [NetContactData] Full Name
- [Chapter] Chapter Name
- [Chapter] Chapter Code
- Click Refresh to refresh the query display columns.
- Click Run.
The query results show any member enrolled in a chapter.
The following example describes how to build a query to display images of members by using the CsContactBasic and CsNamePicture business objects. Use the Filters tab to filter the query to a list of members of profile pictures.
The following example describes how you can build a query to display images of members:
- Go to RiSE > Intelligent Query Architect > New > Query.
- (Summary tab) Name the query. For example, Pictures of members.
- (Sources tab) For this example, we know we want the results to return images of members, so we need to know information about the members:
- Select All sources, select the CsContactBasic business object and the CsNamePicture business object, then click OK.
- Next, we need to make sure each row of data displays only the related information:
- Under Relations, select Custom from the drop-down.
- Select from the drop-downs so the equation reads CsContactBasic.iMIS Id Equals CsNamePicture.Id.
- Click the plus (+) icon to add the join.
Notes: If you do not see any information, or the information you see is not useful, modify the returned display. Click the Display tab to change the results, then run the query again.
- (Filters tab) Narrow the list to members with profile pictures:
- From the Property (Add a filter) drop-down, select [CsNamePicture] Id and [CsContactBasic] iMIS Id.
- (Display tab) Configure the look of the query results:
- Select the following properties to display:
- [CsContactBasic] iMIS Id
- [CsContactBasic] Full Name
- [CsContactBasic] Member Type
- [CsNamePicture] Picture Logo
- [CsNamePicture] Id
Notes: The Length field is only available to text and images. Entering a value will change the IQA image size and limit the number of characters allowed in a field. This option is disabled for fields that are numeric, boolean, date, and so forth.
- Select the following properties to display:
- (Sorting tab) Sort the names in alphabetical order:
- From the Property drop-down, [CsContactBasic] iMIS Id.
- From the Direction drop-down, select Ascending.
- Click Run to see the query's output.
- Click Save.
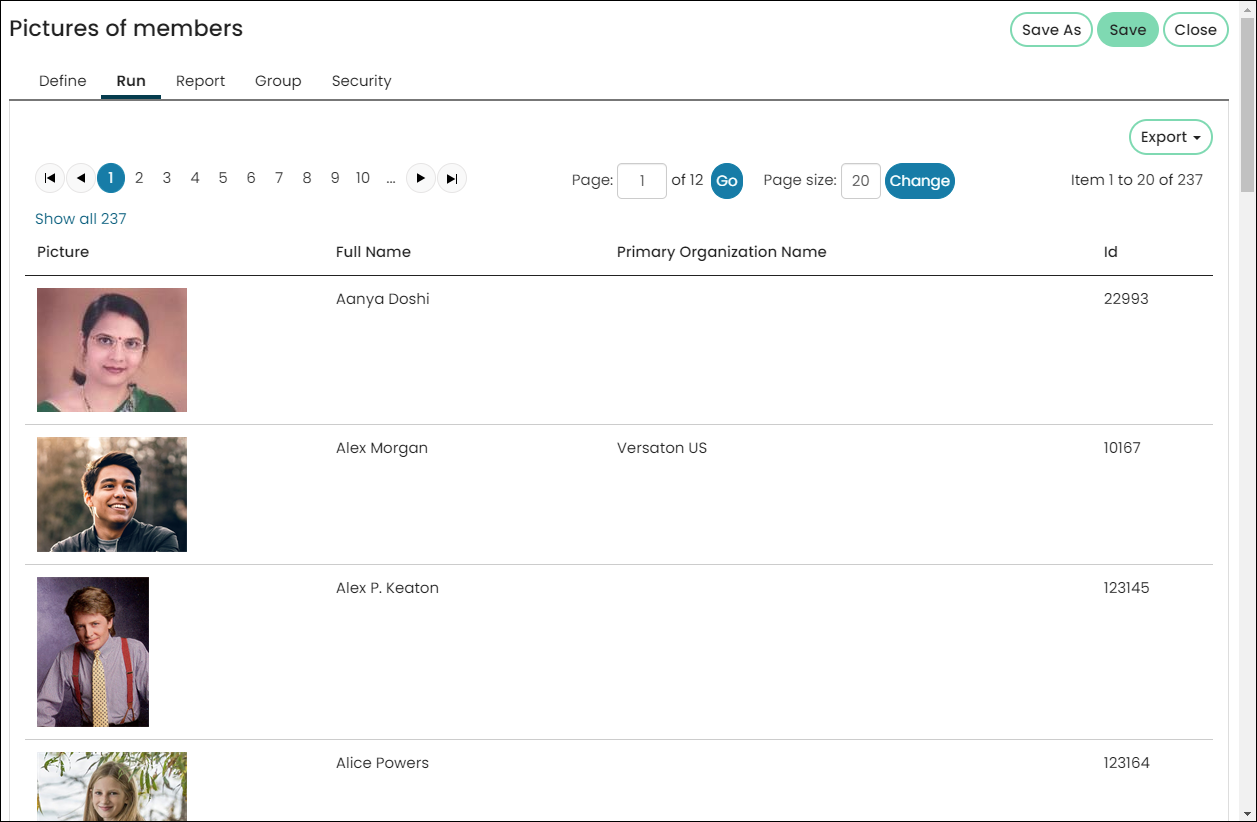
Now you can use your new query in any area that queries can be used. Try adding a Query Menu content item to a page, and select your query for display.
Using the File upload property in Panel Designer, members can upload files directly to their account pages. If the files have an image extension (such as .PNG, .JPG, or more), staff users can create an IQA query to neatly display all images uploaded through that panel source.
The following example shows how to build a query that displays images stored in a panel data source.
Do the following:
- Go to RiSE > Intelligent Query Architect > New > Query.
- (Summary tab) Enter a Name for the query. For example, Badge Photos.
- (Sources tab) Choose All sources, then find the panel data source that has the images you want.
- (Display tab) Select properties that contain the images.
- Under Length, input the image width (in pixels). The size of the image will increase or decrease depending on the number.
-
Click Run. The image results appear in the IQA results.
![]()
This example query returns the results in a random order by using the Random order property in the Sorting tab.
Do the following:
- Go to RiSE > Intelligent Query Architect > New > Query.
- (Summary tab) Enter a Name for the query.
- (Sources tab) Choose the necessary source.
- (Filters tab) If there are filters required for the search query, add them.
- (Display tab) Choose the display properties.
- (Sorting tab) From the Property drop-down, choose Random order. When Random order is selected, the Direction value is ignored.
- Click Run to review the query results.
- Click Refresh to confirm new results display each time the query is refreshed.
- (optional) By default, if the query results are longer than one page, the results’ order will change if the user navigates through the pages, which may be confusing for the user. To keep query result pages from refreshing, enable Use cached results on the Summary tab.
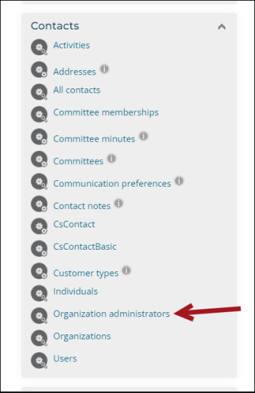
The Organization Administrator query is a pre-built query in iMIS that returns all company (organization) administrators.
Querying administrators of all companies
This example shows how to use the Organization administrators query to find administrators in all companies.
Do the following:
- Go to RiSE > Intelligent Query Architect > New > Query.
- (Summary tab) Enter a Name for the query.
-
(Sources tab) Expand the Contacts section, then select Organization administrators.
- Save the query in a non-system folder.
-
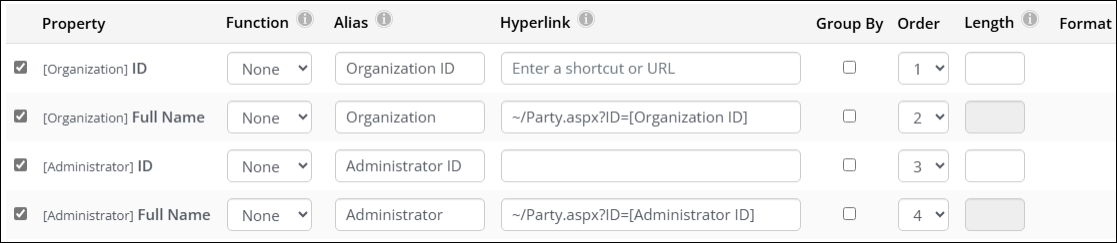
(optional) (Display tab) Other properties can be added from the Selected and Available lists as needed by selecting the desired property.
Querying administrators for a specific company
To find the administrators for a particular company, add the following filter to the Organization administrators query in the Filter tab:
- Property: Organization.ID
- Value: Enter the company's iMIS ID.

The query output should show the organization ID, the organization, the Administrator ID, and the name of the Administrator.

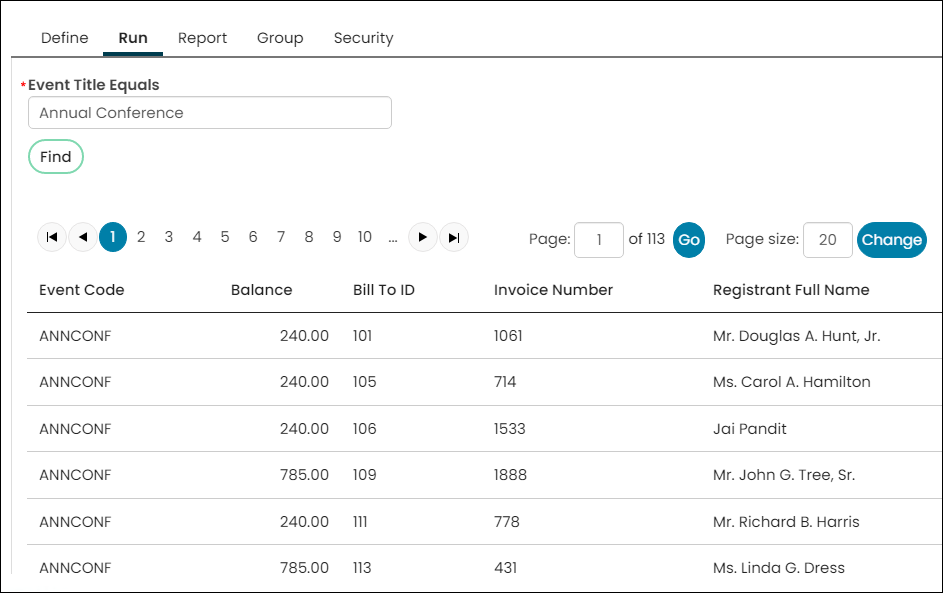
This example uses the out-of-the-box Promotions used query to find event registrations that used promotion codes. The query displays each event registration that used a promotion, detailing the event name, registrant name, promotion applied, and discount amount, among other information.
Do the following:
- Go to Events > Find registrations.
- Select the Promotions used query.
- (optional) To find specific registrations, enter any search filter, then click Find.
- Click View registration to view details such as the event dates, registration option, registration status, and the remaining balance.
The Promotions used query is at: $/EventManagement/DefaultSystem/Queries/Find registrations/Promotions used. To customize this query, create a copy of the query to prevent your changes from being overwritten in a future upgrade. For more information, see Finding and editing existing queries.
Intermediate
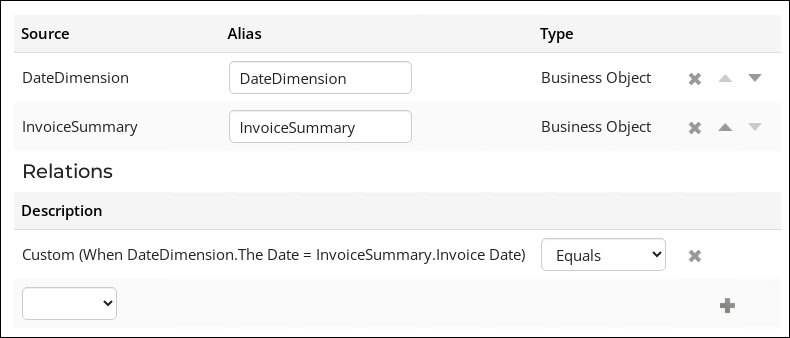
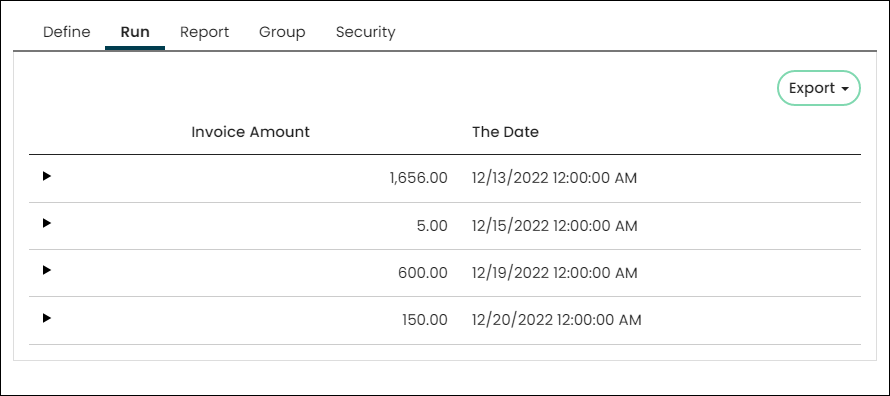
Example: The finance department needs to know how much was invoiced each day during the month of December.
Do the following:
- Go to RiSE > Intelligent Query Architect > New > Query.
- Name the query.
- Sources tab:
- Add the DateDimension and InvoiceSummary business objects.
- Add the following relation: DateDimension.The Date = InvoiceSummary.Invoice Date
- Filters tab:
- Add the [DateDimension] The Date property as a filter.
- From the Comparison drop-down, select Between.
- In the Value fields, enter 12/1/2022 and 12/31/2022.

- Display tab:
- Select [InvoiceSummary] Invoice Amount.
- Select DateDimension.The Date.
- Enable Group By on [DateDimension] The Date.

- Select the Format in which properties will be displayed when the query is Run.
- Click Run.
In this example, we are going to create a query that contains filters and links. The filters can be used after the query is run, and the links are clickable links to the query results.
Do the following to create the query:
- Go to RiSE > Intelligent Query Architect > New > Query.
- Name the query.
- (Sources tab) Select Add source, then select the CsContactBasic business object.
- (Filters tab) We want to allow people who are viewing the query to narrow the list to members by name:
- From the Property (Add a filter) drop-down, select Full Name.
- From the Comparison drop-down, select Contains.
- From the In Search? drop-down, select Required.
- Enter "Name contains" into the Search Label field. This defines a label that will be used for the Required filter.

- Click the Run tab to see the new filter. Instead of a list, you will see a prompt for Name contains, which is required in order to see results:
- Enter "an" in the box (without the quotation marks), then click Find. The results return a list of all members whose name contains the letters "an." If there are no results, try a different set of letters.
Next, we want to add links to the query results that will link to a member's profile page. To do this we will need the contact's ID to be used as a URL parameter to tell the page which contacts to display.
- Click the Define tab, then select the Display tab:
- iMIS Id - In the Alias field enter code_ID.
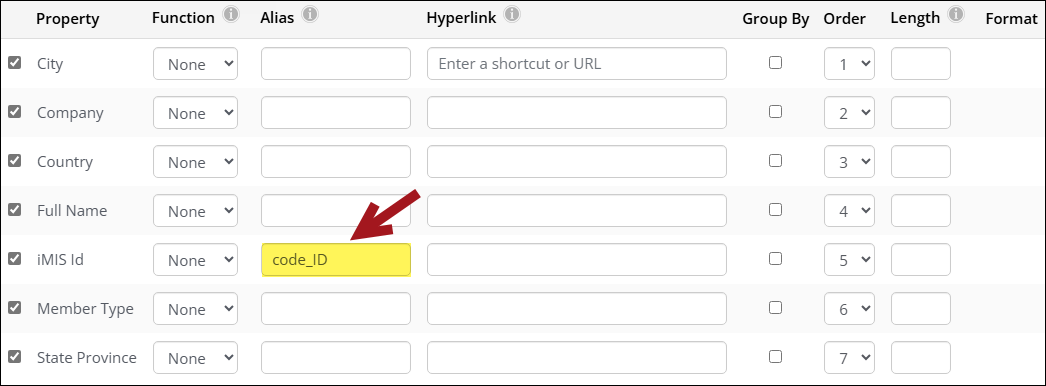
When an IQA query is run, any column with an Alias that begins with code_ will not be displayed, but can be used for links and other IQA functions.
- Click Run to view the results, then click Save.
- Next, add the actual links:
- Navigate back to the Display tab.
- In the row Full Name, enter the following in the Link field: ~/party.aspx?ID=[code_ID]

Each result of a member's name will now display as a link to the party.aspx page with a URL parameter of ID that equals the contact's ID. In other words, it will link to their account page.
- Lastly, we want to change the column header of Full Name to something a little shorter:
In the Alias column for Full Name, enter Name. This will mean that when the query results are displayed, the column header for this column will be Name instead of Full Name.
- From the Order column, arrange the columns to your desired order.
- Click Save.
- Click the Run tab:
- Enter a filter to see results.
- Click a contact's name to verify the links goes to the correct account page.
This query extracts individual members who live in Texas or those who joined between 2010 and 2015, eliminating duplicates when the same rows are returned by the multiple subqueries.
- Go to RiSE > Intelligent Query Architect.
- Select New > Query.
- (Sources tab) Under Add source, select Contacts from the Common section. This adds the NetContactData business object.
- (Filters tab)
- Create a filter on Member Type:
- Comparison: Equal
- Value: Regular Member
- Create a filter on State Province Id:
- Comparison: Equal
- Value: Texas
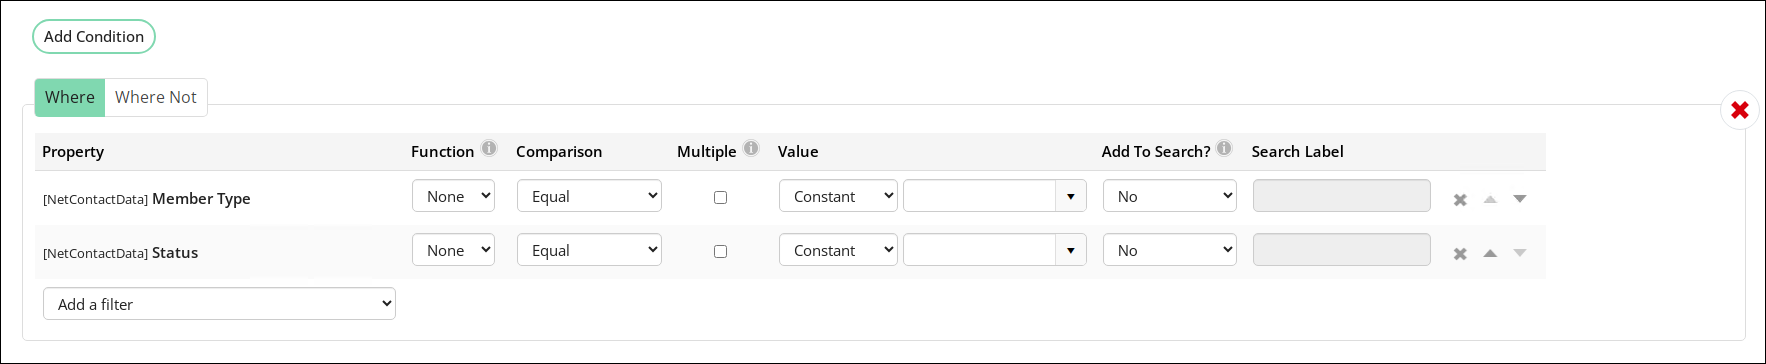
- Click Add Condition and select Or.
- Create a filter on Member Type equal to Regular Member:
- Comparison: Equal
- Value: Regular Member
- Create a filter on Join Dates:
- Comparison: Between
- Value: 1/1/2010 and 12/31/2015
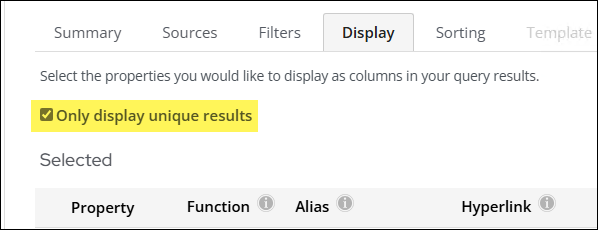
- (Display tab) Select the Only display unique results option.
- Select the following columns:
- Id
- State Province
- Join Date
- Click Refresh.
- In the Order column, assign the following:
- Id – 1
- State Province – 2
- Join Date – 3
- (Sorting tab) Sort the results by iMIS Id to specify the sorting priority.
- Save your settings and run the query.
Notes: A default list of columns is displayed when you select the Display tab. Deselect the columns you do not need.
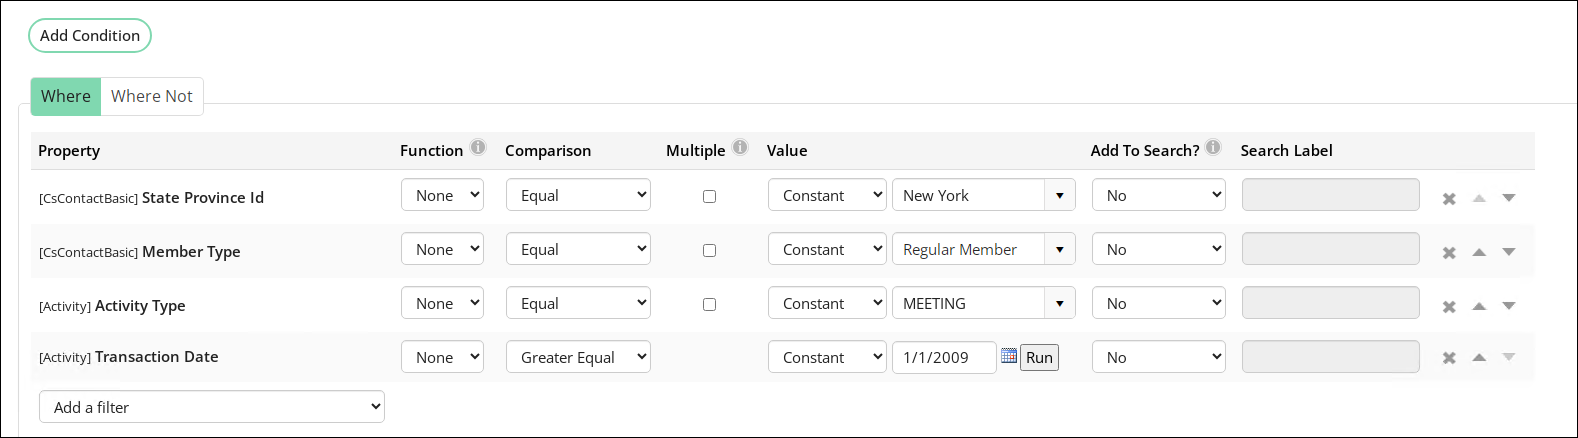
Do the following to find all members in New York who attended an event:
- Go to RiSE > Intelligent Query Architect > New > Query.
- (Summary tab): Enter the name and description for this query.
- (Sources tab) Select All sources > Common > Business Objects > CsContactBasic and > Activity.
- Use the default relation between the two business objects: FK_ Name_Activity (When CsContactBasic.Imis Id = Activity.Id)
- (Filters tab):
- Filter on [CsContactBasic] State Province Id
- Property: [CsContactBasic] State Province Id
- Comparison: Equal
- Value: New York
- Filter on [CsContactBasic] Member Type
- Property: [CsContactBasic] Member Type
- Comparison: Equal
- Value: Regular Member
- Filter on [Activity] Activity Type
- Property: [Activity] Activity Type
- Comparison: Equal
- Value: MEETING
- Filter on [Activity] Transaction Date
- Property: [Activity] Transaction Date
- Comparison: Greater Equal
- Value: 1/1/2009
- Filter on [CsContactBasic] State Province Id
- (Display tab) Select the columns to display and the order. Select the Only display unique results option.
- Click Run. The results are a subset of the list in the previous example.
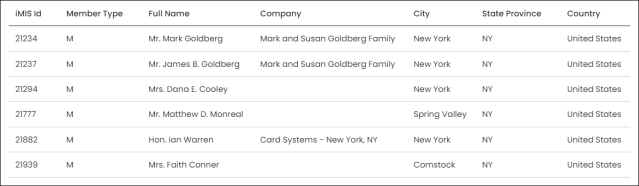
Example query results: Members from New York who attended the 2009 Conference
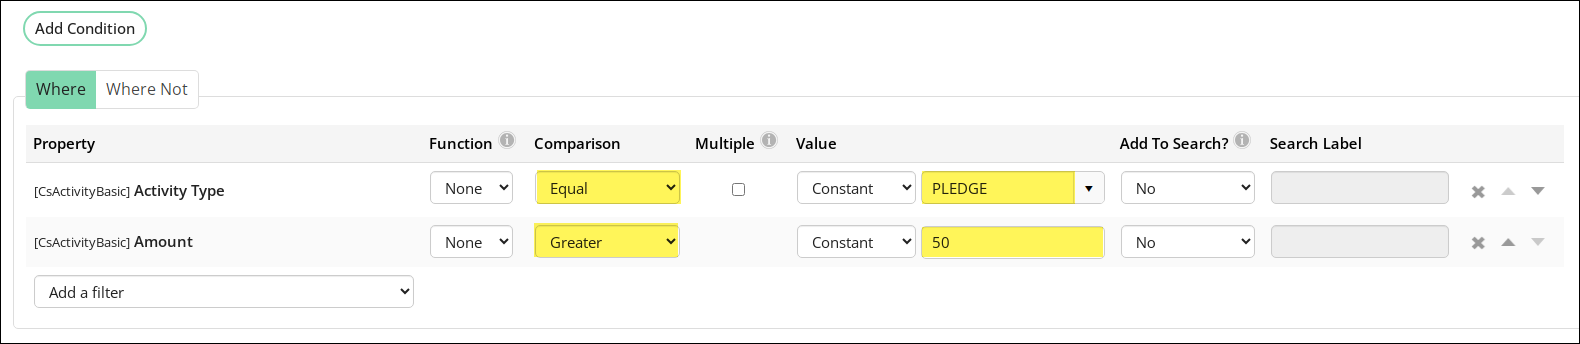
This query extracts the total number of members who have made a pledge of $50 or more.
- Go to RiSE > Intelligent Query Architect. Select New > Query.
- (Sources tab) Browse to the Common > Business Objects folder, and select the following business objects:
- CsContactBasic
- CsActivityBasic
- Use the default relation between the two business objects: FK_Name_Activity (When CsContactBasic.iMIS Id = CsActivityBasic.Id)
- (Filters tab)
- Filter on [CSActivityBasic] Activity Type:
- Comparison: Equal
- Value: PLEDGE
- Filter on [CSActivityBasic] Amount:
- Comparison: Greater
- Value: 50
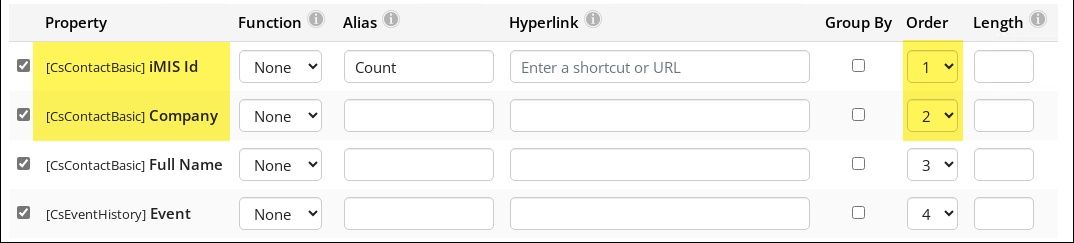
- (Display tab) Select to display the [CsContactBasic] iMIS Id property:
- Function: Count
- Alias: Pledges
- Order: 1
- Save your settings and run the query.

Notes: A default list of columns is displayed when you select the Display tab. Deselect the columns you do not need.
This query joins two business objects to extract the registrants for a specified event. At runtime, the user supplies the event code.
- Go to RiSE > Intelligent Query Architect.
- Browse to the folder in which you want to store a new query. Select New > Query.
- (Summary tab) Enter a Name for the query.
- (Sources tab) Browse to the Common > Business Objects folder, and select the following business objects:
- CsContactBasic
- CsEventHistory
- In the Relations area, make sure the default relation is CSContactBasic.iMIS Id = CsEventHistory.Id.
- (Filters tab)
- Filter on [CsEventHistory] Event Code:
- Comparison: Equal
- Prompt: Optional or Required.
Notes: Enter a prompt in the field, for example, Event Code.

- (Display tab) Select the following columns:
- [CsContactBasic] iMIS Id
- [CsContactBasic] Full Name
- [CsContactBasic] Company
- [CsEventHistory] Event
Notes: A default list of columns is displayed when you select the Display tab. Deselect the columns you do not need. If a column you need is not in the default list, select View all columns from the drop-down, and scroll to find and select the desired column.
- Click Refresh.
- In the Order column, assign the following:
- [CsContactBasic] iMIS Id – 1
- [CsEventHistory] Event – 2
- (Sorting tab) Sort the results by CsEventHistory.Event.
- Save your settings and run the query.
Notes: If you want to show current registrants of open events, link to csRegistration instead of csEventHistory and set the default relation as CsContactBasic.iMIS ID = csRegistration.Ship To ID.
Notes: The primary difference between Cs and non-Cs objects is that the non-Cs objects contain the .NET security, but Cs objects are views pointing to the underlying non-.NET tables. When you use a non-Cs object, you might notice additional fields such as Access Key and Contact Key. These fields are important when you are linking to objects with security, such as a Campaign business object where a user must have certain security to be able to view data.
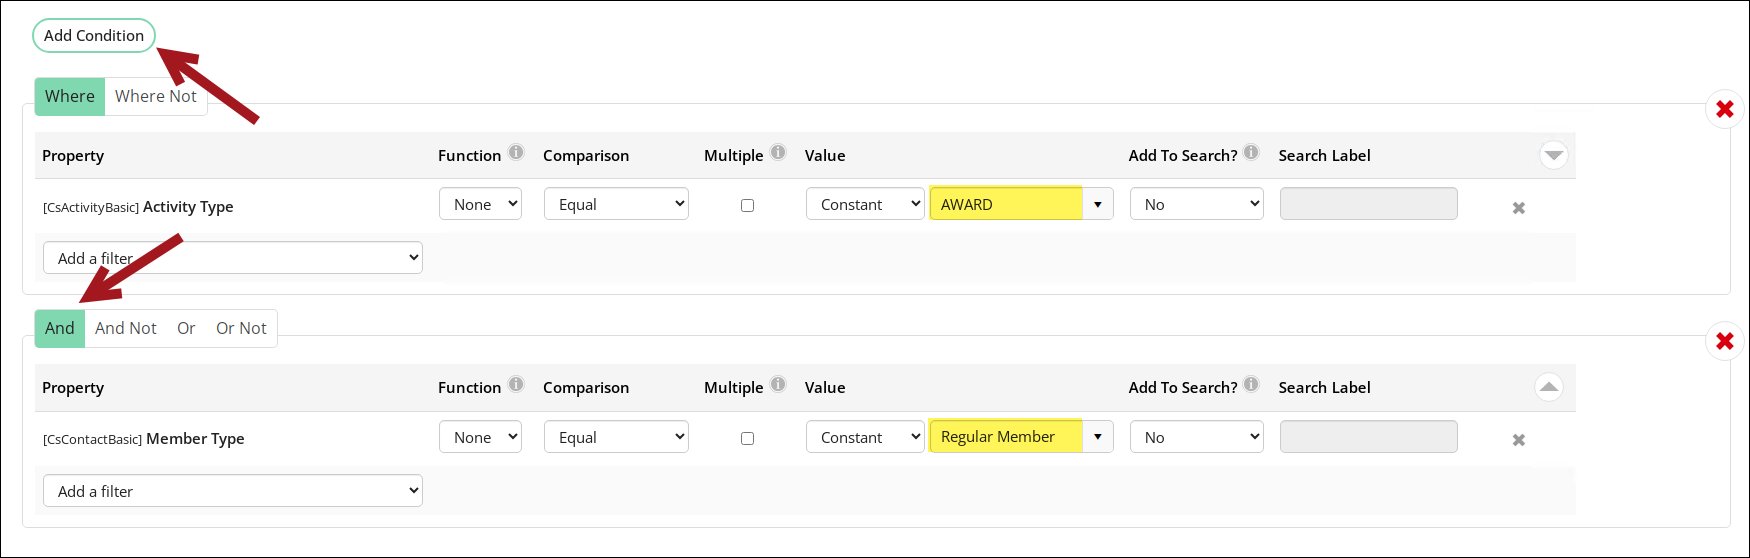
This query shows individual members with an AWARD activity type.
- Go to RiSE > Intelligent Query Architect. Select New > Query.
- (Sources tab) Browse to the Common > Business Objects folder, and select the following business objects:
- CsContactBasic
- CsActivityBasic
- (Filters tab)
- Filter on [CsActivityBasic] Activity Type:
- Operator: Where
- Comparison: Equal
- Value: AWARD
- Click Add Condition.
- Filter on [CsContactBasic] Member Type:
- Operator: And
- Comparison: Equal
- Value: Regular Member
- (Display tab) Select the following columns:
- [CsContactBasic] iMIS Id
- [CsContactBasic] Full Name
- [CsContactBasic] City
- [CsActivityBasic] Description
- [CsActivityBasic] ProductCode
- Click Refresh.
- In the Order column, assign the following:
- [CsContactBasic] City – 1
- [CsContactBasic] Full Name – 2
- (Sorting tab) Sort the results by CsContactBasic.iMIS Id.
- Save your settings and run the query.
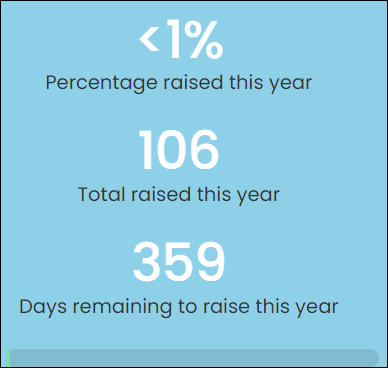
The Progress Tracker content item uses a specifically-designed query to display progress towards a goal. The query design depends on the type of goal that is trying to be achieved. The two examples below detail how to build queries that will be used in the Progress Tracker content item.
This example walks you through how to build a simple Progress Tracker query that displays this year's total revenue with a hard-coded goal that we hope to achieve by the end of the year.
- Go to RiSE > Intelligent Query Architect > New > Query.
- Name the query Progress Tracker - Order Revenue This Year.
- (Sources tab):
- Click All sources and select CsOrders, then click OK.
- Click All sources and select CsOrderLines, then click OK.
- The two sources will automatically be joined.
- Save the query.
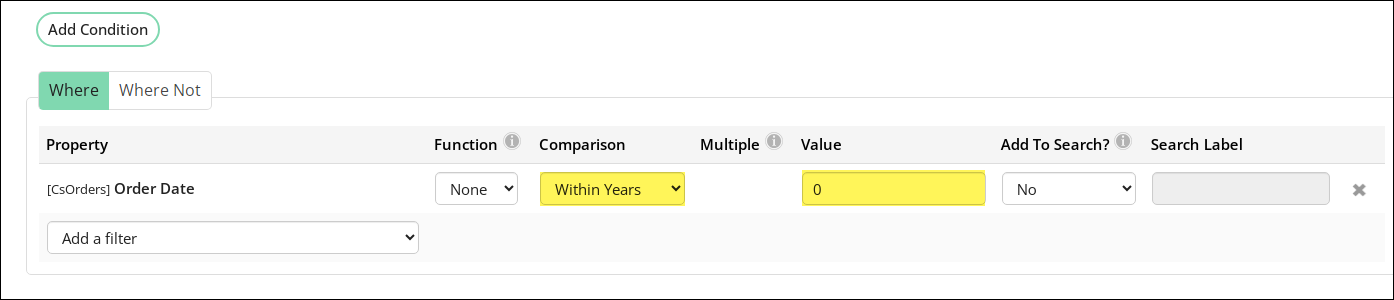
- (Filters tab) Since we only want to see the revenue from this year's sales, we are going to limit the results to return only transactions that occurred this year:
- From the Property drop-down, select [CsOrders] Order Date.
- From the Comparison drop-down, select Within Years.
- In the Value field enter 0.
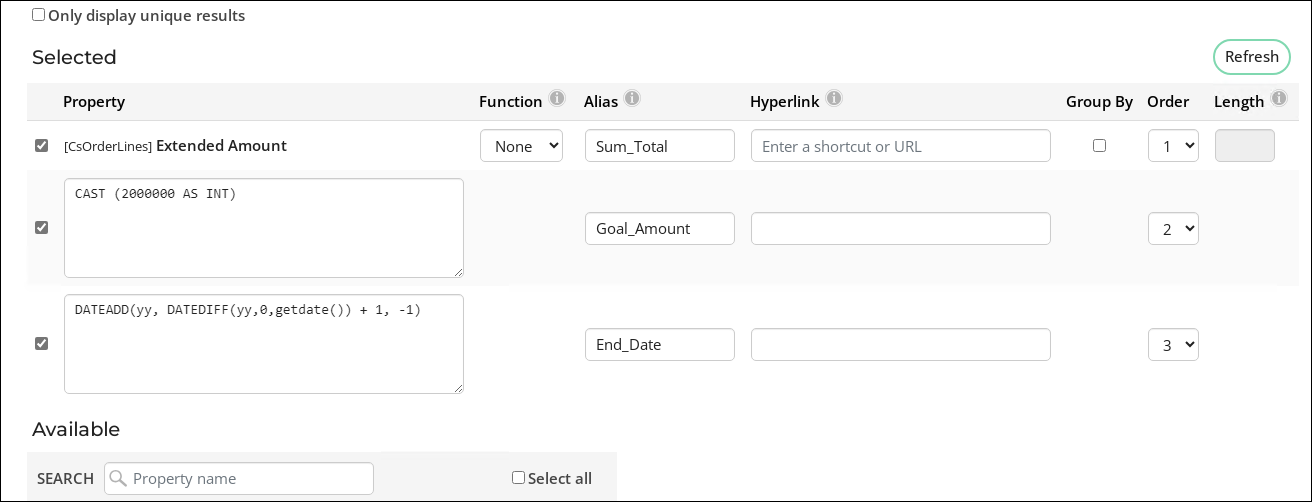
- (Display tab) In order to display this year's current total revenue, we need to calculate the sum and then give it a special name:
- Select [CsOrderLines] Extended Amount.
- Deselect all other properties.
- Click Refresh.
- From the Function drop-down, select Sum.
- In the Alias field, enter Sum_Total.
If needed, change the Format of the property to be displayed.
Notes: This step is required for the Progress Tracker to understand the data.

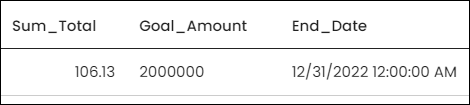
- Click the Run tab. You should see only one row and one column that displays the current year's total revenue.
- Click the Define tab, then click the Display tab.
- Scroll down to the Custom section. This is where you can add custom SQL expressions.
- In the SQL Expression field enter
CAST (2000000 AS INT) - In the Alias field enter Goal_Amount
- Click Add.
- In the SQL Expression field enter
- Next we need to create a custom display that will tell the Progress Tracker what to do when the new year begins. We want the Progress Tracker to automatically roll forward, so once the new year begins, the new end goal is the last day of the new year:
- In the SQL Expression field, enter
DATEADD(yy, DATEDIFF(yy,0,getdate()) + 1, -1) - In the Alias field, enter End_Date
- Click Add.
- In the SQL Expression field, enter
- Save the query, then click the Run tab.
- To display the results using the Progress Tracker content item, go to RiSE > Page Builder > Manage content.
- Create a new content record, or Edit an existing content record to display the Progress Tracker.
- From the Manage content window, select Add content.
- Open the Utility folder, select Progress Tracker, then click OK.
- Change the CSS class to read ProgressTracker2.
- In the Source query field, select the Progress Tracker - Revenue This Year query.
- Scroll down to the Caption Options section:
- From the Progress bar location drop-down, select Below captions.
- Select the Display percent, Display total, and Display days remaining checkboxes.
- Enter a description for each caption.
- Save and Publish the page.
Next, we need to give the Progress Tracker a goal and an end date. For this example, we want the goal to be 2,000,000, and the end date to be the end of the year. Since neither of these values are available using a business object, we will have to use a couple of simple SQL statements.
Notes: Only system administrators have access to the SQL Expression textbox.
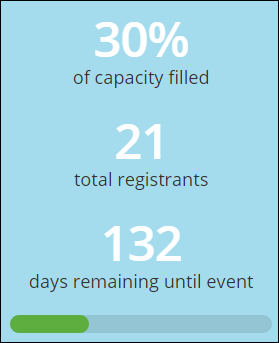
In this example, we are going to build a Progress Tracker query that shows the number of registrants for a particular event. Instead of a set-date goal, the goal is the maximum capacity for the event. The end date will be the start date of the event.
- Go to RiSE > Intelligent Query Architect > New > Query.
- Name the query Progress Tracker - Event Registrations.
- (Sources tab) Click Add Source, choose the CsEvents business object, then click OK.
- (Display tab) In order for the Progress Tracker to properly interpret this information, we have to create special display columns:
- Select for the following properties:
- Event Code
- Max Registrants
- Attendees
- Begin Date
- Click Refresh.
- In order for the Progress Tracker to understand the data we are giving it, some properties need to have a particular alias:

- Max Registrants - Represents the goal.
- Alias - Goal_Amount
- Begin Date - Represents the end date for the goal.
- Alias - End_Date
- Attendees - Represents the current total number of registrations.
- Alias - Sum_Total
- Max Registrants - Represents the goal.
- Select for the following properties:
- If needed, change the Format of the property to be displayed.
- Save the query.
- Go to the event dashboard and add a new Progress Tracker content item:
- Rename the CSS class to ProgressTracker2.
- From the Source query field, select the Progress Tracker - Event Registrations query.
- The query we built displays information for all events in the database, but we only want to display the information that is specific to the individual event. To do this, we will need to filter the Progress Tracker results based on the EventKey parameter in the URL:
- In the Filter Options section from the Filter on data column drop-down, select EventCode.
- In the URL parameter field, enter EventKey.
- In the Caption Option section from the Progress bar location drop-down, select Below captions.
- Enable the Display percent, Display total, and Display days remaining options. Enter a description for each.
- Save and Publish the page.
In this example, we are going to create a query that identifies the active members that have post-purchased content. This will enable you to add the query to an individual's account page for easy access to downloadable links.
- Go to RiSE > Intelligent Query Architect > New > Query.
- Name the query. For example, Post-purchased content.
- (Sources tab) Click All sources and select the following:
- Group
- GroupMember
- GroupUpdateInstruction
- NetContact
- CsProduct
- Click OK.
- Make sure the default joins are:
- Group.Group Key = GroupUpdateInstruction.Group Key
- Group.Group Key = GroupMember.Group
- GroupMember.Contact = NetContactData.Contact Key
- Add the following relation: GroupUpdateInstruction.Item ID = CsProduct.Product Code
- Save the query.
- (Filters tab) Add the following filters:
- From the Property (Add a filter) drop-down, select [Group] Group Status.
- From the Comparison drop-down, select Equal.
- From the Value drop-down, select Active.
- From the Property (Add a filter) drop-down, select [NetContact] Contact Key.
- From the Comparison drop-down, select Equal.
- In the Value Field, enter "@SelectedUser".
- (Display tab) Select the following columns:
- [CsProduct] Related Content Message
- [NetContact] Full Name
- Click the Run tab. You will only see results if the logged-in user has post-purchased content. Delete the @SelectedUser filter to see all individuals that have post-purchased content.

Repeat the same steps for the [GroupMember] Active property, but in the Value field select Yes.
If you want to display the query on individual's account page, you will need to add a filter to specify the logged-in user. Do the following:

This example details how to add a product's thumbnail as a display column in a query's results.
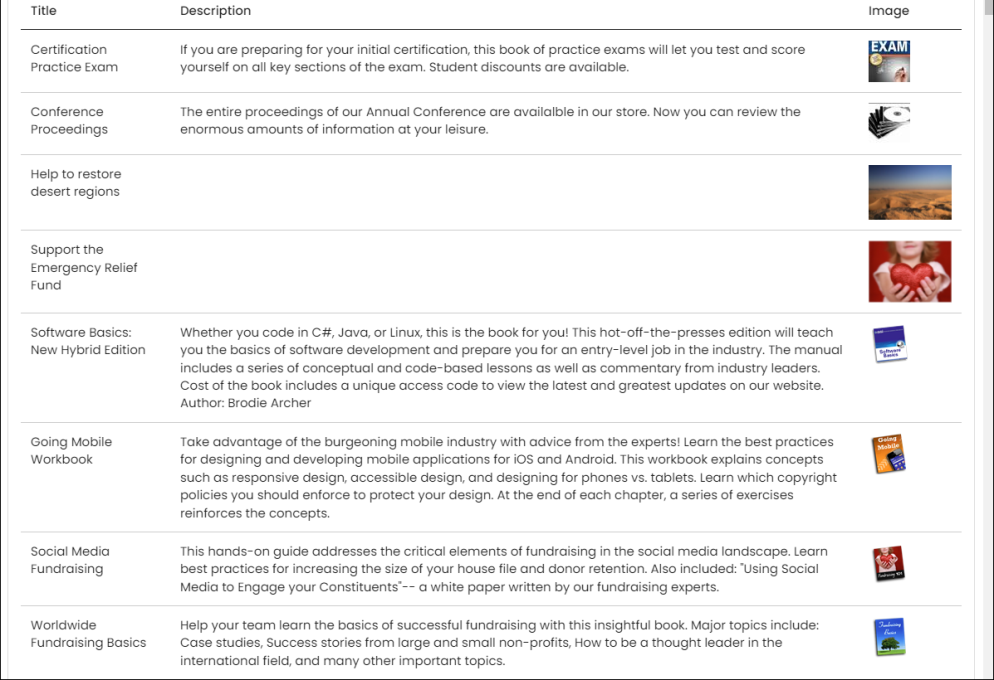
Do the following:
- Go to RiSE > Intelligent Query Architect > New > Query.
- (Summary tab) Name the query Product Thumbnails.
- (Sources tab) From the Add source area, select Products.
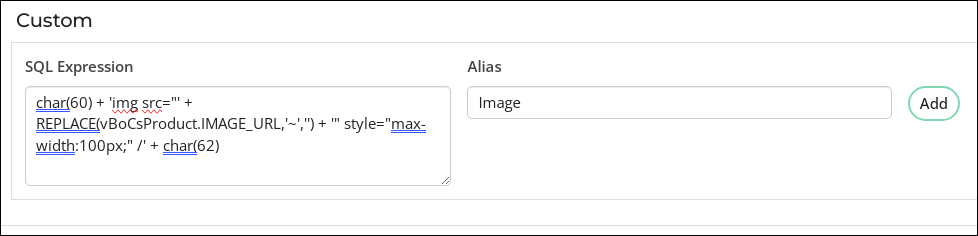
- (Display tab) Enter the following information in the Custom section:
- SQL Expression:
char(60) + 'img src="' + REPLACE(vBoCsProduct.IMAGE_URL,'~','') + '" style="max-width:100px;" /' + char(62) - Alias: Image
- SQL Expression:
- Click Add.
- (Display tab) Continue adding the desired display columns.
- Click Run.
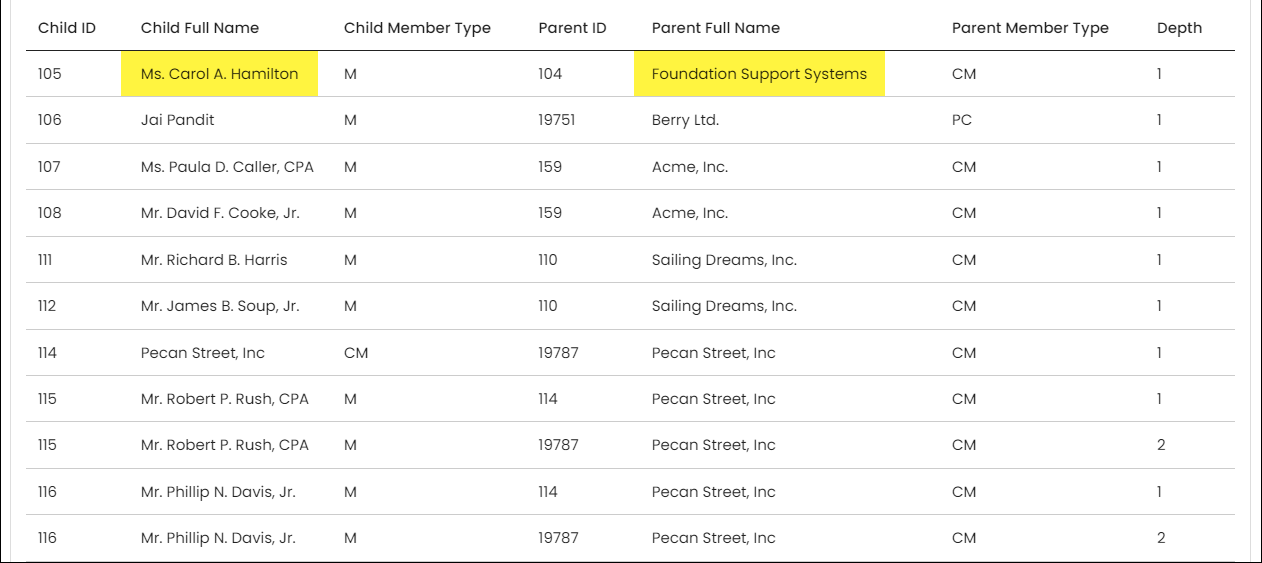
This example details how to easily identify the reporting structure of organizations.
Do the following to create an IQA query that displays a company's roster:
- Go to RiSE > Intelligent Query Architect > New > Query.
- Name the query Organization Hierarchy.
- (Sources tab) Click All sources and then select OrganizationHierarchy.
- (Filters tab) The following filters are optional:
- From the Property (Add to filter) drop-down, select Child Full Name.
- From the Comparison drop-down, select Contains.
- From the In Search? drop-down, select Optional.
- (Display tab) Select all available properties.
- Click Run.
Enter the name of the organization to find the roster members. The query will return contacts (individuals or organizations) who report directly to the organization, as well as contacts who report to child organizations. The Depth displays how many levels of hierarchy between the roster member and the parent organization.
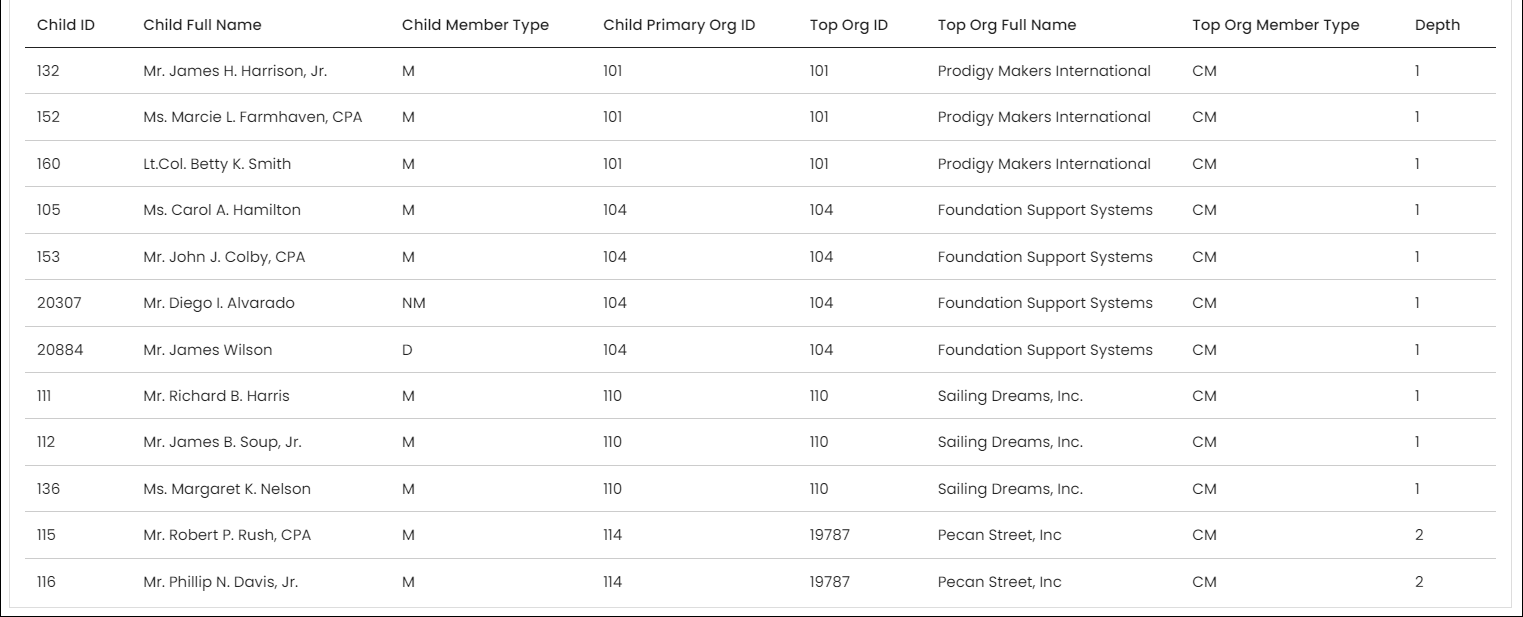
This example goes over how to identify a contact's top-level parent organization. For example, Brian Davidson's primary organization is Versaton New Zealand, but Versaton New Zealand's primary organization is Versaton Global Headquarters. Brian's top-level parent organization would be Versaton Global Headquarters.
Do the following to create an IQA query that displays a contact's top-level parent organizations:
- Go to RiSE > Intelligent Query Architect > New > Query.
- Name the query Top organization.
-
(Sources tab) Click All sources and then select TopLevelParentOrganzation.
- (Filters tab) The following filters are optional:
- From the Property drop-down, select Child Full Name.
- From the Comparison drop-down, select Contains.
- From the Prompt drop-down, select Optional.
- (Display tab) Select all available properties.
- Click Run.
The results of this query will display one row per contact, and includes columns for their primary organization ID as well as the top-level organization in their reporting chain. The Depth displays the number of hierarchy levels between the contact and their top organization.
To determine who has not registered for a specific event, you must first create a query of everyone who has registered for the event. After that query is created, you can create a second query that uses the first query as a source.
The following example details how to find everyone who has not registered for the Annual Conference.
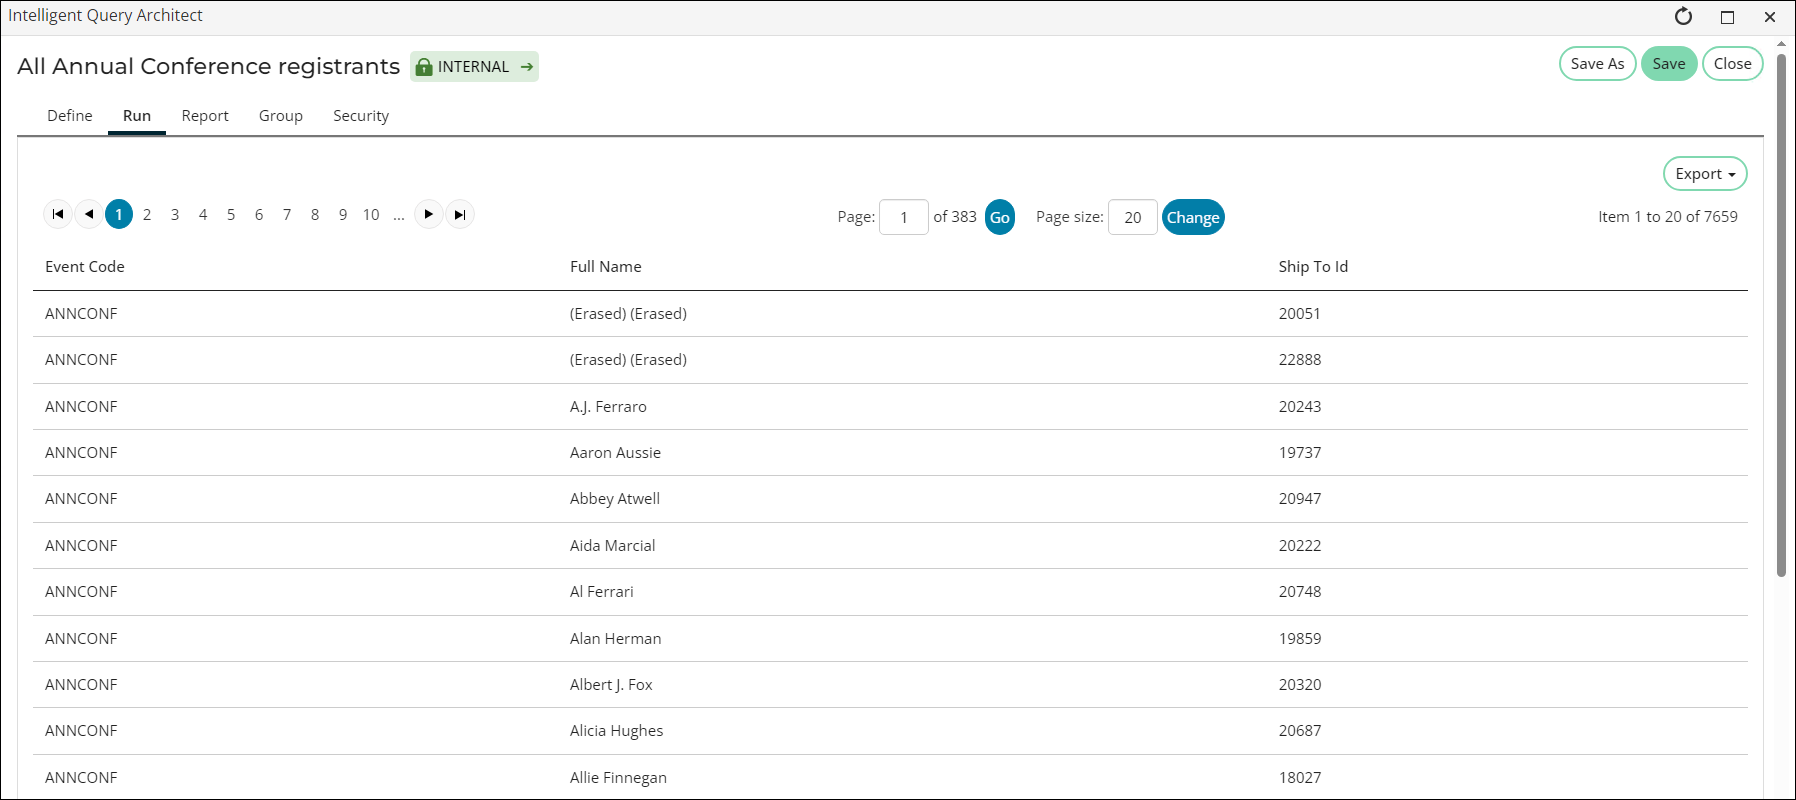
Creating the first query: Finding all registrants of an event
Do the following to create a query to find everyone who has registered for a specific event:
- Go to RiSE > Intelligent Query Architect > New > Query.
- (Summary tab) Enter a Name and Description for your query.
- (Sources tab) Under Add source in the Common section, select Event registrations.
- (Filters tab) From the Property (Add a filter) drop-down, select Event Code and set it Equal to the code of the event you need.
- (Display tab) Enable any properties to display, such as:
- Event Code
- Full Name
- Ship To Id
- Deselect the columns you do not need.
- Click Refresh.
- Click Run to verify the results.
- Save the query.

Creating the final query: Finding all non-registrants of an event
Do the following to create a query that returns results of everyone who has not registered for a specific event:
- Go to RiSE > Intelligent Query Architect > New > Query.
- (Summary tab) Enter a Name and Description for your query.
- (Sources tab):
- Under Add source in the Common section, select Contacts.
- Select All sources.
- Locate the query you created in the section above, then select the query to be used as a source.
- Click OK.
- Define the following Relation: NetContactData.Id Not Exist CsRegistration.Ship To Id
- Click the + icon.
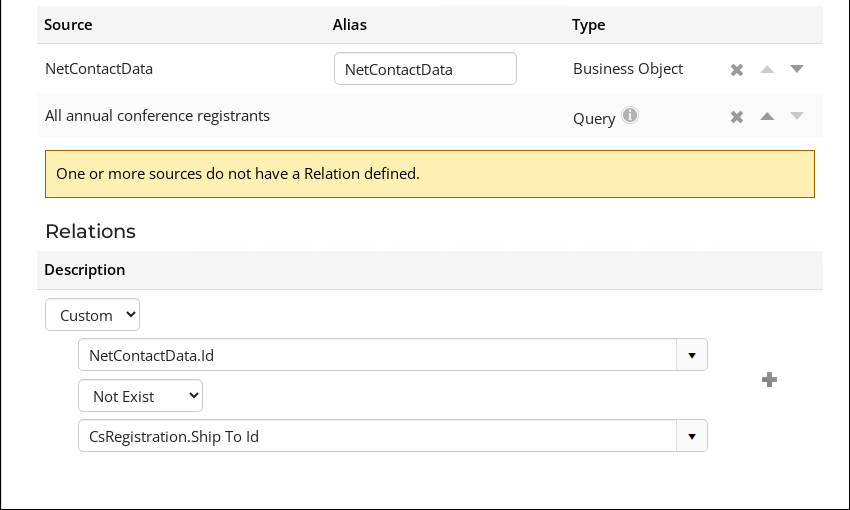
Important! Make sure NetContactData is listed first. If this source is not listed first, use the arrows to move the source location.
- (Filters tab) Add the desired filters, such as excluding company records, inactive members, or certain member types.
- (Display tab) Select the properties you want displayed in the query.
- Click Run. The full list of contacts not registered for the selected event are returned.
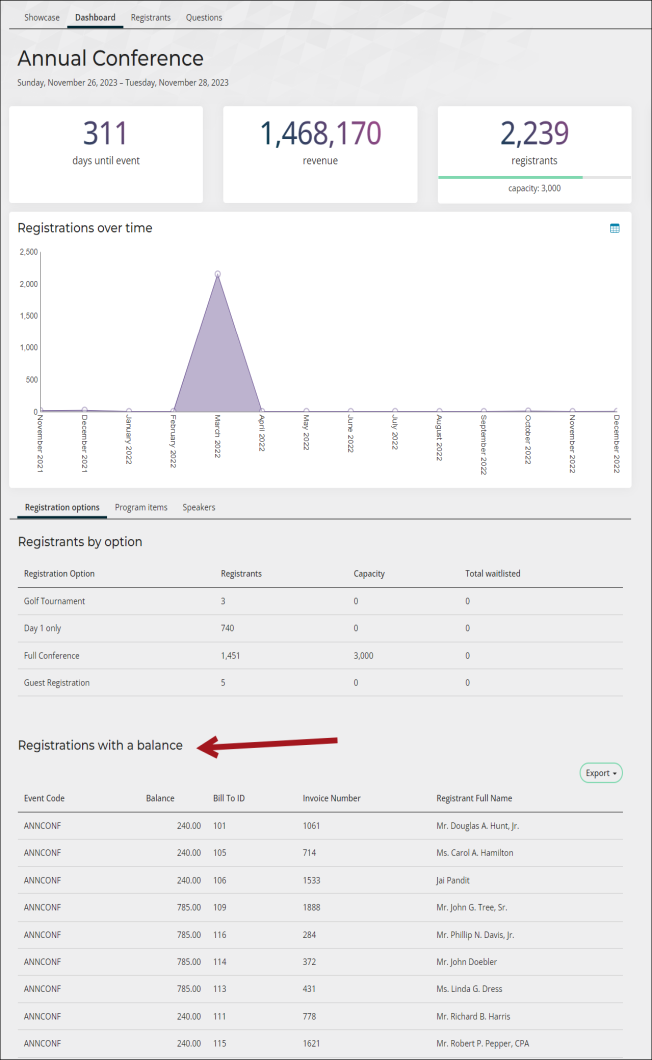
You can join certain invoice business objects with CsEvent to provide detailed invoice information to your specific event dashboards.
Example: You want to know how many registrants for the annual conference have a balance due. To do this, you must create a query and add it to the specific event dashboard.
Creating the query
To create the query, do the following:
- Go to RiSE > Intelligent Query Architect > New > Query.
- Enter a Name, such as Event registration with balance.
- (Sources tab) Select All sources and add CsEvent and EventInvoice.
- (Filters tab) Add the following filters:
- Filter on [EventInvoice] Balance
- Function - None
- Comparison - Greater Equal
- Value - Constant 0
- Filter on [EventInvoice] Event Title
- Function - None
- Prompt - Required
- Filter on [EventInvoice] Balance
- (Display tab) Add the following properties:
- [CsEvent] Event Code
- [EventInvoice] Balance
- [EventInvoice] Bill To ID
- [EventInvoice] Invoice Number
- [EventInvoice] Registrant Full Name
- Save and Run the query.
Adding the query to an event dashboard
To add the query to the event dashboard, do the following:
- Go to RiSE > Page Builder > Manage content.
- Go to @/iCore/Staff_Dashboards/Specific_Event and Copy the Event Detail and Event Dashboard content records.
- Paste the records into a Shared content folder.
- Open the copied Event Detail record and select Add content.
- From the Content gallery select the Query Menu shortcut.
- Select the query you just created in the Source query or folder field, then click OK.
- Click Save & Pubish.
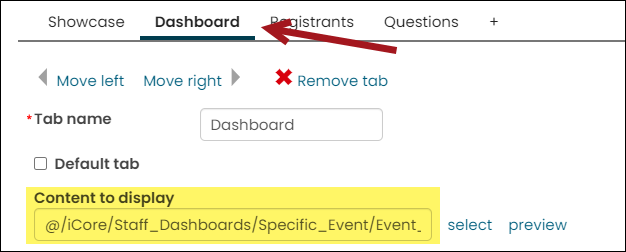
- Open the copied Event Dashboard content record:
- From the Event Dashboard content item, select Configure.
- Click the Dashboard tab.
- From the Content to display field, select the Event Detail content record previously copied.
- Click OK, then click Save & Publish.

- Go to RiSE > Site Builder > Manage shortcuts.
- Edit the EventDashboard and EventDetail shortcuts to point to the new content records. Click Update.
- Go to Events > Find event and select any event. From the Dashboard tab, you’ll see the new query.

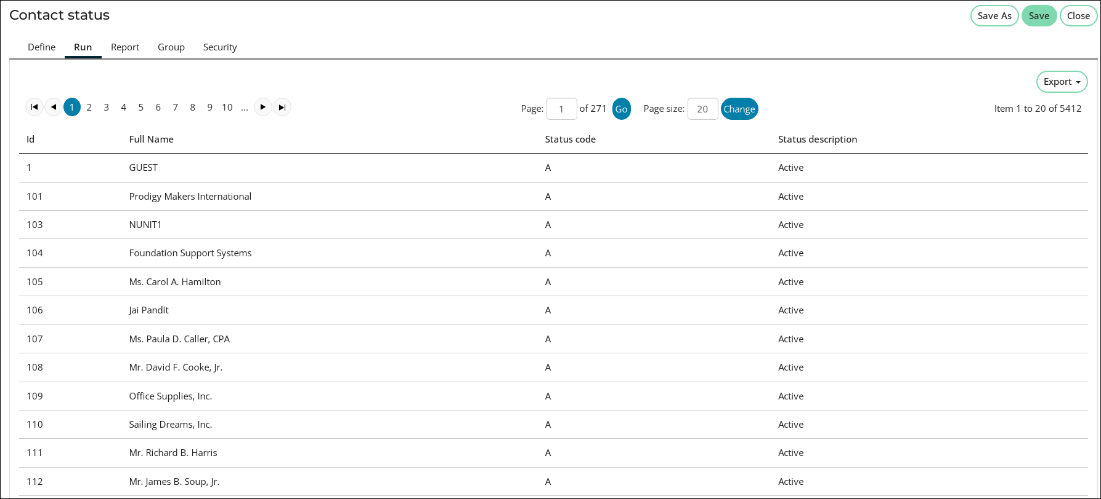
The following query identifies the Contact Status for all contacts. The query returns the Code and Description for each status, including custom statuses.
Do the following to create an IQA query that displays the status of each contact:
- Go to RiSE > Intelligent Query Architect > New > Query.
- Name the query.
-
Sources tab:
- Add the NetContactData and CsGeneralLookupTables business objects.
- In the Alias field for CsGeneralLookupTables, enter StatusRef.
- From the Relations drop-down, select Custom:
- From the first drop-down, select NetContactData.Status. Select Left Join from the second drop-down, then select StatusRef.Code.
- Click the plus (+) icon.
- (Filters tab) Add the [StatusRef] Table Name property as a filter:
- From the Comparison drop-down, select Equal.
- Enter MEMBER_STATUS in the Value field.
- Remove any properties you do not need.
- (Display tab) Select the following properties:
- [NetContactData] Id
- [NetContactData] Full Name
- [StatusRef] Code
- [StatusRef] Description
- Click Refresh.
- Save and Run the query.
The results return one row per contact with the Code and Description of their current status.
Advanced
Example: Create a link that takes you on behalf of a contact, allowing you to register them for an event.
Notes: This feature is only compatible with event registrtions.
Do the following:
- Go to RiSE > Intelligent Query Architect > New > Query.
- Name the query.
- (Sources tab) Select All sources, then select the CsRegistration business object.
- Click OK.
- (Display tab) Populate the Hyperlink field on the Event Code property with the following: ~/Event.aspx?EventKey=[code_EventKey]&ID=[code_ID]&EditRegistrationObo=true.
- Click Save.
Next, add links to the query results that will let you register or view current registration someone On behalf of.
Notes: When an IQA query is run, any column with an Alias that begins with code_ will not be displayed but can be used for links and other IQA functions. The Event.aspx target page also needs two parameters: Id and EditRegistrationObo in order to function as On behalf of.
Staff users can build a query that displays summary information on one row with the ability to drill down and see more details. This example demonstrates how to build a query that displays a list of event registrations with a drop-down to see the registration options and program items for which users have registered.
Do the following:
- Go to RiSE > Intelligent Query Architect > New > Query.
- Name the query Registrations.
- (Sources tab) Select All sources, then select the following business objects:
- CsEvent
- CsFunction
- CsRegFunctions
- CsRegistration
- Click OK.
- (Display tab) Select the following display properties:
- [CsEvent] Title
- [CsFunction] Title
- [CsRegFunctions] Registered Quantity
- [CsRegFunctions] Status
- [CsRegistration] Full Name
- [CsRegistration] Order Date
- [CsRegistration] Status
- Click Refresh.
- (Sorting tab) Add the following sorts:
- Save the query.
- Click Run. Notice that there is a row in the query per function registration, and the overall event registration data is repeated on each of these rows. Modify the query so that there is just one row per registration with a drop-down to see the selected registration options and program items.
- Click Define, then click Display.
- Select the Group By checkbox for the following properties:
- [CsEvent] Title
- [CsRegistration] Full Name
- [CsRegistration] Order Date
- [CsRegistration] Status
- Click Run. You should now see one row per order with a toggle button to the left of each row.
- Select the toggle button to see the details of the order.
- Save the query.
- Use theQuery Menu content item to display the query results on any page.
Notes: Use the Ctrl key to select multiple business objects at once. Use the Quick find field to filter the list.
| Priority | Property | Direction |
|---|---|---|
| 1 | [CsEvent] Title | Ascending |
| 2 | [CsRegistration] Last First | Ascending |
| 3 | [CsFunction] Is Event Registration Option | Descending |
| 4 | [CsFunction] Title | Ascending |
Notes: Do not use the Group By option to display query results in a hierarchical grid of summary rows and detail rows.
The above query example can become overwhelming after just a few registrations have been entered. To simplify the query, add dynamic filters.
Example: Build a query that returns results of a contact's event registrations, and then display the results on the contact's page.
Do the following:
- Make a copy of the Registrations query from the example above.
- Open the query and click Save As.
- Name the new query Registrations for Contact.
- Click OK.
- (Filters tab) To return registration data for a single user, add the following filter:
- From the Property drop-down, select [CsRegistration] Ship To Id.
- From the Value drop-down, select Dynamic, then choose Selected ID.
- Save the query, then click Run. The only results that display are the registrations that you (the Selected ID) are registered for.
To use this query to display a contact's event registrations, go to the contact's account page, add the Query Menu content item, and select the Registrations for Contact query. The query will display on the account page with only the selected contact's registrations displayed.
For this example, use the Registrations query to view the registrations for one specific event:
- Open the Registrations query and click Save As.
- Name the new query Registrations for Event, then click OK.
- (Filters tab) Add a filter that will only show the event whose key is passed in the URL parameter:
- From the Property drop-down, select [CsRegistration] Event Code.
- From the Value drop-down, select URL param.
- Update the default Value text to the following: "@url:EventCode"
- Save the query.
- Add the query to the event dashboard:
- Navigate to a specific-event dashboard and add a new Query Menu content item to the page.
- Select the Registrations for Event query as the source.
- Save and Publish the page.
Notes: When working on a query filtered by URL parameter, you might not see any results on the Run tab. Try temporarily filtering on the Value of the URL parameter, such as a specific Event Id, until you have the query looking the way you want.
A list of registrations for the event will display on the page.
In this example, the query finds the contacts created this year using the @Now variable to dynamically filter the query.
Do the following:
- Go to RiSE > Intelligent Query Architect > New Query.
- (Summary tab) Name the query.
- (Sources tab) Under Add source in the Common section, select Contacts. This adds the CsContactBasic business object.
- (Filters tab) From the drop-down, select Date Added:
- Comparison: Between
- Value: 1/1/2015 and @Now
- (Display tab) Customize the fields to display.
- Save the query.
- Click Run. The results display the contacts created so far this year.
Example: Use the Query Menu content item and the Link feature to display completed orders to users.
Do the following:
- Go to RiSE > Intelligent Query Architect > New > Query.
- (Summary tab) Name the query Completed Orders.
- (Sources tab) Select All sources, then choose the following business objects:
- CsContactBasic
- CsOrderHistory
- (Display tab) Select the following properties:
- [CsContactBasic] Full Name
- [CsOrderHistory] Transaction Date
- [CsOrderHistory] Id
- [CsOrderHistory] Product Name
- [CsOrderHistory] Product Code
- [CsOrderHistory] Quantity
- Update the Alias or Link for the following properties:
- (Sorting tab) Select the [CsOrderHistory] Transaction Date property and sort by Descending.
- Save the query.
- Go to RiSE > Page Builder > Manage content, and add the Query Menu content item to a content record.
- In the Source query or folder field, select the Completed Orders query.
- Click OK, then Save & Publish the content record.
- Go to RiSE > Site Builder > Manage sitemaps, and add the content record to a navigation item. When the query results are displayed in your website, the results in the Account and Product columns are linked to the pages you defined in your query.
| Property | Alias | Link | Notes |
|---|---|---|---|
| [CsOrderHistory] Id | code_ID | Properties with an Alias prefaced with code_are hidden in the query results but can still be used as a reference in the Link. | |
| [CsOrderHistory] Product Code | code_ProductCode | ||
| [CsContactBasic] Full Name | ~/MyAccount&ID=[code_ID] | This Link assumes that you have a shortcut named MyAccount pointing to a content record containing Contact content items that can use the ID URL parameter. | |
| [CsOrderHistory] Product Name | ~/ItemDetail&iProductCode=[code_ProductCode] | This Link assumes that you have a shortcut named ItemDetail pointing to a content record containing the General Product Display content item. |
The Query Chart Viewer dynamic content item builds a dynamic chart based on the query data. The chart can be set to a range of sizes, skins, and chart types. For more information, see Query Chart Viewer.
Example: Build a query that will be used to display a stacked bar chart of a contact's gift contributions over two years. Each year will be broken up into the different funds the contact contributes to.
Create the query
Do the following to create the query:
- Go to RiSE > Intelligent Query Architect > New > Query.
- Name the query Contact Gift Contributions by Year.
- (Sources tab) Select All sources:
- Select GiftsReceived.
- Click OK.
- (Filters tab) Add filters so that only gifts that were given by the selected user from this year and last are returned in the query:
- (Display tab) Select the following properties:
- Calendar Year
- Fund
- Amount
- Click Refresh.
- For a multi-series chart in the Query Chart Viewer, you must have at least one property that is selected as a Group By column. This should be the property that you want to display on the x-axis. Select the Group By checkbox for the Calendar Year property.
- For the Amount property, select the Sum function.
- Click Run. Here you will see a list of the gifts that you have made in the last two years with the ability to drill down to see the breakdown by fund.
- Save the query.
| Property | Comparison | Value |
|---|---|---|
| ID | Equal | Dynamic | Selected ID |
| Date Received | Within Years | 1 |
Notes: The date within comparisons are zero-based. This means that if you want to filter to just this year's activities, you should set Within Years to 0. For two years you would set it to 1, and so forth.
Notes: Do not use the Group By option to display query results in a hierarchical grid of summary rows and detail rows.
Add the query to a content record
Next, add the query to a content record:
- Navigate to the account page and enable on Easy Edit.
- Select Open in Content Designer.
- From the desired location, select Add content.
- Open the Utility folder, then select the Query Chart Viewer.
- Click OK.
- In the configuration for the content item, set the following settings:
- Chart data:
- Source query = Select the query that you just created.
- Display options:
- Type = Bar - Vertical
- Enabled stacked series = checked
- Chart data:
- Series data column = CalendarYear (This will be the x-axis label)
- Series data format = Year
- Data axis = Amount (This will be the value on the y-axis)
- Data axis format = Integer value (This will be the categories each column is broken down into)
- Label axis format = No Format
- Set the other settings as desired. The following are a few of the settings we selected:
- Height = 400
- Width = 0 (When the width is set to 0 it will stretch to fit the width of the container)
- Skin = Metro
- Legend Position = Right
- Chart data:
Now when you view the account page it will display a bar chart indicating the selected user's gifts broken down by year and fund contributed to.