Last updated on: June 23, 2026
The Query Menu content item allows you to merge query results into your site for tremendous utility. You can configure the content item to display a query's title, parameters, columns, and labels. You can enable the query results to be exported, allowing data to be opened with several different applications.
This content item can be found out-of-the-box in the Staff site at Community > Find contacts.

In This Article
- Query Menu configuration options
Changing the query column headers
Automatically displaying query results
Hiding the Query Menu content item when there are no results to display
Emailing the returned list of contacts
Mapping the content list using Google Maps
Pointing to an entire query folder
Pointing to a communication template
Query Menu configuration options
This content item uses the Common content item configuration options, in addition to the following:
- Limit users who can view data for other contacts - (enabled by default) If this option is enabled, only authorized users can view information for contacts other than themselves. This prevents other users from changing the ID in the URL to access another contact's data. Authorized users include staff and Company Administrators for a group that the contact belongs to. Disable this option to allow all users to view information for other contacts, such as for a public profile. If this option is disabled, the system security settings determine whether a user must be logged in to view information for other contacts.Ensure the contact security queries are configured correctly, so that users have access to view data for other contacts.
- Open link in a pop-up - Select this option to display the target page in a pop-up. Default is navigate to the target page.
- Show initial results for queries with optional filters - Enable this option to automatically show a list for queries with optional filters. However, queries with a required filter without a default value will not automatically display, even if this option is selected.
- Enable export of query results - Select this option to display icons to export the data to .doc (Word document), .xls (Excel spreadsheet), .pdf (Adobe PDF), .csv (comma-delimited file), or .xml (Extensive Markup Language file). Click the Export button above the query results to display these options in a drop-down.
- Enable email merge from query results - Select this option to display
an Email button. This button enables staff users to send emails to contacts returned from an IQA query.
You must be a staff user to have access to the Email button.
- Default communication path - If you have a communication template, you can select it and send that communication template to the contacts returned in the IQA query.
Important! The selected communication template's recipient query is overwritten and is replaced by the query selected in the Source query or folder field. For more information, see Best practices for defining recipient queries.
- Map query results if address is available - Enable this option if you want
to automatically map your query results. Only one address property per query can
be mapped. When this option is enabled, the content item looks for the following address
properties in this order and maps the first one it finds:
- FullAddress
- Address
- FullAddressText
- AddressText
- Address Text
- Full Address Text
- Reload list from database when page refreshes - Enable this option if you want to automatically reload the data list from the each time the page refreshes.
- Hide when no results - Enable this option to hide the Query Menu content item when the query specified in Source query or folder returns no results.
- Source query or folder - Select the path in the Document System to display for the source of the data.
- Query section label - Enter a label to display next to the drop-down of available queries for user selection (when multiple queries are available).
- Display filters horizontally - When enabled, the search filters display horizontally with a maximum of three filters per row.
- Results to display per page - Enter the number of results to display per page. 0 = display all results. The default value is 20 listings before paging is activated.
- Results to display per page - Enter the number of results to display per page. Entering "0" will display all results. The default value is 20 listings before paging is activated.
- Pager display style - When multiple pages of results are
returned for the query, a paging area is displayed so that users can navigate
through the results. This option specifies the style of the paging area. Select
one of the following:
- Simple: The paging area displays in a list with a number you can click to go to a particular page of results.
- Advanced: The paging area displays arrows and page selection links. Also allows the user to specify the number of results displayed on a page.
- NextPrev: The paging area displays simple Next and Previous buttons that are used to navigate through results.
- Slider: The paging area displays a slider below the list of results which can be used to navigate through results.
- NextPrevandNumeric: The paging area displays Next and Previous buttons with numbers you can click to go to a particular page of results. Also allows the user to specify the number of results displayed on a page.
- Pager location - The sets of controls to move forward and backwards through the pages of results can be placed in the following locations on the page:
- Top - Select to show paging controls at the top of the page.
- Bottom (preferred) - Select to show paging controls at the bottom of the page. This is the preferred location in order to meet WCAG guidelines.
- Both - Select to show paging controls twice: once at the top of the page and once at the bottom of the page.
Note: Select either Top or Bottom, but not Both, to meet WCAG guidelines.
Note: The Open link in a pop-up option should not be used if any links go to external websites.
Note: This option is required for the membership queries found on out-of-the-box account pages.
Note: Results exported to Excel are stored as text; this includes numeric data. If you want to convert numeric data from text to numbers for a desired operation, the data must be manually formatted.
Note: If Used cache results is enabled in your query, the Reload list from database when page refreshes option will not apply.
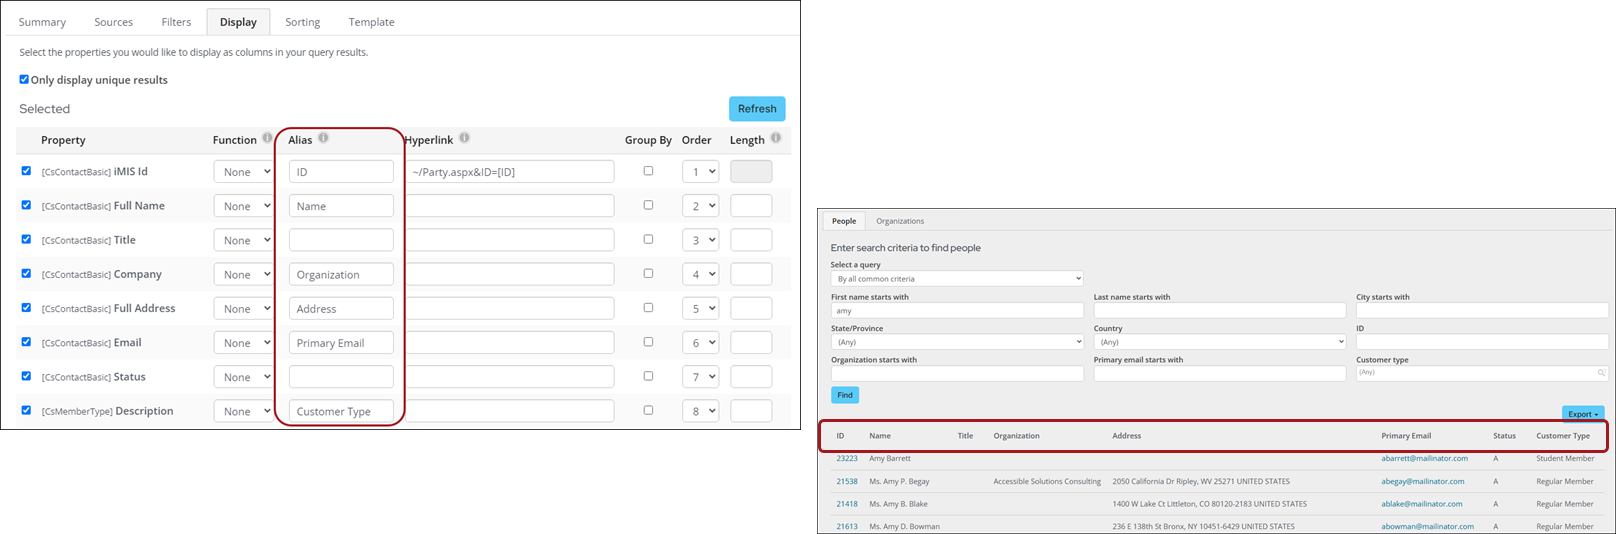
Changing the query column headers
The column headers that display can be overwritten by entering a value in the Alias column for the query properties.
Automatically displaying query results
You can configure the Query Menu content item to automatically display query results by enabling the Show initial results for queries with optional filters option. However, if your query requires at least one value, or contains a required prompt, this option, even when selected, will not automatically display the query.
Hiding the Query Menu content item when there are no results to display
You can configure the Query Menu content item to remain hidden when there are no query results to display. Enable the Hide when no results option to hide the Query Menu content item when the query specified in Source query or folder returns no results. When this option is enabled, the Query Menu content item will hide the content item if the following conditions are true:
- A single query is displayed.
- There are no results for the query.
- There are no filters displayed OR Show initial results for queries with optional filtersis enabled.
Emailing the returned list of contacts
If the query selected returns contacts, the Query Menu provides the ability to send an email to all of the contacts using the Communication Creator content item. You can use the Email button in the Query Menu to email the entire contact list if the query contains a required Id column or column alias. You must be a staff user to have access to the Email button.
Important! The selected communication template's recipient query is overwritten and is replaced by the query selected in the Source query or folder field.
See Creating a list of contacts to email to view a list of columns and column aliases that you can use to enable mass emailing of the contact list.
Mapping the contact list using Google Maps
When Map query results if address is available is enabled, a Google Maps of the query results is displayed.
Requirements
Review the following requirements to ensure the Google Map properly displays in the Query Menu content item:
- The selected query has one of the following address properties:
- FullAddress
- Address
- FullAddressText
- AddressText
- Address Text
- Full Address Text
- The Query Menu looks for one of the above properties (in the displayed order) and maps the first one it finds.
- In the Google Maps Platform, the Geocoding API and the Maps JavaScript API must be enabled. If both APIs are not enabled, the Query Menu content item will not display the map.
Note: The Google Maps API key (Settings > RiSE > Quick setup) must be defined in order for the map to properly load. To learn how to obtain a Google Maps API key, see the Google Maps API documentation.
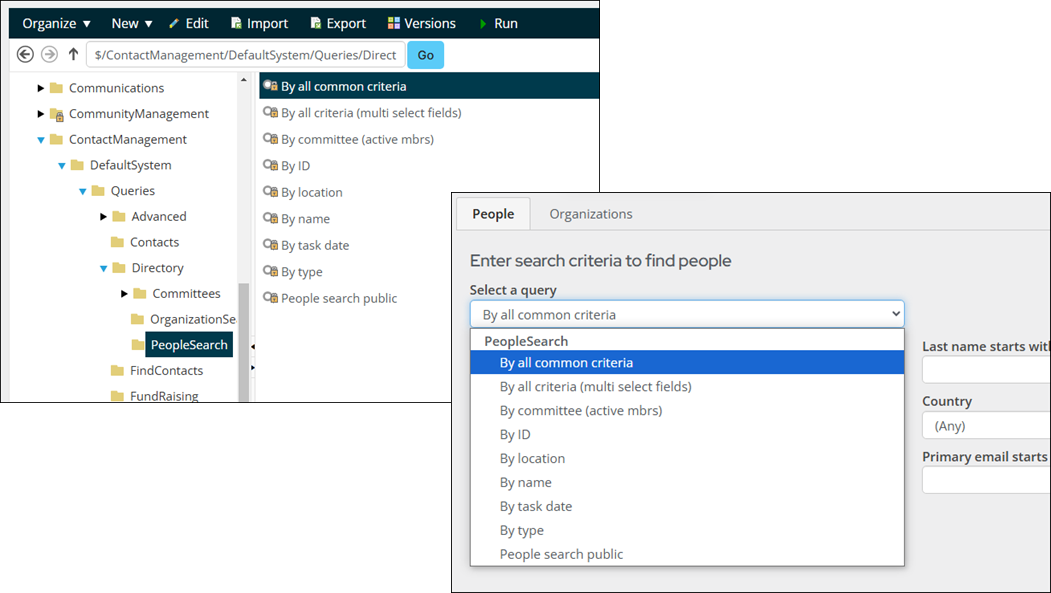
Pointing to an entire query folder
You can also organize helpful queries into a folder and point the content item to that folder. When the page loads, the content item displays the first query at the top of that folder, and it presents a drop-down menu of additional queries available, organizing them by subfolders, if any. When the user clicks on a query from the menu, the content item immediately runs that query and displays the results.
Pointing to a communication template
You can point your Query Menu content item to an existing communication template. This will allow you to send that communication template to the contacts returned from the IQA query. For more information, refer to Creating a new communication template.
Important! The selected communication template's recipient query is overwritten and is replaced by the query selected in the Source query or folder field.