Last updated on: January 27, 2026
Access settings give you a consistent way to apply security (grant permissions) to folders and objects throughout iMIS:
- Content records
- Entire websites
- Individual navigation items
- Queries
- And the wide array of objects that you can define, import, and store in the Document System
In This Article
- Understanding the different options
Example 1: Creating pages that only members have access to
Example 2: Creating a page that only certain member types have access to
Example 3: Creating a page that anyone has access to, including non members and unauthenticated users
Example 4: Creating a page that only specific staff can edit
Understanding the different options
From the Access settings tab, there are two radio buttons: Use a preconfigured security set and Make this available to
Use a preconfigured security set
Throughout iMIS, whenever you configure access settings, you see a drop-down list of available security settings that you can apply to individual folders and objects. These security sets offer you easier control and faster performance than defining custom ones.
These are the key security sets you should use, from most permissive to least:
- Everyone — No restrictions, including the public (if they can access this level/context).
- Authenticated Users — Restricts access to users who are signed in (both staff and public members).
- All Staff Full Control — Restricts access to staff users.
- Administrators Full Control — Restricts access to users with the SysAdmin role.
Note: If you do not have the feature named in the security set (such as Certification), do not use the set.
iMIS ships with these pre-built security sets to cut down on the customization you need, for objects that should be neither unsecured (Share) nor locked for you alone (Private). Each security set contains a predefined Access List and permissions (Full Control, Read, Add, Delete, Edit) that are constant for all objects that use it. A Select permission is also available for tagged objects.
When you choose a set, the Current Access List below it updates to show the settings it includes. Look at those details to decide if the selected security set has the permissions you need.
Make this available to
Allows you to restrict the content to specific roles, groups, users and member types. When this option is selected, you will see the Specific roles section has Content Administrator and SysAdmin automatically selected. These are default system-defined security roles that are assigned to every content record:
- SysAdmin - Anyone with the SysAdmin role.
- but the Content Administrator role is automatically assigned to every iMIS user who is a member of a content authority group (CAG) that is designated as a Master Admin CAG.
The permissions that can be assigned to each entry in the list are:
- Full Control - Enables all of the following permissions.
- Read - Enables users to see this object both in definition windows and as rendered output in websites, but they cannot change the object's definition.
- Add - Enables users to create new objects, or to paste or import an object into the Document system.
- Edit - Enables users to edit this object's definition, but not to delete the object.
- Delete - Enables users to delete this object.
- Select - Enables users to assign a tag to content folders and content records.
Note: These permissions are only used with Content Authority Groups. To see how they are used with CAG, please see Defining content authority groups.
Example 1: Creating pages that only members have access to
Example: There are multiple pages that only members should have access to, so you create a Members query group, then use the query to restrict access to the pages.
Creating the query group
Do the following to create the query group of members:
- Go to RiSE > Intelligent Query Architect > New > Query.
- Enter a Name, then click the Sources tab.
- Click the Contacts source, then click the Filters tab.
- From the Property(Add a filter) drop-down, choose Is Member, then set the value to Yes.
- From the Property(Add a filter) drop-down, choose Status, then set the value to Active.
- Click the Group tab:
- Enter a Group name.
- Click Create Group.
- Click Save.

Using the query group to restrict access to a page
Do the following to use the query group as a way to restrict access to a page:
- Go to RiSE > Page Builder > Manage content.
- Create the page (New > Website Content) or open an existing page.
- Click the Access settings tab.
- Choose the Make this available to radio button.
- Choose the Make this available to radio button.
- (important) From the Specific roles section, deselect Everyone.
- Expand the Specific groups section, then select Add group.
- In the Type Equals field, select Dynamic Group.
- In the Name Contains field, enter the Group name.
- Select the group, then click OK.
- Click Save & Publish.
Adding the page to navigation
Do the following to add the page to the website's navigation:
- Go to RiSE > Site Builder > Manage sitemaps.
- From the drop-down, choose the website.
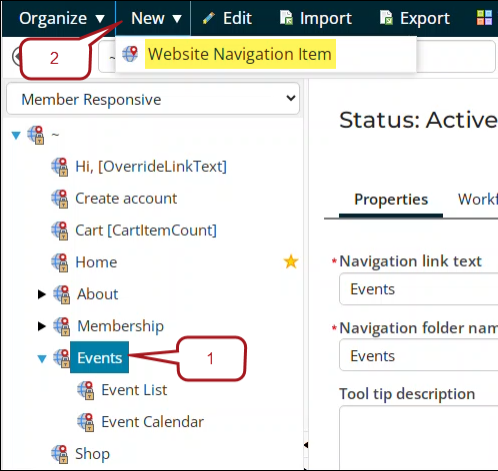
- If there is already a parent navigation item where you want the new navigation item to be placed under, click the existing parent navigation item. If this is a new parent navigation item, you can move the item around after it is created.
- Click New > Website Navigation Item:
- Enter the Navigation link text, such as Member Event Info.
- From the Content or URL to link to, select the page you just created.
- Click the Access settings tab and do one of the following:
- Leave the Access settings set to Everyone Full Control to allow anyone to see and click on the navigation item. Only those assigned the member types specified at the page level will have access to the page's content. Everyone else will see an Access Denied message.
- Update the selection to Make this available to, then repeat the access setting configurations that you applied at the page level. When these access settings are applied, only those specified will see the navigation item. Everyone else will not see the navigation item at all.
- Enter any other optional details, then click Save.
- Drag the new navigation item to a different spot if required, then click Publish.
Example 2: Creating a page that only certain member types have access to
Example: There is a members-only event coming up that you need to promote. You want to create a new page that only members can access, so non members do not have access to the event information.
Creating the page
Do the following to create a page that only members have access to:
- Go to RiSE > Page Builder > Manage content.
- Create the page (New > Website Content) or open an existing page.
- Click the Access settings tab.
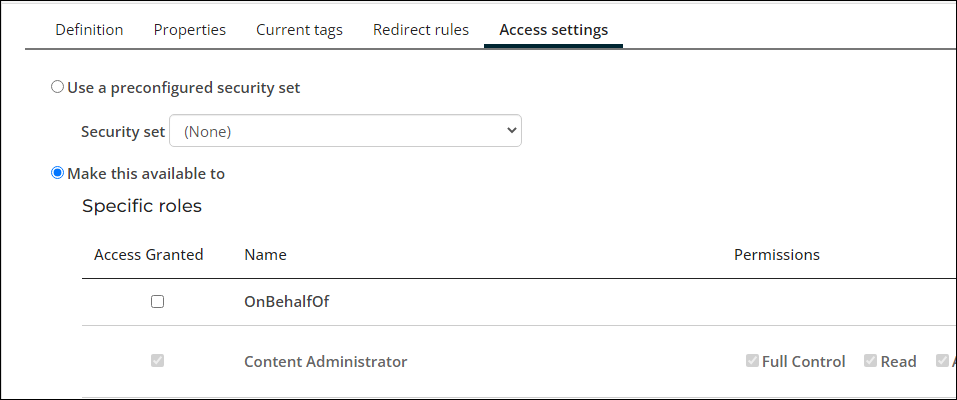
- Choose the Make this available to radio button.
- (important) From the Specific roles section, deselect Everyone.
- Expand the Specific member types area.
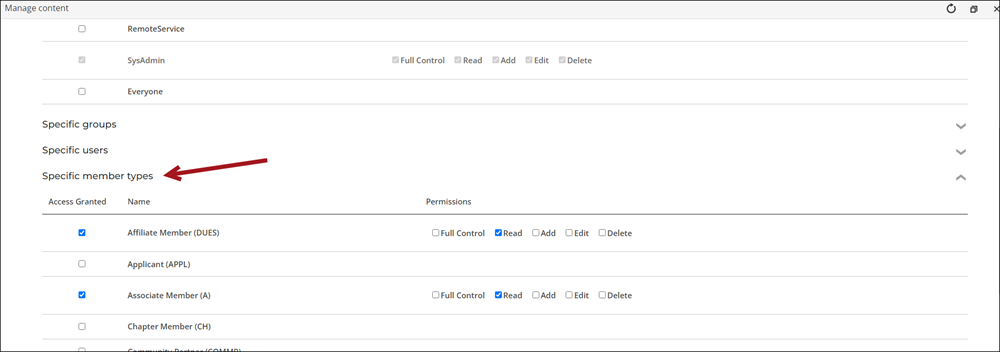
- Enable the member types that should have access to this page. The Permissions appear when the member type is enabled. Enable the level of permissions you would like to grant for each member type. Typically, you will leave this set to Read only for member content, unless there is content on the page you need them to edit or delete.
- Click Save & Publish.
Adding the page to the navigation
Do the following to add the page to the website's navigation:
- Go to RiSE > Site Builder > Manage sitemaps.
- From the drop-down, choose the website.
- If there is already a parent navigation item where you want the new navigation item to be placed under, click the existing parent navigation item. If this is a new parent navigation item, you can move the item around after it is created.
- Click New > Website Navigation Item:
- Enter the Navigation link text, such as Member Event Info.
- From the Content or URL to link to, select the page you just created.
- Click the Access settings tab and do one of the following:
- Leave the Access settings set to Everyone Full Control to allow anyone to see and click on the navigation item. Only those assigned the member types specified at the page level will have access to the page's content. Everyone else will see an Access Denied message.
- Update the selection to Make this available to, then repeat the access setting configurations that you applied at the page level. When these access settings are applied, only those specified will see the navigation item. Everyone else will not see the navigation item at all.
- Enter any other optional details, then click Save.
- Drag the new navigation item to a different spot if required, then click Publish.

Example 3: Creating a page that anyone has access to, including non members and unauthenticated users
Example: You are creating basic website content that anyone can read.
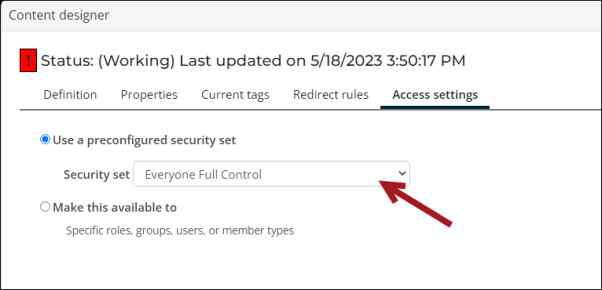
The default behavior when creating a new page is that everyone (members, non members, unauthenticated users, staff, etc.) has access to review the page. If this is the access level you need, there are no changes that need to be made to the access settings.
Example 4: Creating a page that only specific staff can edit
Example: Member pricing is being restructured and only certain staff users should have access to the content where the proposed changes are outlined.
Update the page access settings
- Go to RiSE > Page Builder > Manage content.
- Locate and open the page for edit.
- Click the Access settings tab.
- Select Make this available to.
- Ensure Everyone is deselected.
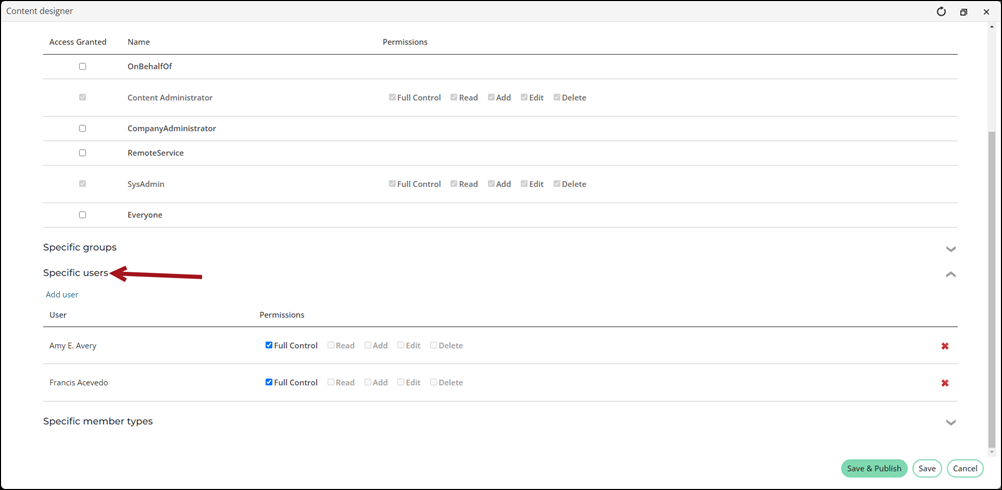
- Expand the Specific users section, then select Add user.
- Search for and select the required staff users.
- Update their Permissions if necessary.
- Click Save & Publish.
Update the Navigation access settings
Do the following to add the page to the Staff site navigation and restrict the access:
- Go to RiSE > Site Builder > Manage sitemaps.
- From the drop-down, choose Staff.
- Select the parent navigation item for the new navigation item, then click New > Website Navigation Item.
- Enter the Navigation link text, such as Member Pricing Changes.
- From the Content or URL to link to, select the page you just created.
- Click the Access settings tab.
- Update the selection to Make this available to, then repeat the access setting configurations that you applied at the page level. When these access settings are applied, only those specified will see the navigation item. Everyone else will not see the navigation item at all.
- Enter any other optional details, then click Save.
- Drag the new navigation item to a different spot if required, then click Publish.