Last updated on: January 27, 2026
Defining and publishing content for your website happens from RiSE > Page Builder > Manage content.

In This Article
Defining content records
Do the following to define and create content records:
- Go to RiSE > Page Builder > Manage content.
- Select the content folder in which you want to create the content record. Do one of the following:
- Select New > Website Content to create a new content record.
- Click Edit to modify an existing content record.
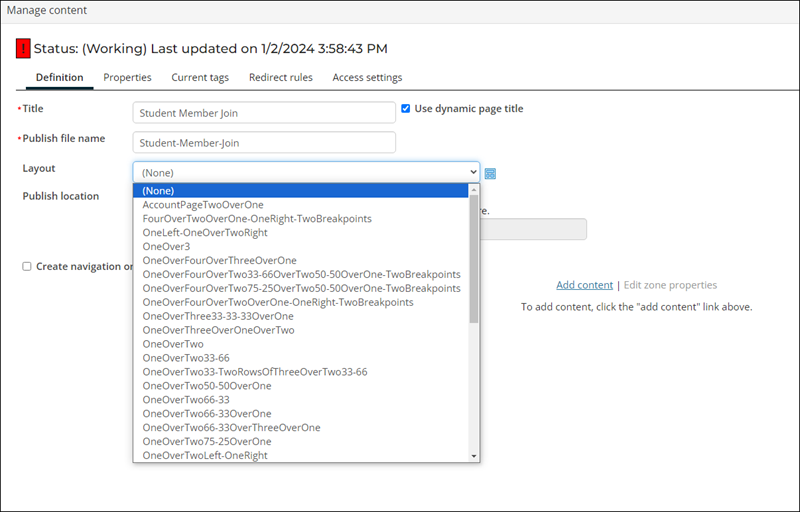
- Enter a Title for the content record. If you would like to include the title of a dynamic content item with the title of your content record, select the Use dynamic page title checkbox.
- Enter a Publish file name for the content record.
- Select a layout in the Layout drop-down list.
-
(optional) If you want to create a navigation item for this content record, select Create navigation on publish to select the location in a web page sitemap where the content record will be published:
- Enter a name for the new navigation item in the Navigation link text field.
- Click select to choose the Navigation location where this content record is published.
When the content record is published, the Navigation Link Text and the Breadcrumb Name values on the navigation item match the values entered in the Navigation link text field on the content record.
Note: The Create navigation on publish option is displayed only if the logged-in user is one of the following:
- A System Administrator.
- A member of a content authority group with Navigation Creator permission.
The Navigation Folder Name value on the navigation item matches the value entered in the Navigation link text field on the content record, where spaces and special characters are replaced with underscores.
The Content or URL to Link to field is set to the content record being created, and any Access Settings on the content record being created will migrate forward for the navigation item.
Once the new content record is published, the Create navigation on publish option is hidden.
If the content record does not publish right away, then the navigation item will not be available until the sitemap is rebuilt.
Note: If you are creating content in the same site to which you're adding a navigation item, you will need to refresh the page after publishing the content record in order to see the new navigation item.
- Select Add content to add one or more content items to each content item zone.
- Select the content item you want to use. Click OK.
- Configure each content item to define its individual content. Do the following to modify an existing content record:
- Select the content record.
- Click Edit.
- Click Configure for a specific content item.
- Configure the content item.
- Provide the following for each content record:
- Definition
- Properties
- Current Tags
- Access Settings
- If the parent content folder has been enabled for content authoring workflow, you can optionally change the default settings:
- Select the parent folder.
- Click Edit.
- (Workflow Management tab) Modify the content record.
Note: Do not use any special characters in the name of content records or folders.
Note: The content record supplies the name of your web page unless you choose to override with a navigation item title.
Note: If a content record contains several dynamic content items, it is recommended that you turn dynamic page titles off for the entire page in order to limit the title length.

You can also click and drag content items to rearrange them within a content item zone or between different content item zones. It's also possible to copy or move existing content items from one content record to another.
Note: All content records in the Core Content and Quick Start Sites content folders are protected as System content records and cannot be edited or deleted. If you want to update a System content record, create a copy of it, and then edit the copy. Be sure to also update any navigation items or shortcuts that point to that content record.
Publishing content records
When you first create a content record, or when you make changes to an existing Published content record, that particular version of the content record is not visible on any iMIS RiSE websites until it is published.
You have two publishing options:
- Save and publish immediately: Before closing the content record, select Save and Publish to make your changes immediately visible on all websites that use the content record. A yellow bar appears next to the content record when publishing is pending. Click Organize > Refresh to double check the page was successfully published and no longer pending.
- Save, then publish later: If you Save the content record without publishing, the content record is marked with a status of Working. A red bar appears next to the content record when it is yet to be published. To publish the content record, select it and then click Publish in the Document system toolbar.
After publishing your content record, the status changes briefly to PublishPending, and then to Published once it has been fully rendered to an .aspx file on all web servers that host the relevant iMIS RiSE websites.
If status changes don't appear right away, go to Settings > About iMIS, then click Purge System Cache. The publish changes will now appear.
Revising content in place
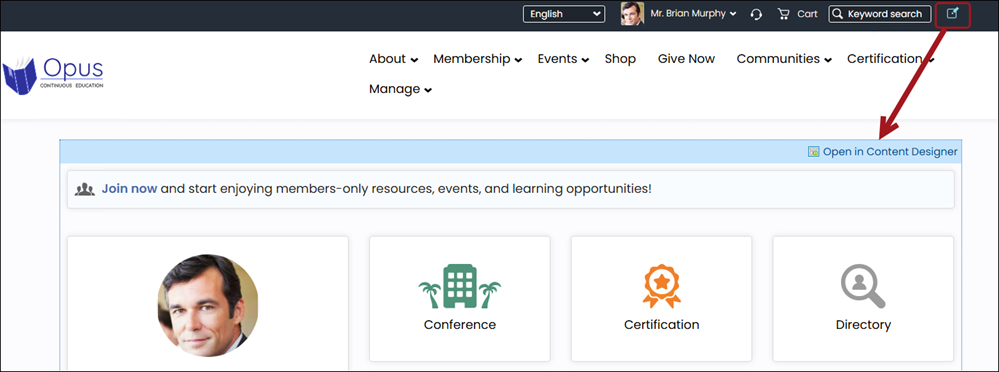
To revise an iMIS RiSE content record by using the Easy Edit feature, log on to the website and click the Easy Edit icon located by default near the Sign Out link on every web page of the website. This enables the Easy Edit mode until you click the Easy Edit icon again to disable it. See Easy Edit overview.

Using Easy Edit for a system content record
If you modify a system (out-of-the-box) content record, the page will contain an Open in Content Designer link at the top and bottom of the page. Select this link to open the page. Note the presence of a Save As button.

There are two scenarios where you will be asked to use the Save As Easy Edit approach: Shortcuts and Sitemaps.
Do the following to use Easy Edit to modify a system content record through Shortcuts (for example, an event detail, product detail, or account page):
- Click the Easy Edit icon.
- Select Open in Content Designer.
- Make a change to the content record.
- Click Save As. You are prompted to save your content in a Shared Content folder.
- Click OK.
- Click Save & Publish.
- Go to RiSE > Site Builder > Manage shortcuts.
- Find the shortcut that is currently pointing to the page you edited. Note the values for For Website and Shortcut.
- If the shortcut is for All Sites or your specific website, either edit the content record or create a site-specific content record using the following:
- Select Add shortcut.
- In For websites, select your website.
- In Shortcut, enter the value noted in Step 8.
- In URL or Content record, click select. Select the new content record.
- Click Save.
- Go back to the page you were editing. Note in the URL, the web page is accessing the Shared_Content record. You can edit as normal.
Do the following to use Easy Edit to modify a system content record that is reached through your website’s sitemap (for example, clicking on a navigation link):
- Click the Easy Edit icon.
- Select Open in Content Designer.
- Make a change to the web page content.
- Click OK.
- Click Save As. You are prompted to save your content in the Shared Content folder.
- Click Save & Publish.
- Go to RiSE > Site Builder > Manage Sitemaps.
- Find the sitemap for your website.
- Click the navigation for the page you’ve edited.
- In Content or URL to Link to, click select.
- Find your new content record.
- Click Save.
- Click Publish.
- Click OK.
- Go back to the page you were editing. Note in the URL, the web page is accessing the Shared_Content record. You can edit as normal.
Troubleshooting
To edit a web page's underlying content records or content items by using the Easy Edit feature, you must have Content Editor content authority group permissions in at least one content authority group to which you belong, and you must also have Read and Edit Document system permissions for that content record. Without these permissions, you are instead presented with a form that submits a change request to the Page Builder Task list for all Content Editors defined in the system.