Last updated on: January 27, 2026
A content record is a single website page that can be configured to display on any RiSE website.
To access a content record, go to RiSE > Page Builder > Manage content. Double-click an existing content record, or click New > Website content to create a new content record.
In This Article
Definition tab
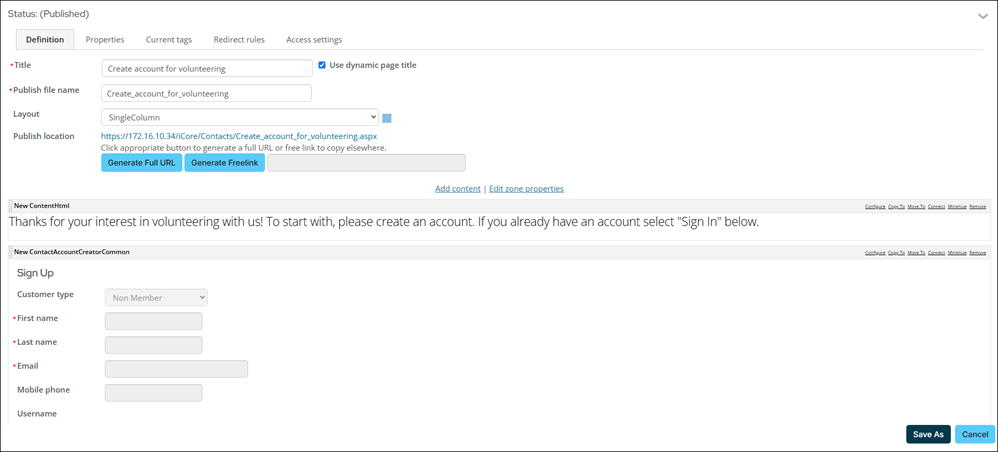
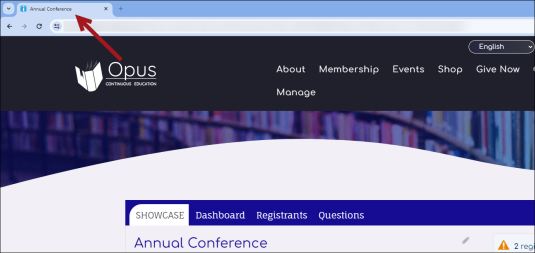
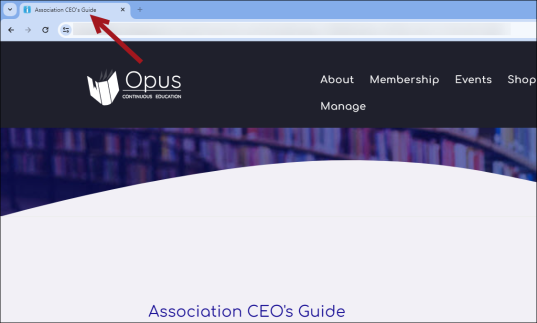
Title
Specifies what is displayed in the title of a browser window or browser tab when the rendered output of a content record is displayed. The words used in this field also factor into the relevancy weighting of search results. Go to Settings > RiSE > Search configuration for more information.
Note: This Title can be overridden by a navigation item title.
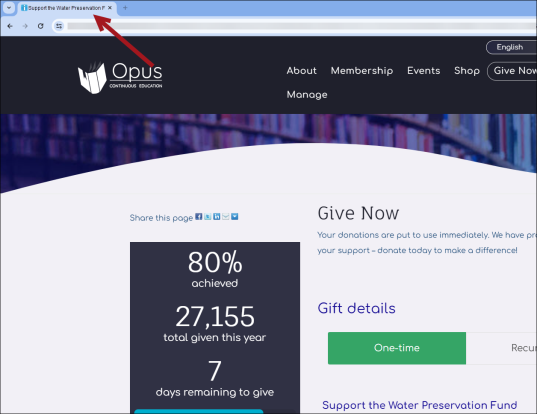
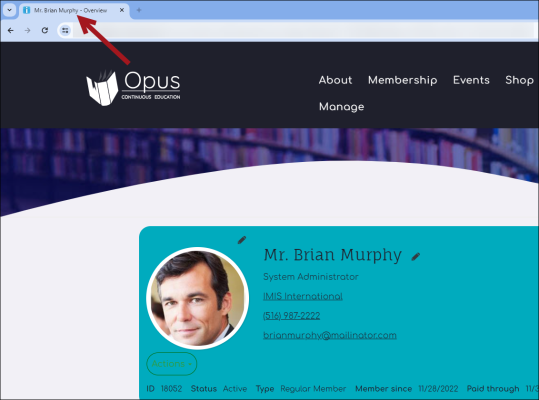
Use dynamic page title
When selected, this option allows certain dynamic content items to replace the page title as it is displayed in a browser window or tab. This option only applies when the following content items appear on a page:
- Event Display - Event Name is displayed.
- General Product Display - Product Name is displayed.
- Donation Creator - Gift item Name is displayed.
- Contact Mini Profile - ContactName and current tab are displayed.
- All community content items
Publish file name
Specifies the name of the .aspx file to which this content record is published.
Layout
A content layout is a predefined set of content item zones within a content record. Each content item zone can contain one or more content items, and you can drag and drop content items among the zones to rearrange the position in which content appears in a rendered content record.
Publish location
The full URL path to the published file. This URL can be used to link to the content directly.
Generate Full URL
Enables you to paste a full URL for this content record into the body of a content item (for example, http://example.com/iMIS/ContactManagement/ContactLayouts/Personal.aspx).
Generate Freelink
Enables you to paste a wiki-style internal link for this content record into the body of a content item (for example: [[About_Us]]). The Freelink text is the defined Publish file name of this content record. When the web page is rendered in a browser, the Freelink is replaced by a standard URL link:
<a href=http://www.example.org/iMIS/Content/About_Us/About_Us.aspx>About_Us</a>
(optional) You can add replacement text to the Freelink (for example, [[About_Us | Learn about our organization]]), which would be rendered as:
<a href=http://www.example.org/iMIS/Content/About_Us/About_Us.aspx>Learn about our organization</a>
If you have multiple content records with exactly the same Publish file name (which is possible if the content records are in different content folders), you can assign a unique content code to each content record. The system will copy the content code instead of the name. Alternatively, you can manually add a content folder path to identify a specific content record (for example, [[@/Legal_Services/About_Us]]).
Note: If you add a content folder path to a Freelink, the Freelink will not resolve correctly in rendered web pages if the target content record is moved to a different content folder. For this reason, it is generally best practice to ensure that all your content records are uniquely named and thereby avoid the need to add a content folder path to a Freelink.
Add content
Displays a Content gallery browser that lets you select from available ASP.NET content items. Select a content item and click OK to add the content item to the content record. After the content items have been added to the zone, you can drag each content item within the zone to define the order in which you want the content items to appear in the rendered web page.
The Content folder contains the system-defined content items that ship with iMIS and are meant for general-purpose content authoring. For example, the Content Html content item enables you to author a block of HTML text, and the Content Tagged List content item enables you to specify the automatic inclusion of other content records or even entire content folders that have a certain tag associated with them.
The Or, enter a path to a web user control field enables implementers to specify a path to a user control that is not defined within the Content gallery. This will add an instance of the ContentWebUserControl content item, which serves as a placeholder for your control.
Note: To see the Communities content gallery, you must have a license key. For more information, contact your AiSP or ASI Technical Support.
You can click one of the following commands on the content item's title bar:
- Configure – Displays a configuration window that enables you to define the content item's properties. For example, for a Content Html content item an HTML editor is displayed. When configuring a content item, click the
 link for Configuration Help.
 - Copy To – Copies the content item to another content record.
- Move To – Moves the content item to another content record.
- Connect – Displays a connection editor that enables staff or consultants to define content item connections. Connections allow one content item to interact with another content item on the same content record. Not all content items support connections, so when configuring a content item, open the Configuration Help to determine the content item’s connection options.
- Click Connect on the Recurring Donation Creator content item. A Connect window is displayed.
- Click Create a new connection.
- Select the Donation Creator in the Object Consumer drop-down.
- Click Connect.
- Click the red X to close the Connect window.
- Minimize – Collapses the content item's preview box, instead displaying only the content item's title bar.
- Restore – Expands a minimized content item to display its preview box.
- Remove – Removes the content item from the content record.
When creating a new connection, the available connection types are listed, and a drop-down list enables you to select from the other content items on the same content record.
For example, to configure the Donation Creator content item to act upon the Recurring Donation Creator content item, create a connection and set Donation Creator as the Object Consumer. Set Recurring Donation Creator to be the Object Provider:
Once you select Connect on a separate content item, the connections for the previous content item are no longer visible. The only connections that appear are the ones for the selected content item. To review connections for any content item, select Connect.
Each content item can only have one Object Consumer and one Object Provider per connection type. So a content item can only act as an Object Provider for one other content item only, and not as an Object Provider for several other content items.
The connection editor lists all current connection points for the content item and allows you to define new connections. Each content item (consumer and provider) displays the connection once it is defined. For example, if you select Donation Creator and connect it to Recurring Donation Creator, and then look at the connections for Recurring Donation Creator, you will see the connection there as well. Connections can also be disconnected from here.
Currently, connections can be of four types: Object, Atom Object, Uniform Key, or String Key. The type of connection to use depends on the implementation by the content item’s author. Please refer to the specific content item’s Configuration Help for details.
Note: The content types defined in the system determine the behavior of ASP.NET content item controls within iMIS. Each content item's control must have an associated content type, which tells iMIS how to create the corresponding content item within the system, how to edit the content item, how to display the content item, how to publish the content item, and so on. The system-defined content items in the Content gallery all have a corresponding content type. A special ContentWebUserControl content type is used as the default content type for all custom content items that you add to a content record. You can optionally define entirely new content types to enable more sophisticated system handling of a custom content item that has been added to a content record.
Edit zone properties (the link at upper right of each content zone)
Specifies the displayed title and CSS classes associated with this content item zone of the content record.
- Title – Specifies a title for the zone, which is displayed in the rendered output at the top of the zone, preceding the content items in that zone.
- Title CSS Class – Specifies a CSS
classattribute for the<div>element that comprises the rendered zone title. This class must be available in the stylesheets associated with the theme used for the associated website. - Zone CSS Class – Specifies a CSS
classattribute for the<table>element that comprises the rendered zone. This class must be available in the stylesheets associated with the theme used for the associated website.
Properties tab
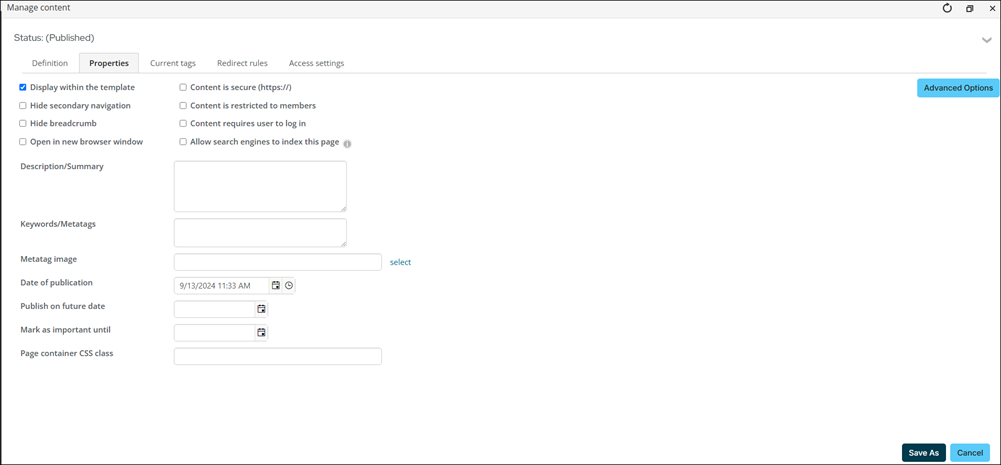
Display within the template
Renders the content record within the content area of the website's master page. When cleared, renders the content record as a standalone web page that contains none of the navigation areas or graphic look-and-feel of the website's master page.
Hide secondary navigation
Enabling Hide secondary navigation will suppress the secondary navigation for the content record. When the content record is loaded, the secondary navigation will not display. This option only affects the secondary navigation.
The Hide secondary navigation setting (located on the Property tab of each content record) is ignored when you are using a Theme Builder template (RiSE > Theme Builder > Website templates) and have the Secondary Navigation content item’s Starting at option set to Level 1.
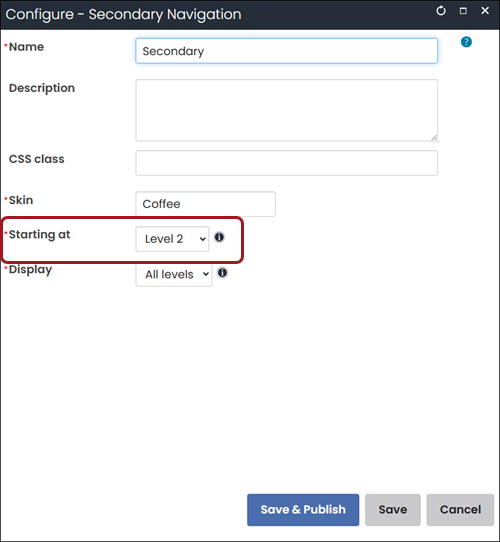
Setting the Starting at option to Level 1 specifies that the secondary navigation is globally applied to the website and is never hidden. The Starting at option should be set to Level 2 if you do not want the Hide secondary navigation option to be ignored.
Hide breadcrumb
Enabling Hide breadcrumb will suppress the breadcrumb for the content record. This option only applies if the website has been configured to display breadcrumbs by going to RiSE > Site Builder > Manage websites.
Open in new browser window
Opens the content record in a new browser window when a navigation item calls the content record. This option does not control links defined in content items on the content record itself and is only meant to open the content record in a new browser tab when access from navigation.
Content is secure (https://)
The rendered version of this content record is displayed through a secured connection to the web server regardless of which navigation item sends the user to this content record, but only if each of the following conditions are also met:
- The websites whose sitemap navigation items point to this content record have valid https:// URLs listed in the Website base URL(s) field in their definition.
- Contact ASI Hosting for assistance to reset IIS whenever you change the Website base URL(s) setting.
- You have installed valid site certificates for each web server that hosts these websites.
Note: localhost is not a valid Secure URL.
Because a content record cannot know in which websites it will ultimately be used, there is no validation possible for this checkbox. If this content record ends up being served by a website that does not meet the above criteria, the content record will be displayed through a non-secured connection (http://).
Content is restricted to members
Makes the rendered version of this content record non-readable unless:
- The person attempting to view the rendered content on the website is logged on to the website with a valid iMIS logon.
- The contact record that corresponds with the iMIS logon is a member type (customer type).
When cleared, the rendered version of this content record is readable by any user regardless of their member type.
Note: The Member status and Contact status do not affect the determination of whether a user is considered a member. Only the Customer type is used to determine whether the user is a member.
Content requires user to log in
Makes the rendered version of this content record non-readable unless the person attempting to view the rendered content on the website is logged on to the website with a valid iMIS logon. When cleared, the rendered version of this content record is readable by anonymous website visitors.
Allow search engines to index this page
This option allows your organization to either approve or deny external search engines, such as Google, Bing, and others, from indexing the specific page. This option is enabled by default on all existing pages and any new pages that are created. When disabled, a noindex meta tag is added to the <HEAD> of the page. Pages secured behind a login will not be indexed by search engines regardless of this option.
Description/Summary
A description of the content record that is oriented to the people who perform web-content authoring, and which is also included in the <META> element's description attribute in the rendered page's source code for this content record. This text is not displayed in the rendered web page itself or in search results summaries, but the words used in the <META> element enable searches performed through the iMIS content management search engine, and also many external web-based search engines such as Google, to locate this content record even if the words are not actually used anywhere in the visible rendered content.
The words used in this field also factor into the relevancy weighting of search results.
Keywords/Metatags
Specifies the keywords that should be included in the <META> element's keywords attribute in the rendered page's source code for this content record. These keywords enable searches performed through the iMIS content management search engine to locate this content record even though these keywords are not actually used anywhere in the visible rendered content.
Note: External web-based search engines such as Google do not typically index the contents of this <META> element.
The words used in this field also factor into the relevancy weighting of search results.
Metatag image
You can select the image that should be included in the <HEAD> element's image attribute in the rendered page's source code for this content record. This allows the image, along with any associated attributes such as a description, to be rendered on social media platforms when shared.
Date of publication
Specifies the publication date for this content record for the purpose of filtering search results or for filtering and sorting the output from Content Tagged List content items. For example, you could override the default (actual) date that this content record was published if you wanted searches based on a different date to find the rendered version of this content record.
Note: If you manually change the publication date, the date will not change for future publishing of the content when you select Publish All. If the publication date is blanked out, the date will reset to the current date when the content is published.
Publish on future date
Specifies a delayed and automated publication date for this content record, enabling you to delay the content by completing the content record now but ensuring that its rendered version does not become available on any websites until later.
Mark as important until
Specifies the date after which the New icon for an entry in the rendered version of a Content Tagged List content item will stop being displayed.
Note: This field affects only content records that contain a Content Tagged List content item, and only if the CM.UseImportantUntilDate configuration option is enabled.
Content Parameters
(displayed only in content records that contain a custom content item)
Specifies the parameters for a custom content item that has been added to this content record. The exact parameters cannot be described here because they are defined in the custom content item and its associated content type. Contact the custom content item creator for information about what should be entered in this field.
Page container CSS class
Allows for specific styles to be applied to specific pages in RiSE, for example, a home page.
Advanced Options
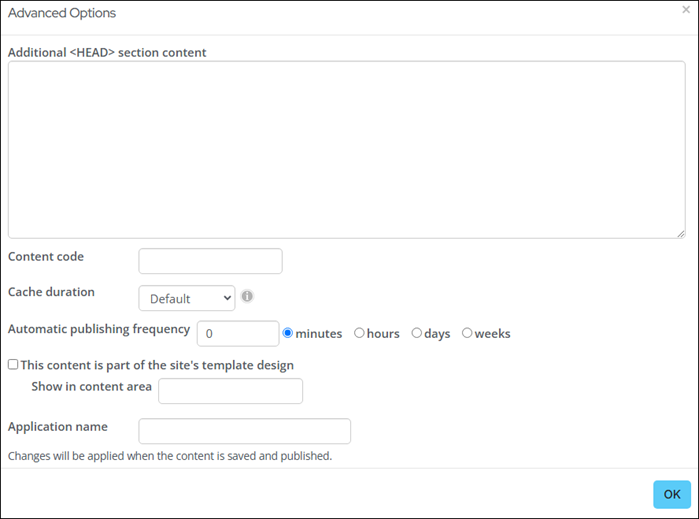
Additional <HEAD> section content
Use the Additional <HEAD> section content to include metadata (for example, custom metatags) for a particular content record. You can also add scripts, links to custom stylesheets, fonts, javascript, and so forth.
Content code
Specifies a unique identifier for this particular content record that can be used to ensure that a navigation item will always point to this content record even if the content record's location in the Document system hierarchy changes at some future date, for example, moving the content record to a different content folder.
Normally if this happens, the Content or URL to Link to field in a navigation item must be manually changed to point to the new relative path of the content record within the Document system hierarchy. However, if you specify this ContentCode value in the Content or URL to Link to field in a navigation item, then even if this content record is moved to another content folder or renamed, the navigation item will still point to this content record.
Cache duration
(Enabled by default) You have the option to cache web pages on the server to improve website performance. This option only caches pages for unauthenticated users. A version of the page is cached for each major browser version that accesses the page (for example Firefox, Chrome, Edge, and so forth).
The Cache duration options include the following:
- Default
- None
- 10 Seconds
- 5 minutes
- One hour
- Default - The Default system duration is set in Page builder configuration or Quick setup.
- None - No duration is set.
- Short - The duration is set for ten seconds.
- Medium - The duration is set for five minutes.
- Long - The duration is set for one hour.
The Default system duration is set in Page builder configuration or Quick setup.
When you enable this option, the first request for the content record generates and stores a cached version of the web page on the server for the specified duration. Within that period of time, if another unauthenticated user visits the page using the same web browser type and version, then the page is loaded from the cache instead of accessing the database again.
Consider the type of content the page displays when you choose the cache duration. For example, if the content record contains a Content Tagged List, and new data is tagged regularly, then you would likely only want to cache the page for a short or medium period of time. However, if the data is more static, like an article, then caching for a long period of time might make more sense.
The Cache duration is ignored if the content record contains any content items that require dynamic data as dynamic data cannot be accessed from the cache. This applies to the following:
- Payment Creator
- Contact Account Creator
- Contact Sign In
- Cart Details Display
- Submit Order Button Link
- Confirmation Display
- Forms
- Any Content Html content items that contain script tags (such as JavaScript).
Automatic publishing frequency
Specifies how frequently to automatically republish this content record. This field can be used to prevent a content record from being automatically expired if a non-zero value has been specified in the Content is considered expired n days after last published field for the content folder that contains the content record. You do this by specifying a value here that is smaller than the value in the Content is considered expired… field.
This content is part of the site's template design
Enables this content record to populate a named content area of a template design. When cleared, the rendered version of this content record can only be viewed if it is pointed to by a navigation item.
The available content areas that you can specify in the associated Show in content area field are the first part of the .aspx file names listed in the content areas folder of the iMIS content management website folders. For example, if you want this content record to be the content displayed for the HomePageContentArea6.aspx page in a website created with the master page template, you would specify HomePageContentArea6 in this field.
Current tags tab
Specifies the tags that are currently associated with this content record. The Tags inherited from parent hierarchy area lists all tags that are being inherited from a content folder higher in the content folder hierarchy. Click Modify to open a Select tags window. You can select the tags for this content record.
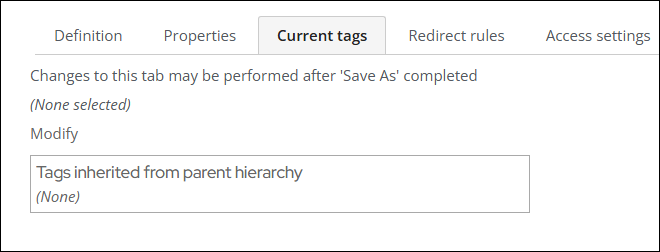
Only the inherited tags and the specific tags that you select here are used by the iMIS content management search engine. If you want search results to also find this content record by descendant tags in the tag hierarchy, you must select the parent tag and also the specific descendant tags.
Although the iMIS content management search engine recognizes tag inheritance and finds descendant content records based on inherited tags, the Items by Tag report does not recognize tag inheritance and does not list the descendant content records and content folders for a tag that they inherit.
To choose useful tags for the dynamic handling of a content record, it helps to understand how tag-related functionality handles tag inheritance:
- The pre-filtered result set of a basic or advanced search includes all published content records that are tagged with any descendant of the tag that is matched by the search keywords.
- The pre-filtered result set of a rendered Content Tagged List content item also includes published content records that are tagged with any descendent of a tag that is specified in the configuration of the Content Tagged List.
- The content of the Items by Tag report does not list published content records that are tagged with any descendant of each tag in the report.
Note: Tags are always overwritten on import. For example, if you import a content record from a staging server to a production server, the assigned tags on the production server are overwritten by whatever tags were assigned on the staging server.
Redirect rules tab
Select a condition to redirect users when they visit this content. The default condition of Never does not allow for a redirect to take place.

Define a Target URL or shortcut for redirect if one of the following options is selected:
- Always
- User is authenticated
- User is not authenticated
The target can contain one of the following:
- Full URL beginning with http://or https://
- Shortcut such as ~/MyShortcut
- Content path supplied by using the select link to navigate to a piece of content
The Define rules option allows you to create a set of rules that determine where a user should be redirected. See Creating redirect rules for more information.
Access settings tab
Specifies the document system permissions granted for this definition object to iMIS security roles, security groups, specific iMIS users, iMIS member types, or to all Full and Casual users based on their assigned authorization levels.
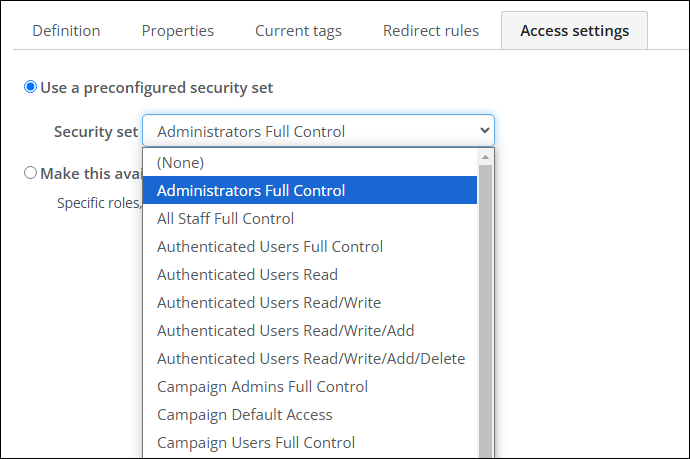
Use a preconfigured security set
If you select a preconfigured security configuration and then switch to the Make this available to option, the permissions granted by the preconfigured security configuration are copied. This enables you to use a preconfigured security configuration as a starting point for defining custom permissions.
Make this available to
Lists the roles, groups, users, member types, or authorization levels that have been enabled to define or view rendered output from this object. This option enables you to specify custom permissions for the definition object if none of the preconfigured security configurations meets your needs. The SysAdmin, Content Administrator, and Everyone roles are default system-defined security roles that are assigned to every definition object used by iMIS content management. The SysAdmin role is assigned in the definition of an iMIS user record, but the Content Administrator role is automatically assigned to every iMIS user who is a member of an iMIS content management content authority group that is designated as a Master Admin content authority group.
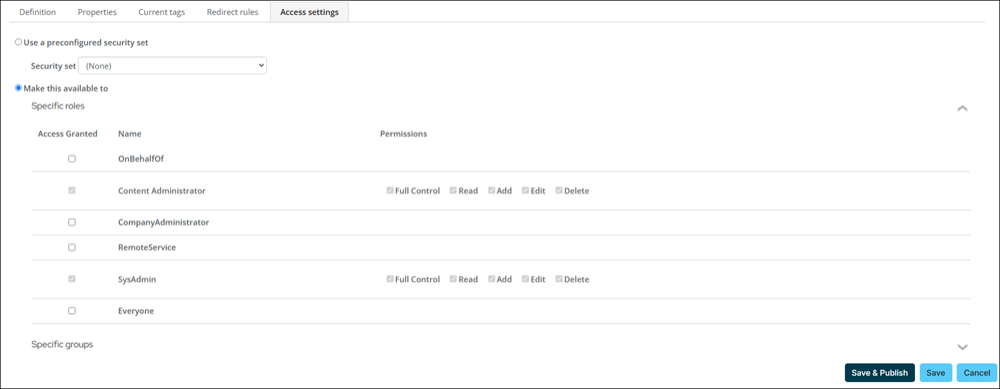
The permissions that can be assigned to each entry in the list are:
- Full Control – Enables all of the following permissions.
- Read – Enables users to see this object both in iMIS content management definition windows and as rendered output in iMIS content management websites, but they cannot change the object's definition.
- Add – Enables users to create new objects, or to paste or import an object into the Document system.
- Edit – Enables users to edit this object's definition, but not to delete the object.
- Delete – Enables users to delete this object.
- Select – (iMIS content management only) Enables users to assign a tag to content folders and content records.
Saving options
The Save options available for a content record are:
- Save - A Working version of the content record is saved. Publish the content record to make it the active version.
- Save As - This option is available on system content records. You can rename and save the content record to a new non-system folder. The Save and Save & Publish options are hidden.
- Save & Publish - This option is available if you have the Content Approver content authority group permission. When you Save & Publish, your changes are immediately visible on any iMIS content management website that uses the content record.
- Save and Submit for Approval - This option is available if you do not have the Content Approver content authority group permission. When you Save and Submit for Approval, your changes are saved and a content publishing request is submitted to the content folder’s Content Approver.
Note: System content records cannot be edited or deleted. If you want to update a system content record, create a copy of the content record and then edit the copy. Be sure to also update any navigation items or shortcuts that point to the system content record; they should now point to your saved and edited copy.
Note: Content records might also contain additional iMIS content management user-defined fields (UDF). UDFs are displayed in the Properties section following the Mark as important until field.
Note: The iCore (Core Content) content folder and all of its descendant content folders and content records are protected for use by iMIS. The default Document system permissions for these content folders and content records permit editing only by members with the SysAdmin role.
Note: You cannot use Export and Import to make copies of objects within the same iMIS database. To make copies, use Organize > Copy and Organize > Paste.
Status
Specifies the state of this definition object. Options include:
- Working
- PublishPending
- Submitted
- Published
- Inactive
- Active
Click the Click to collapse/expand icon to view further details, including who created the record, who modified it last, and dates of these changes.
- Content records in a Working state have been saved within the iMIS database, but the latest changes have not been made active on the associated iMIS content management websites by the associated publishing servers and their corresponding publishing service. The Publish command on the toolbar queues the content record to the associated publishing servers, during which the content record is in a PublishPending state and can be viewed in the Pending Requests detail for the associated publishing servers. After each publishing server has successfully processed the publishing request, the latest changes become visible on the associated websites and become active within iMIS, both of which are denoted by the Published state.
- For all other definition objects, the publishing process is less complex and does not involve content authority group permissions, publishing servers, or the iMIS publishing service. When the object is in a Working state, the latest changes have been saved within the iMIS database, but they have not yet been made active within iMIS. The Publish command makes the latest changes active within iMIS.
- Websites in an Inactive state are offline so that browsers cannot view the website content, and instead see a 503 Service Unavailable error. Selecting the Is this website active? checkbox in the Status section of the website's definition puts the website in an Active state, enabling browsers to view the website content. Clearing the checkbox puts the website in an Inactive state.
If an iMIS user does not have content authority group Content Approver permissions, they will see a Submit command instead of a Publish command. The Submit command queues a publishing request to the Page Builder Task list of all content authority group members who have Content Approver permissions (or, if workflow is enabled for the parent content folder, only those members of the content folder's assigned content authority group who have Content Approver permissions). Only a person with Content Approver permissions in at least one content authority group can publish content records.
Workflow Management
This tab is displayed only when a content authority group is assigned to the parent content folder, which means that content workflow is enabled for this content record.
Owner of this content
Specifies the contact to receive email notification when this content record approaches its expiration date, and should be assigned a content change request in their Page Builder Task list when an Easy Edit user requests a change to this content record. If the person who creates a content record has Content Editor content authority group permissions in at least one content authority group, that person is automatically assigned as the content owner. You can subsequently change this value. The drop-down list includes only those members of the assigned content authority group who have Content Editor permissions.
Content is considered expired n days after last published
The expiration interval can be effectively overridden by specifying a value smaller than the expiration interval for the Automatic Publishing Frequency field. This ensures that the expiration interval is never reached for that content record.
Content set to expire
Specifies an exact expiration date for this content record. You can specify a value for this field only if the value specified for the Content is considered expired n days after last published field is 0. Otherwise, this field is read-only.
Automatically remove expired content?
Overrides the default expiration behavior by automatically deleting the content record when it has passed its expiration date. The content record is moved into the Recycle Bin at the bottom of the content folder hierarchy and its status is changed to Recycled.
