Last updated on: June 08, 2026
The Contact Mini Profile content item displays the basic contact information for a contact record, which can be an individual or a company. This information can include the name, profile image, company, and member status.
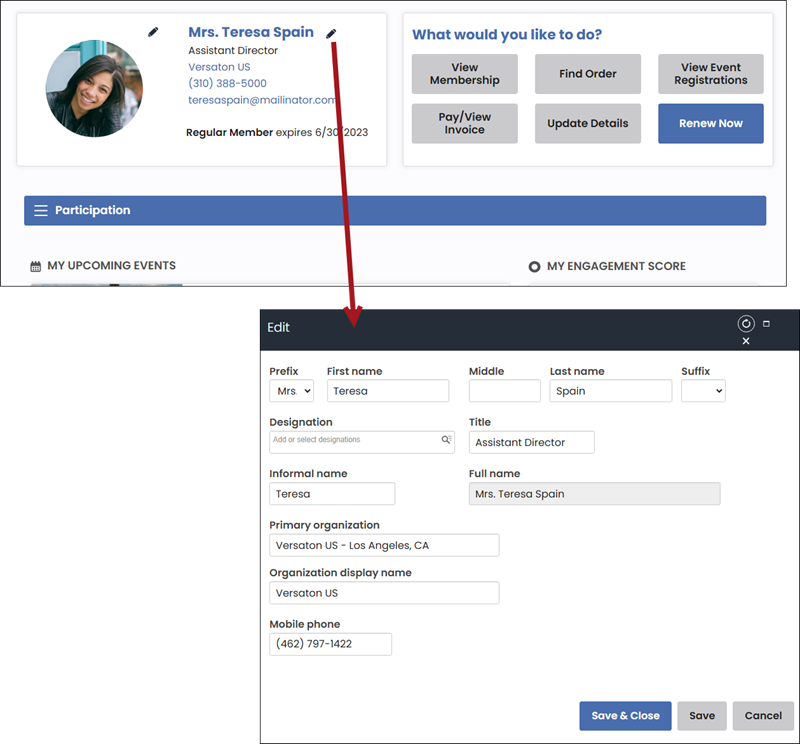
Contact information can easily be edited by both the member or system administrator by using the Contact Mini Profile.
This content item can be seen on the out-of-the-box on several content records, including:
- @/iCore/Contacts/ContactLayouts/Account_Page_Staff
- @/iCore/Contacts/ContactLayouts/AccountPage
- @/iCore/Contacts/ContactLayouts/Profile
Contact Mini Profile configuration options
This content item uses the Common content item configuration options, in addition to the following:
- Title - Enter a Title to display as a heading for the mini profile. You can also enter a variable ([First Name], [FullName], [OrgName]) to uniquely display each contact's first name, full name, or organization name.
- Display style - Choose how the Contact Mini Profile is displayed:
- Standard - Left-aligned name and contact information intended to be displayed in a narrow column.
- Large banner - Full-width banner with profile picture and primary contact information embedded in the banner and additional information displayed horizontally below the banner. On smaller screens, the banner will take the look-and-feel of the Small banner.
- Small banner - Full-width banner with profile picture embedded in the banner, with the contact information centered below the banner. Intended to be used in a narrower column.
Note: For Staff-site pages, the banner can be extended to the top and side edges of the page using the account-page-with-banner CSS class. To use this CSS class, open the content record for edit, click the Properties tab, then enter the CSS in the Page container CSS class field.
- Limit users who can view data for other contacts - (enabled by default) If this option is enabled, only authorized users can view information for contacts other than themselves. This prevents other users from changing the ID in the URL to access another contact's data. Authorized users include staff and Company Administrators for a group that the contact belongs to. Disable this option to allow all users to view information for other contacts, such as for a public profile. If this option is disabled, the system security settings determine whether a user must be logged in to view information for other contacts.
- Display name - Select this option to display the contact record's full name.
- Link name to profile - Enable this option to make the name a live link to the contact's account page.
- Display title - Select this option to display the contact record's title on a new line.
- Display organization - Select this option to display the organization's name associated with this contact record on a new line. For authenticated users, the organization name will appear as a link.
- Display club - Select this option to display the name of the club the contact is a member of. For authenticated users, the club name will appear as a link.
- Display mobile phone - Select this option to display the contact record's mobile phone.
- Mobile phone label - Enter the text you want to display as the label for the mobile phone. If left blank, no label is displayed.
- Allow name editing - Select to enable the user to edit contact name information (such as Prefix, Name, and Designation) by clicking an edit link on the content item's title bar.
- Allow input/selection of primary organization - During name editing (if
enabled), this option adds a Primary organization field in which users can add or change
their organization name. After the user types several characters, a dynamic
filter begins presenting the user with possible matching organization records,
to encourage them to link themselves to an existing organization. If none match,
the entered name is saved as plain text. When a matching organization is selected, the individual contact is added to
the selected organization's roster.
Note: To enable the dynamic filter, the Allow all users to link to an organization option must be enabled (Settings > Contacts > General).
Note: The Primary organization displayed for a contact can be changed without altering the contact's Primary organization ID. Contacts will continue to be a member of their primary organization but display a different organization name on their record. For more information, refer to Changing the displayed Primary organization name for a contact.
- Require primary organization - Select this option to force users to select an existing organization or enter a new organization to be saved with their record.
- Organization list query path - If
needed, select a custom query for listing appropriate organizations, for example, if you have content records specific to different types of users.
Note: If the query is not found (such as when the query name is mistyped), the content item displays an empty list. Delete the query path to reinstate use of the default query.
- Organization list query path for staff - If needed, specify a query for staff to use when selecting existing organizations. This option supports queries with up to two optional search filters. The out-of-the-box example query which includes the organization ID (for both display and searching) is located at $/ContactManagement/DefaultSystem/Queries/Organizations/PrimaryOrganizationSelectWithId.
Note: If a query is not selected, the Organization list query path is used for both staff and public users.
Note: The following options apply only to profiles of individuals, not organizations:
Picture
- Display picture - Select this option to display the contact's picture.
- Image width - Enter a value in pixels for the maximum width of the image. The value must be between 50 and 1000. The height is automatically adjusted to maintain the aspect ratio of the image and to prevent distortion.
- Image size ratio – Select one of the following size ratios to apply to the image:
- Original image ratio – Displays the image in an uncropped format.
- Crop to square – The image displays within a square.
- Crop to circle – The image displays within a circle.
- Link picture to profile – Enable this option to make the picture a live link to the contact's account page.
- Allow picture change and removal - Select this option to allow users to add,
change or remove profile pictures.
- Max. file size - Enter a value for the largest allowable file size of an uploaded picture. The default value is 1024 KB. There is no maximum value, but consider your database size when setting the maximum file size.
- File types - Enter the graphics file types that can be uploaded. The default values are .GIF, .JPG, .PNG, and .BMP (widest use for multiple browsers and multiple platforms on the website). Enter additional allowable file types, separated by commas.
Address
- Address type to use - Select an address type to display an address, phone number, or email, then enable any of the following options:
- Display address
- Display phone number
- Display email address
Status
- Display ID - Enable to display the contact's ID.
- ID label - Enter the text you want to display as the ID label.
- Display billing category - Enable to display the billing
category to which the contact belongs.
- Billing category label - Enter the text you want to display as the billing category label.
- Display join date - Enable to display the contact's join
date.
- Join date label - Enter the text you want to display as the join date label.
- Display type - Enable to display the contact's type (for example,
membership type).
- Type label - Enter the text you want to display as the type label.
- Display status - Enable to display the status of the contact's
membership.
- Status label - Enter the text you want to display as the status label.
- Display paid thru date - Enable to display the date that the contact's
membership has been paid through.
- Paid thru date label - Enter the text you want to display as the paid through date's label.
- Allow status editing - Enable to allow users to edit the contact's status and billing category. These fields can only be edited if you have enabled them to display. This configuration item needs to be enabled in order to update the customer type for an individual or organization when choosing to do so from the Contact Mini Profile content item.
Note: If Allow status editing is enabled, public users (such as company administrators) can edit the status of a selected contact if they have edit access. This means that public users can update their own statuses, and company administrators can update the status of contacts in their company. To prevent public users from editing statuses, disable Allow status editing on public-facing account pages. For more information, see Contact Status.
Notes
- If a content record contains several dynamic content items, it is recommended that you turn dynamic page titles off for the entire page in order to limit the title length.