Last updated on: June 08, 2026
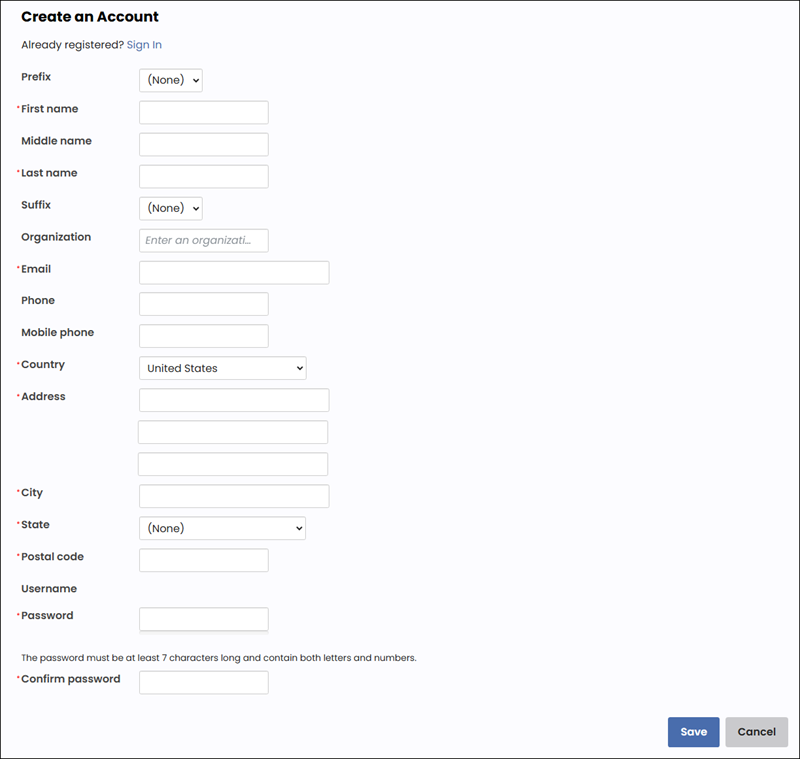
The Contact Account Creator content item enables users to create an account for an individual or organization. You can choose either an individual or organization account type, include a sign-in link, and even choose to redirect the user to a content record. Addresses entered through this content item are automatically uploaded to a service that verifies and standardizes the address. Users can accept the suggested address, or keep the original address as they entered it. See Address Verification Service (AVS) for more information.
The Contact Account Creator is available out-of-the-box on several public Quick Start Sites:
Warning! Do not enable the Hide for authenticated users configuration option when configured for the account type of Organization. The Contact Account Creator will not display to unauthenticated users when configured for organization.
To ensure that a duplicate email is not created, configure the Contact Account Creator to require a username and password. Contacts do not have to use an email as their username.
Note: The Commit sequence field allows you to explicitly define the execution order of multiple content items in a content record. The number in this field indicates the processing order for this content item, relative to the other content items in the same content record. The value must be 0 or greater. You can leave the default value of 0 if the execution order of content items is not a concern. Content items with a value of 0 are processed after any other content items with a non-zero Commit sequence value that are on the same content record.
Contact Account Creator configuration options
This content item uses the Common content item configuration options, in addition to the following:
- Hide for authenticated users - Enable to display this content item only to unauthenticated users. For example, you could hide the content item from authenticated users when making a donation since they would not need to enter their contact information. Unauthenticated users would be required to enter their contact information.
- Commit sequence - Allows you to explicitly define the execution order of multiple content items in a content record. The number in this field indicates the processing order for this content item, relative to the other content items in the same content record. The value must be 0 or greater. You can leave the default value of 0 if the execution order of content items is not a concern. Content items with a value of 0 are processed after any other content items with a non-zero Commit sequence value that are on the same content record.
- Type of account to create - Sets the type of account that authenticated users can create from this content item (note that unauthenticated users can only create individual accounts):
- Individual only - Only individual contacts can be created.
- Organization only - Only organization contacts can be created.
- Individual or organization - Either individual or organization contacts can be created.
- Customer type for individuals (available only if the Individual only or Individual or organization account type is selected) - Choose the default customer type for individual contacts created from this content item. If no specific type is selected, the System default (determined by The default Customer Type to use when creating new customers online in Settings > Organization) is automatically applied.
- Customer type for organizations (available only if the Organization only or Individual or organization account type is selected) - Choose the default customer type for organization contacts created from this content item. If no specific type is selected, the System default (determined by The default Customer Type to use when creating new organizations online in Settings > Organization) is automatically applied.
- Type of organization to create - Sets the type of organization that can be created from this content item:
- Company - (Default)
- Chapter - (Future feature)
- Assign selected user as administrator for new organizations (available only if the Organization only or Individual or organization account type is selected) - Select this option to automatically assign the logged-in user as the administrator for newly created organizations. If a staff user creates the organization, they can choose the administrator.
- Include primary organization for individuals (available only if the Individual only or Individual or organization account type is selected) - This option adds a Primary Organization field in which users can add their organization name. After the user types several characters, a dynamic filter begins presenting the user with possible matching organization records, to encourage users to link themselves to an existing organization. If no existing organizations match, the entered name is saved as plain text. When a matching organization is selected, the individual contact is added to the selected organization's roster.
- Require primary organization for individuals - Select this option to force users to select an existing organization or enter a new one, to be saved with their record.
- Organization list query path - If needed, select a custom query for listing appropriate organizations, for example, if you have content records specific to different types of users.
- Include prefix (available only if the Individual only or Individual or organization account type is selected) - Select this option to display the Prefix field.
- Include middle name (available only if the Individual only or Individual or organization account type is selected) - Deselect this option to hide the Middle name field.
- Include suffix (available only if the Individual only or Individual or organization account type is selected) - Deselect this option to hide the Suffix field.
- Include designation (available only if the Individual only or Individual or organization account type is selected) - Select this option to display the Designation field.
- Include informal name (available only if the Individual only or Individual or organization account type is selected) - Select this option to display the Informal Name field.
- Include title (available only if the Individual only or Individual or organization account type is selected) - Select this option to display the Title field.
- Include phone - Select this option to display the Phone field.
- Include mobile phone - Select this option to display the Mobile Phone field.
- Require mobile phone for individuals - Select this option to require the contact to include a mobile phone number.
- Include email for individuals (available only if the Individual only or Individual or organization account type is selected) - Deselect this option to hide the Email field. For individual contacts, this option is selected by default.
- Require email for individuals - Select this option to require the contact to include an email address. This option is deselected by default.
- Include email for organizations (available only if the Organization only or Individual or organization account type is selected) - Deselect this option to hide the Email field. For individual contacts, this option is selected by default.
- Require email for organizations - Select this option to require the contact to include an email address. This option is deselected by default.
- Include address:
- Require address - (required when creating accounts for commerce) Select this option to display the Address fields. When enabled, a user must enter their address information to create an account.
- Use address verification service (recommended) - When enabled, the address verification service validates the address on submit. If the service detects a problem with how the address was entered, the user is prompted to verify the address or select a suggested correction. It may be desirable to disable this setting for Give Now pages that are designed for quick giving. See Address Verification Service (AVS) for more information.
- Multiple lines for street address (recommended) - Select this option to display three Street address lines. If disabled, only a single line is displayed for the Street address. This setting is recommended, because addresses returned by the address verification service will use multiple lines.
- Create address purpose - Select the address purpose to which the new address will be applied.
Note: This option must be enabled for United Kingdom addresses to properly format.
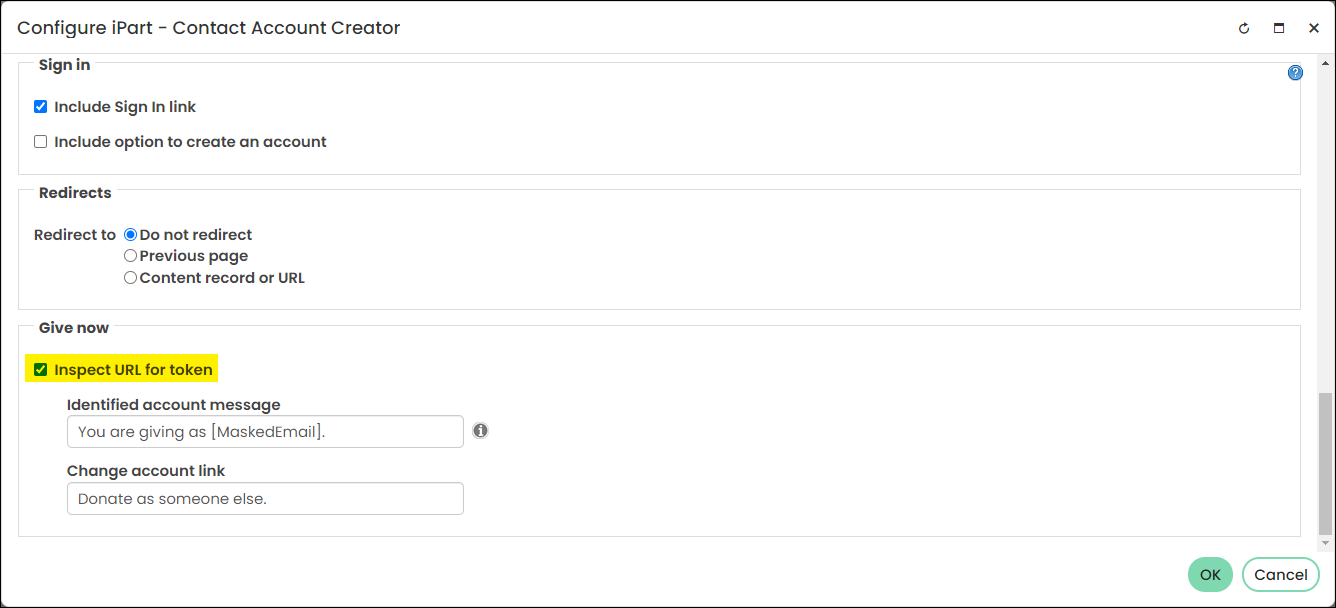
- Include Sign In link - Select this option to display a sign-in link for users who are already registered. This link is displayed only when no user is currently logged in.
- Include option to create an account (available only if the Individual only or Individual or organization account type is selected) - Select this option to allow users to create a logon and password at the same time they create their account. When this option is selected, the following options are available:
- Require username and password - Select this option to require the user to enter a logon and password.
- Enabling this option will make the email field mandatory even if Use email as username and Require email for individuals are not enabled. The email field will be mandatory because if you have a login, you will need an email address to retrieve your username and password.
- Use email as username - Select this option to set the logon as the user's email address. The user is prompted to confirm their email address when creating an account.
- Require username and password - Select this option to require the user to enter a logon and password.
- Redirect to:
- Do not redirect - Select this option to return to a fresh version of the page after a successful account creation.
- Previous page - Select this option to redirect the user to the previous page after an account is created.
- Content record or URL - Select this option to redirect the user to a content record or URL after an account is created.
- Content or URL to Link to - Enter the content record or unique URL link that will be displayed after an account is created. This is the target of the navigation link. You can specify an absolute URL to any website, a relative URL to pages within the website associated with this sitemap, or you can browse for a content record. For relative URLs, use a tilde character to represent the IIS web site root where this sitemap's website is located: ~/ThisWebsiteFolder/Default.aspx
- Include ID as a URL parameter - Include the ID for the newly created account in the URL that is linked to. For example, select this option if you link to a contact profile page and would like to display the newly created contact's profile.
Note: This option is recommended when you use the Contact Account Creator content item within a Content Collection Organizer content item.
Account
Important! It is not recommended to select Is-member types for the Customer type for organizations or Customer type for individuals. Instead, use the Join Now process to ensure proper membership handling, such as generating invoices and updating membership dates.
Note: Use the Organization Type property in the PartyData business object to query and report on the organization types.
Note: If this query is not found (such as when the query name is mistyped), the content item displays an empty list. Delete the query path to reinstate use of the default query.
Note: Any query used with the Contact Account Creator must include ID and Organization as Display Columns. Please see the default query (PrimaryOrganizationSelect at $/ContactManagement/DefaultSystem/Queries/Organizations/PrimaryOrganizationSelect) for an example.
Note: To enable the dynamic filter, the Allow all users to link to an organization option must be selected at Settings > Contacts > General.
Sign in
The following Sign In options are available in the Contact Account Creator:
Redirects
Give now
The Give now section is designed specifically for organizations who want to send emails to donors with a link that allows the donor to donate without logging in to the website. See Permitting donors to give without logging in for more information.
The following options are available to configure this functionality:
- Inspect URL for token - Enables the Give Now page to accept donations without having the donor log in.
- Identified account message – Enter a message to inform the donor who they are giving as. The default message is, “You are giving as DonorEmailAddress@email.com.” The following placeholders are available to use in the message:
- [Email] - Use the [Email] placeholder to display the donor’s email address in the message.
- [MaskedEmail] - Use the [MaskedEmail] placeholder to display a masked version of the donor’s email address in the message.
- Change account link – If the donor does not identify with the displayed email address in the Identified account message, they have the option to switch to their correct account. In the Change account link field, enter the linked text that informs the user they can click the link to change who they are giving as.

Notes
- Postal addresses entered through this content item are automatically uploaded to a service that verifies and standardizes the address. Users can then either accept the suggested address or keep the original, as they entered it. See Address Verification Service (AVS) for more information.
- The selected default country in iMIS (SystemDefaultCountry) is used as the default country in the Contact Account Creator. To change the default country in iMIS, in the iMIS staff site, navigate to Settings > Contacts > General and select an option from the Set the default country drop-down list.
- The address purposes available in this content item are based on the ADDRESS_PURPOSE table defined Customers table setup for General lookup/validation.
- You can select the default Customer Type to use for new contacts created in this content item from Settings > Organization.
- The Contact Account Creator is required when you set up a donation page
that processes payments immediately (instead of through the cart). Processing a
donation immediately requires that multiple content item are defined in a single content
record. It does not matter the order in which the content item are defined on the page.
In the scenario outlined below, where the Donation Creator is the first content item displayed
on the page and the Submit Order Button Link is the last content item displayed, the Commit
sequence value controls the order in which the content items are processed. When
the donation is submitted from the content record, execution control
is given to each content item based on the Commit sequence value shown in parentheses:
- Donation Creator (2)
- Contact Account Creator (1)
- Submit Order Button Link (3)
- Payment Creator (4 or 0)
When adding this content item to a content record, keep the following notes in mind: