Last updated on: January 27, 2026
Security configuration settings can be found in various areas throughout iMIS. Granting access or applying restrictions to certain users depends on what you are wanting to grant or restrict access to. This article goes over the many security options you can configure throughout iMIS.
General
The contact security queries (Settings > Contact > Contact security) allow you to define the contacts that are visible by unauthenticated users (guests), authenticated users (contacts with a login), and members. Review Contact security queries for more information.
Contacts returned in these queries can be found when searching your website, and their profile pages can be viewed by website visitors. These contacts may also be found through the API for each respective user type. When viewed through our API and in search, the following information can be obtained for contacts in these queries: Full name, ID, Profile picture, City, State/province, Country, Email, and Phone number.
Example:
- All users access query returns group A: All website visitors, authenticated, and unauthenticated users can view group A contacts
- Authenticated users access query returns group B: Website visitors who are logged in can view groups A and B contacts
- Members access query returns group C: Members of your organization can view group A, B, and C contacts
User security
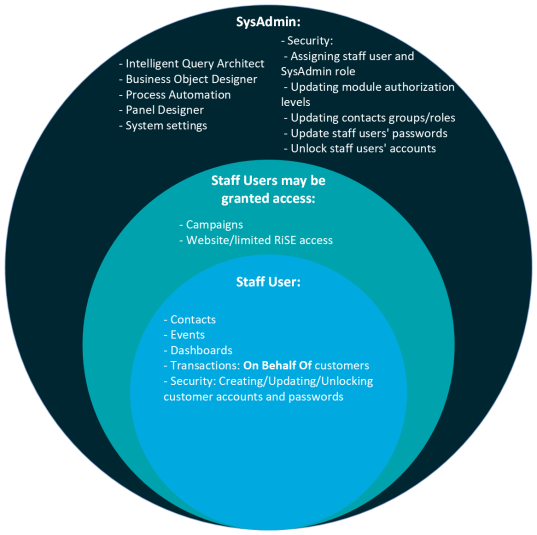
System administrators versus staff users
Staff users have access to the following:
- Contacts
- Events
- Dashboards
- Reports
- Transactions on behalf of other contacts
- Security:
- Unlocking a user’s account (excluding other staff users)
- Updating a user’s password (excluding other staff users)
- Creating a username and password for a user
Note: Perform these security actions from the Security tab on contact account pages or from Community > Security > Users. Staff users must have Customers: 4 module authorization level access for these features.
Additionally, staff users can be granted access to Site Builder, Page Builder, Tagging, and Easy Edit by being added to Content Authority Groups (CAGs). Staff users can also be granted access to Campaigns by being added to the Campaign groups (Marketing > Campaigns > Settings > Security Groups).
System Administrators have access to all the above, and the following:
- Security:
- Assigning someone else the staff user or system administrator role
- All security settings under User information, which include the following:
- Modifying the Disabled checkbox
- Changing the Effective date
- Changing the Expiration date
- Updating a contact's Roles
- Updating a contact's Security groups
- Updating a staff user’s module authorization levels
- Update passwords for other staff users
- Unlock other staff users’ accounts
- Intelligent Query Architect (IQA)
- Business Object Designer (BOD)
- Process automation
- Panel Designer
- System settings
Security best practices for staff user accounts
As a security best practice, staff user accounts should never be shared between staff users. Each staff user should have their own account, so that tracking changes to contact accounts, edits to the website, modifications to published content, and so forth, are all easily identifiable. Contact ASI Technical Support to learn more about how you can increase your available staff user accounts in iMIS.
It is recommended that two-factor authentication and session timeouts are enabled for staff users. See Password security for more information about configuring these settings.
As a built-in security best practice, staff user accounts are automatically logged out of iMIS if an additional log in is detected from another browser; for example, if you continue your iMIS work on another computer, you are logged out of other iMIS session on any other computer. This does not apply to a single browser session with multiple tabs but does apply to separate browsers, such as using Chrome for one session and Firefox in another session.
System Administrators
System administrators have all the permissions of staff, plus they also have access to everything that staff users do not have access to. System administrators are super users with access to everything in the system.
From the Security tab on user account pages or from Community > Security > Users, system administrators can update any contact’s security details, such as the username, password, security groups, module authorization levels, user class, and staff access.
The Company Administrator is a versatile role that allows company administrators to manage organizational specific tasks in a variety of ways. The Company Administrator for an organization can manage organization profile information, manage the roster, update account information for organization members, register members for events, and manage billing for the organization. They can also bill transactions to the organization. Note that this permission can also be granted to any organization they are a part of by changing the settings in Settings > Contacts > General.
A staff user can assign the Company Administrator role to a member, and they can assign the role to contacts that are not part of the organization. Contacts are able to be Company Administrator for more than one organization.
If you navigate to a member’s profile page and click the About tab, you’ll see the Organizations section. For people that are not Company Administrators, they will only see their primary organization, but for people that are Company Administrators for more than one company, they will see those companies listed here. See Managing organizations for more information.
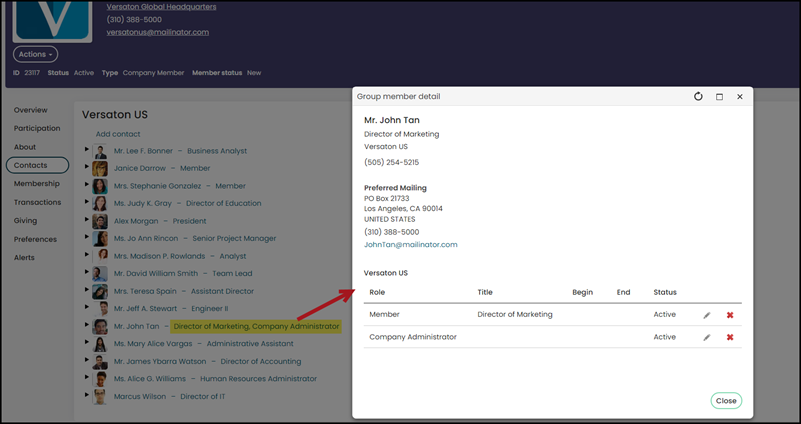
As a security precaution to ensure Company Administrators cannot give themselves edit permissions for contacts they should not have access to, administrators cannot search for and add existing contacts to their organization. When adding a new contact to the organization's account page, the Company Administrator only has the option to create a new contact. When an administrator adds a new contact, no duplicate checking is performed, resulting in potential duplicate contact account records being created. To avoid duplicate records, have the contact add themselves to the organization from their account page.
Review the following information related to resetting passwords.
Public users resetting their own passwords
Although staff users and system administrators have access to reset passwords, it is recommended that staff users direct public users to reset their own passwords.
This can be done in one of the following ways:
- Direct users to the Forgot password link - Direct the public user to the Sign In page and have them click the Forgot password link.
- Send the password reset email - System administrators can send a password reset email directly to a contact from the Security tab of their account page or Community > Security > Users, bypassing the need for the contact to click the forgot password link.
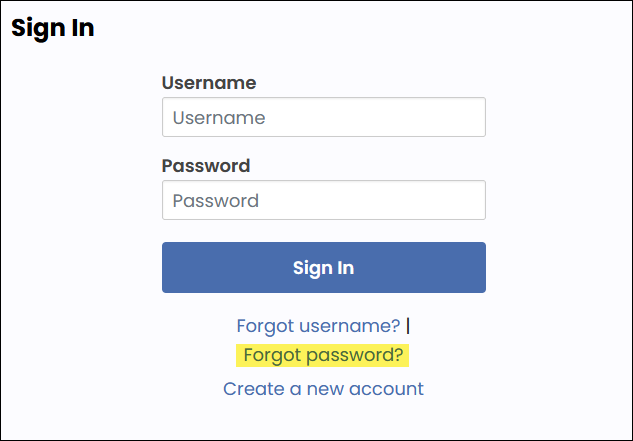
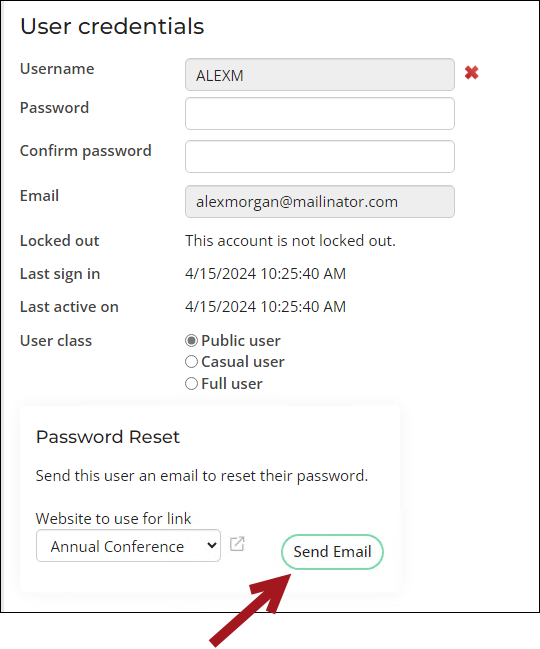
In both cases, users receive the same email with a link to the RecoverPassword shortcut, where they can reset their password securely.
Note: To customize the contents of the password reset email, adjust The body of the email sent to a user when they fill out the "Forgot my password" form (Settings > Contacts > Account management).
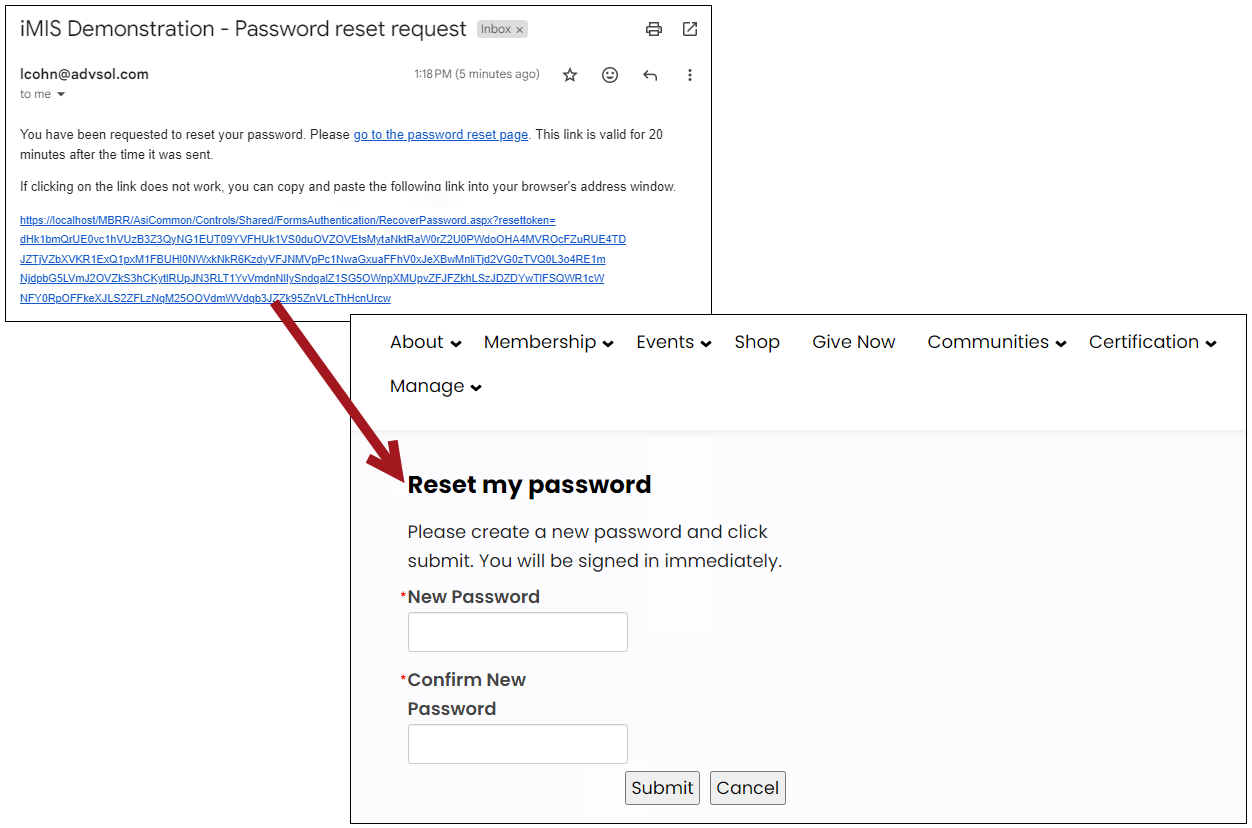
DIRECTING Users to the forgot password link
Do the following to direct users to the Forgot password link:
- Verify that the public user's email is current on their iMIS account page.
- Direct the public user to the Sign In page and have them click on the Forgot my password link.
- User resets their own password following the process outlined in the email sent to them.
Sending the password reset email directly to contacts
Staff users can send a password reset email directly to a contact, allowing them to securely update their password without clicking the "Forgot password" link.
Important! At least one active public site with Everyone Full Control access is required to use this feature. If no such site exists, the Password Reset options are not available. For details on configuring site access, see Using Access Settings.
To send the email, do the following:
- Do one of the following:
- Go to the Security tab of the contact’s account page.
- Go to Community > Security > Users and search for the contact.
- Select the public site for the password reset link from the Password Reset area.
- Click Send Email. The contact receives the standard password reset email containing a link to update their password on the selected site securely.
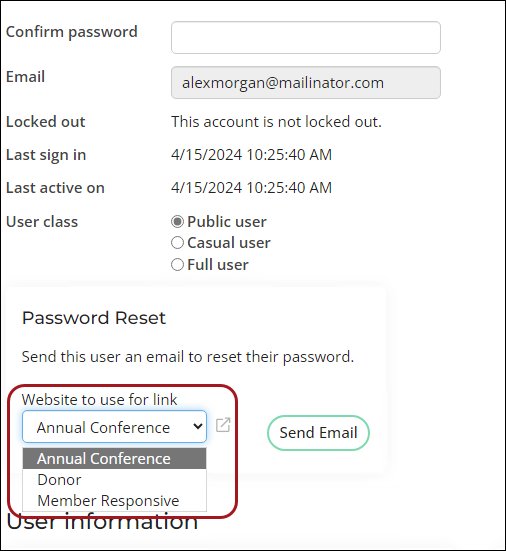
Note: The Website to use for link drop-down only lists active public sites with Everyone Full Control access. To configure site access, see Using Access Settings.
Public users creating their own credentials
If the user has an iMIS account page but does not have existing credentials (e.g., a staff user added them as a contact but did not assign them a username and password) , they can create their own credentials by clicking the Forgot my username link on the Sign In page.
Note: Ensure the Allow "Forgot my username" to automatically create user credentials for existing contacts setting (Settings > Contacts > Account management) is enabled.
iMIS is shipped with an account referred to as the Manager Account. This account's purpose is to initially create system administrator accounts. After you have created accounts for system administrators, you should begin using the system administrator accounts to administer your iMIS system.
Warning! Never remove the System administrator role from the manager or administrator account.
It is not a secure practice to use the Manager Account as a remote service account, and it is not recommended that you continue to use the Manager Account after you have created your system administrator accounts. It is also policy that you never change the username or password of the Manager Account.
Note: The Manager Account credential should not be used for API or integrations such as Single Sign-On.
The Manager Account is scheduled to be deprecated in the coming years.
The Committee Administrator has the ability to add committee members (existing and new contacts), edit member type and term dates, assign the committee administrator role to a committee member, and update committee memberships through the website. See Managing committees for more information.
As a staff user, if your organization has the Group Admin license, you can assign the Chapter Administrator role to non-Staff members of your chapters. Chapter Administrators are able to assign or remove the Chapter Administrator role to other chapter members, pay dues on behalf of chapter members, as well as edit chapter member profile pages.
Chapter members will be able to access their chapters directly from the Member Quick Start Site. On the initial login page, chapter members will see a link to their chapters. Members can also access their chapters from the My Participation tab on their profile page. See Managing chapters for more information.
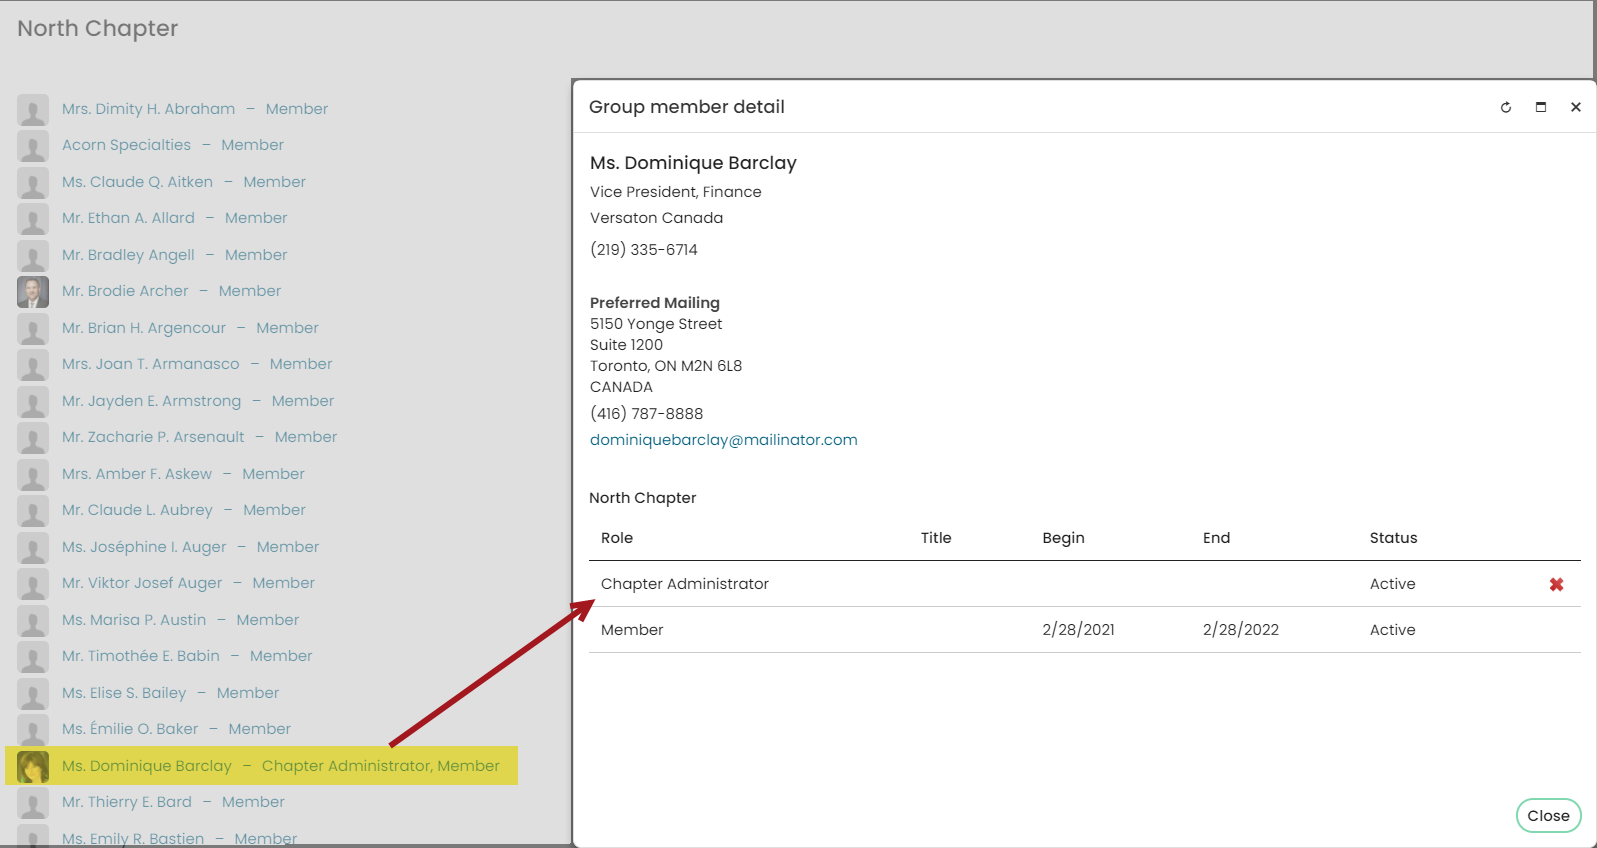
This chart compares the responsibilities between the Company Administrator, Committee Administrator, and Chapter Administrator.
Company Administrators can perform actions on records linked to the company for which they are the administrator. Chapter Administrators can perform actions on records within a given chapter. The Chapter Administrator role requires a Group Admin license.
Note: System administrators have access to everything in iMIS, such as assigning logon credentials and user types (Public, Casual, Full), adding roles and groups, assigning access for staff users, assigning the System Administrator role to other users, and disabling user accounts.
| Company Administrator | Committee Administrator | Chapter Administrator
|
|---|---|---|
| License required? | ||
| No | No | Yes - Group Admin license |
| Can add contacts to the group? | ||
|
Yes
Note: Duplicate checking is not performed, and the administrator cannot search to determine if the contact already has an account. This is to ensure company administrators do not have access to contacts they should not have access to. |
Yes |
Yes, when Allow staff to manage chapter memberships directly from member list is enabled (Settings > Membership). It is only recommended to enable this setting if all chapters are complimentary. If setting is disabled, No. |
| Can edit contacts in the group? | ||
| Yes | No | Yes |
| Can edit the group/organization? | ||
| Yes |
No | No |
| Can add new roles? | ||
| Yes | Yes | Can add the Chapter Administrator role only. |
| Can edit roles? | ||
| Yes – Can edit the Member and Company Administrator roles only. | Yes – Add a Term End date to the existing role, then add a new role for the same member. |
Yes, when Allow staff to manage chapter memberships directly from member list is enabled (Settings > Membership). It is only recommended to enable this setting if all chapters are complimentary. If setting is disabled, No. |
| Can delete roles? | ||
| Yes | No |
Yes, when Allow staff to manage chapter memberships directly from member list is enabled (Settings > Membership). It is only recommended to enable this setting if all chapters are complimentary. If setting is disabled, No. . |
| Can assign the role to other members? | ||
| Yes – To other members in the company roster. | Yes | Yes |
| Can edit relationships on member account pages? | ||
| No | No | No |
| Can select other queries or email? | ||
| No | No | No |
| Can pay invoices and renewals for members? | ||
| Yes – Can also join on behalf of non-member contacts in the company, and the invoice can be billed to the company. | No | Yes – Can pay invoices and membership renewals for members. The invoice cannot be billed to the chapter. |
| Can register members for events and bill registrations to the organization? | ||
|
Yes – Can only register members for events that are in their primary organization. Cannot see members from any other company for which they are also a Company Administrator. |
No | No |
| Can make donations on behalf of contacts? | ||
| No | No | No |
Group security
Products can be set up so that users are added to a group. This group can be used to grant access to particular content, such as downloadable and online products. The content that you grant access to can simply be a secure web page that only the purchaser should have access to, or it could contain a downloadable file. The security setting for only allowing a group to access a specific content record is found on the content record's Access Settings tab.
Granting specific access to a product is defined when creating or editing the individual product. These two security features can be combined so that when purchasers buy the product, they are granted access to the content record. See Granting access to secure website content and the associated video for more information.
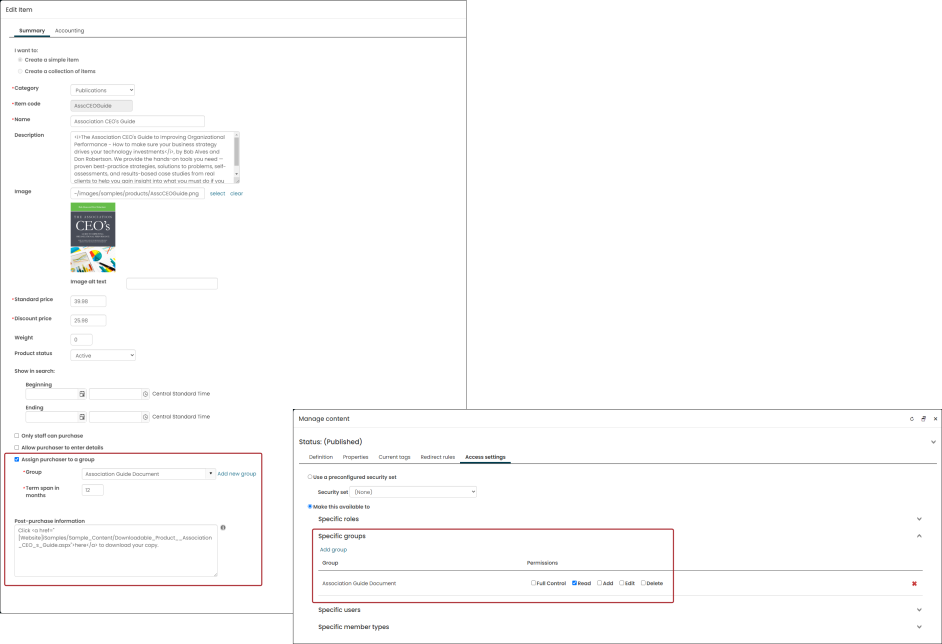
Staff users can create groups based off of an IQA query. After query sources are defined, you can select the Group tab to define the group elements. This feature allows staff users to create a group that automatically refreshes the query to determine the members of the group by the query results. By assigning members to this dynamic group, users can create a group, for example, that includes only active members of a certain member type. These groups can be used to grant access to items in iMIS using Access Settings. For more information, see Creating Groups with IQA.
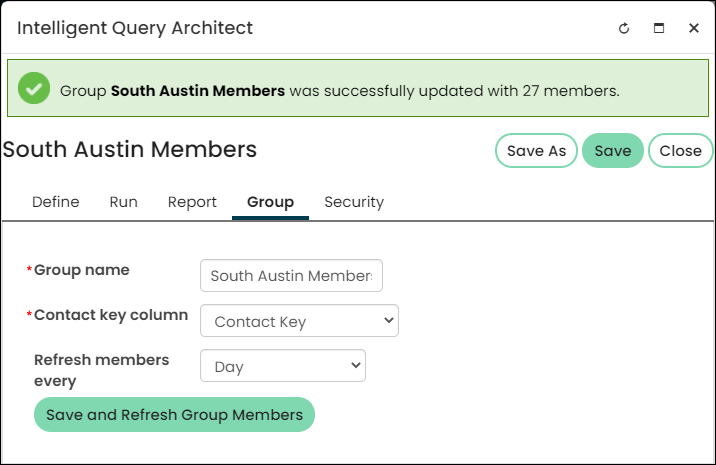
Individual iMIS communities also have their own security settings. For example, you could secure a community to a certain group of people, you can control who has access to create wikis, and you can set administrators for a community. For more information, see Administering communities.

Content security
Content Authority Groups (CAGs) are extremely important. Creating CAGs help you control who has access to edit content within iMIS and to what extent. For example, you can allow someone to edit content but not delete content. They are a great way to let non-administrator users create content for your site.
Content authority groups contain several group roles that allow for different content permissions. Although you can add anyone in your iMIS database, including members, to a content authority group, you will want to be cautious when specifying members of the group. Adding the wrong person or designating the wrong role to someone can grant an user edit permissions that you generally wouldn’t want them to have.
For more information about how dynamic content authority groups are, see Defining content authority groups.
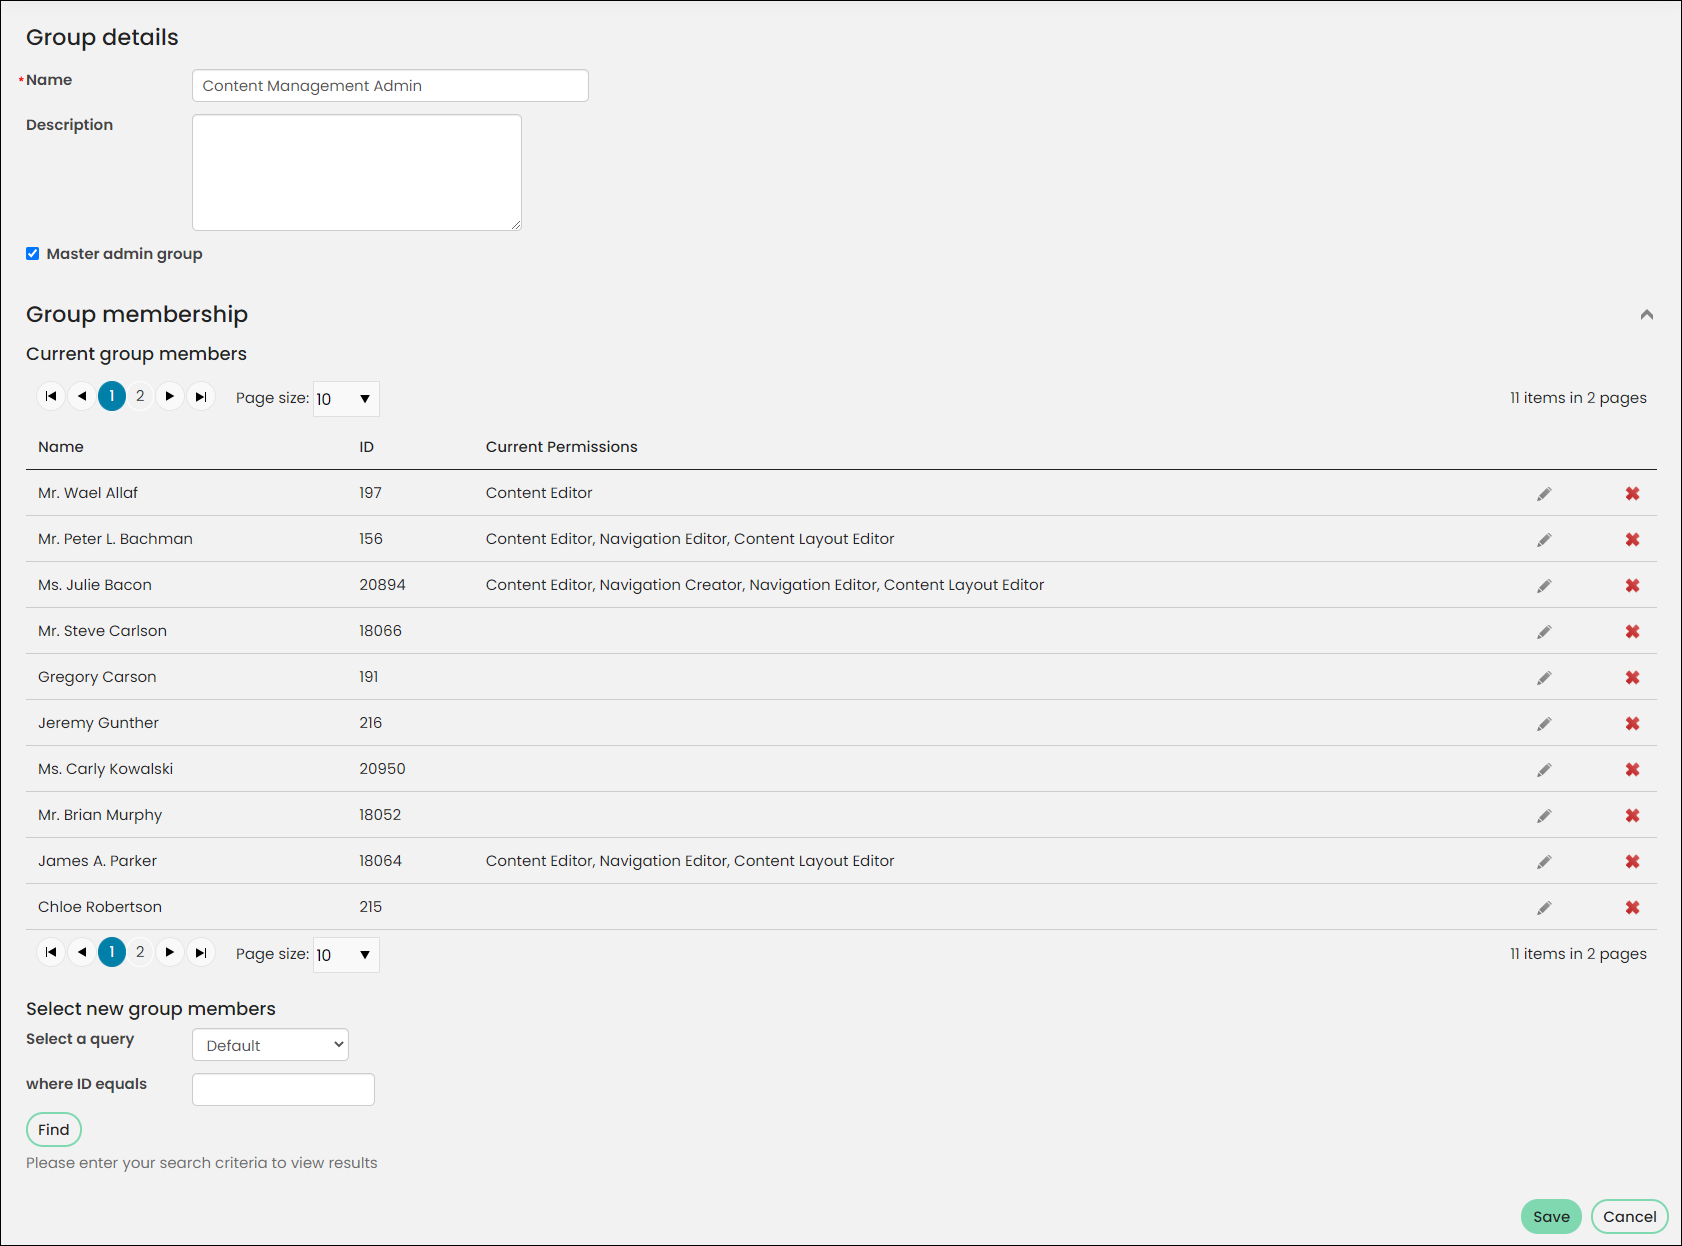
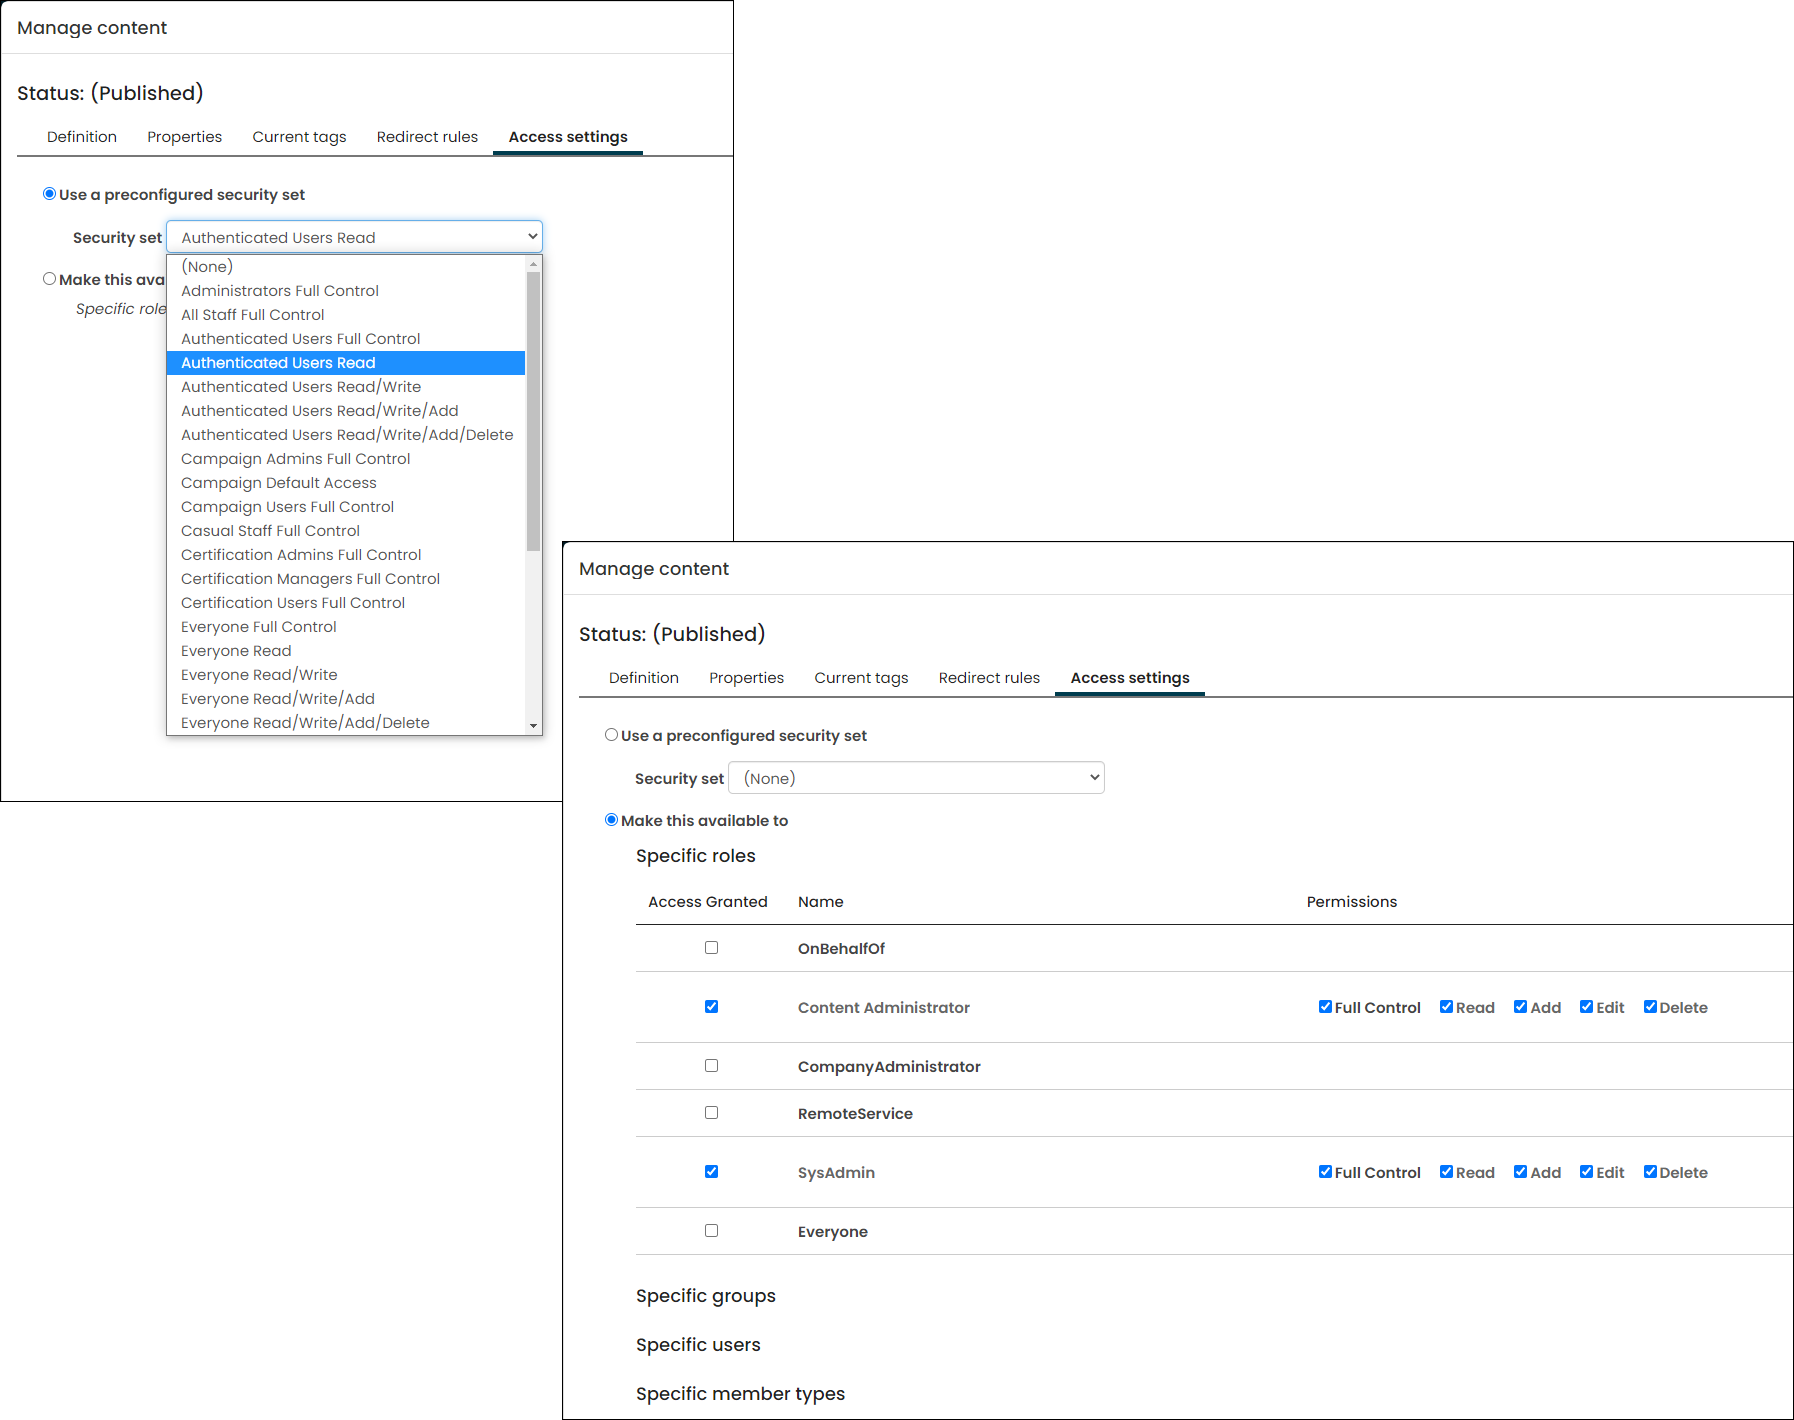
Access Settings give you a consistent way to apply security (grant permissions) to folders and objects throughout iMIS: entire websites, individual navigation items, content records, queries, business objects, and the wide array of objects that you can define, import, and store in the Document system.
Access Settings are immensely flexible: they let you tie an object’s permissions to iMIS security roles, security groups, specific users, member types, or your organization’s staff (licensed iMIS users). See Using Access Settings for more information.
Within Access Settings there are preconfigured security sets. Throughout iMIS, whenever you configure Access Settings, you see a drop-down list of available security settings that you can apply to individual folders and objects. These security sets offer you easier control and faster iMIS performance than defining custom ones. For more information, see Preconfigured security sets.
You also have the ability to grant access to specific groups, roles, and users. For more information, see Custom security groups.
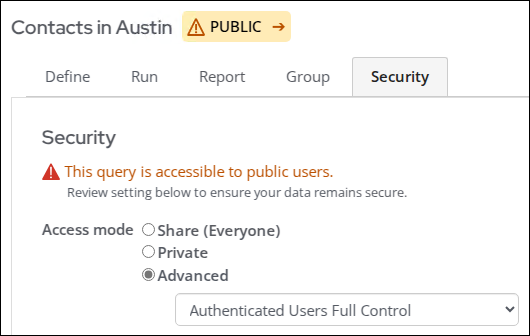
When you create a query, the current access level is displayed next to the query name. This helps you quickly identify which user groups have access to the data within that query:
- Public – Public queries are available to public users, and an alert appears reminding you that the data in this query is accessible to them. To create a public query, choose one of the following:
- Select Share (Everyone) to make the data in the query available to all users, even if they are not signed in to the website.
- Select Advanced and choose a security group that starts with Authenticated users to grant access to website users who are signed in.
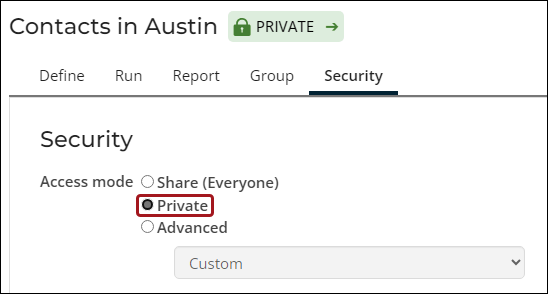
- Private – Private queries are considered safe since they are only accessible to the currently logged in user and system administrators. Select Private to make a query available only to yourself and system administrators.
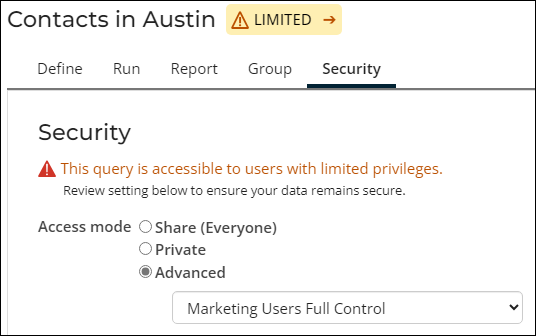
- Limited – Limited queries are accessible to a custom set of groups, roles, or users. An alert also appears letting you know that the data is potentially available to non-staff users. Select Custom under Advanced and then select the relevant Groups, Roles, or Users to restrict a query to specific users or groups.
- Internal – Internal queries are only accessible to staff users and system administrators. All Advanced options, except those that start with Everyone, Authenticated, or Custom are considered Internal.
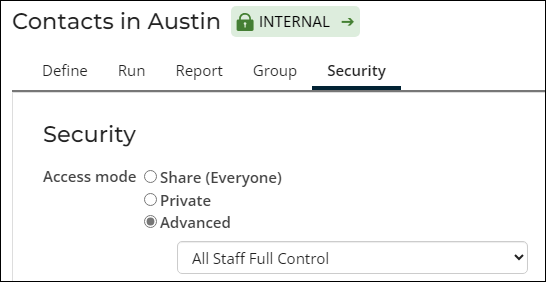
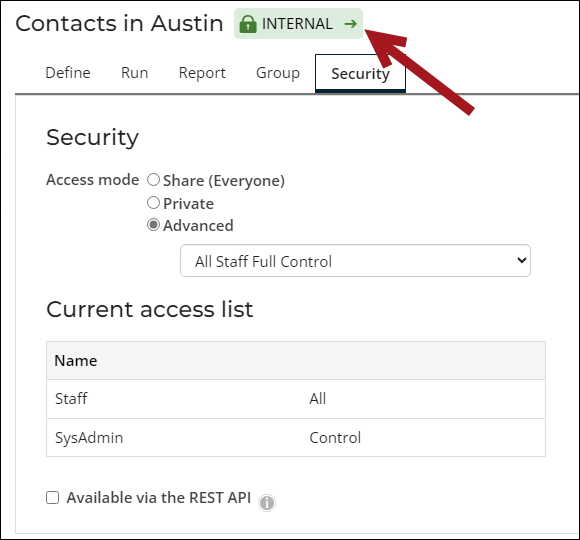
By default, all new queries are restricted to staff users only, marked by an INTERNAL label. This setting can be updated from the Security tab of the query window or by clicking the INTERNAL label from another query tab. It is not recommended to change the setting if the query contains sensitive information, such as names, email addresses, physical addresses, or phones numbers.
Note: The security on an out-of-the-box query cannot be modified.
See Building a new query.
Queries that must be accessible to the API for purposes of third-party integrations must have the Available via the REST API checkbox enabled. This setting will grant API access to individual queries; however, the user trying to access the query via the API must still possess the relevant permissions as specified in the query itself. It is important that Available via the REST API is only enabled for queries that meet at least one of the following criteria:
- The query does not contain any personally identifiable information, or
- The query is properly filtered to only show information the requesting party is asking for, or
- The query is secured so that only staff users have access to it
Important! The Available via the REST API setting is restricted to system administrators. You must have system administrator permissions to enable or disable this option.