Last updated on: January 27, 2026
Security configuration settings can be found in various areas throughout iMIS. Granting access or applying restrictions to certain users depends on what modules you want to grant or restrict access to. Use this guide to get started with the various security features that iMIS has to offer.
Securing the Staff site
To ensure the safety of your iMIS system and members, the first step is securing the Staff site. Review the following steps for setting up Staff site security:
- Enabling multi-factor authentication for staff users
- Assigning staff users as system administrators and staff users
- Enabling security queries
- Granting module authorization
Important! Multi-factor authentication is required for staff users.
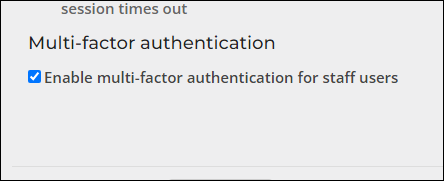
You are required to enable multi-factor authentication (MFA) for staff users to ensure the utmost protection of your staff site. Do the following to enable MFA:
- Go to Settings > Contacts > Authentication.
- Enable the Enable multi-factor authentication for staff users setting.
- Click Save.
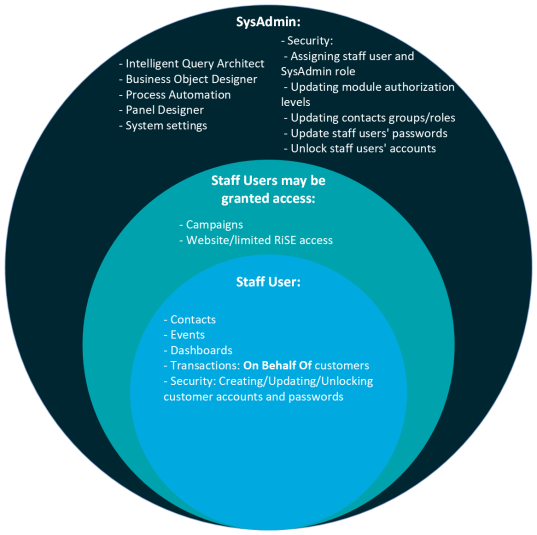
When considering system administrative users, the two main types are System administrators and staff users. In general, System administrators have the highest level of security clearance and configuration capabilities, whereas staff users are restricted to more basic actions. It is very important to determine who should be granted system administrator privileges, and who should be a staff user. Review the diagram below to see the different authorizations granted to the two groups:
Assigning the System administrator role
To assign someone as a system administrator, do the following:
- Navigate to the contact’s account page.
- Click the Security tab.
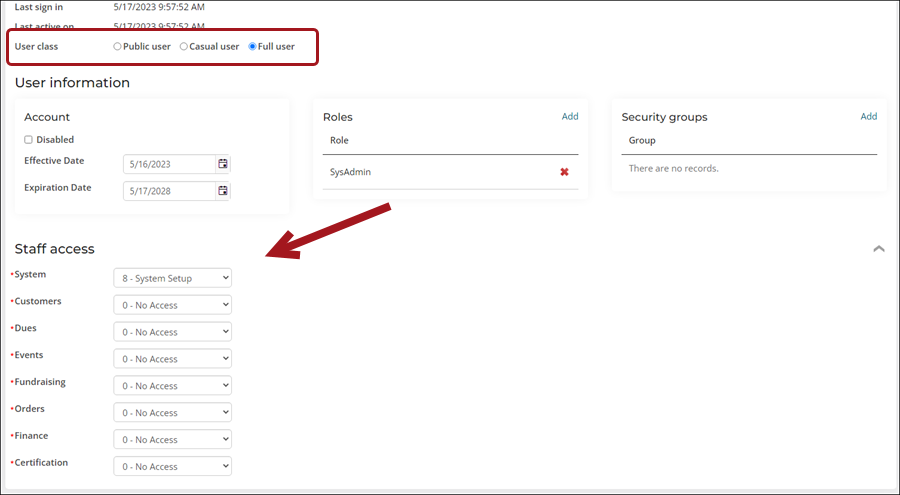
- From the User class field, select Full staff user.
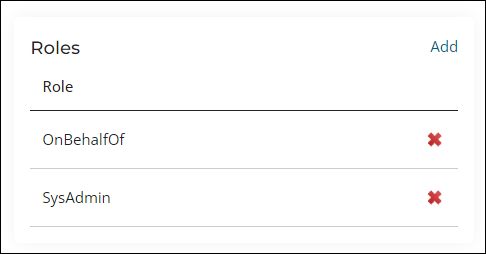
- From the Roles section, select Add.
- Enable SysAdmin, then click OK.
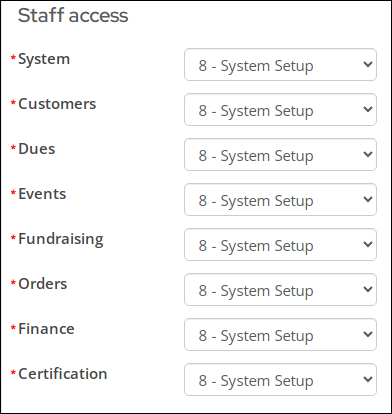
- Expand the Staff access section and update each drop-down to level 8.
- Click Save.
Assigning the staff user role
The Staff access area includes settings for user-specific correspondence and Module authorization levels. This section only appears if the User class is Full staff user or Casual staff user.
Note: By default, this section is collapsed. Simply click on the arrow next to Staff access to expand this section.
To assign someone as a staff user, do the following:
- Navigate to the contact’s account page.
- Click the Security tab.
- From the User class field, select one of the following:
- Full staff user - Assigning someone as a Full staff user grants them access to the Staff site. Although the user has the Full staff user role, they will not have access to all areas of the Staff site. You must update the module authorization levels to determine what specific areas of the Staff site they will have access to.
- Casual staff user – Assigning someone as a Casual staff user grants them access to the Staff site but they are unable to act On Behalf Of another contact or to act as a system administrator. A Casual staff user’s access to all areas of the Staff site is determined by the module authorization levels.
- Expand the Staff access section, and select the appropriate levels for the user. For more information, see Module authorization levels.
Security Roles
Security roles (Community > Security > Roles) grant specific administrative privileges to user records. There are system roles that cannot be deleted:
- SysAdmin - Requires a valid email address. System administrators can expect to receive emails requiring their attention in order to maintain the security and performance of their iMIS systems. System administrators have access to all areas of the staff site. See Overview of security throughout iMIS and Module authorization levels.
- CompanyAdministrator -Do not use this role; instead, assign someone a company administrator through the organization account page. See Assigning the company administrator role for one or more companies.
- OnBehalfOf - Can only be assigned to a Full User. See On Behalf Of.
- RemoteService - Allows users to remotely access the REST API. If external API calls are missing the RemoteService role on the service account, the API calls will fail until it is added. The RemoteService role is not required for client-side iParts, only for B2B (an application requiring its own username and password) access.
- Everyone - Dynamically assigned to authenticated and guest users. This role is hidden and cannot be added to a user's account.
- Content Administrator - Dynamically assigned to members of any Master Admin Content Authority Group. This role is hidden and cannot be added to a user's account.
Assigning a role to a contact
Do the following to assign a role to a contact:
- Go to Community > Security > Users.
- Search for the user, then select their ID.
- From the Roles section, select Add.
- Select the available role, then click OK.
- Save the changes.
Contact security queries allow you to restrict the contacts who can see and access other contacts on your public websites. This allows you to further secure your public sites.

Each of the queries grants a specific level of access:
- All users access query – This query returns group A: All website visitors, authenticated, and unauthenticated users can view group A contacts. If this field is left blank, visitors cannot see the public profiles of any contacts and an error message is displayed.
- Authenticated users access query – This query returns group B: Website visitors who are logged in can view groups A and B contacts. Create or edit a query for this field to determine which public profiles all logged-in users can view. Logged-in users will not be able to access public profiles or information for any contacts not included in this query. If this field is left blank, logged-in non-members will effectively have the same level of access as unauthenticated users.
- Member access query – This query returns group C: Members of your organization can view group A, B, and C contacts. Create or edit a query for this field to determine which public profiles members of your organization can view. If this field is left blank, members will effectively have the same level of access as logged-in non-member users.
To enable these queries, do the following:
- Go to Settings > Contacts > Contact security.
- Enable the Enable public directory checkbox.
- Select the query for each access level.
- Click Save.
Module authorization levels determine what functionality the user sees in the Staff site. The levels are assigned by iMIS area.
Understanding staff access
When the contact is a Full user, the Staff access settings appear that allow you to define module authorization levels for the staff user. A staff user with no authorization levels defined will have access to the following:
- Community: Dashboard, Engagement, Find contacts, Add contacts, Data integrity, Committees, Communities, Volunteers, Groups, Import contacts
Note: They also have full access to contact account pages, where they can update the account page but cannot perform on-behalf-of tasks unless they have the On Behalf Of role.
- Membership: Chapters
- Fundraising: Find gift items, Moves management my major donors
- Events: Find events, Find registrations, Calendar, Issue event confirmations
- Commerce: Find products
- Advertising: Dashboard, Media orders, Settings
- Marketing: Dashboard, Advanced email, Communication templates, Communication logs
Understanding the levels
Authorization levels let you precisely control the iMIS Staff site privileges of individual users. Each option contains access levels of 0 - 8. All authorization level privileges are additive. For example, authorization level 3 automatically gets all of the privileges available at levels 0, 1, and 2.
| Level | Common privilege type |
|---|---|
| 0 | No access |
| 1 | View information |
| 2 | Run reports |
| 3 | Create and edit records |
| 4 | Delete records |
| 5 | Maintain tables |
| 6 | Change reports |
| 8 | Configure features - SysAdmin |
Assigning module authorization
To access the Module authorization levels, do the following:
- Navigate to the contact's account page and click the Security tab.
- Click on the arrow to expand the Staff access area.
- Choose the Module authorization levels and Save.
Note: Module authorization levels can also be accessed from Community > Security > Users.
Securing members
iMIS includes many out-of-the-box features for securing and maintaining your members account pages. Review the following sections for securing member accounts:
- Configuring password settings and best practices
- Allowing members to request data erasure
- Payment security
- Content Authority Groups (CAGs)
Out-of-the-box, staff users have the ability to configure password settings and reset passwords. Review the following for recommended password practices.
- A strong password includes:
- A minimum of seven characters
- At least one numeric character
- At least one alphabetic character
- Each new password should be different from previous passwords.
- Do not share your password with anyone.
- Never send your password through email or instant message.
- Change passwords immediately if you suspect your account may be compromised.
- Consider using a password manager.
To configure password settings, go to Settings > Contacts Authentication. To learn more about staff resetting passwords, see Password security.
Members have the ability to request that their data be erased from iMIS. System administrators can then approve or reject this request.
Example: Personal data is categorized as any information that can be used to identify an individual, for example, names, addresses, email addresses, phone numbers and license numbers are considered personal data. This information can be used on its own or in conjunction with other information to identify the individual.
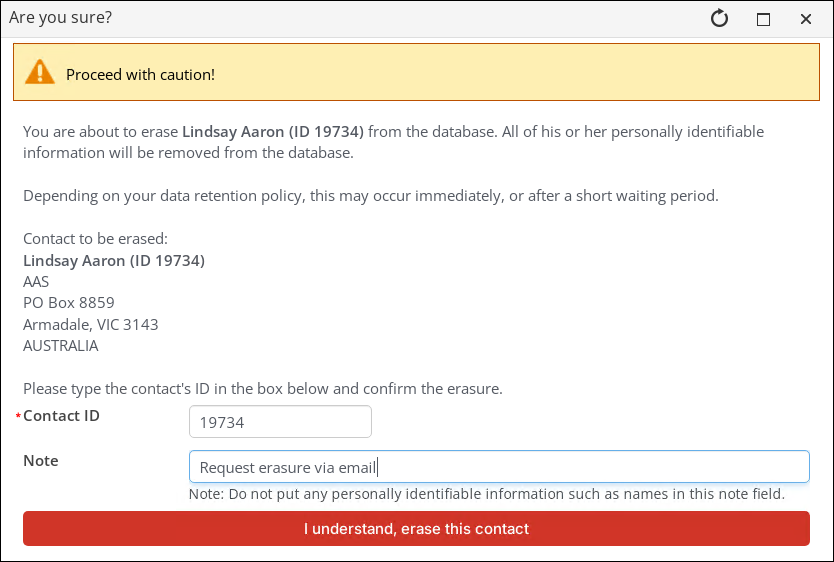
Note: Only System administrators may fully erase a contact and their data from iMIS.
For more information, including who can and cannot erase data, see Erasing a contact's personal data.
Keeping member payment information safe is integral to providing a secure member experience. All payments made through iMIS are secure, but the following features grant some added peace of mind for your members and donors.
AutoPay
Automatic renewal of membership fees and recurring donations using the member or donor’s preferred payment method allows for quick and easy payments. This option can be made available to members and donors in the Join Now and Give Now pages of your website.
You can also configure your website to invite the member and donor to opt in or opt out of automated renewals. You can even configure your website to have AutoPay enabled for all new members and donors by default.
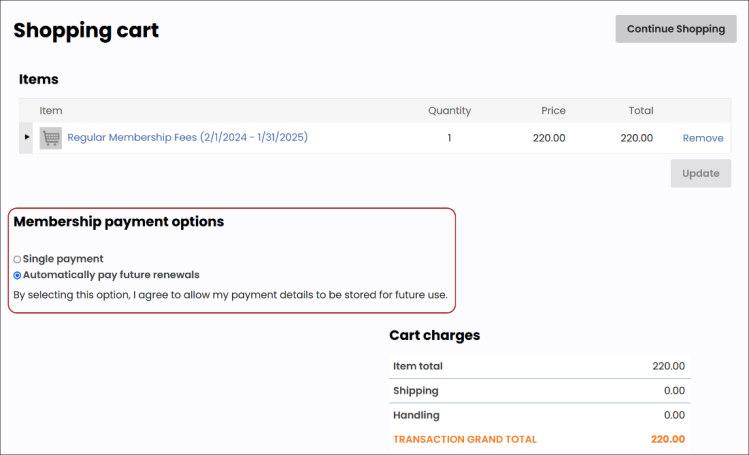
See AutoPay: Getting Started Guide for full details.
(UK only) 3D Secure
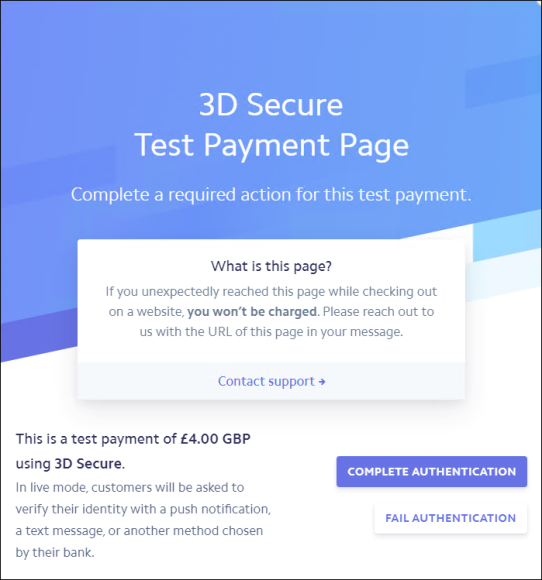
As an added security measure, the Stripe gateway for UK credit cards includes 3D Secure (3DS), which requires customers to complete an additional verification step with their bank or card issuer when completing payments. A pop-up challenge window displays, asking the customer to either complete or fail the authentication.
Note: 3DS Authentication is only required in the UK and Euro regions.
Creating content authority groups help control who has access to edit specific areas of content within iMIS. Content authority groups contain several group roles that allow for different content permissions. To learn more about what each specific group role can do, see Understanding the edit permissions.
Although you can add anyone in your iMIS database, including members, to a content authority group, you will want to be cautious when specifying members of the group. Adding the wrong person or designating the wrong role to someone can grant an user edit permissions that you generally wouldn’t want them to have.
There are two types of content authority groups that you can create:
- Content Management Admin (master admin group) - Members of this group can have access to all navigation within iMIS, but their group role determines if they can edit the content. Adding members to this group should be rare. Although members within this group have access and can view content in all sites, including the Staff site, they do not have as much authority as system administrators.
- Other content authority group - The second group you create is where you should do the majority member adding and permission setting. This is where you will ensure that certain members are never limited in any way by the Access Control settings of RiSE definition objects.
Securing public websites
To ensure the safety of your members, donors, and their information, iMIS contains out-of-the-box features for protecting your RiSE websites:
- Website cookies
- Granting a staff user access to RiSE without making them a system administrator
- GDPR
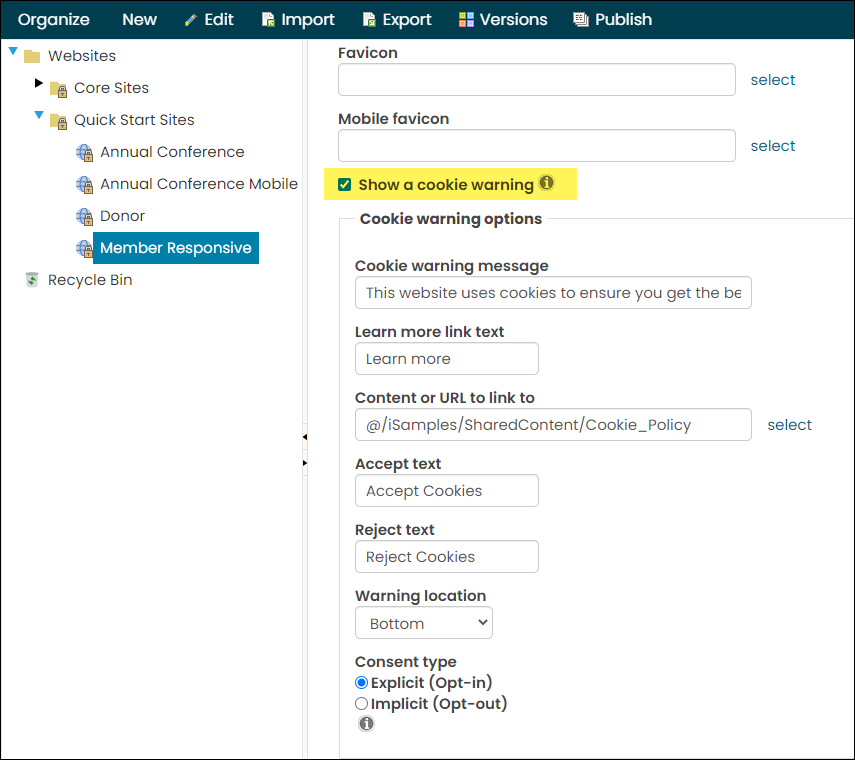
Website cookies are small text files stored on your computer by websites you visit. They contain data such as login information, preferences, and browsing history, which help websites remember you and provide a more personalized experience. iMIS can be configured to display a cookie warning message to users that allows them to accept or reject nonessential cookies. This allows your users to customize their security preferences when visiting your sites.
To ensure the utmost protection, only System administrators are allowed access to the RiSE module. However, trusted staff users may be granted partial access to RiSE in order to edit specific content areas within iMIS.
To grant a staff user access to RiSE without making them a system administrator, the following must be true:
- Their User class is set to Full staff user or Casual staff user. See Assigning security credentials and staff access.
- They belong to at least one Content Authority Group (CAG).
Adding a staff user to a CAG
To add a user to a CAG, do the following:
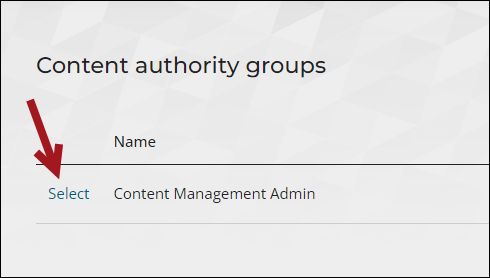
- Go to RiSE > Maintenance > Content authority groups.
- Select the Content Management Admin group, or create a new group.
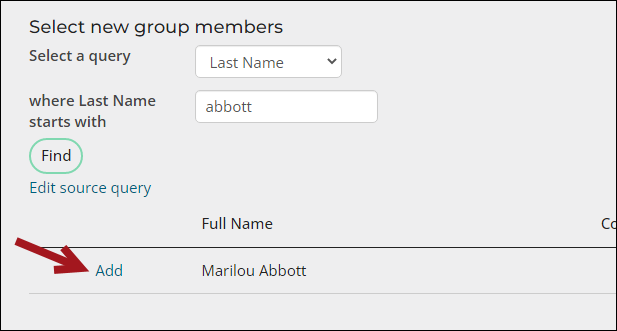
- Scroll down to the Select new group members section.
- Choose a query, then search for the staff user using the provided search filters.
- Select Add next to the staff person's name.
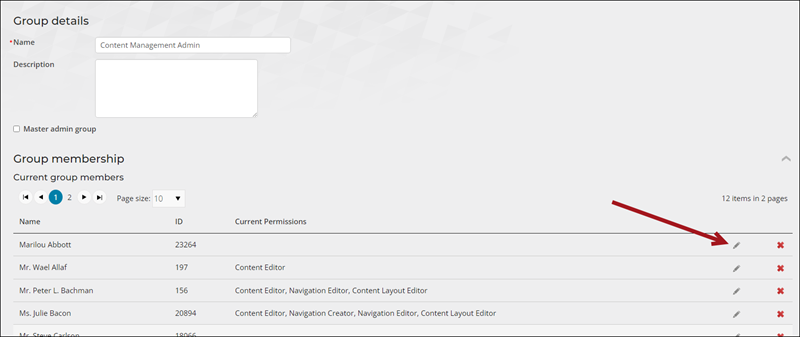
- Click the edit icon for the newly added staff user.
- Select the desired permissions to make available to the staff user. See Understanding the edit permissions for more information about the permissions.
- Click Update, then click Save.
- If the staff user is currently logged in, have them log out, wait a few minutes, then log back into iMIS. Once they log back in, they should see the RiSE navigation item with access to the areas you permitted to them.
As of May 2018, organizations who process personal and sensitive data related to European Union (EU) citizens must be compliant with the General Data Protection Regulation (GDPR), no matter where the organization is located. The goal of the GDPR is to expand privacy rights granted to EU individuals, and how your organization achieves this goal is primarily reliant upon the steps you take.
Much of GDPR compliance relies upon policy-driven and procedural responses to its articles and directives. While ASI has invested a significant amount of time investigating and preparing for the GDPR, it is ultimately up to the individual organizations to make their own determinations of what it means to meet the policy-driven and procedural responses to the GDPR's articles.
See GDPR guidelines for more information.
Note: The GDPR guidelines article is for informational purposes only. ASI encourages you to work with legally qualified professionals to discuss GDPR.
Best Practices
Review the following best practices to guarantee the utmost safety for your system, users, and members.
Review the following tips pertaining to account usage to ensure no security issues arise when logged in:
- Each staff user should have their own account, so that tracking changes to contact accounts, edits to the website, modifications to published content, and so forth, are all easily identifiable.
- Only use the MANAGER account for initial account creation to avoid change log and change history discrepancies. Do not use the MANAGER account for general iMIS usage, since it is unknown who is actually logged in while using this account. See Manager account for more information.
- Ensure staff users only have access according to their iMIS responsibilities.
- Ensure only those who need to be are system administrators. These are super users, so make sure only the necessary staff are system administrators.
- Similarly, ensure only those who need to be are company administrators.
Example: One staff user only works in the Events module to create new events and manage registrations. This user does not need access to the RiSE or Settings modules.
Review the following information relating to IQA security:
- Only change the security Access mode query to Authenticated Users Full Control when the returned data should be available to public users. See Defining queries and IQA Queries: Best Practices for more information.
- Only enable Available via the REST API when the query should be accessible to API requests. See Granting queries access to the REST API for details.
Review the following tips:
- Enabling MFA is required for staff users.
- ASI recommends using a standard for users creating passwords. To allow for this, make sure to define and configure the password requirements.
- Never share your password with anyone to insure protection.
- It is recommended to enforce Password expiration and Prevent password reuse to mitigate possible password breaches.
- Although staff users and system administrators can reset passwords, it is recommended to direct public users to reset their own passwords. This practice avoids potential security risks associated with staff manually updating and communicating new passwords.
The iMIS software development kit (SDK) provides a secure set of web services for accessing the iMIS platform, across the organization, across different physical locations, and even across organizational boundaries. To read more about the REST API security, review the following: