Last updated on: June 18, 2026
From the Pay Central settings, you can do the following:
- Review the Pay Central Service messages
- Review and configure gateways
- Review and configure payment methods
- Review and configure payment method sets
- Review and configure the AutoPay settings
- Configure SDK settings
To locate the Pay Central settings, go to Settings > Finance > Pay Central.
In This Article
- Pay Central Service
Gateways
Payment methods
Payment method sets
Automatic payments
SDK (license only)
Pay Central Service
The Pay Central service is the hub for Global Payments and AutoPay payments in iMIS. If you are not using Global Payments or AutoPay, the red errors referencing Pay Central do not apply to you.
If you are using Global Payments or AutoPay, these status messages need to be green. If the statuses are not green, review the table below to figure out what you must do next.
Tip: If you have issues with Pay Central not properly connecting, verify that the Certificate expiration date is current and not expired. To review this date, go to Settings > About iMIS, then select the Show more link. If the date has expired, contact ASI Technical Support.
| Warning Message | Meaning |
|---|---|
|
Pay Central service address is not set.
|
One or more of the following is true:
|
| Pay Central UI service address is not set. | |
| Could not connect to the Pay Central authorization service. | |
| Could not connect to the Pay Central service. | |
| Could not create a new Pay Central service account. | Your Pay Central Account may not be saved yet, or the Pay Central Service server may be down. Contact ASI Hosting Support. |
| Pay Central service account not saved. | |
| Could not authenticate. | |
| No gateways have been activated. | (*Required) Activate your gateway. Click the Gateways tab, and add the gateway to iMIS. See the Gateways documentation for specific setup instructions based on the gateway you are using. |
| Recurring donations are turned off. | (AutoPay users only) To turn on recurring donations, click the Automatic payments tab. Enable Allow users to create recurring donations. |
| Auto-renewing memberships are turned off. | (AutoPay users only) To turn on auto-renewing memberships, click the Automatic payments tab. Enable Allow users to create auto-renewing memberships and subscriptions. |
| Task 'Retrieve processed payments from Pay Central' task is inactive and is not scheduled. | (AutoPay users only) Enable this task if you want to automatically retrieve processed payments. See Processing recurring transactions. |
Gateways
The Gateways tab specifies authorization options for credit cards and debit cards. Go to Settings > Finance > Pay Central > Gateways. From this window, you can review the defined gateway accounts. To create a new gateway account, select Add new gateway account.
From the Gateway type drop-down, select a gateway account and enter the appropriate information. See Gateways documentation for more information.
Note: For Global Payments, CSC and postal code are required for public users and optional for staff users. For Stripe, CSC is required for all users, including staff. There is no setting in iMIS to amend these requirements.
You cannot delete an in-use payment gateway. If you attempt to delete a payment gateway that is currently in use by a payment method, you will see the following error:

Payment methods
You must set up payment methods so that users can purchase items from your website.
Defining a new payment method
Note: Before defining new payment method, complete the setup of your card authorization accounts on the Gateways tab.
Do the following to define a new payment method:
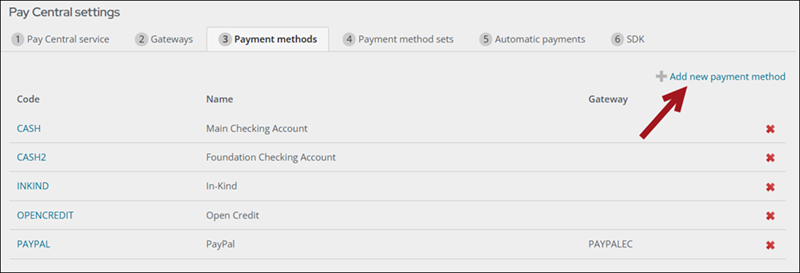
- Go to Settings > Finance > Pay Central > Payment methods tab.
- Select a payment method to edit or select Add new payment method.
-
Depending on the type of payment method you are creating, do one of the following:
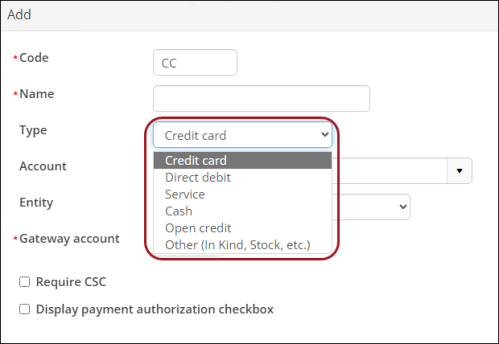
- Credit or debit cards: Enter any preferred Code.
- Direct debit: The Code field must begin with the two-digit country code and can be followed by any preferred additional characters; for example, US_DD for a new ACH/direct debit payment method in the United States.
Note: To find your two-digit country code, visit the ISO website.
Tip: Unless specific General Ledger (GL) Accounts are needed for each credit card provider, it's not necessary to create separate payment methods (like Visa, Mastercard, etc.). Instead, you can create just one credit card payment method to cover all credit card transactions.
- In the Name field, enter the full name to assign to the account.
- Select a Type:
- Credit card - Specifies that the account is a credit card account.
- Direct debit - Specifies that the account is a direct debit account (payment is taken directly from the bank account) that is used with automatic and recurring payments. Used for ACH payment methods.
- Service - Specifies that the account is a third-party payment service, such as PayPal Express.
- Cash - Specifies that the account is a checking or other deposit account (other than a credit card account).
- Open Credit - The balance remaining on an adjusted already-paid invoice. The Open Credit can be applied to a different invoice or a new transaction for the same contact.
- Other - Specifies that the account is a non-cash asset account. Only staff users are able to checkout with this type of payment method.
Note: US debit cards and credit cards are handled the same in iMIS.
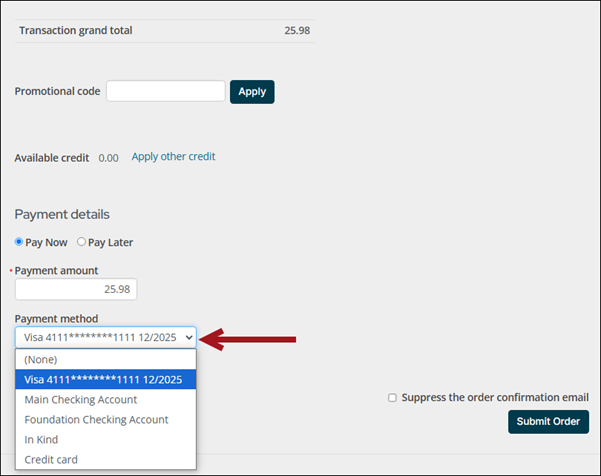
- (optional) From the Account drop-down, select the cash account for the payment method.
- (optional) Select the Entity. For more information, refer to Financial entities.
- (Credit card, direct debit, and Service only) Select the associated Gateway account.
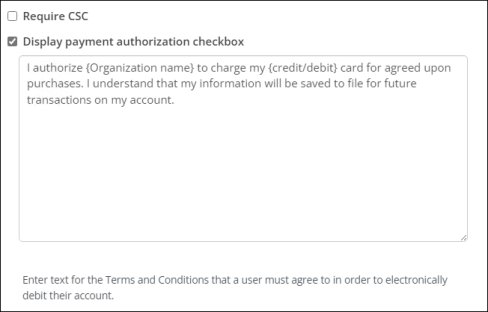
- (Direct debit, credit or debit card, or bank draft only) Enable the Display payment authorization checkbox to display an authorization checkbox in the cart for this payment method. When this setting is enabled for the payment method, the user must enable the authorization checkbox in their cart before they can submit the payment. The provided HTML text box must have the authorization details that the customer is agreeing to, such as:
- Click Save.
- If you are creating a Global Payments or Stripe payment method, the SDK Options field appears upon saving the payment method. The provided JSON can be used by developers and AiSPs to create payment requests that can be sent to the iMIS API. For more information, see Pay Central SDK.

I authorize {Organization name} to charge my {credit/debit} card for agreed upon purchases. I understand that my information will be saved to file for future transactions on my account
Note: This setting is required for Australian and New Zealand users.
Modifying a credit card, debit card, or ACH/direct debit payment method
Card authorization accounts are limited in how they can be modified. You might need to create new card authorization accounts:
- Go to Settings > Finance > Pay Central > Payment methods.
- Select a Code to edit from the payment methods list.
- Modify the credit card, debit card, or ACH/direct debit payment method.
- Click Save.
Note: When editing card authorization accounts, you cannot modify the Code value.
Note: You cannot delete a card authorization account that has been assigned a payment method.
Payment method sets
Go to Settings > Finance > Pay Central > Payment method sets to define collections of allowable payment methods for a particular commerce transaction process. For example, you might want to present only a few choices of payment methods to online users, but allow the full array of options for a Staff user.
You can create a new payment method set, or edit an existing payment method set.
Do the following to add a new payment method set, or edit an existing payment method set:
- Go to Settings > Finance > Pay Central > Payment method sets.
- Select the payment method set to edit, or Add a new payment method set.
- Enter the following information for the payment method set:
- Enter a Method set name and a Description for this payment method set.
- Select the Specific context, which is the same as the name of the copied and published site.
- Click Save.
After you define all payment methods, you can add them into a payment method set.
Note: You must create a payment method that is tied to a gateway account before you can add the payment method to a payment method set.
Do the following to add or edit a payment method in a payment method set:
- Go to Settings > Finance > Pay Central > Payment method sets to define collections of allowable payment methods for a particular commerce transaction process. For example, you might want to present only a few choices of payment methods to online users, but allow the full array of options for a Staff user.
- Select the payment method set to which you want to add a new payment method.
- Click Add new to add a new payment method. Enter the following information for the payment method:
- Enter a Display Name for the payment method.
- Select a Payment Method from the drop-down.
- (optional) You can specify the payment method as Default. If you specify a payment method as Default, then any existing payment method previously marked as Default is demoted.
- Click Save.
- Save the changes to the payment method set.
Automatic payments
Staff users can define automatic payment settings for recurring donations and auto-renewing memberships. Go to Settings > Finance > Pay Central > Automatic payments tab.
Note: In order to use automatic payments, you must have a license key for AutoPay. Contact ASI for more information.
- Enable Allow users to create recurring donations:
- Donations are recurring by default - Select this option to allow all donations to be recurring. Donors can disable this function at the time of transaction.
- Allow donors to change the amount of their donation - Select this option to allow donors to modify the amount of an active recurring donation.
- Allow donors to choose their collection date - Select this option to allow donors to choose the billing date for their recurring donations
- Donors may select - 1 or 15 only - Billing will occur on the 1st or 15th of the month.
- Donors may select - Any day 1-28 - Billing will occur on the date selected, between the 1st and the 28th of the month.
Note: This option is required for customers to add new payment methods to their existing AutoPay enrollments.
- Allow users to create auto-renewing memberships and subscriptions - Select this setting to enable automatic billing for memberships and non-dues subscriptions.
- Memberships and subscriptions are auto-renewing by default - Select this option to make all sitewide memberships and non-dues subscriptions auto-renew by default. Members can disable this function at the time of transaction.
- Memberships and subscriptions are required to be auto-renewing - Select this option to have all memberships and non-dues subscriptions auto-renew. Members cannot opt out once enabled, but staff users have the option to choose Single payment from the cart and can process non-AutoPay joins and renewals if necessary.
- Allow stored payment methods to be used for all purchases – Select this option to allow customers to use saved payment options for future purchases. You must be licensed for AutoPay and have an Global Payments gateway configured to access this option.
- Allow staff users on behalf of a customer to use their stored payment methods – Enable to allow staff users with the On Behalf Of role and a Finance: 2 module authorization level or above to use customers’ saved payment methods when working on their behalf.
- Allow users to save their payment for future use when making a non-AutoPay purchase – Enable to allow customers to save their payment methods for future use when making one-time purchases from the cart.
- Retry failed payment requests - The number of times a payment will be resubmitted. The value can range from 1 to 999. After the limit is reached, the payment will no longer appear in the Review invoices and Submit invoices tabs at Automatic payments > Process payments.
- Allow scheduling of payments in advance - When enabled, this setting allows payments to be submitted up to 28 days before they are collected. If a recurring payment is cancelled by the customer, the queued payment fails. iMIS automatically processes the payment at the optimal time based on the payment method, taking into account any required lead times.
- ACH (United States) – Two business days before the payment is due
- BACS (United Kingdom) – Three business days before the payment is due
- BECS (Australia and New Zealand) – One business day before the payment is due
- PAD (Canada) – Two calendar days before the payment is due
- SEPA (Euro region) - Two business days before the payment is due
- Credit Card (all regions) - Processed the day the payment is submitted
- Additional text when enrolling for AutoPay – Add a custom message to display when a customer pays for their AutoPay enrollment or keep the default message.
- Click Save.
Important! Some gateways may charge for each submitted payment. Check your gateways documentation for details.
Review the following lead times regarding different payment types:
Important! These lead times are subject to change without prior notice.
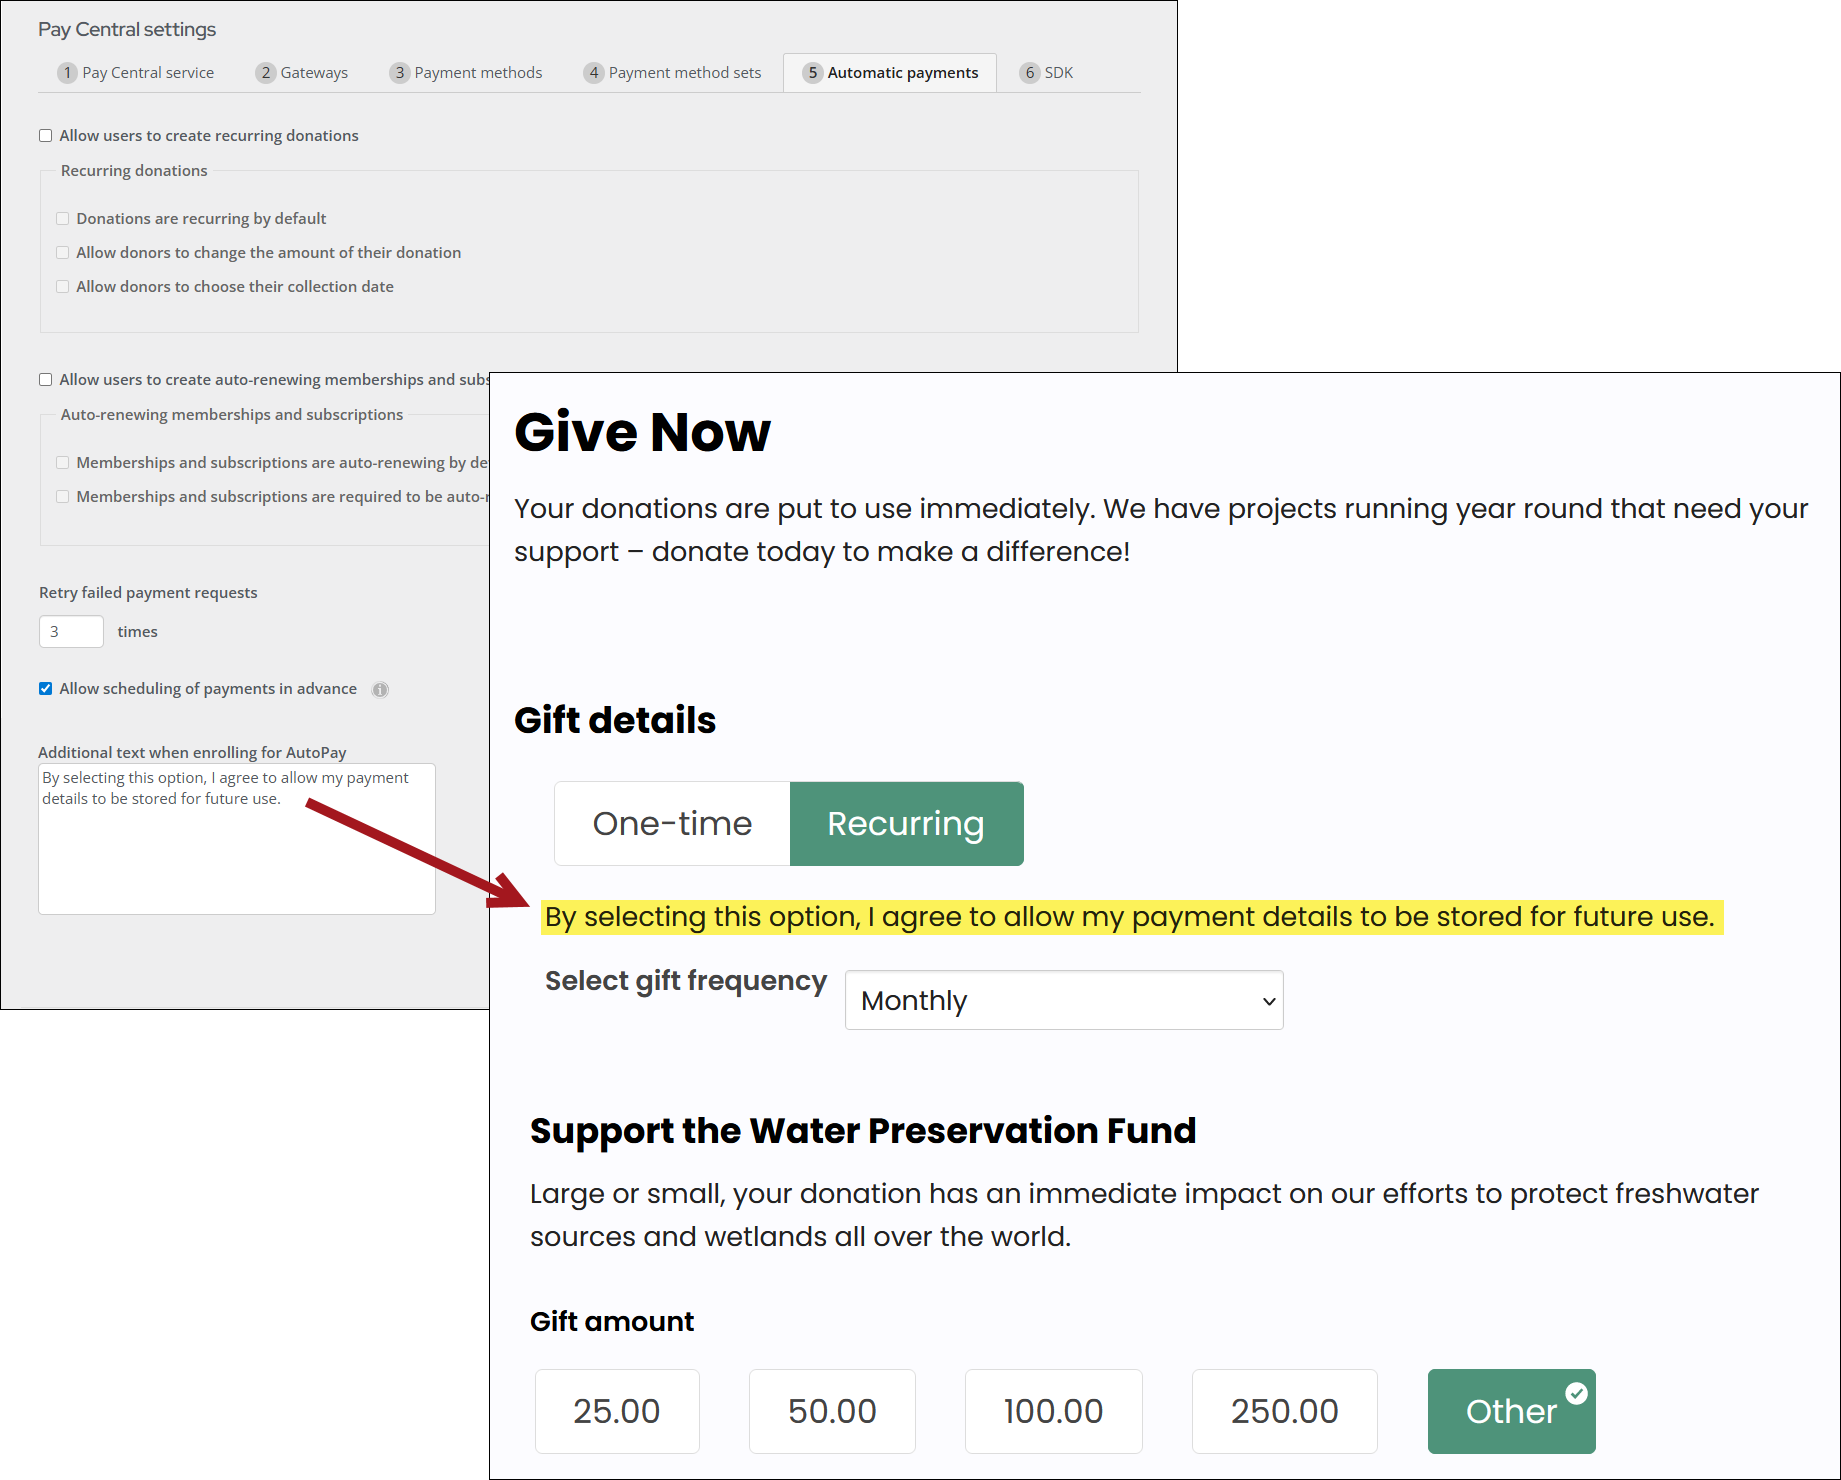
Note: If Allow stored payment methods to be used for all purchases is enabled, this message should clearly inform customers that their AutoPay payment method will be stored and available to use for future purchases.
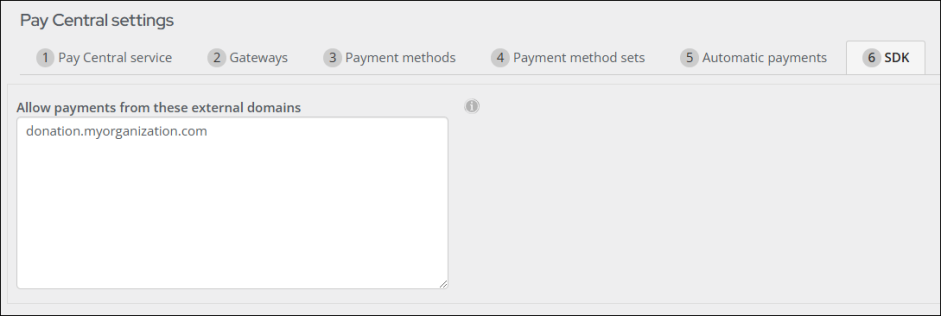
SDK (licensed only)
The SDK tab allows you to configure settings associated with the Pay Central SDK. The Pay Central SDK allows you to accept payments through Pay Central from external websites. This feature is only available for the Global Payments and Stripe gateways. For more information, see the Pay Central SDK.
Note: To use the Pay Central SDK, you must have a Pay Central SDK (Dev) license. Contact ASI for more information.
The Pay Central SDK can only be used in pages loaded from whitelisted domains. To whitelist external domains, do the following:
- Go to Settings > Finance > Pay Central > SDK tab.
- Enter your external domains, one per line.
- Click Save.
Note: Do not include the http:// or https:// protocol prefixes.