Last updated on: January 27, 2026
In This Article
Although it is recommended to double-check all settings configured in iMIS EMS, the following settings are the most important to review. Verify the following settings are correctly configured.
Contact settings
iMIS can perform real-time address verification using the Address Verification Service (AVS). It is enabled by default, but you may want to disable the service, depending on your association's needs.
The AVS can be disabled on specific content records only or system-wide.
Disabling the AVS for specific content records
In some instances, you may not want the address verification service to validate or suggest addresses, such as on Give Now donation pages that are designed for quick, on-the-fly giving.
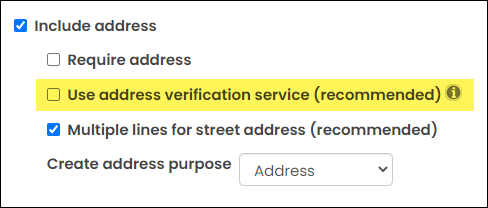
To disable the address verification service, you must disable the Use address verification service (recommended) checkbox on the Contact Account Creator. If you have multiple content records with their own instance of the Contact Account Creator, the checkbox must be disabled on each instance.
Disabling the AVS system wide
Although not recommended, the Address Verification Service can be disabled.
Note: Even when AVS is disabled, UK addresses still use the UK Postal Code lookup.
Do the following to disable the Address Verification Service:
- Go to Settings > Contacts > General.
- Deselect the Use address verification service (recommended) setting.
- Click Save.
Membership settings
Membership renewal prior to billing
Members can renew their memberships in advance, allowing them to renew their membership term before their bill is issued. The renewal is for the same membership type, and the point in time in which they are eligible to renew their membership is a time specified during configuration.
Before you begin, review the following important notes:
- For renew in advance to work, the contact must have existing subscriptions, and the Renewed through date must be populated.
- The billing is always for a full-term; there is no prorating, and processing is identical, regardless if it is done on an annual or anniversary basis.
- If the billing cycle is set for Require billed chapters for renewal, this option does not apply to Renew in advance.
Out-of-the-box, the Allow for staff only option is enabled. To offer members the option to renew in advance, do the following:
- Go to Settings > Membership.
- Select the desired Membership renewal prior to billing option:
- Disabled - No one is able to process membership renewals before billing is issued.
- Allow for staff only - The early-renewal button will appear on all profile pages, but only staff users can see the button and have the ability to generate the renewals on behalf of users.
- Allow for staff and members - The early-renewal button will appear on all profile pages for all users to see, allowing members and staff users to renew memberships in advance.
- In the Number of days prior to expiration that members can renew in advance field, enter the number of days in which the Membership renewal prior to billing button will begin appearing for eligible users. For example, entering “30” in this field means that the button will begin to appear 30 days prior to a member’s expiration date. Setting this field value to “0” means that the button will always appear for unexpired members. If Membership renewal prior to billing is Disabled, this field takes no effect, and the button will never appear.
- Click Save.
- Go to Membership > Billing cycles and select the billing cycle you want to be used with renew in advance.
- (required) Enable Use to display itemized renewals. The option to renew in advance will not appear if the billing cycle does not have Use to display itemized renewals.
- Navigate to the content record used for member and contact profile pages. Out-of-the-box, these pages are Account Page Staff and Account Page (@/iCore/Contacts/ContactLayouts).
- If the Invoice Payment Link content item already exists on the page, select Configure to open the content item for edit. If there is no Invoice Payment Link content item on the page, select Add content, and add the content item (Finance folder).
- Select Enable renewing membership prior to dues billing, and configure the Renew without billing options:
- Select Allow for all members or Allow only for unexpired members:
- Allow for all members - (recommended selection) When selected, the renewal button remains on all member profile pages as long as the member is an active member, even for those whose paid-through date has passed. An active member is anyone with an Is-member member type and a Status of Active.
- Allow only for unexpired members - When selected, members can renew in advance, prior to their paid-through date. When their paid-through date has passed, the renewal button is no longer displayed.
- Button text - Enter the text that appears on the button.
- Message - Enter text to be displayed above the button. For example, you could enter a message that explains to users what to expect when they click the button. The default message is, Membership expires after {0}, where {0} is derived from Name.Paid_Thru.
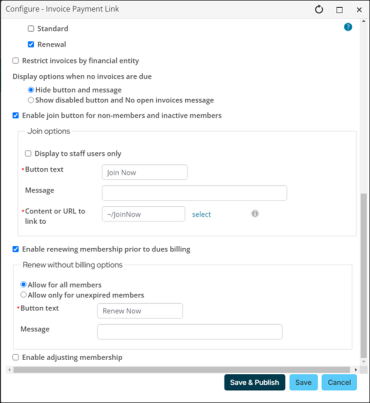
Note: When Allow for all members is enabled, the Number of days prior to expiration that members can renew in advance setting (Settings > Membership) also applies to unexpired members. This allows all expired members who still have an active member state to also renew. Use the Manage Expired Members function to terminate the membership status for those who failed to pay by the end of the grace period. See Managing expired members.
- Select Allow for all members or Allow only for unexpired members:
- Click OK, and Save the changes.
Warning! Entering 0 in this field means that the button will always be displayed for unexpired members.
Important! If the Membership billing cycle option is disabled on the selected billing cycle, renewals always generate as cash invoices. If the option is enabled, the defined accounting method is respected. See Setting up billing cycles for more information.
Note: When a member initiates a renewal, and there is an existing balance on their account because of a previous partial payment of their membership fees, the itemized renewal page will display a balance column. This balance column will show the remainder of the membership fees and cannot be edited. However, if a staff member changes the Unit Price, this will be reflected in the balance.
Allow staff or chapter administrators to manage chapter memberships directly from member list
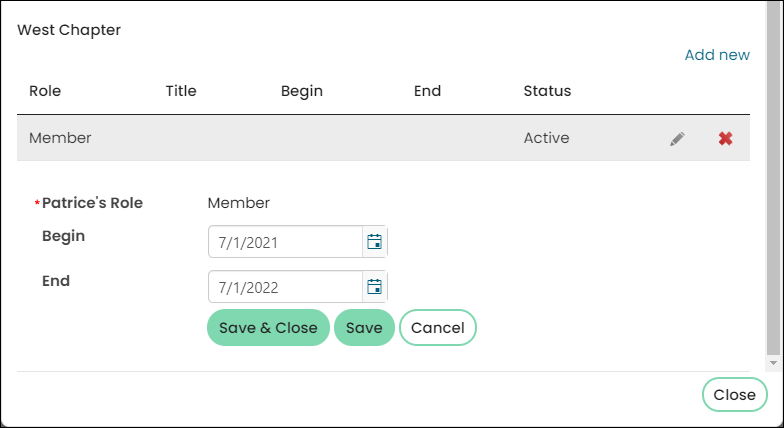
Staff users and chapter administrators can modify the chapter rosters of non-fee based chapters. Members can be added, removed and their membership dates modified. Chapter membership roles can also be adjusted.
From the Staff site (Settings > Membership), authorized users can enable the following settings, which are disabled by default:
Note: Non-staff Chapter Administrators can access their chapters from the My chapters and sections area in the My Participation tab of their account page.
- (staff only) Allow staff to manage chapter memberships directly from member list (recommended only if all chapters are complimentary)
- (chapter administrators only) Allow Chapter Administrators to manage chapter memberships directly from member list (recommended only if all chapters are complimentary)
Note: It is strongly recommended that these settings are only enabled for systems with complimentary chapters, as no billing or invoice will be created for new contacts who are added when these settings are enabled.
Using these Membership settings for non-fee based chapters, authorized users can do the following tasks:
- Add contacts to a chapter – Authorized staff users can add existing contacts to the chapter. Chapter Administrators can only add new contacts to the chapter.
- Assign the Chapter Administrator role - Chapter Administrators can assign the Chapter Administrator role to existing chapter members.
- Edit chapter memberships – Authorized staff can modify the Begin and End dates of chapter memberships. However, the chapter administrator role Begin and End date cannot be edited.
-
Delete members from the chapter – Authorized staff and Chapter Administrators can delete members, and those assigned the Chapter Administrator role, from the chapter.
See Managing chapters for details.
Fundraising settings
Default receipt preference
Staff users can configure the default frequency with which fundraising receipts are delivered to donors. This option allows you to set the default receipt preferences for donors who do not want to be inundated with tax documents throughout the year.
Fundraising receipts are normally sent to donors as a donation is processed. The Default receipt preference setting enables donors to specify that they will receive fundraising receipts at alternate intervals. For example, if a donor wanted to receive only one gift receipt per year for tax purposes, the donor would specify Annual. The donor would then receive one gift receipt with a complete summary of their donations for the year.
Defining the default receipt preference
You can specify a Default receipt preference for how frequently a charity or other organization that accepts charitable contributions or donations will send a donor receipts for any gifts the donor makes. To define the default preference, do the following:
- Go to Settings > Fundraising > General.
- From the Default receipt preference drop-down, choose one of the following:
- No preference
- Immediate
- Annual
- Quarterly
- Monthly
- Click Save.
Adjusting the default preference
Staff users and donors can adjust the frequency with which fundraising receipts are delivered to donors. Staff users can amend the receipt preferences of specific donors from the account page or On behalf of non-staff users. Additionally, non-staff users can update their receipt preferences through the account page in the Member site.
Do the following to modify donor fundraising receipt preferences:
- As a staff user, locate the desired donor account page and go to the Preferences tab.
- Under Gift preferences, select the Edit item values icon.
- Select the appropriate Receipt preference for the donor:
- No preference
- Immediate
- Annual
- Quarterly
- Monthly
- Click Save.
Note: A contact’s preference is not populated from this global setting by default. However, if a contact’s record does not define a value, the contact’s record will use this globally defined default value.
Events settings
Create separate invoices for event adjustments
If you require separate invoices for adjustments made toward event registrations, you must enable the Create separate invoices for event adjustments option.
Do the following to enable the option:
- Go to Settings > Events > General.
- Enable Create separate invoices for event adjustments.
- Click Save.
Note: All event adjustments will result in new invoice lines, regardless of whether this option is enabled. If a program item is added and then removed, there will be one positive invoice line and one negative invoice line.
Automatically generate invoices for registrations and adjustments upon checkout
Event invoices can be automatically generated upon checkout, or manually generated later by a staff user.
When the Automatically generate invoices for registrations and adjustments upon checkout setting (Settings > Events > General) is enabled, event invoices are automatically generated and assigned an invoice number upon checkout. When the setting is disabled, the invoice is assigned a reference invoice number until the invoice is manually generated. See Event invoices for more information.
To always automatically generate event invoices and adjustments (including cancellations), do the following:
- Go to Settings > Events > General.
- Enable Automatically generate invoices for registrations and adjustments upon checkout.
- To only automatically issue invoices for registrations and adjustments that have an open balance, then also enable Registrations and adjustments with a non-zero balance only. Registrations and adjustments without an open balance must be manually invoiced.
- Click Save.
Any new registration or adjustment, including cancellations, are automatically invoiced.
Commerce settings
Order type settings
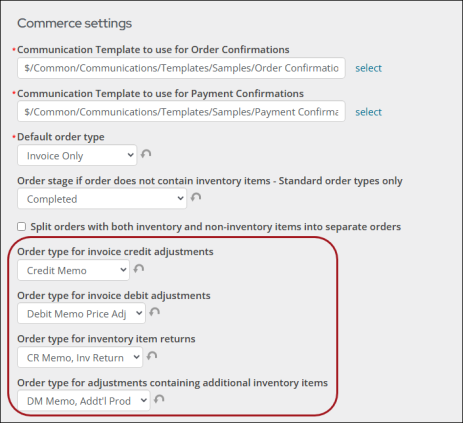
You must ensure the settings related to order types are correctly configured. If these settings are not correctly configured, then you may experience issues when entering, reversing, or adjusting order invoices. See Defining order types for more information.
- Default order type
- Order type for invoice credit adjustments
- Order type for invoice debit adjustments
- Order type for inventory item returns
- Order type for adjustments containing additional inventory items
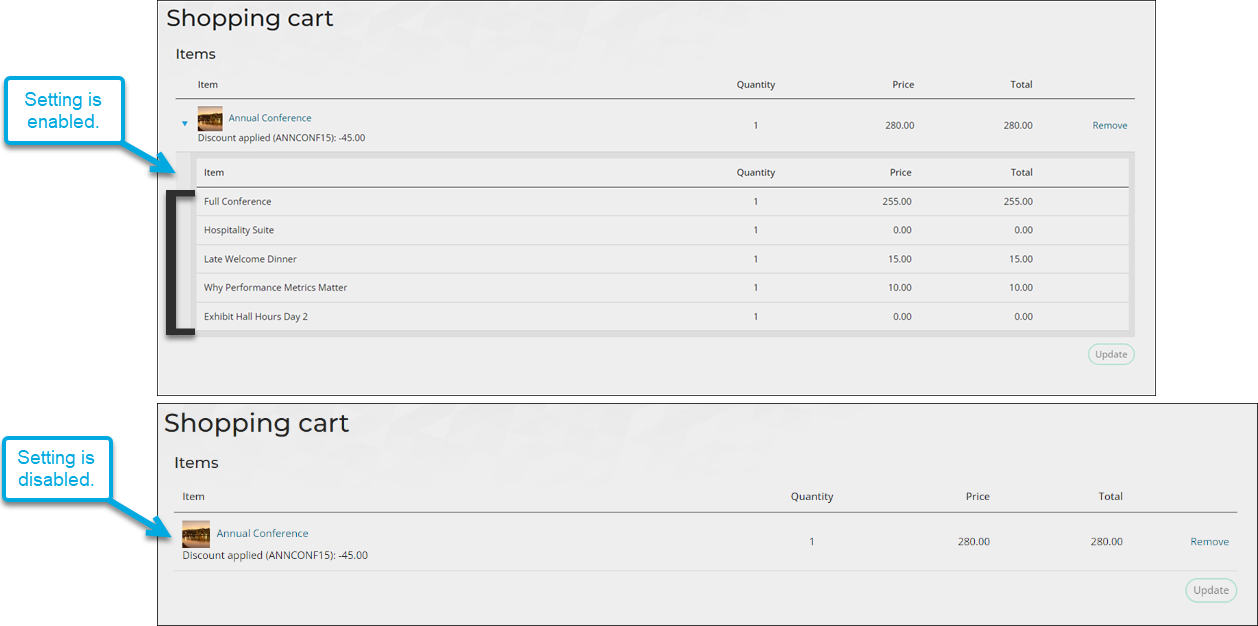
Allow users to see line item details for items and invoices in the cart
To offer users an itemized list of their items in the cart, do the following:
- Go to Settings > Commerce > General:
- Enable Allow users to see line item details for items and invoices in the cart.
- Click Save.
Default out of stock message
If you offer inventory products, you may need to review the "out of stock" message that displays to users when there is no available inventory for a product:
- Go to Settings > Commerce > General.
- From the Default out of stock message setting, enter the message that will display to users when there is no available inventory for a product.
- Click Save.
Finance settings
Note: The following navigation items are now under Settings > Finance > Pay Central: Gateway accounts, Payment methods, Payment method sets, Pay Central Service settings, Automatic payments.
Allow staff users to enter prepayments and overpayments
A prepayment is the payment of an obligation that satisfies the obligation before it is due. Users can use prepayments to prepare for an upcoming purchase or registration. Payments sent ahead of time can be entered by a staff user operating On Behalf Of a contact.
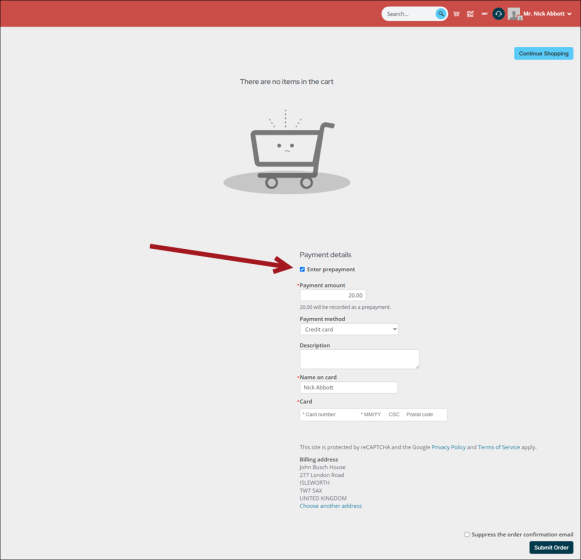
Example: A company sends payment to a trade association in anticipation of a number of employees registering for an upcoming event. The payment is entered using On behalf of the company, so that employees can complete registration using the company's credit.
Example: A member sends a check for 100.00 to an association but did not indicate what the payment was for. Staff users must record that the payment was deposited, but the contact did not specify how to apply the payment. The staff user enters the payment as a prepayment to the member's account.
If the association needs to enter prepayments, do the following:
- Go to Settings > Finance > General.
- Enable Allow staff users to enter prepayments and overpayments.
- Click Save.
See Applying prepayments for more information.
Allow non-staff users to enter partial payments
When a partial (under) payment is received, the payment can be entered directly from the shopping cart by staff users. You can enable this setting for public users, if desired.
Do the following to enable partial payments for public users:
- Go to Settings > Finance > General.
- Enable Allow non-staff users to enter partial payments.
- Click Save.
See Applying partial payments for more information.
Refund method for credit invoices
Before using the credit invoices feature, you must review the Refund method for credit invoices setting to determine which GL account to use when issuing refunds to credit card, bank draft, or PayPay Express payments:
- Go to Settings > Finance > General.
- Locate the Refund method for credit invoices setting, and choose one of the following:
- Original payment method – The payment method, financial entity, and GL account of the refund payment is the same as the original payment. Refunds are recorded to the original payment method.
- Issue checks – The refund payment is issued using the original payment’s financial entity and financial entity’s refund clearing GL account, with no payment method. Refunds are processed by issuing checks to the customers.
- Click Save.
If you chose the Issue checks option, be sure the Refund clearing account is populated. To populate the Refund clearing account, do the following:
- Go to Settings > Finance > Financial entities.
- Select the desired financial entity for which you want to assign a refund clearing account.
- Click the Default Accounts tab.
- From the Refund clearing drop-down, select an account.
The Refund clearing account represents a bridge or clearing account between AR and AP. Use the Refund clearing account for the debit distribution entries in the Accounts Payable (AP) entries in the same manner that you use the clearing account for the credit side of the AR reversal entries.
Batch mode and numbering
You can place all transactions in a single batch or create separate batches for staff and public transactions. Placing staff transactions in their own batch allows for easier auditing of the transactions by a system administrator.
Do the following to configure the batch mode:
- Go to Settings > Finance > General.
- Select the appropriate Batch mode for staff web transactions. You can choose from the following options:
- Staff transactions in same batch as public transactions - The default option places staff and public users’ transactions in the same batch. One batch of transactions is created for each day.
- Separate batches for staff and public transactions - This option places staff and public users’ transactions into two separate batches per day. If a batch does not exist for either category of users for the day, it is created.
- Individual batch for each staff user per day - This option places each staff user’s transactions into a separate batch per day. All transactions by public users are placed into one batch for the day. If a batch does not exist for a specific staff user or for public users, it is created.
- Manual batches - Staff users with a Finance: 3 module authorization level or higher can create new batches. Staff users can control into which batches a staff user's transactions are placed.
For more information, see Batch control.
- (Manual batches only) Default batch selection – This option controls the batch selected when a staff user selects the default batch. Options include:
- Staff transactions in the same batch as public transactions
- Separate batches for staff and public transactions
- Individual batch for each staff user per day
- Batch numbering – Select a value to determine how batches are numbered. Options include:
- Based on batch date – (Default) Batch numbers are generated based on batch date. The batch date is derived from the Time zone setting (Settings > RiSE > Quick setup).
- Sequential batch numbers – Batch numbers are generated sequentially.
- Click Save.
