Last updated on: June 30, 2026
Quick Tutorial Training course
A prepayment is the payment of an obligation that satisfies the obligation before it is due. Users can use prepayments to prepare for an upcoming purchase or registration. Payments sent ahead of time can be entered by a staff user operating On Behalf Of a contact.
Example: A company sends payment to a trade association in anticipation of a number of employees registering for an upcoming event. The payment is entered using On behalf of the company, so that employees can complete registration using the company's credit.
Example: A member sends a check for 100.00 to an association but did not indicate what the payment was for. Staff users must record that the payment was deposited, but the contact did not specify how to apply the payment. The staff user enters the payment as a prepayment to the member's account.
In This Article
- Configuring prepayments
Entering a prepayment
Applying prepayments
Entering an overpayment
Overriding the transaction date of a prepayment
Configuring prepayments
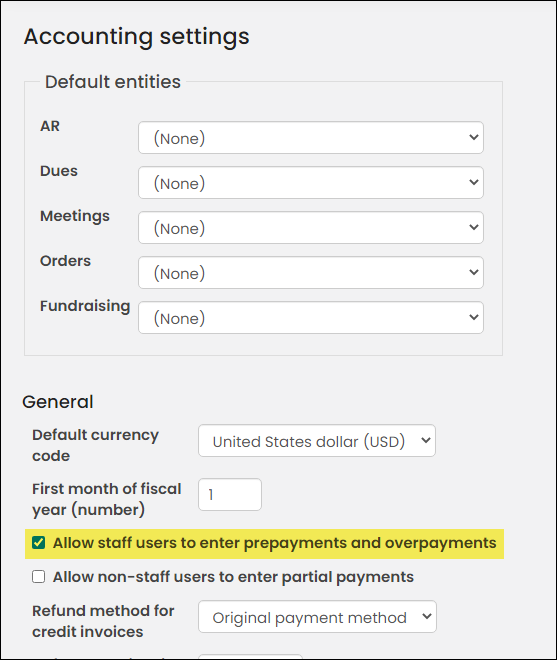
Before you can begin accepting prepayments, you must enable the related setting:
- Go to Settings > Finance > General.
- Enable Allow staff users to enter prepayments and overpayments.
- Click Save.
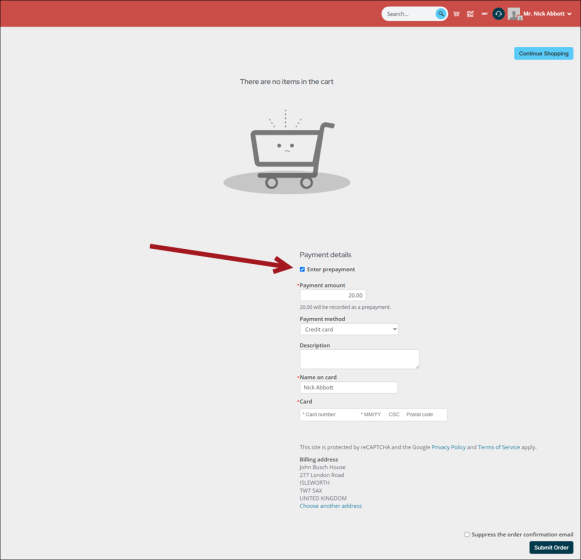
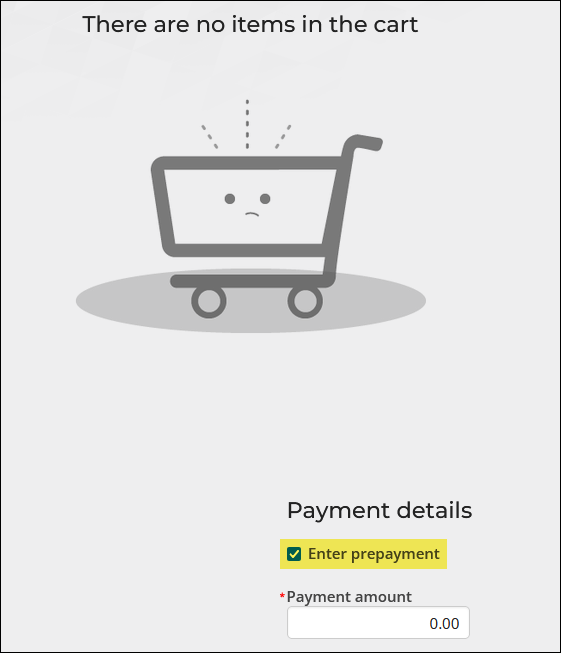
- Navigate to the Cart to confirm the Enter prepayments checkbox is displayed.
Note: The Enter payments checkbox only displays if the Cart is empty. If the checkbox does not display, try purging the system cache (Settings > About iMIS > Purge System Cache).
Entering a prepayment
Do the following to enter a prepayment:
- Begin working on behalf of a contact.
- Navigate to the Cart. Make sure the Cart is empty. If the Cart is not empty, the Enter prepayment option does not display.
- Enable Enter prepayment.
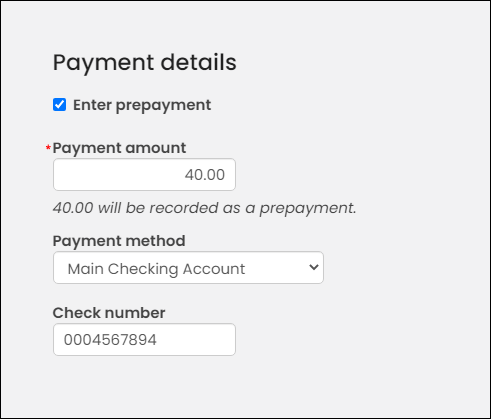
- Enter the associated Payment details.
- (optional) Enter a Description (up to 200 characters). This description is saved in the Notes field of the PaymentSummary business object. The description is added to the following areas:
- Invoice details
- Payment details
- Order confirmation screen and order confirmation email
This description is also visible when searching for open credits from the cart.
- Click Submit Order.
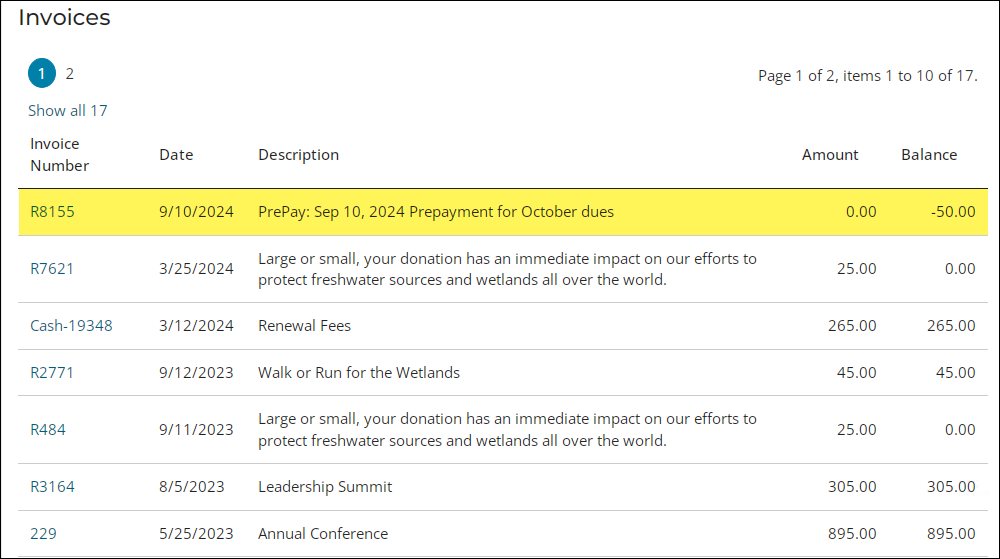
- Navigate to the contact's account page. The prepayment is displayed as an Open Credit:
- Account page alert: An available credit alert displays on the contact's account page.
- Transactions tab: The prepayment displays in the Invoices query on the Transactions tab.

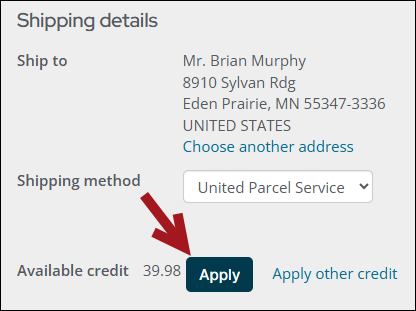
Applying prepayments
To use or apply an existing prepayment, do the following:
- Begin working on behalf of the contact.
- Add the desired products, event registrations, or membership dues to the Cart.
- From the Cart, Apply the available credit.
- Review the Summary, then enter the remaining payment details.
- Click Submit Order.
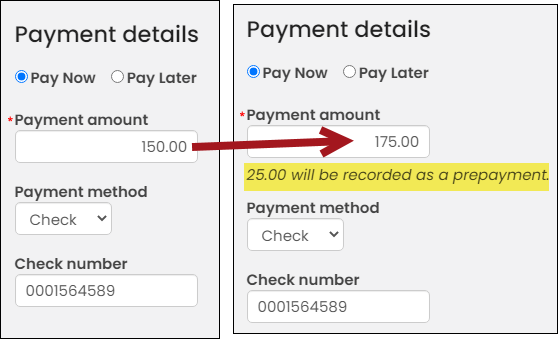
Entering an overpayment
Staff users can enter an amount greater than the sum of the items in the cart, resulting in an overpayment.
Example: An event registrant asked you to register them for an event on their behalf. The registrant gave you 105.00 for their registration, but the registration is only 85.00, so you need to enter an overpayment of 20.00.
To enter an overpayment, do the following:
- Make sure Allow staff users to enter prepayments and overpayments is enabled.
- Add an item to the Cart, then navigate to the Cart.
- From the Payment details section, overwrite the Payment amount to be higher than the sum of the items in the Cart.
- Click Submit Order.
Note: Staff users cannot enter overpayments if the Cart contains a gift item or the open credit total exceeds the total in the Cart.
Overriding the transaction date of a prepayment
Staff users can override transactions dates of prepayments on behalf of public users.
To override the transaction date of a prepayment, do the following:
- Begin working on behalf of a contact.
- Navigate to the Cart.
- Enable Override transaction date from either the cart or the top navigation.
- Select a date.
- Continue entering the prepayment.
- Click Submit Order.
Note: If the Cart is not empty, the Enter prepayment option does not display.
View the payment details within the overridden date from the users account page.
