Last updated on: January 27, 2026
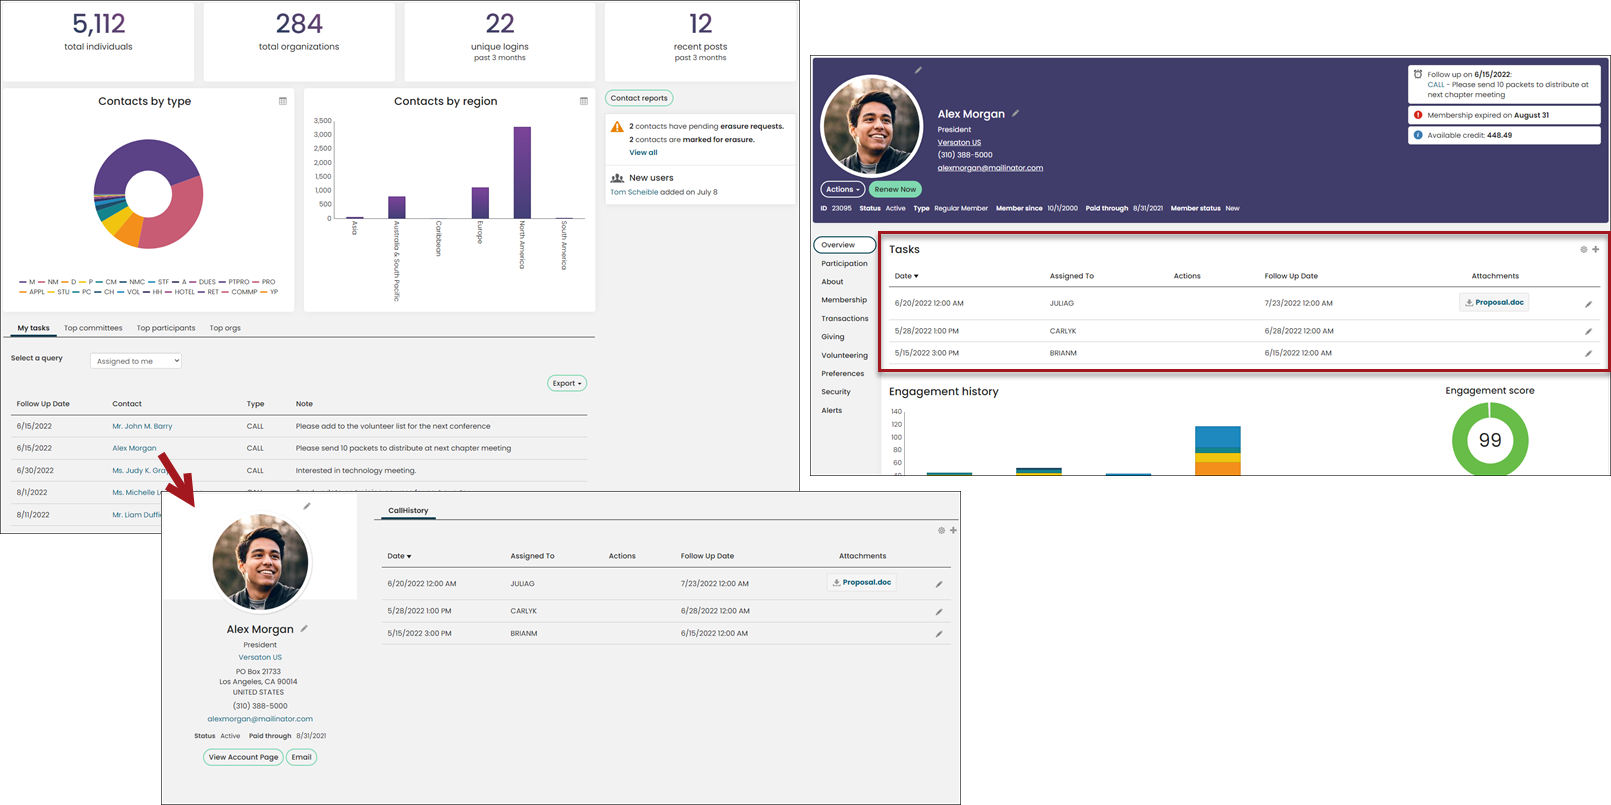
Staff users can assign follow-up activity tasks for other staff users or themselves as reminders to perform certain actions. For example, you can remind an event coordinator to call an event attendee by creating a call reminder activity task assigned to the event coordinator. The activity task will then generate an alert that appears on the event attendee's profile page that only the event coordinator can see.
Out-of-the-box, there is a Tasks panel on the Overview tab of profile pages where new activity tasks can be created and assigned. In addition to this panel, staff users can create new panels with other various activity types that suit their organization's needs.

Staff users can view tasks assigned to them and all unassigned tasks from the Community dashboard on the My tasks tab. They can also Find tasks by contact, date range, or assignee. Only activities with a follow-up date will be included in the results from either of these queries. Selecting the hyperlinked name pulls up an Activity Profile page where the staff user can review the activity information alongside the contact person's information. A staff user can then mark the task as completed by removing the follow-up date, and adding notes in the follow-up field.
In This Article
- Creating and assigning activity tasks
Creating a custom activity type
Adding activity types to contact profiles
Creating and assigning activity tasks
Do the following to create a new activity task:
- Navigate to the profile page of the user who needs to be contacted.
- From the Tasks panel on the Overview tab, add a new row.
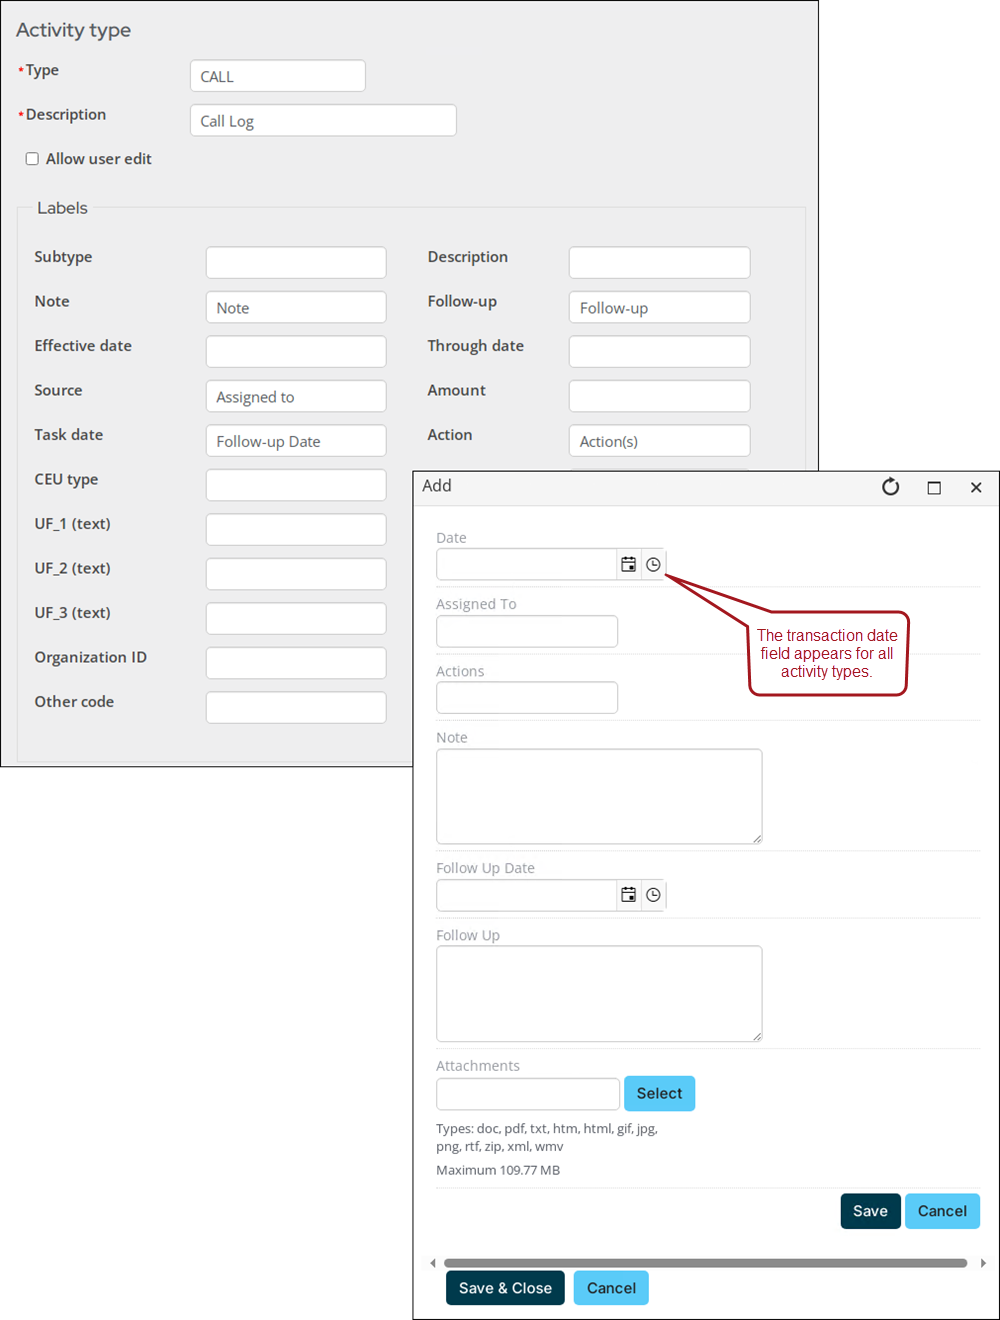
- Enter the following information:
- Date - The date the activity request was made.
- Assigned to - The person who should perform the activity task. In order for this person to be alerted, you must enter their login username. Leaving this field blank or entering something other than a valid login username results in the task being unassigned. Unassigned tasks appear in the My tasks tab of the Community dashboard when the Unassigned tasks query is selected.
- Action(s) - The actions that need to be performed.
- Note - Additional notes about the actions.
- Follow Up Date - (required) The date the task needs to be performed by. Without this date, the task will not appear in the My task section of the Community dashboard, and the alert will not appear on the profile page.
- Follow Up - After the task is performed, it is best practice for the person who completed the task to enter their name, the date the task was completed, and a brief description of the outcome of the task in this field.
- Attachments - Any relevant attachments. The maximum file size is 109.77 MB. The following file types are supported: doc, pdf, txt, htm, html, gif, jpg, png, rtf, zip, xml, wmv.
Entering any other type of data in this field results in no one being able to see the task. It will not appear as an alert, and will not appear in the Unassigned tasks query.
- Click Save & Close.
Creating a custom activity type
To create an activity type, do the following:
- Go to Settings > Contacts > Activity types.
- Select Add new activity type.
- Enter the activity category or code in the Type field.
- Enter a full name Description for the activity type.
- Enable Allow user edit if you want to allow users to edit detailed activity records of this type.
- Define any desired Labels. When a label is defined, a field appears for edit when someone is adding data to the activity type:
- Subtype - Specifies a subtype of the activity type. This field enables you to sub-categorize the activity type. For example, a product code is a subtype of the activity type Sales.
- Description - Describes the Subtype.
- Note - Specifies notes you want to keep about the activity type.
- Follow-up - Specifies follow-up comments. Activity types containing a follow-up date can be used within activity tasks. See Managing activity tasks for more information.
- Effective date - Specifies an additional date field (The activity date is system generated). Used if another date field is necessary for the activity. For example, for tracking the begin date of a committee appointment.
- Through date - Specifies an end date. For example, the ending date of a committee appointment.
- Source - Specifies either a marketing code, or an individual to which an item will be assigned. For example, if an order sale is made over the phone, the code used to track this information might be Phone. Codes may be set up for advertising, catalogs, salespeople, and so forth.
- Amount - Specifies a monetary amount for the activity.
- Task date - Specifies the date on which an activity record will be displayed in the user's task list.
- Action - Specifies the type of action taken on a task item. For example, CALL or EMAIL.
- CEU type - Specifies the type or category of educational credit awarded (licensed feature).
- Quantity/CEU - Specifies the number of credit hours awarded for a CEU course, or specifies the frequency of a recurring request.
- UF_1 (text)/UF_2 (text)/UF_3 (text) - Specifies user-defined character information. For example, the GIFT and PLEDGE activities define these fields as List As, Campaign Code, and Fund Code.
- UF_4 (number)/UF_5 (number) - Specifies user-defined numeric information.
- UF_6 (datetime)/UF_7 (datetime) - Specifies user-defined date information. For example, the REQUEST activity defines these fields as End Date and Last Reminder.
- Organization ID - Specifies an ID number. For example, the REQUEST, GIFT, and PLEDGE activity types define this field as Solicitor ID.
- Keywords - Deprecated.
Note: For task or call logging activities, the iMIS ID for which this reminder should be logged is entered in the Source field. If the field is blank, the reminder message will display in all users' task activities. See Managing activity tasks for more information.
Note: For SALES and ORDER activity types, the system stores the value entered in the Quantity/CEU field in Activity.QUANTITY. For all other activity types, the system stores the value entered in the Quantity/CEU field in Activity.UNITS.
- Click Save & Exit.
Editing and deleting activity types
Important! Do not delete the REQUEST activity type. This activity type is required for fundraising requests.
To edit an activity type, select the activity Description, then make the necessary changes. The Type field cannot be modified.
To delete an activity type, click the delete icon, then click OK. The following activity types cannot be deleted: DUES, SEC, SUB, VOL, MISC, CHAPT.
To display an activity type on a customer page, see Creating a panel that allows multiple entries.
Adding activity types to contact profiles
After an activity type is created, you must create a new panel in order to manage activities of that type from a contact profile page:
- Go to RiSE > Panel Designer > Panel definitions.
- Select Add panel definition.
- Enter the Panel name.
- Select Show data sources that allow multiple entries per object instance.
- Expand the activity type from the list of activity types, then drag the properties to the panel creation area.
- After all properties are added to the table, click Save & Continue.
- Add the new panel to the Activity Profile content record (@/iCore/Contacts/ContactLayouts/Activity_Profile) .
- Add the new panel to the History tab (@/iCore/Contacts/ContactLayouts/Staff/Tabs/2History).
Note: You must update the ActivityProfile shortcut when modifying the activity profile content record. See Tailoring default navigation and content for more information about shortcuts.
Note: See Understanding and modifying account pages for more information about modifying user profile page tabs.
If there are multiple activity panels you need to use for reminders, for example calls and emails, you can use the Panel Collection Editor content item. See Panel Designer for more information.
