Last updated on: January 27, 2026
RiSE is where you create, manage, and publish seamless web content experiences. Create web pages that provide dynamic or static data internally to staff users or externally to members and donors.
Use this Getting Started Guide to perform any of the following tasks:
- Learn about iMIS RiSE websites and the various configuration options
- How to create a website based on a copy of a Quick Start Site
- Creating your own website content and website themes
- Working with Sitemaps and Shortcuts
- Learn about website accessibility and advanced features
Understanding the Quick Start Sites
Quick Start Sites are out-of-the-box iMIS websites that you can easily copy to create custom sites for your organization. Quick Start Sites showcase some of the more complex enhancements in iMIS, such as new dynamic content items, functionality, and user-interface improvements as they become available.
Quick Start Sites are designed to be copied and tailored using powerful RiSE tools to create a unique web presence for your organization.
By default, the Quick Start Sites are not active, but you can activate them to use as a demonstration site. To activate a Quick Start Site, do the following:
- Go to RiSE > Site Builder > Manage websites.
- Select the site you would like to activate.
- Click the Click to collapse/expand icon in the Status area.
- Enable Is this website active?.
- Click Save.
- Click Publish, then click OK.
- Wait a few seconds, then refresh the browser.
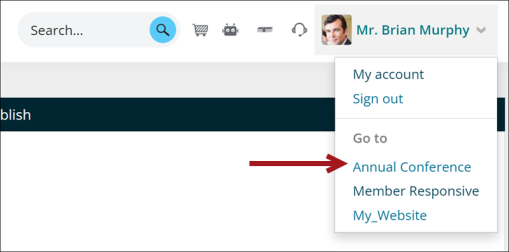
- Click the account utility drop-down, then click the website link.
- Since you are currently signed in as a staff user, you will be reviewing the Quick Start Site as a staff user. To review the site as a non-staff user, do one of the following:
- Log out to review the website as an unauthenticated user.
- Create a new test account (public user) to review the website as an authenticated user.

For more information, see Using Quick Start Sites.
When you begin creating your own website, you will mainly be working in the Site Builder, Page Builder, and Theme Builder areas. There are many subsections within these sections, but the following are quick explanations of each section:
- Site Builder - Used to modify navigation (sitemap), website properties, shortcuts, website access, and more.
- Page Builder - Used for creating and publishing web pages and managing images.
- Theme Builder - Used for creating and managing RiSE-based website templates and themes.
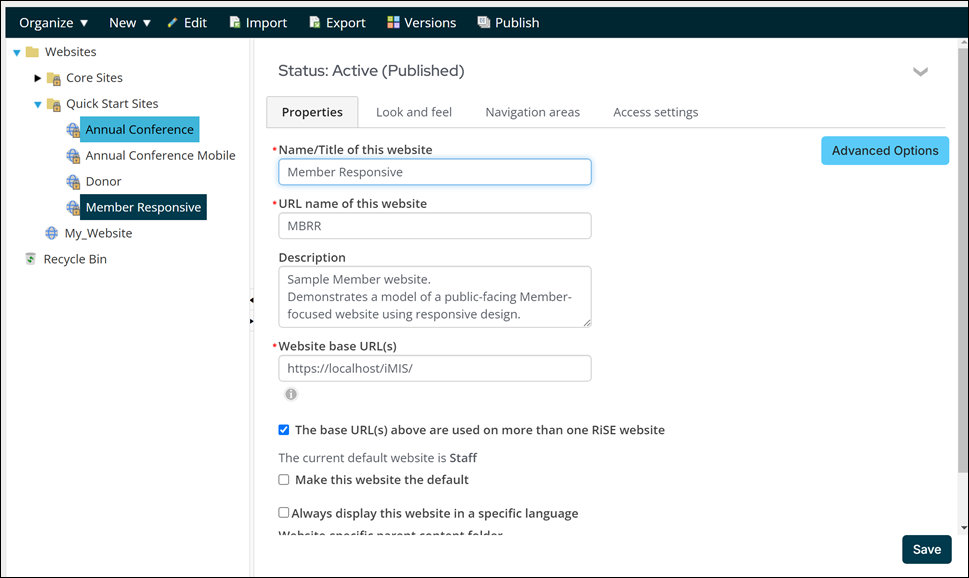
Website management is the process of configuring and maintaining the appearance, navigation structure, and content authoring environment for your iMIS websites. From the Staff site, you can manage sitemaps, websites, and shortcuts by selecting RiSE > Site Builder > Manage websites.
Important! Only system administrators have access to this navigation.
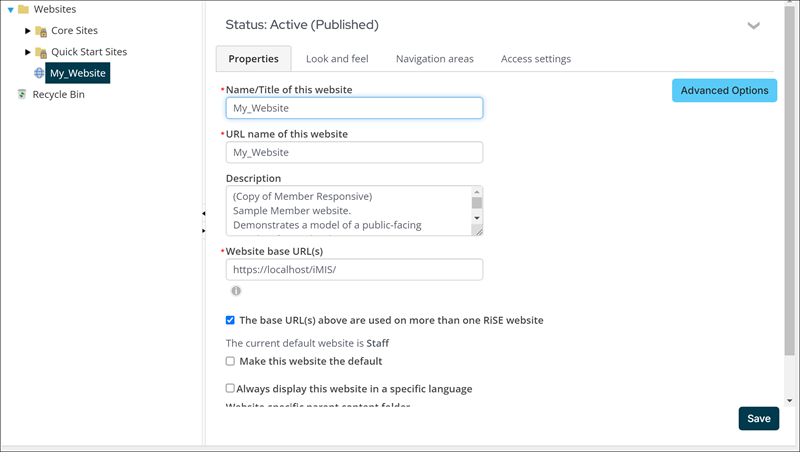
All RiSE websites offer configurable properties located on each of the following tabs:
- Status - This area specifies whether the website is in a Working, PublishPending, Submitted, Published, Inactive, or Active state. Click the Click to collapse/expand icon to view further details, including who created the website, who modified it last, and dates of these changes.
- Properties tab - This tab allows you to configure the basic properties of the website, such as, Name and Title, URLs, and various Advanced options.
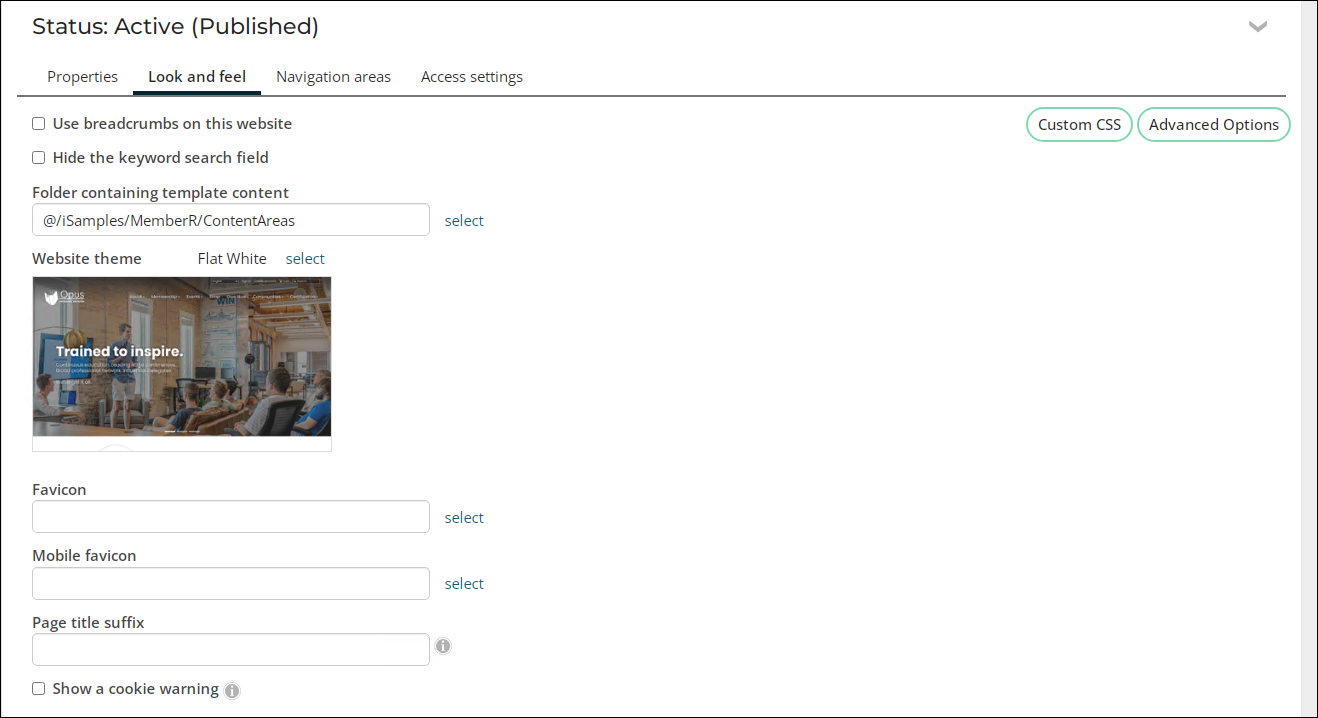
- Look and feel tab - This area allows you to configure the look and feel of the website, with options pertaining to Website cookies, Themes, Mobile themes, Favicons, CSS, and more.
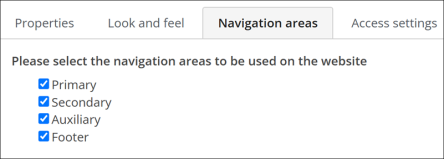
- Navigation areas - This area lists all of the navigation areas that are defined for use. These include Primary, Secondary, Auxiliary, and Footer areas.
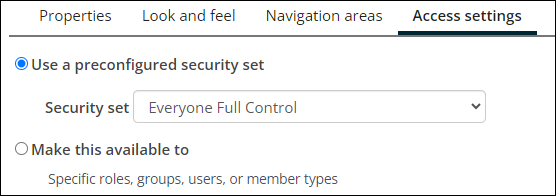
- Access settings - This area lets you define security settings. You may choose from preconfigured security sets, or create your own.

Configuring RiSE Settings
Review the following important settings to configure when building a public RiSE website:
The following fields control the basic global behavior of RiSE content. Go to Settings > RiSE > Quick setup:
- Enable share cookies across subdomains - Recommended if your website has more than one URL that uses the same domain. Enabling this option allows website cookies to be shared among subdomains, making sure users stay logged while navigating between the websites. In the Share cookies across subdomains for these domains text field, enter the domain, such as abc.org.
- Use simple URLs in sitemap navigation - When enabled, the navigation path is excluded from URLs. While this option shortens the length of URLs, any URLs that members and users may have bookmarked on their browser are still active links.
- Use canonical links for SEO - Canonical URLs are designed to help search engines rank the amount of traffic your site receives through various methods. When enabled, the canonical URLs are automatically generated and cannot be edited. The URLs use the publish file path of the content and include the first defined URL and website name of the website being visited. All URL parameters are excluded from the canonical link except for ProductCode and EventKey.
- Allowed attachment file types - Specifies the types of files that can be uploaded as attachments. You can add or remove allowed attachment file types by adding them to or removing them from this field.
| URL | Domain | Subdomain |
|---|---|---|
| example.org | example.org | |
| www.example.org | example.org | www |
| members.example.org | example.org | members |
Example: A member visited a page in the Member Site: www.example.com/mbrr/path/to/content.ascx. The member then visited the same page in the Annual Conference Site: www.example.com/imisannualconference/path/to/content.aspx. Visiting the same page from multiple different sources in one site will have one unique link, but the link will be different for each website you visit.
See Quick Setup for more information.
These fields configure the global behavior of the Page Builder tool.
Go to Settings > RiSE > Page builder configuration to configure the following settings:
- With Content Manager, you can display multiple content records as a list of records. These content records may contain data types such as Word, Excel and PDF files. Similarly, you may upload multiple files to a single content record. This variable indicates whether or not the file type description should be displayed at the front-end next to the content record title
- Content Manager allows for the categorization and resultant display of content records based on date. This variable should be set to true if this above functionality is used, i.e. if a system that will prioritize search results, or display a new icon next to certain items is used
- The number of tries publishing servers will attempt before marking a content record as failed
- Send email to content approver when content is requested for approval
- Any content record with a Cache duration of "Default" will use this value (required)
- Set the site in maintenance mode?
- The message that is displayed when user goes to the login page and the site is under maintenance
Specifies which file extensions should prefixed before the content record's Title in the rendered results of a Content Tagged List content item, if the content record contains a Content File content item that will download a file with the listed extension.
Enables the behavior of the Mark as important until field in content records. When cleared, disables the field's behavior.
Specifies how many times each publishing service will attempt to process a system publishing request for a content record before it flags the request as failed. This prevents over-consumption of system resources if there is a connection issue or other issue that is preventing the publishing service from successfully processing the request.
Sends an email to all people who have Content Approver permissions in at least one content authority group (CAG) to which they belong whenever anyone submits a content record publishing request. When cleared, disables email notification of publishing requests.
Specifies the default system setting that will be used if Default is selected in the Cache duration field for a content record (Properties tab). Any content record with a Cache duration of Default will use this value.
When enabled, only system administrators can log in to iMIS.
Specifies the message to display to users attempting to log on to iMIS while in maintenance mode.
Creating a custom website from a Quick Start Site (Site Builder)
There are many out-of-the-box Quick Start Sites available to use as a starting point for your own custom RiSE website. It is recommended that the website is copied, so that you can make changes to the copied website without having those changes overwritten on the next upgrade.
Deciding which website to copy
Before you copy a Quick Start Site, decide which one you would like to copy and use as the starting point for your custom website.
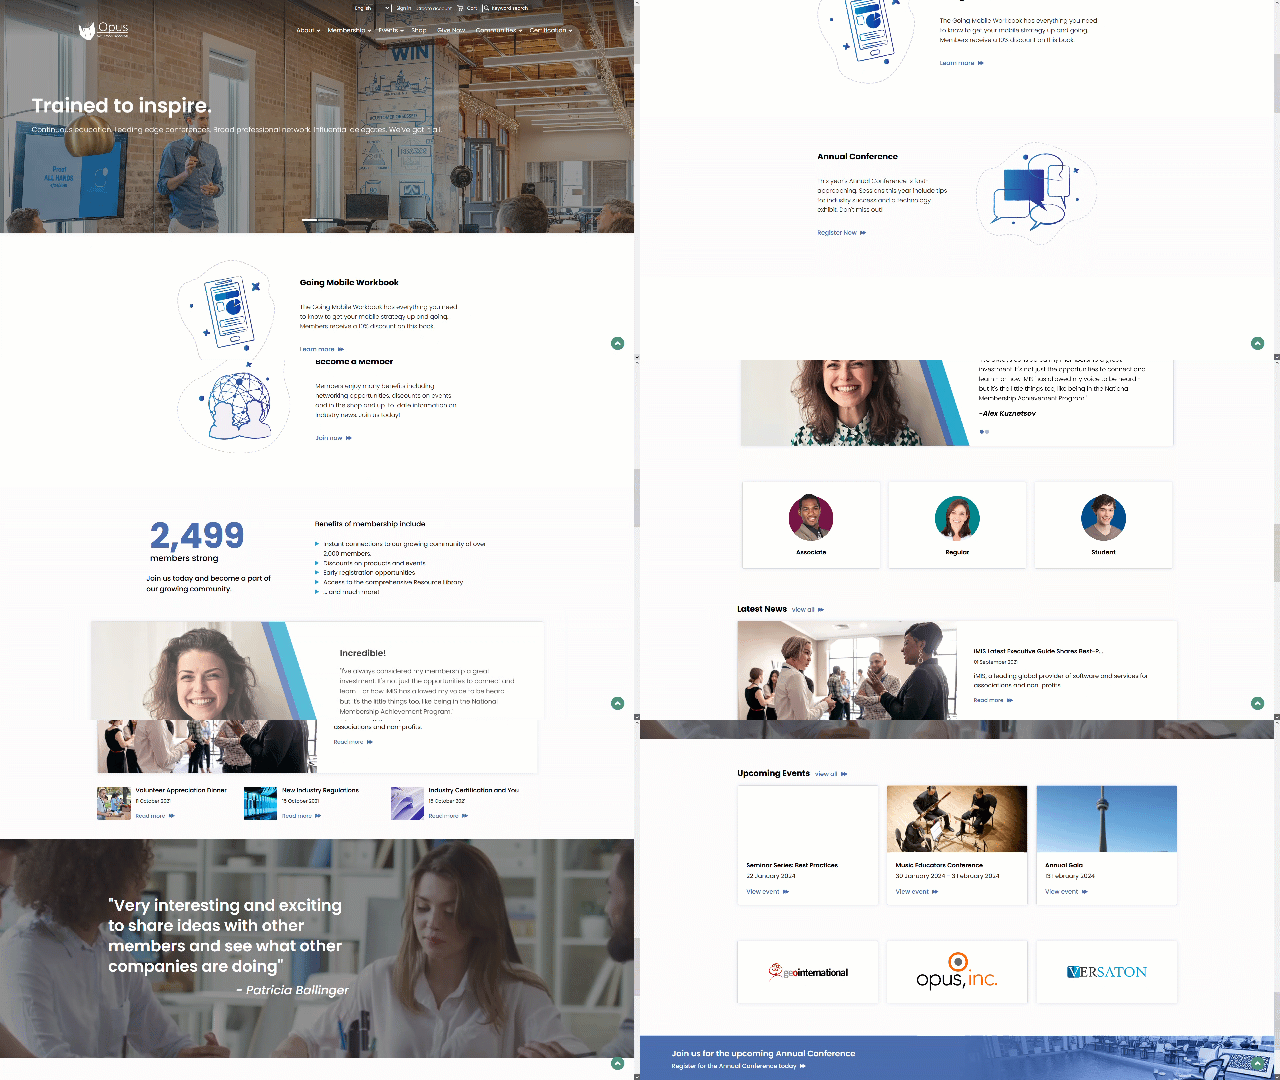
The Member Responsive site adds the flexibility to truly take advantage of the engagement opportunities that iMIS delivers. The iMIS Member Responsive site enables users to access your sites from a variety of different devices – from regular desktop computers, to the latest smartphones that your busy members use to stay in touch – and stay engaged with your products, events, and offerings.
The Member Responsive sites respond to the screen size of the device on which it is being accessed, like a desktop computer:
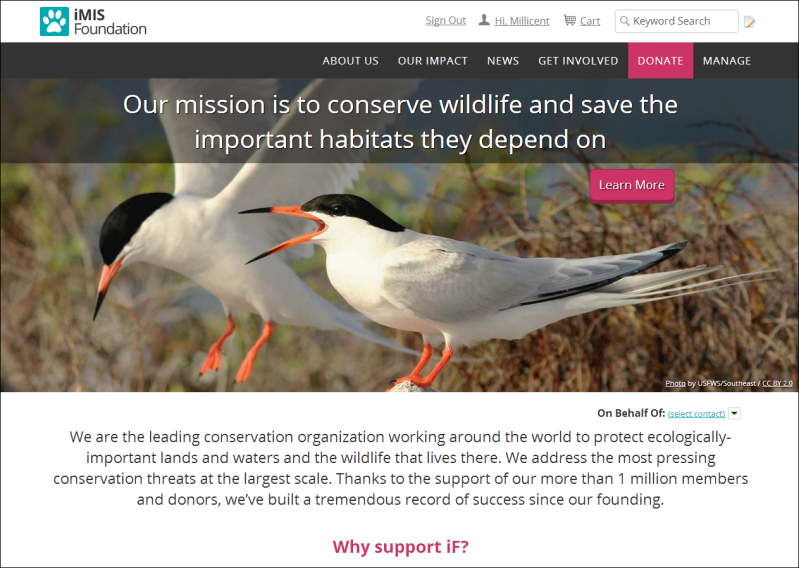
The responsive Donor site offers a rich and highly customizable experience for fundraisers. It's easy for your members, donors, and prospects to make and share easy donations. It is the perfect way to spread the word about your organization’s missions and fundraising goals, including immediate fundraising needs. The Donor site offers a rich experience for your donors, members, and the general public.
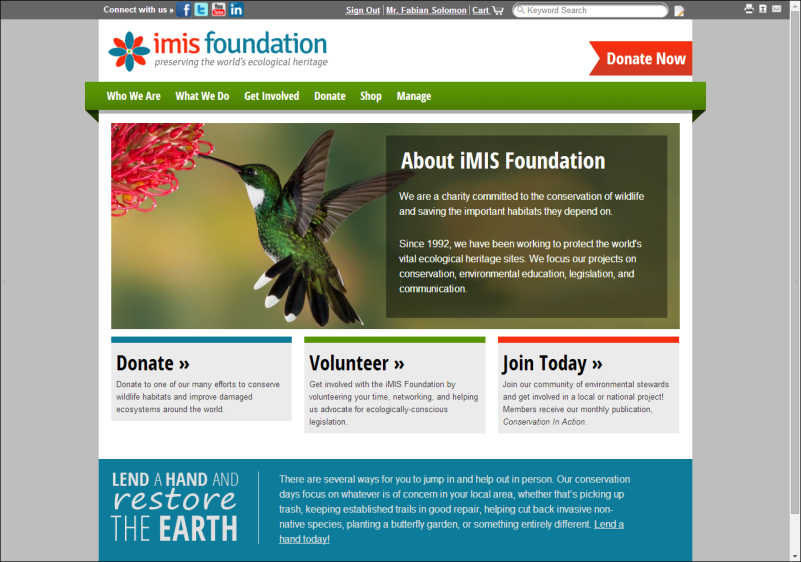
One of the most important events for an organization is the Annual Conference. With its dedication to conferences and other key projects, this iMIS site can be customized by your organization with your own unique content. Tailored sites can maximize the impact of your conferences, without affecting your main site. iMIS seamlessly integrates content between your various sites.
The Annual Conference Quick Start Site is built using the London_Responsive theme to allow access from any device.
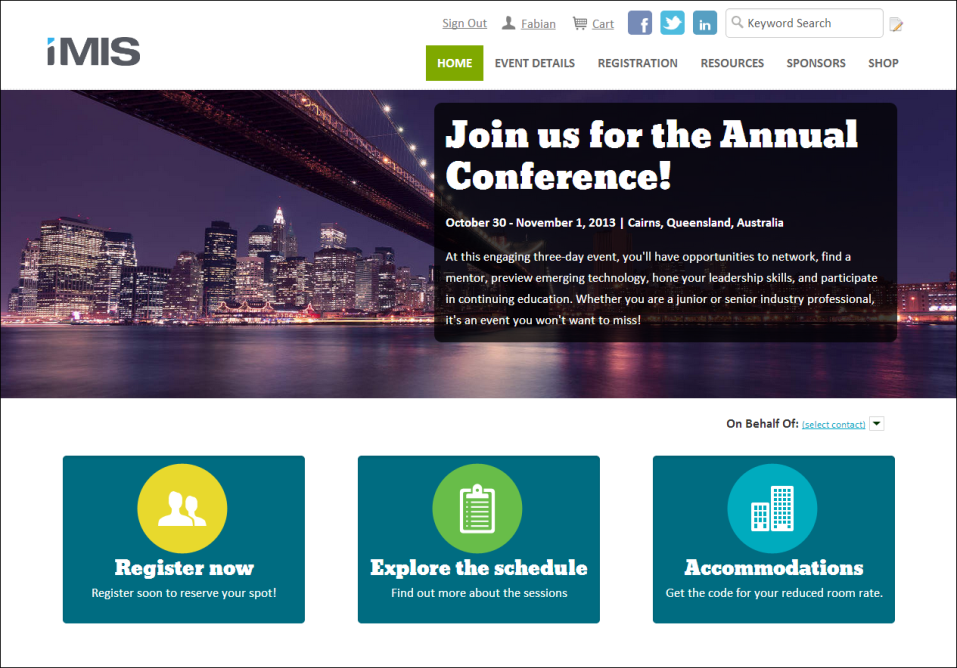
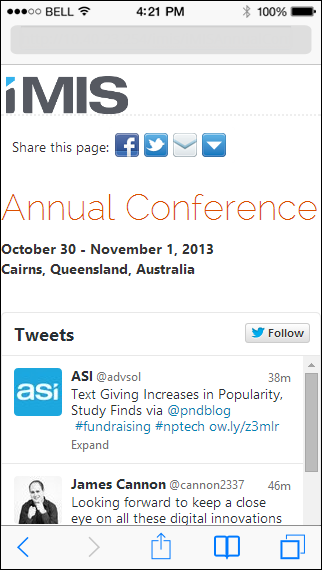
This site renders a version of your Annual Conferencesite that is optimized for use on mobile devices for both members and staff. Annual Conference Mobile is especially handy for members and staff while attending conferences. This site promotes quick access to personalized programs, activities, event feeds, and provides instant look-up directory profiles of other attendees.
Copying and publishing the website and related content
To create your own personalized website, you can copy a Quick Start Site and make changes to the copy. When you copy a website, iMIS duplicates the site navigation and content records for the new site.
To copy a website, do the following:
- Go to RiSE > Site Builder > Manage websites.
- Expand the Quick Start Sites folder.
- Select the desired website.
- Copy the website:
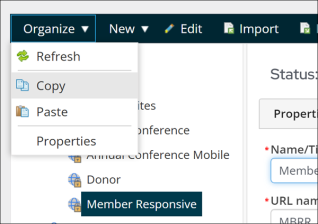
- Select Organize > Copy.
- Click the Websites folder.
- Select Organize > Paste.
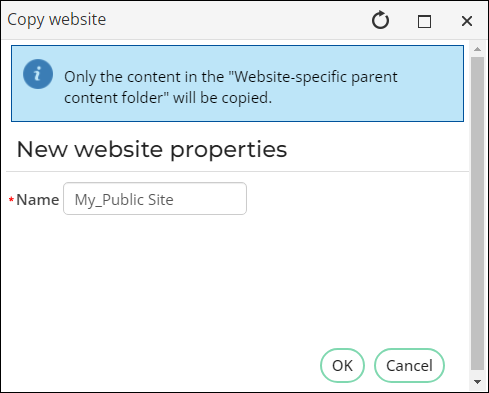
- Enter the Name of the new website.
- Click OK.
- Select the copied website and click the collapse/expand icon in the Status area.
- Confirm that the Is this website active? option is enabled. If needed, enable the option, then save the change.
- Click Publish, then click OK.

When a website site is copied, the content defined in the Website-specific parent content folder field is also copied.
Tip: This does not mean you must use and include the copied content in your new website, but it does mean the content is currently included in the website until you begin making changes. You must publish the copied content, then you can begin excluding or updating content.
To publish the copied content, do the following:
- Navigate to RiSE > Page Builder > Manage content.
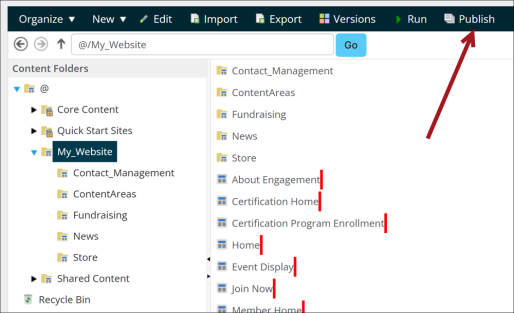
- Select the copied website’s content folder. Red bars displaying beside content records indicate that their status is Working.
- Click Publish, then click OK.
- As each folder and content record publishes, the status will change from PublishPending (represented by a yellow bar that displays beside the content record) to Published (no bar will display).
Reviewing the copied website and related navigation
Before you begin updating website content, you should review and understand the settings defined in the copied website to confirm they are correctly configured.
To review and update the website settings, do the following:
- Go to RiSE > Site Builder > Manage websites.
- Click the website.
- Review the Properties tab:
- Update the Description for the website.
- To learn more about other settings, see Properties tab.
- Review the Look and feel tab:
- The Website theme is automatically set based on the website you copied. There are many out-of-the-box website themes to choose from, or you can create your own theme. See Updating the theme for details.
- If you are required by law to provide a cookie policy, enable the Show a cookie warning setting and configure the related settings. See Website cookies for details.
- To learn more about the other settings, see Look and feel tab.
- Review the Navigation areas tab:
- By default, all navigation areas are enabled. Disable the navigation areas you do not wish to use. To learn more about these settings, see Navigation areas.
- Review the Access settings tab:
- These access settings grant access to the overall website. You can restrict access to specific website pages through the content records, so it is recommended to leave the access settings here set to Everyone Full Control for the website; however, if the website is for a specific group only, you can apply those restrictions here.
- To learn more about Access Settings, see Granting access to content using the Access Settings.
- Click Save, then click Publish.
Just like the website content, the website navigation is automatically copied. You can update the navigation as you begin updating and creating website content.
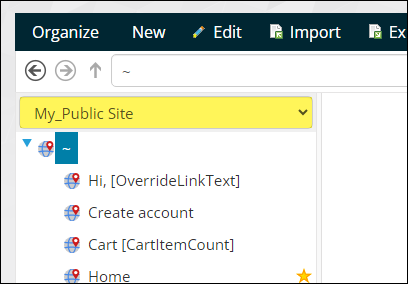
To review and update the website navigation, go to RiSE > Site Builder > Manage sitemaps. From the drop-down, choose your newly copied website.
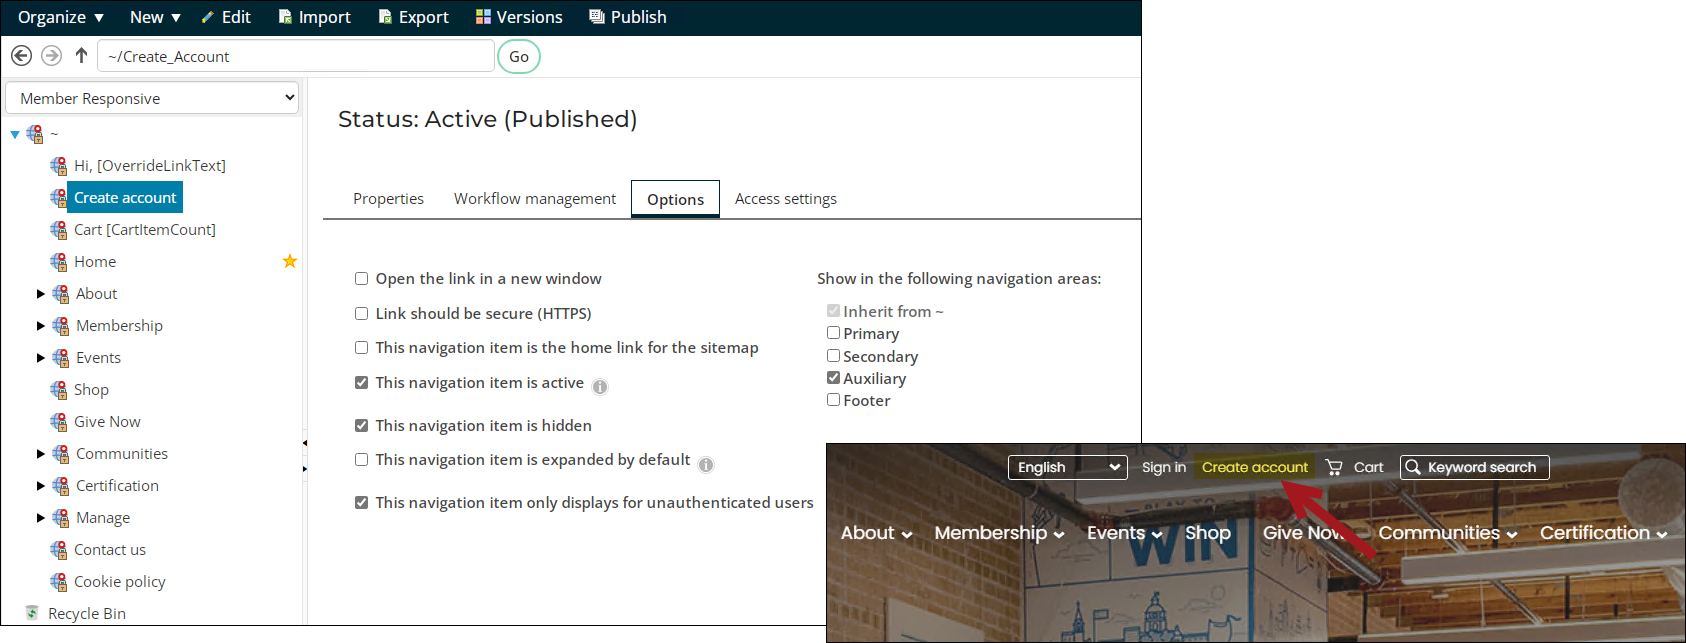
Certain navigation items such as Create account and Cart are configured to display in the auxiliary navigation of the website.
Many navigation items are configured to display as the primary navigation. This is the more traditional location of navigation items and are the navigation items you will be updating as you create your own content.

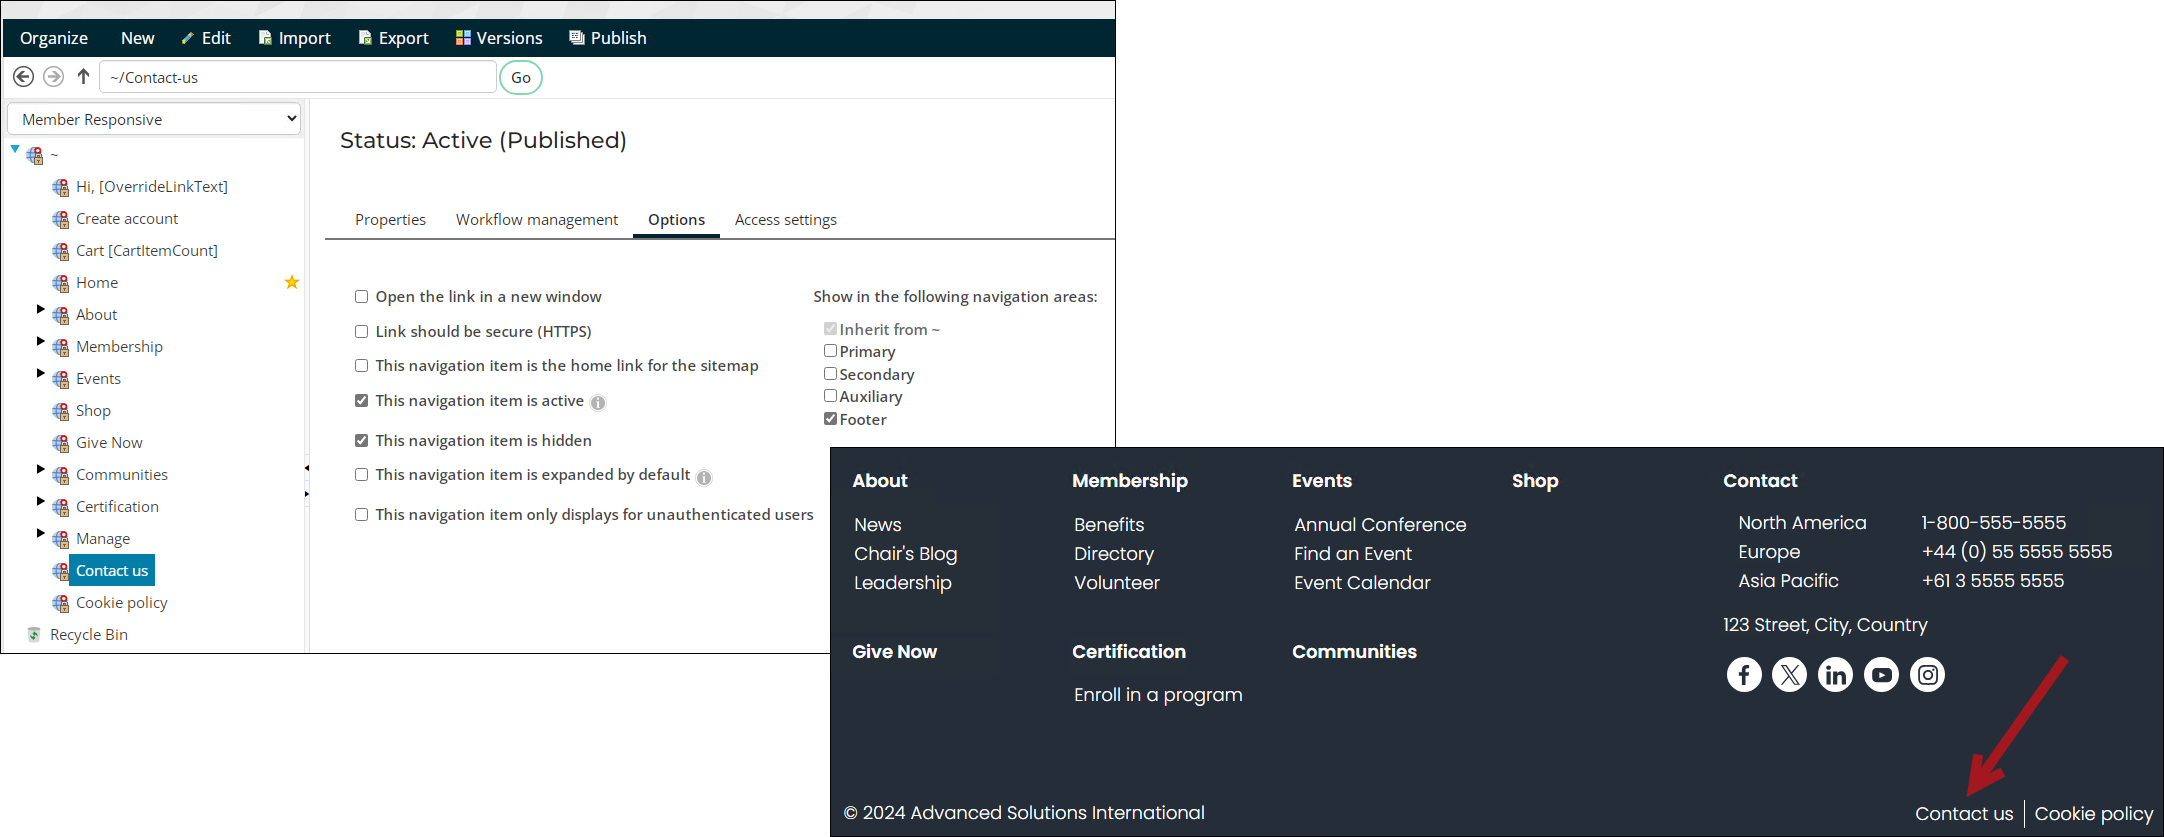
Other navigation items are configured to display in the website footer, such as the Contact us and Cookie policy pages.
You will not need to update the navigation until you begin making changes to the website content. For more information, see Using sitemaps and Controlling sitemap behavior.
Creating custom content (Page Builder)
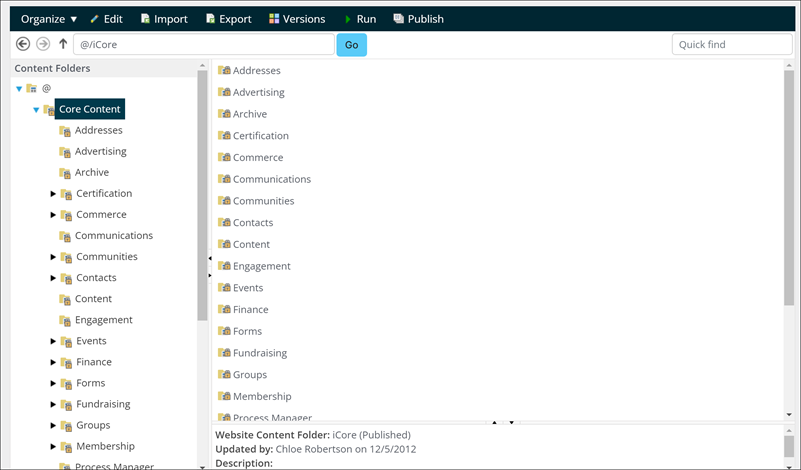
Defining and publishing website content happens from RiSE > Page Builder > Manage content. The Manage content menu item contains a filtered view of the document system where all available website content records, or web pages, are organized into content folders.
A content folder is automatically generated for each new website, and when a website is copied, the content records and folders housed within the original website's parent content folder are automatically duplicated into the new website's folder. To manage or add content for a specific website, navigate to its corresponding folder.
Review the following information to learn more about creating and managing website content:
Each content record represents an individual web page. Content records specify all the information needed to render a web page, including how to display various content items on the page.
To define or edit content records, do the following:
- Go to RiSE > Page Builder > Manage content.
- Select the content folder in which you want to create the content record. Do one of the following:
- Double-click an existing content record to open it for edit.
- Select New > Website Content.
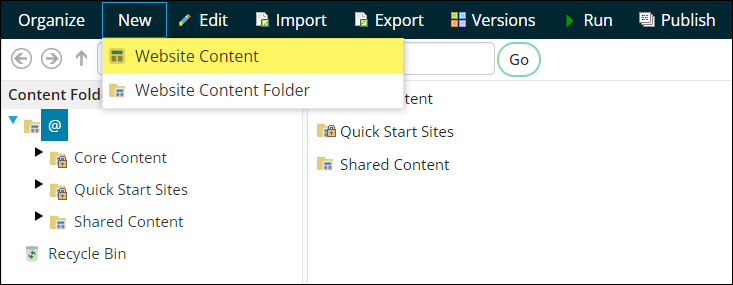
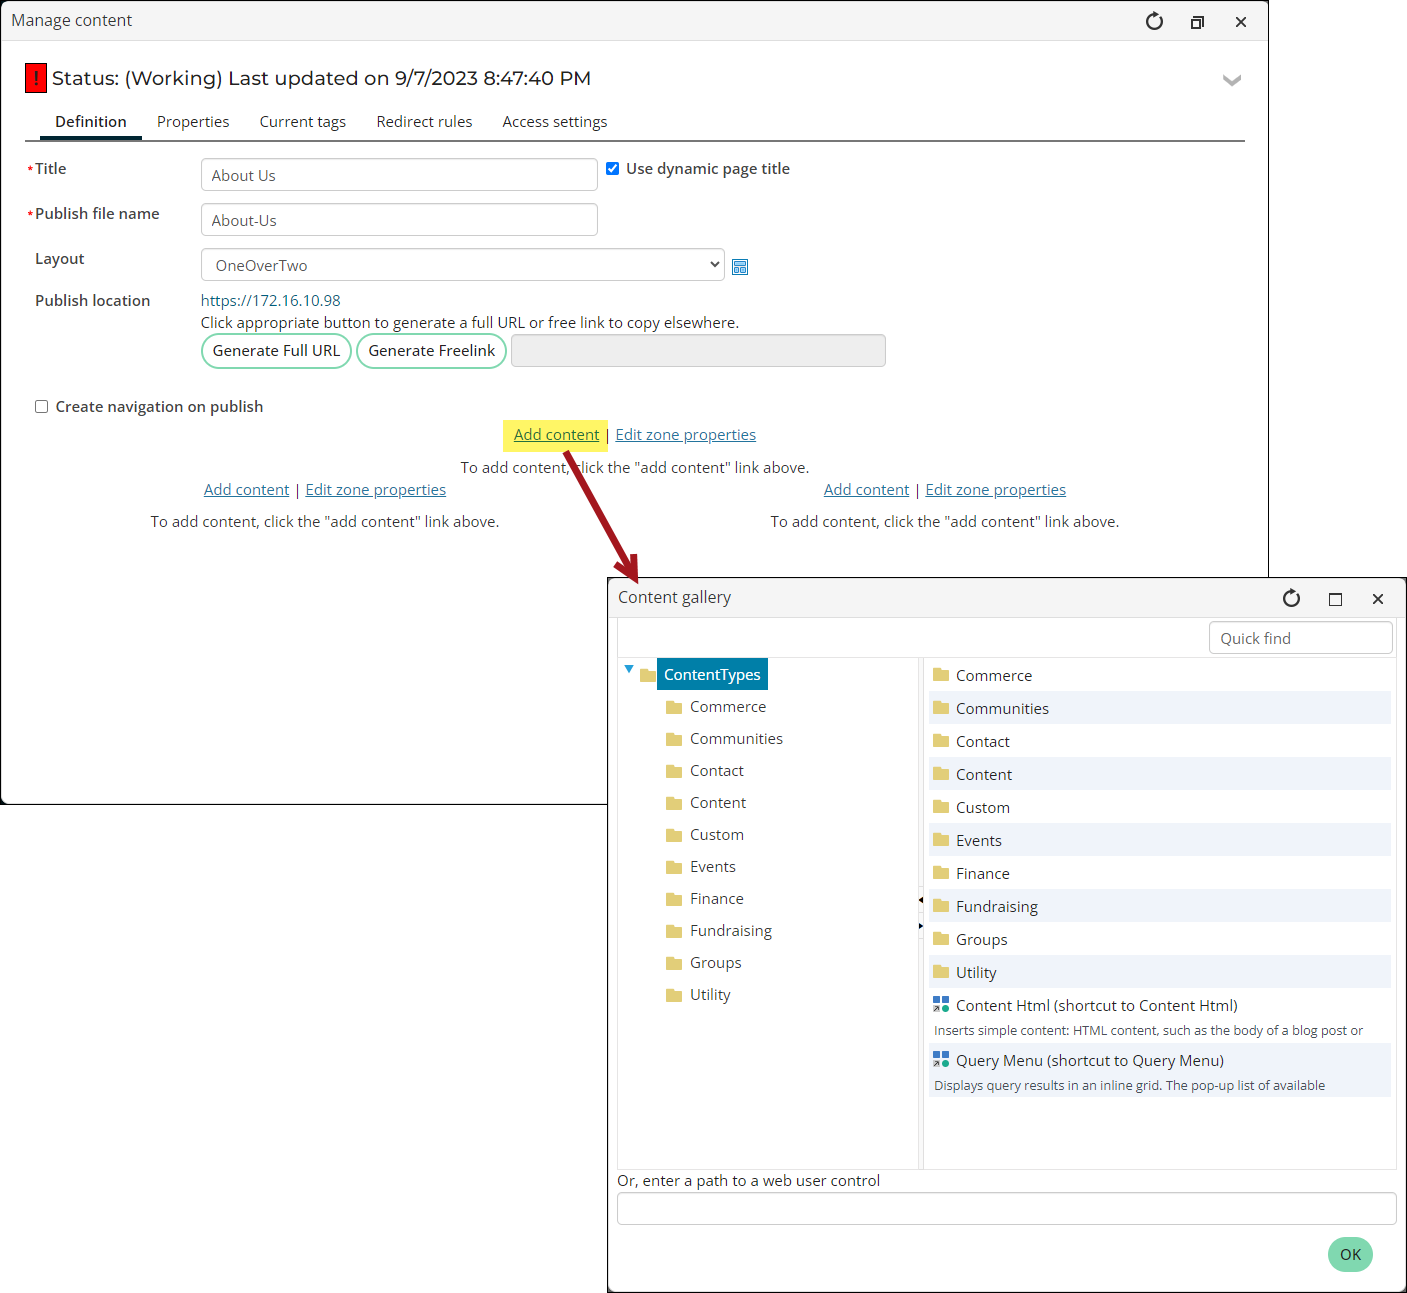
- Enter a Title for the content record, or enable Use dynamic page title. When selected, this option allows certain dynamic content items to replace the page title as it is displayed in a browser window or tab. For more information, see Overview of content records.
- Enter a Publish file name for the content record. This specifies the name of the .aspx file to which this content record is published.
- Select a layout in the Layout drop-down list. For more information, see Changing zone properties.
- (optional) If you want to create a navigation item for this content record, select Create navigation on publish to select the location in a web page sitemap where the content record will be published:
- Enter a name for the new navigation item in the Navigation link text field.
- Click select to choose the Navigation location where this content record is published.
For more information, see Defining content records.
- Design the content:
- Select Add content to add one or more content items to each zone. For more information, refer to Working with content items.
- Select Edit zone properties to specify the displayed title and CSS classes associated with the content item zone of the content record. For more information, see Changing zone properties.
- Once you have configured the Definition tab of the content record, review and adjust the settings on the remaining tabs as needed:
- Properties – Review and adjust the settings on the Properties tab as needed.
- Current Tags – Review the tags that are currently associated with this content record from the Current tags tab.
- Access Settings - Define the security options on the Access settings tab.
- Save and publish the content record. There are two publishing options:
- Save and publish immediately: Before closing the content record, select Save and Publish to make your changes immediately visible on all websites that use the content record.
- Save, then publish later: If you Save the content record without publishing, the content record is marked with a status of Working. To publish the content record, select it and then click Publish in the Document system toolbar.
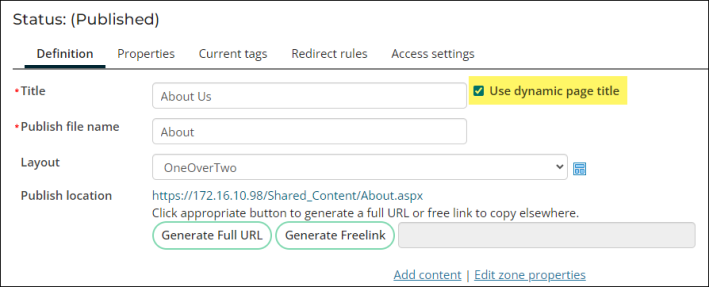
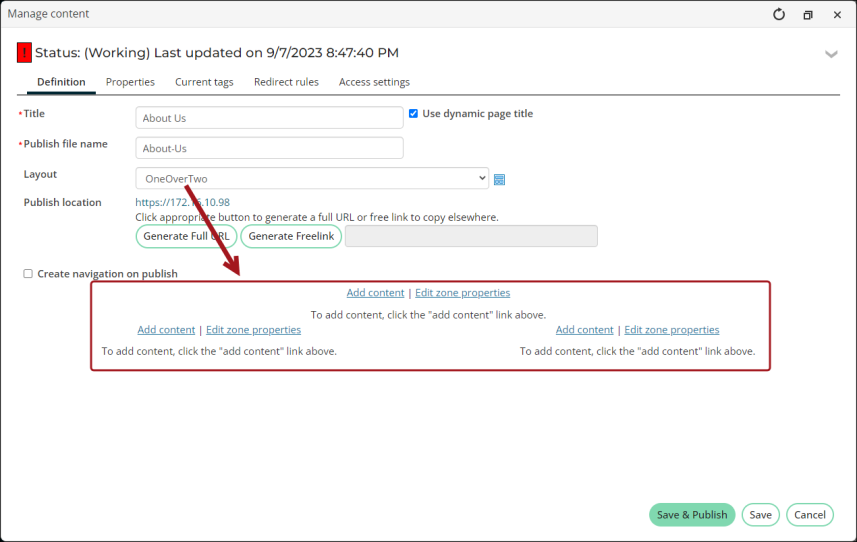
For more information, see Publishing content records.
All content records in the Core Content and Quick Start Sites content folders are protected as System content records and cannot be edited or deleted. To update a System content record, see Updating out-of-the-box content records.
All content records in the Core Content and Quick Start Sites content folders are protected as System content records and cannot be edited or deleted. If you want to update a System content record, create a copy of it, and then edit the copy. Be sure to also update any navigation items or shortcuts that point to that content record.
Copying and updating out-of-the-box content
To create a copy of an existing content record, do the following:
- Go to RiSE > Page Builder > Manage content.
- Open the desired content record for edit.
- Click Save As.
- Choose the non-system folder created for the project.
- Click OK. You will see a message that says, "A website navigation item must be modified or added to reference this new content record." This will be addressed in one of the following sections.
- Make the updates you desire to the content record.
- Click Save & Publish.

After system content is copied and updates are made to the copy, you must configure iMIS to use the copied page instead of the out-of-the-box page. Most out-of-the-box pages are defined in a shortcut, which means you must update the related shortcut to use your new page instead of the out-of-the-box page. For more information, see Updating out-of-the-box content records.
Determining what shortcut to update
All system content is configured and displayed through the use of a shortcut. If you are unsure of the shortcut to update, do one of the following:
- Review the Managing shortcuts article. Many popular shortcuts are defined in this article.
- If you are updating content related to a navigation item, do the following:
- Go to RiSE > Site Builder > Manage sitemaps.
- Choose the site from the drop-down, then choose the navigation item.
- Make note of the shortcut defined in the Content or URL to link to field.
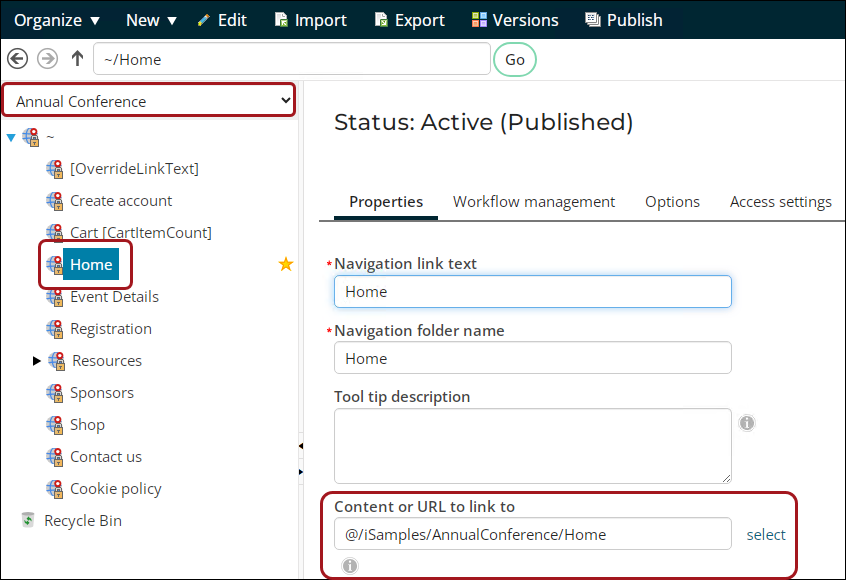
Note: If the content defined in the Content or URL to link to field is not a shortcut (does not begin with ~/ ), then you do not need to update a shortcut. Instead, you can select the page you copied (in the above section), then Publish the updated sitemap.
Update the related navigation or shortcut
After the system content is copied and updates are made to the copy, you must configure iMIS to use the copied page instead of the out-of-the-box page. Most out-of-the-box pages are defined in a shortcut, which means you must update the related shortcut to use your new page instead of the out-of-the-box page.
Do the following to update the related navigation or shortcut:
- Go to RiSE > Site Builder > Manage shortcuts.
- Search for the shortcut.
- Click the edit icon.
- From the URL or content record field, select the copied content record you created in the above section.
- Click Update.
- The iMIS cache may need to be cleared to see the changes more quickly (Settings > About iMIS > Purge System Cache).
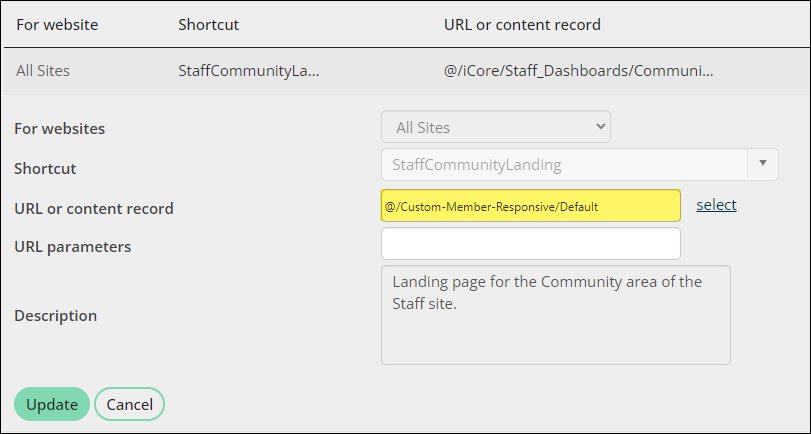
Going forward when using Easy Edit, there will be a Save & Publish button instead of the Save As button. For more information, see Updating out-of-the-box content records.
Updating the homepage images for out-of-the-box themes
The iMIS quick-start-sites use several content records to render the images on their home pages. If you created a copy of one of these sites, the related out-of-the-box website content was also automatically copied. To customize the out-of-the-box homepage images, see Updating the homepage images on out-of-the-box themes.
Dynamic Content Items, also known as iParts, contain the actual content displayed to website visitors, such as text, images, queries, embedded forms, and other interactive elements. Multiple content items can be combined and displayed in a content record as you prefer.
Adding content items to content records
To add content items to content records, do the following:
- Add a content record or edit an existing content record.
- Select Add content.
- Select the desired content item from the Content Gallery.
- Click OK to add the content item to the content record.
- Configure the content item. For details on the configuration options for each content item, refer to the Content galleries or the in-product help.
- Click OK.
- Save and Publish the content record.
Managing content items
After the content items have been added to the zone, you can drag each content item within the zone to define the order in which you want the content items to appear on the rendered web page. You can also click one of the following commands on the content item's title bar:
- Configure – Displays a configuration window that enables you to define the content item's properties. For example, for a Content Html content item, a text editor is displayed. When configuring a content item, click the
 link for Configuration Help.
 - Copy To – Copies the content item to another content record.
- Move To – Moves the content item to another content record.
- Connect – Displays a connection editor that enables staff or consultants to define content item connections. Connections allow one content item to interact with another content item on the same content record. Not all content items support connections, so when configuring a content item, open the Configuration Help to determine the content item’s connection options.
- When creating a new connection, the available connection types are listed, and a drop-down list enables you to select from the other content items on the same content record.
Content galleries
Review the content gallery articles for details on each available iPart:
Access settings give you a consistent way to apply security (grant permissions) to folders and objects throughout iMIS:
- Content records
- Entire websites
- Individual navigation items
- Queries
- And the wide array of objects that you can define, import, and store in the Document System
From the Access settings tab of content records and folders, there are two radio buttons:
Use a preconfigured security set
Throughout iMIS, whenever you configure access settings, you see a drop-down list of available security settings that you can apply to individual folders and objects. These security sets offer you easier control and faster performance than defining custom ones.
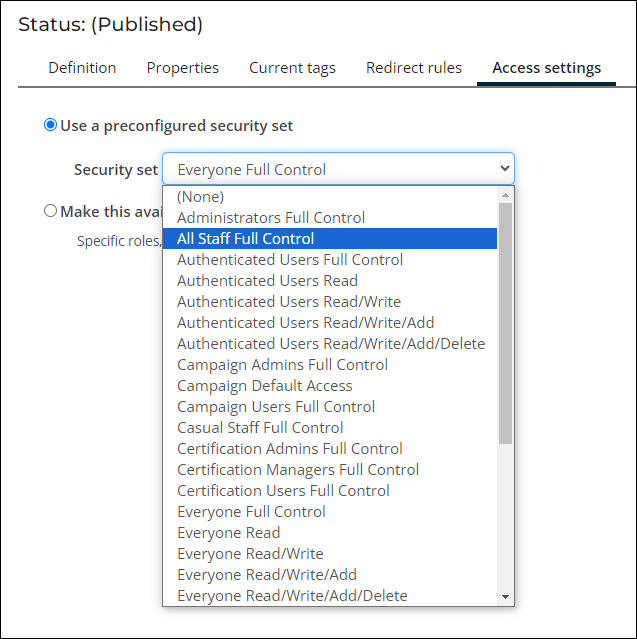
These are the key security sets you should use, from most permissive to least:
- Everyone — No restrictions, including the public (if they can access this level/context).
- Authenticated Users — Restricts access to users who are signed in (both staff and public members).
- All Staff Full Control — Restricts access to staff users.
- Administrators Full Control — Restricts access to users with the SysAdmin role.
Note: If you do not have the feature named in the security set (such as Certification), do not use the set.
When you choose a set, the Current Access List below updates to show the access settings it includes. Look at these details to decide if the selected security set has the permissions you need.
Make this Available to
Allows you to restrict the content to specific roles, groups, users, and member types. When this option is selected, you will see the Specific roles section has Content Administrator and SysAdmin automatically selected. These are default system-defined security roles that are assigned to every content record:
- SysAdmin - Anyone with the SysAdmin role.
- Content Administrator - This role is automatically assigned to every iMIS user who is a member of a content authority group (CAG) that is designated as a Master Admin CAG.
The permissions that can be assigned to each entry in the list are:
- Full Control - Enables all of the following permissions.
- Read - Enables users to see this object both in definition windows and as rendered output in websites, but they cannot change the object's definition.
- Add - Enables users to create new objects, or to paste or import an object into the Document system.
- Edit - Enables users to edit this object's definition, but not to delete the object.
- Delete - Enables users to delete this object.
- Select - Enables users to assign a tag to content folders and content records.
Note: These permissions are only used with Content Authority Groups. To see how they are used with CAG, see Defining content authority groups.
When you first create a content record, or when you make changes to an existing Published content record, that version of the content record is not visible on any iMIS RiSE websites until it is published. You have two publishing options:
- Save and publish immediately: Before closing the content record, select Save and Publish to make your changes immediately visible on all websites that use the content record.
- Save, then publish later: If you Save the content record without publishing, the content record is marked with a status of Working. To publish the content record, select it and then click Publish in the Document system toolbar.
After publishing your content record, the status changes briefly to PublishPending, and then to Published once it has been fully rendered to an .aspx file on all web servers that host the relevant iMIS RiSE websites.
If status changes don't appear right away, go to Settings > About iMIS, then click Purge System Cache. The published changes will now appear.
Use the following tips when troubleshooting content record and folders.
Required Access Settings
Certain document system access settings are required when performing the following content management functions:
- To create new content records or folders, you must have both Read and Edit permissions on the content folder in which you create the new records or folders.
- To edit existing content records or folders, you must have both Read and Edit permissions on the content record or folder.
- To delete content folders, you must have Delete permissions on each content folder. The Document system permissions from the parent content folder are copied into each newly created content record but can be changed later.
- You must have Select permissions on each content record or folder to which you assign tags.
Note: Membership in the SysAdmin security role effectively grants the full set of Document system permissions and the full set of content authority group permissions (you are effectively a member of a MasterAdmin content authority group too). However, to participate in web-content authoring workflow, a member of the SysAdmin role must be an explicitly-listed member of at least one content authority group. The core content folder and all its descendants are protected for use by iMIS. The default Document system permissions for the content folders and content records permit editing only by members of the SysAdmin role.
Required Content Authority Group permissions
You must have some or all of the following edit permissions in at least one content authority group:
- To create or edit content records, you must have Content Editor content authority group permissions.
- To publish content records without requiring approval from another person, you must have Content Approver content authority group permissions.
- To delete content records without requiring approval from another person, you must have Content Approver content authority group permissions, and you must have Delete Document system permissions for each content record.
- To create new content folders, you must have Folder Creator content authority group permissions. Folder creators can create new content folders, as well as edit or delete existing content folders.
- To modify the properties of a content folder, you must have Folder Editor content authority group permissions.
- To be the content owner of a content folder, you must have Content Editor content authority group permissions in the content authority group that is assigned to the content folder.
Additional tips
- You can edit content records with the Easy Edit feature. Casual and Public users cannot perform the tasks described here because they cannot access iMIS RiSE. However, they can use the Easy Edit feature to revise existing content records.
- With the help of those who perform website management, you must determine in which content folder to create the content record. Every content folder specifies important criteria that define how the system should manage content, and automatically applies these criteria to the content records created in that content folder. For example, the content folder specifies which iMIS RiSE websites the content records will be published to, and also specifies the content authority group that determines the default workflow for the content records, such as who is notified when a content record nears its expiration date.
- You should not create content records in the root content folder (the @ folder). It is unwise to specify system management criteria for content folders at the root level of the content folder hierarchy, as these criteria would be copied into all new content folders. By leaving the system default values intact in the root content folder, those who perform website management can design a more flexible authoring and publishing environment.
- If content items appear to overflow the boundaries of content item zones in the rendered pages, you may need to modify your website's template.
To help you to organize your site images where they cannot be overwritten during upgrades, iMIS uses one system-defined path for all of the image files that you upload. Images are stored in the Document system and can be viewed and maintained in RiSE > Page Builder > Manage images or in RiSE > Document system in the $/Images folder. Event and product images are stored in the $/Images folder.
Note: The Image Manager is only available to logged-in staff users, system administrators, and those with content authority roles.
| Allowed image sizes and extensions | |||
|---|---|---|---|
|
Suggested max size |
Suggested dimensions | Allowed extensions | |
| Regular images (Image manager) | 10 KB | Any | *.gif, *.png, *.jpg, *.jpe, *.tif, *.bmp, *.svg, *.ico |
| Homepage banners / Slideshow images | 20 - 50 KB | 1000 - 1400 (w) x 400 (h) px | *.gif, *.png, *.jpg, *.jpe, *.tif, *.bmp, *.svg, *.ico, *.webp |
| Favicon (Desktop) | 4.77 KB | Must be square, at least 48 x 48 pixels, and a multiple of 48 (e.g., 48 x 48 px, 96 x 96 px, 144 x 144 px) | *.ico, *.png, *.jpg, *.jpe, *.gif |
| Favicon (Mobile) | 4.77 KB | Must be square, at least 48 x 48 pixels, and a multiple of 48 (e.g., 48 x 48 px, 96 x 96 px, 144 x 144 px) | *.png |
| Navigation icons | 4.77 KB | 15 x 15 px | *.gif, *.png, *.jpg, *.jpe, *.ico |
uploading images
Note: To upload images, you must have Content Upload content authority group permissions.
To upload a new image, do the following:
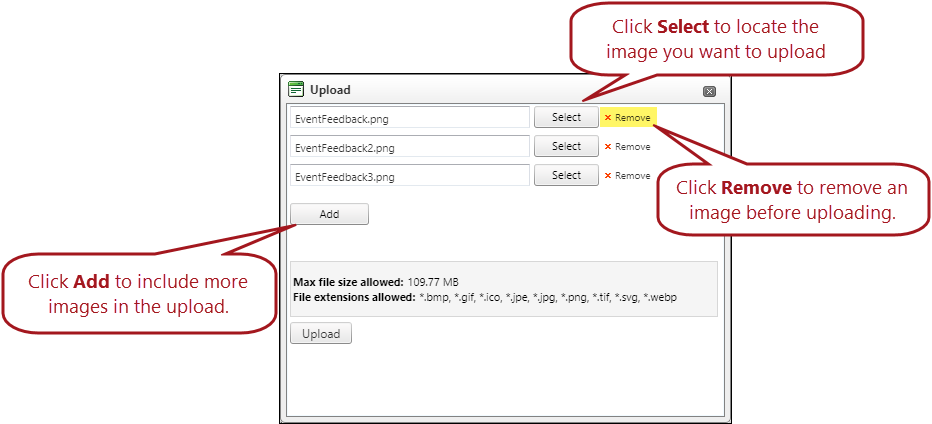
- Go to RiSE > Page Builder > Manage images.
- Select the folder to which you want to upload an image. You can also select to create a New Folder to upload your images.
- Click Upload.
- Click Select to browse to the image you want to upload.
- Select the image and click Open.
- Click Remove to remove an image before uploading.
- When you have finished selecting images to upload, click Upload.
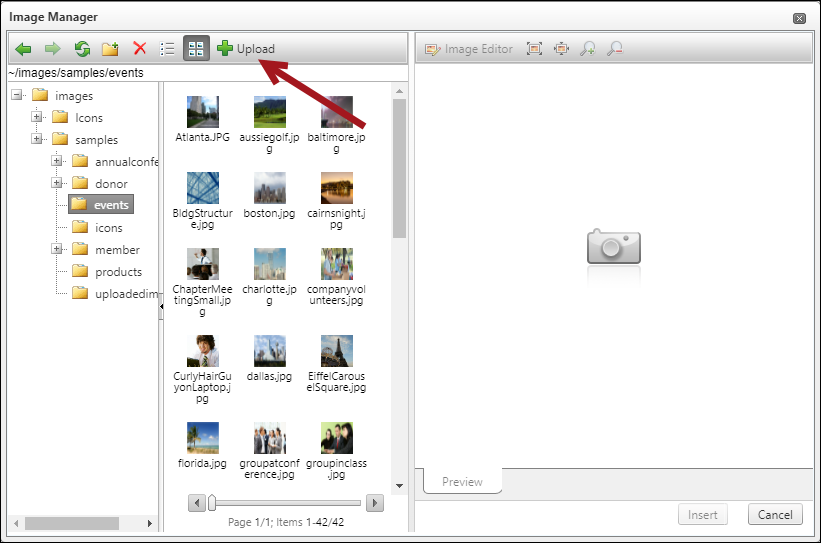
Editing and deleting images
The Image Manager has a built-in Image Editor that can perform some basic edits to images that you have already uploaded.
Images can be deleted from the following two areas:
- Image Manager – When an image is deleted from the Image Manager, the image is deleted and purged at the same time and cannot be recovered.
- Document system – When an image is deleted from the Document system, the image is placed in the Recycle Bin, where it can be recovered if necessary.
Managing files
Using the Content Html content item, you are able to insert links to downloadable documents.
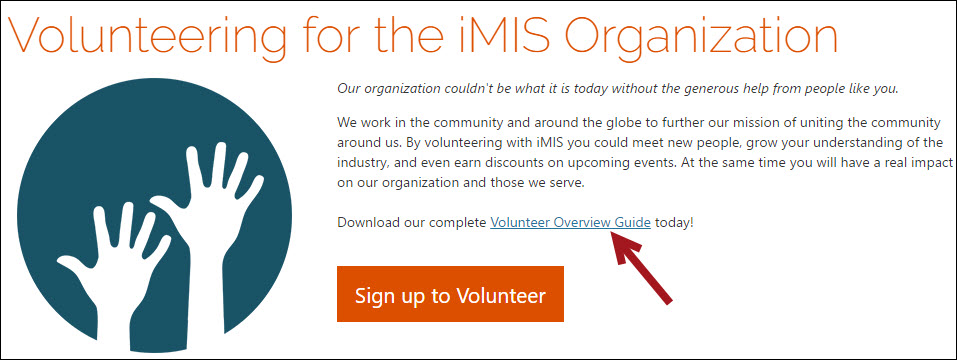
These documents are managed from RiSE > Page Builder > Manage files. From here, system administrators and content authority group members are able to manage existing and upload new documents. If there is a document in the Document System that you want to provide as a downloadable document, you must move or reupload the document to the Uploaded files folder ($/Common/Uploaded files).
| Allow file sizes and extensions | ||
|---|---|---|
| Max size | Allowed extensions | |
| File upload (Manage files) | 112400 KB |
*.7z, *.avi, *.bmp, *.dmg, *.doc, *.docx, *.epub, *.fml, *.gif, *.htm, *.html, *.ics, *.jpeg, *.jpg, *.mid, *.midi, *.mobi, *.mov, *.mp3, *.mp4, *.mpg, *.msg, *.pdf, *.png, *.ppt, *.pptx, *.tif, *.tiff, *.txt, *.wav, *.webp, *.wmv, *.xls, *.xlsx, *.xml, *.zip |
| File import (XML backup) | 112400 KB | *.xml |
For more information regarding images and files, see Managing files and images.
Making the content available on public websites (Sitemaps & Shortcuts)
Adding the content to your site consists of updating the sitemap and shortcuts, both of which can be done through the Site Builder. Sitemaps define a hierarchy of navigation items. Each iMIS RiSE website has a corresponding sitemap. Shortcuts allow users to update a shortcut link one time which updates all areas that use the same shortcut.
Site Builder allows you to manage sitemap navigation, websites, and URL shortcuts. Every iMIS RiSE website has a corresponding sitemap, in which you define a hierarchy of navigation items.
See Using sitemaps for more information.
Defining sitemaps and navigation items
The website's sitemap is automatically created when you define a new iMIS RiSE website and is given the same name as the website. You define sitemaps by adding and removing navigation items, rearranging the sitemap hierarchy, and changing the definition of individual navigation items.
Do the following to define a sitemap:
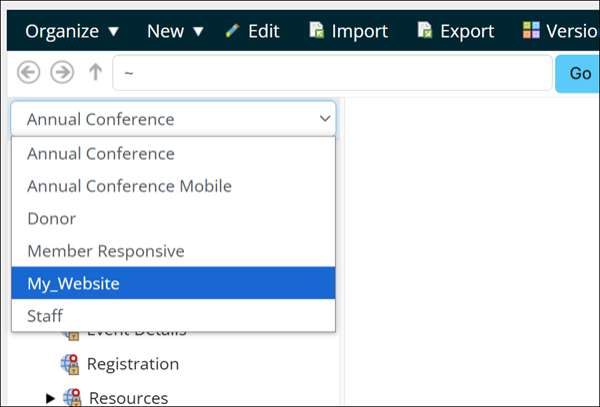
- Go to RiSE > Site Builder > Manage sitemaps.
- Select a sitemap you want to define in the drop-down.
- In the sitemap tree, select the location where you want to create the new navigation item.
- Do one of the following:
- Click New > Website Navigation Item to create a new navigation item.
- Click Edit to modify a selected navigation item.
- Click Organize > Delete to delete a selected navigation item.
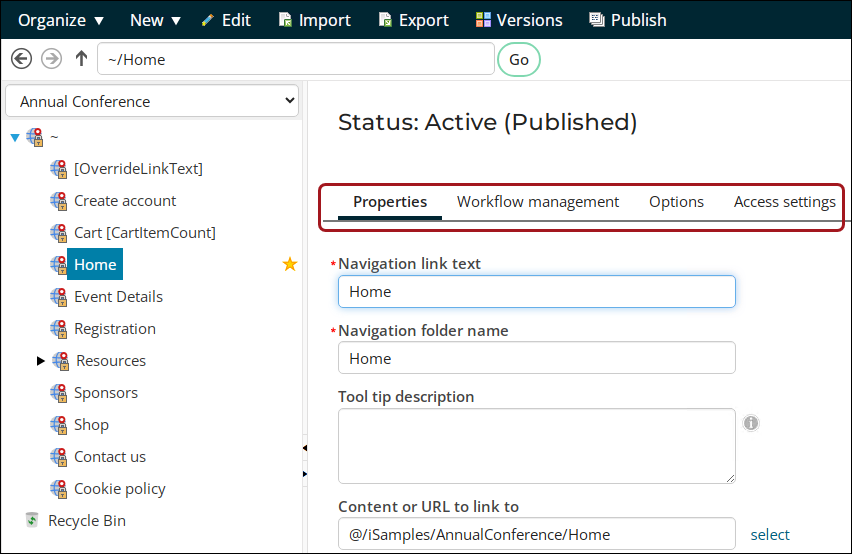
- Define the navigation item’s Properties, Workflow Management, Options, and Access Settings.
- Save and publish your navigation item.
- Publish the sitemap. See Publishing a sitemap for more information.
Modifying a sitemap
You can modify the sitemap hierarchy by dragging and dropping navigation items into new locations. Do the following to reorganize navigation items within the sitemap hierarchy:
- Drop navigation item A onto navigation item B to make A subordinate to B (A becomes a child of B, and B is the parent of A).
- Drop navigation item A into the space below navigation item B (a dotted line appears below B) to make A follow B at the same level of the hierarchy (A becomes a sibling of B).
See Modifying a sitemap for more.
You can tailor many aspects of your out-of-the-box sites without worrying that your changes will be overwritten on upgrade. Items that will be overwritten during an upgrade that you want to tailor can be copied and any needed modifications made to the copy.
New navigation items that you create are not overwritten during an upgrade. To tailor the navigation on your website, create new navigation items that point to the correct content records.
Important! Out-of-the-box navigation items may be overwritten on upgrade.
For more information on creating navigation items, see Using sitemaps. For more information on using shortcuts, see Managing shortcuts.
Review the following sections to learn more about updating navigation items:
Viewing the content and continuing to make changes
Once you have created website content, it is important to view the published content to ensure there are no issues. If issues arise, review the following recommendations regarding editing existing content:
While it is important to view the website content as a staff user to check for errors, it is essential to view the content from a public user point-of-view.
For example, a staff user logged in to the out-of-the-box Member Responsive site will see a different account page than a public user will see. The staff user account view features vertical tabs and contains considerably more functions and information. The public user account view features horizontal tabs and has far fewer editable fields and panels.
In order to view the content from a public user’s point-of-view, create a mock public user account that all staff can access for testing purposes.
Note: Using On behalf of does not allow a staff user to view the website from the public point-of-view.
There are two ways to edit content:
- Go to RiSE > Page Builder > Manage content, and update individual content records.
- Use Easy Edit to make changes in place.
Managing content in the Staff site
Do the following to edit website content from the Staff site:
- Go to RiSE > Page Builder > Manage content.
- Locate and open the content.
- Make any desired changes to the content. See Defining content records for more.
- Save and Publish the content record.
Editing content with Easy Edit
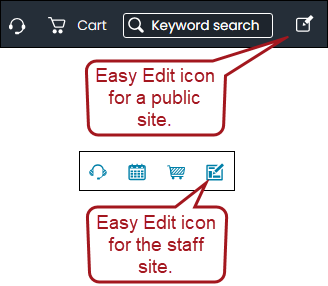
Easy Edit allows staff users to edit content in place. To revise a website page by using the Easy Edit feature, log on to the website and click the Easy Edit icon. This enables the Easy Edit mode until you click the Easy Edit icon again to disable it.
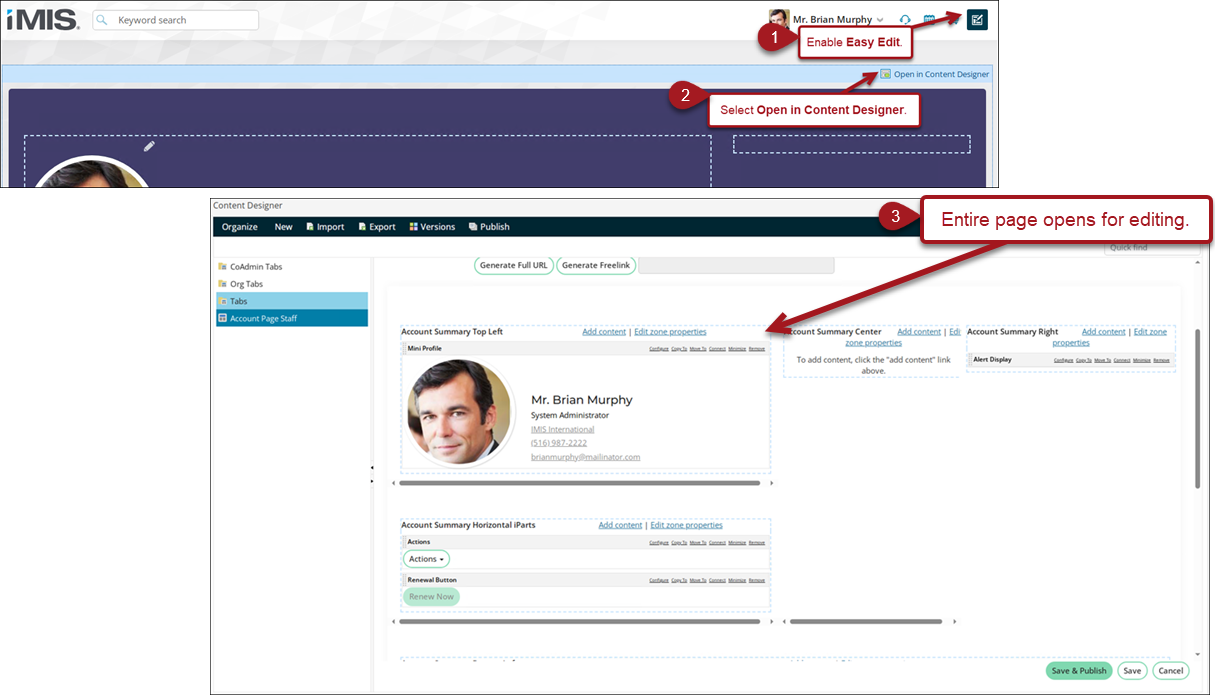
Staff users will see varying Easy Edit icons for sections of content depending on the Content Authority Group (CAG) and Document System permissions on the underlying content record. Review the Required Access settings and Required Content Authority Group permissions for more.
To edit a system content record using Easy Edit, do the following:
- When you find a page that needs updating, enable Easy Edit.
- Hover over a specific content item, then click Configure. To open the entire page, select Open in Content Designer.
- Make any desired changes.
- Save & Publish the content record.
- Be sure to update any necessary website navigation items to reference the new content. See Adding the content to your website for more.

Updating the theme (Theme Builder)
Website themes are an important part of the website creation process. The theme enables website designers to determine the styling, fonts, layout, colors, and more of a website.
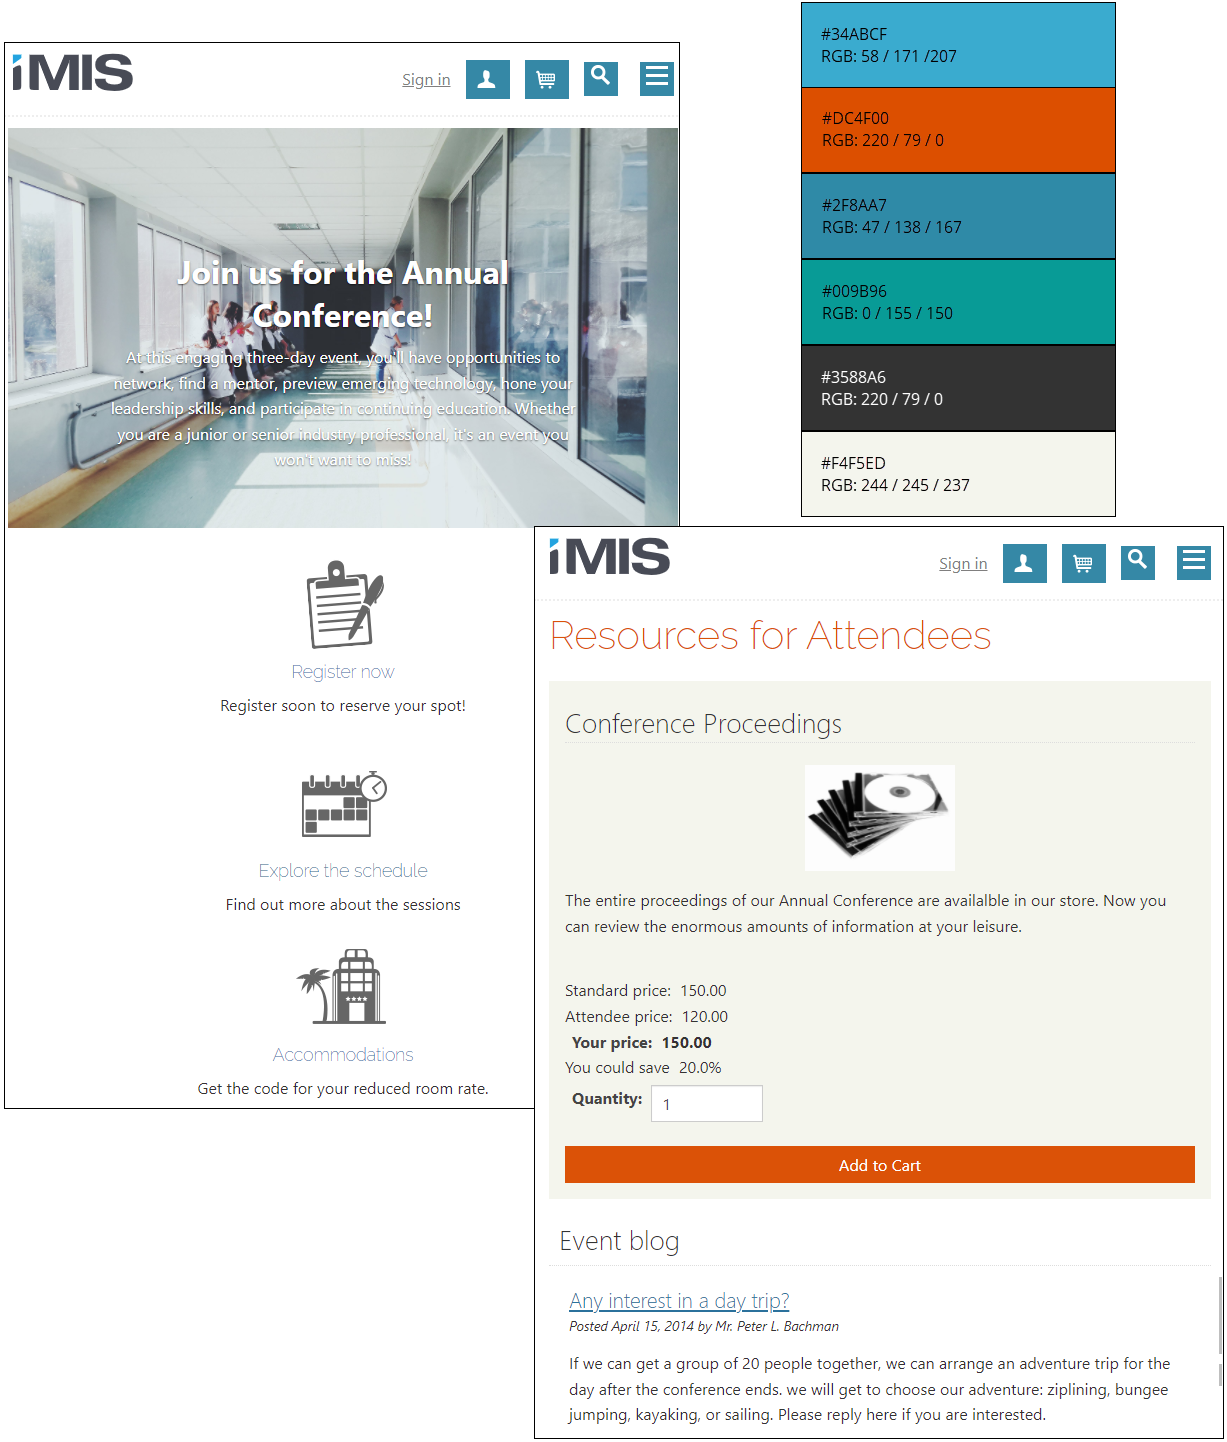
To create a personalized theme for iMIS, copy an out-of-the-box theme and customize it to fit your organization's needs. If you need greater creative control over the look and feel of your website, you can build a new theme.
Review the following outline to begin understanding the various steps involved to create and update a website theme:
- It is recommended to use one of the out-of-the-box themes as a starting point for a custom theme, since the required theme elements are already provided. Review the out-of-the-box themes to determine which one you would like to use as a starting point for your own theme.
- Copy the chosen website theme files.
- Make the desired changes to the theme files. Be sure to review what is required to remain in the theme files before you begin editing.
- Upload the theme to iMIS.
- Apply the theme to the website.
- Continue making changes as necessary.
Note: If you do not wish to start with a copy of an out-of-the-box theme, see Creating a custom theme.
If you also need to create or update the website layout and template, review the following:
- Determine if you need to modify the correlating theme’s layout or template:
- Layout: A website layout is the arrangement of all visual elements on a webpage. For example, through the layout definition you can create a design that determines where the logo, navigation, and footer are to be placed.
- Template: A website template is where you arrange the actual content using the layout as a guide. For example, in the layout you created space for the logo, navigation, and footer. The template is where you specifically define that the top-left space is for the logo, the full-width space at the top is for the navigation, and the full-width space at the bottom is for the footer.
- If you would like to change the layout or template that correlates with the theme you copied, do the following:
Themes change and develop with every iMIS update. To avoid losing your changes, be sure to work from a copy of the theme. Working from a copy of a website theme is easier than creating a theme from scratch.
Do the following to copy an existing iMIS theme:
- Go to RiSE > Site Builder > Manage websites.
- Open the Quick Start Sites folder.
- Select the Member Responsive site.
- Click the Look and feel tab.
- Click Advanced Options.
- From the Theme drop-down, select the theme you want to copy.
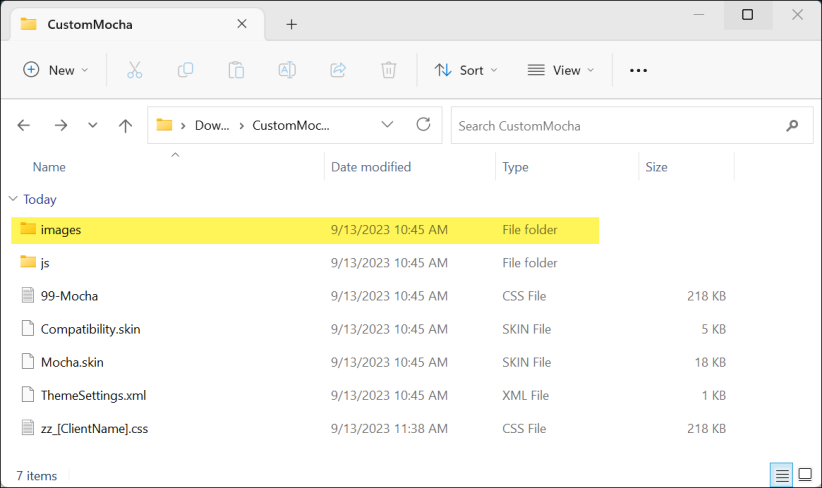
- Select Download theme files. The theme's content (images, skins, and CSS) will download to your computer as a zip file.
- Copy the .css file and paste it in the same folder.
- Rename the copied file to zz_[ClientName].css.
- Any CSS changes must be made to the copied .css file. See the best practices for more information.
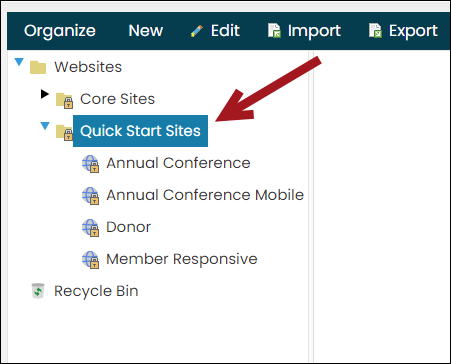
Note: For this example, the Member Responsive site is used, but the ability to download a theme is accessible from any website.

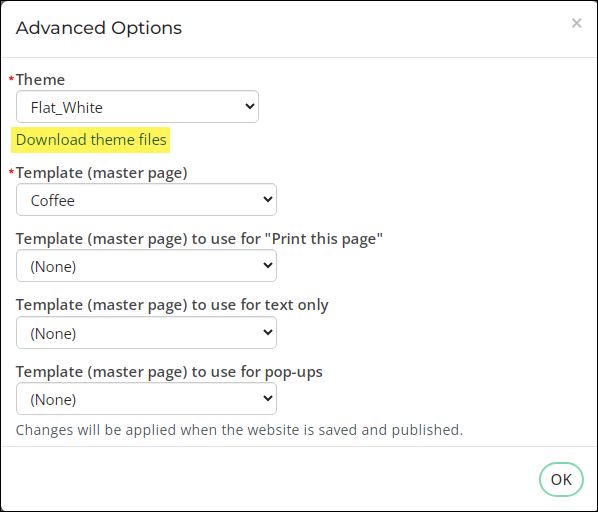
Warning! Do not save the website with an incorrect theme selected from the Theme drop-down.
Note: For a preview of the out-of-the-box iMIS themes, see Using out-of-the-box themes.

To learn more about what files you should edit (for example, how to change the colors or fonts), see Creating a custom theme. To learn how to upload a theme back into iMIS, see Making a custom theme available in iMIS.
When you create a new theme, it must contain the following required elements:
- Theme CSS File – The theme CSS files control the styles (colors, fonts, headings, button styles, link styles, and so forth) displayed within your website.
- A .skin file – Skin files contain property settings for controls such as buttons, labels, and grids. Each theme must have a skin file that includes several required elements so that these controls render correctly in your website.
- Required images – There are several images required for a theme to display properly, including images for icons, user messages, and other elements. Many of the required images are referenced in the .skin files. It is recommended that you copy an images folder from one of the existing themes into your custom theme folder. You can replace or edit any of these images.
After the theme is created, you will zip all the files and images into one folder, then upload the folder to RiSE > Theme Builder > Themes. You can then use the new theme in a specific website from the Look and feel tab of the website.
Do the following to upload a custom theme:
- Put all of the required theme elements in one folder, then zip that folder.
- Go to RiSE > Theme Builder > Themes.
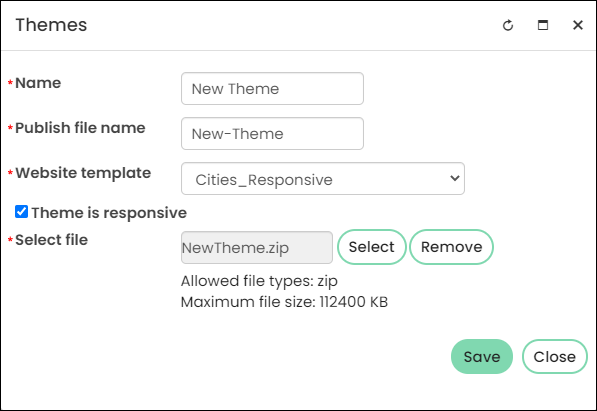
- Click New > App Theme.
- Enter the theme's Name. This automatically populates the Publish file name.
- Choose the correlating Website template. See Creating RiSE-built website templates for more information.
- By default, Theme is responsive is enabled. Disable the option if this theme is not responsive, or leave it enabled if it is responsive.
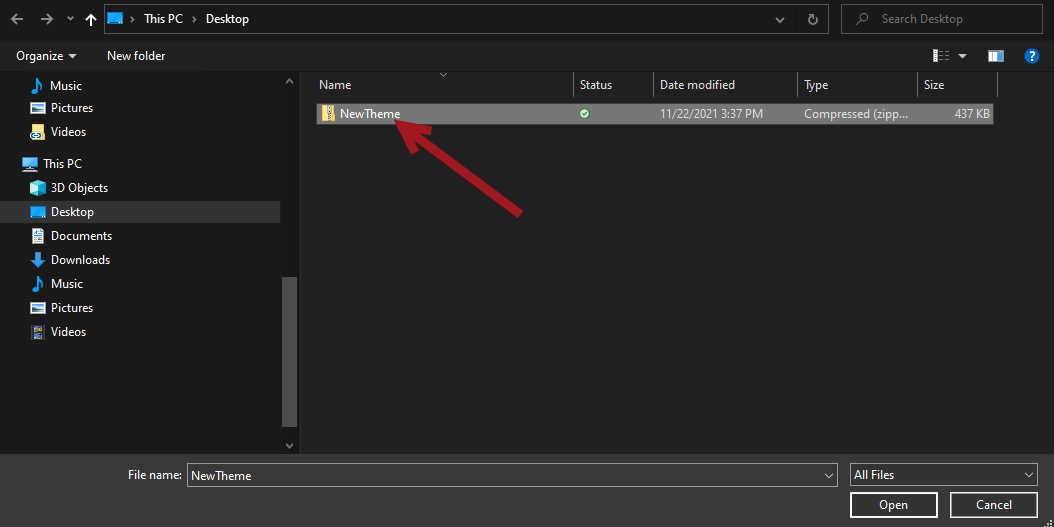
- From Select file, choose the theme's zipped folder.
- Click Save.
- Click the uploaded theme, then click Publish.
- Apply the theme to the appropriate website.
Important! To create a zip file on Windows, be sure to select all files within the custom theme, right-click on the CSS file, and select Send to > Compressed (zipped) folder. Be careful not to zip the already zipped folder that contains all theme files.
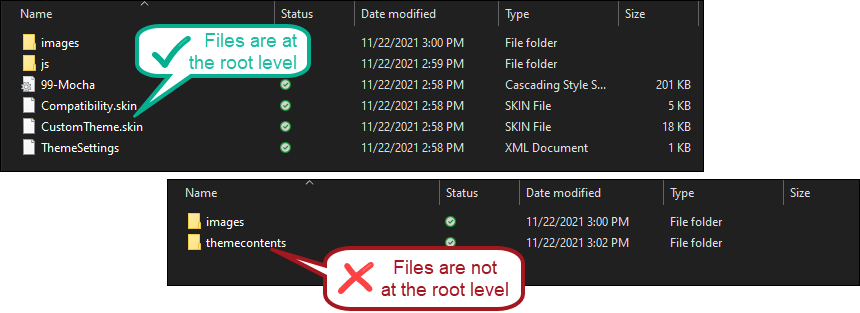
Creating a custom, RiSE-built template allows you to easily modify your website’s logo, navigation, header, footer, and layout. To learn how to modify the theme (colors, fonts, styles), see Creating custom themes.
Every website template you create must contain a website layout. The layout defines how each page will be organized, while the template defines where specific content will appear. Once defined, the custom template and its corresponding layout will be applied to each page of the website.
Important! Before you can define a template, you must first create a website layout.
Creating a layout
To create a website layout, do the following:
- Go to RiSE > Theme Builder > Website layouts.
- Go to New > Website layout.
- Enter a Title and optional Description for the layout.
- Add rows using the Tool Box field.
- Click Save when you are finished.
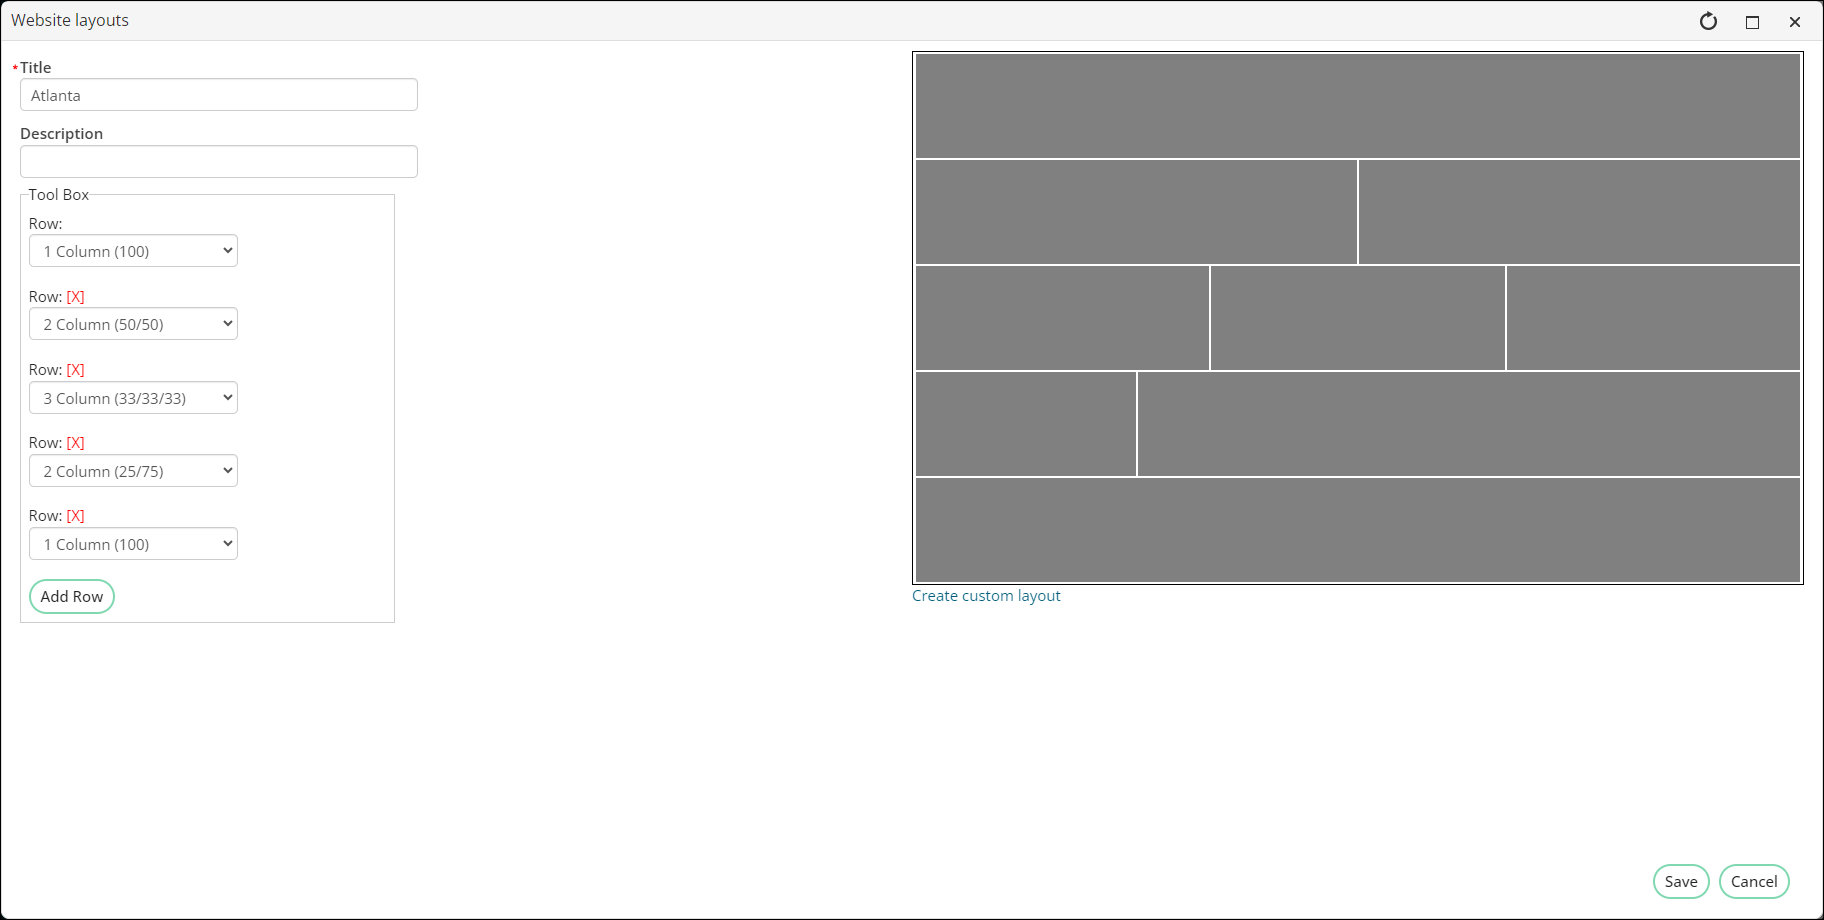
Optionally, you can create a custom layout for your website. See Using the provided styling elements for more.
Designing and applying the template
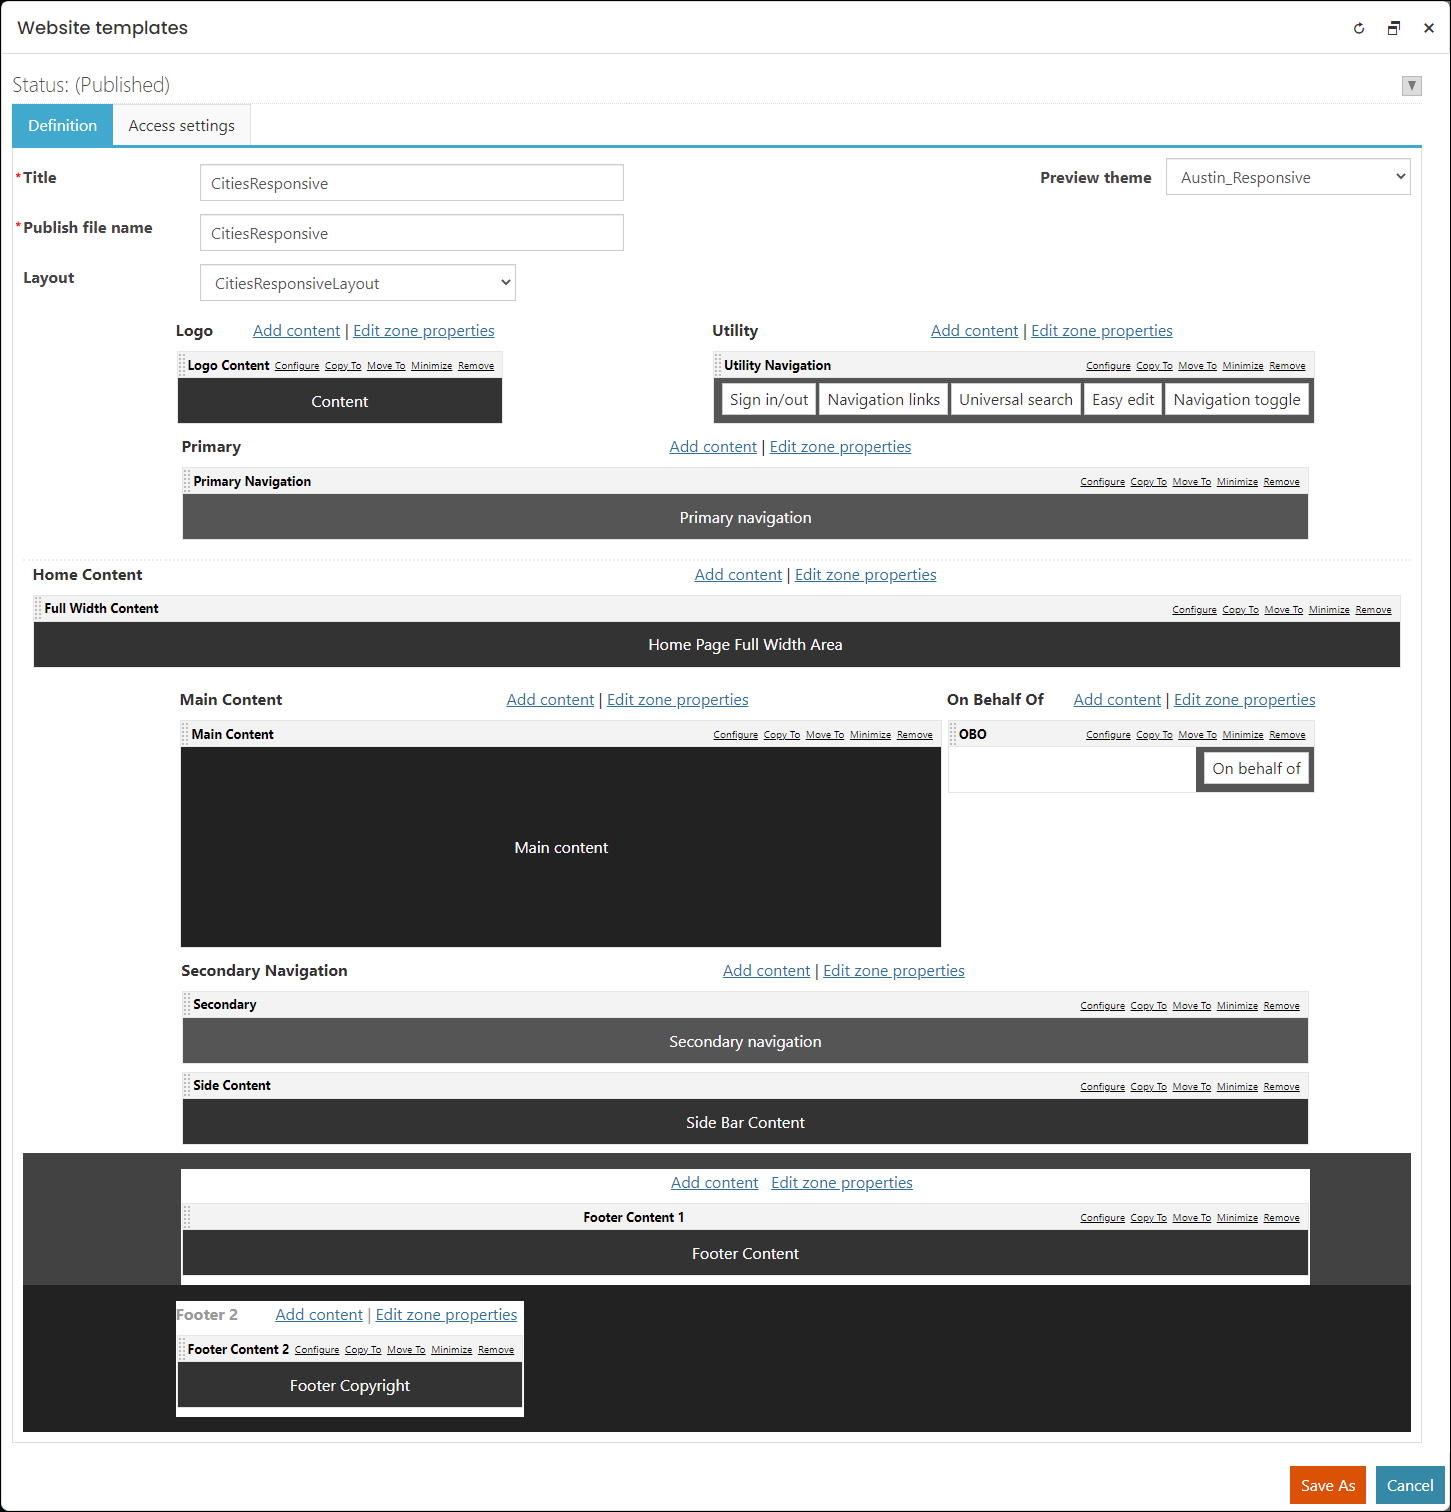
After you have a website layout ready, you can begin creating the website template. You can also make a copy of the out-of-the-box CitiesStandard, CitiesResponsive, or NaturalHeritageSitesResponsive template in the Samples folder, and then apply customizations to the copy.
All RiSE-built website templates will appear in the Template (master page) drop-down.
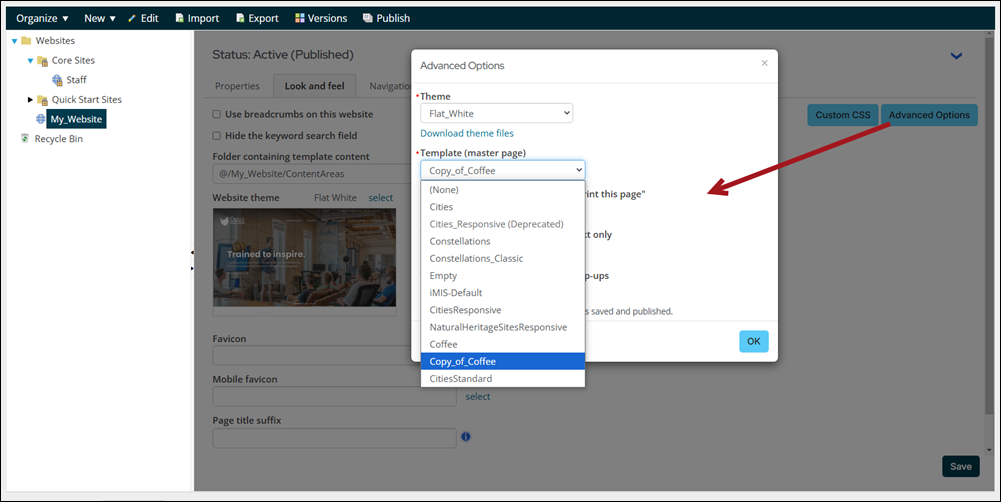
Note: To have the out-of-the-box CitiesResponsive, CitiesStandard and NaturalHeritageSitesResponsive website templates to appear in this drop-down, make a copy of each template from the Samples folder (RiSE > Theme Builder > Website templates > Samples), then paste the copy in the Website Templates folder. Templates will appear in the Template (master page) drop-down after a few minutes.
Do the following to create and apply a RiSE-built website template:
- Go to RiSE > Theme Builder > Website templates.
- Select New > Website Template.
- Enter a Title and Publish file name. The Title must be unique and cannot already exist in the iMIS database. The template name will be in the format WST - Publish file name.
- From the drop-down, select a Layout.
- If the layout has theme-specific styling elements, select the correlating theme from the Preview theme drop-down. See Building the layout for more information.
- Begin building your template. Most content items function properly on the website template, but there are a few content items that we suggest you add first. These content items can be found in the Website folder. This folder will only appear when you are working in the Theme Builder section of RiSE:
- Content Display - Displays a selected content record in the website’s template. The content can be configured to display on all pages, the home page only, or on the interior pages only. The out-of-the-box CitiesStandard and CitiesResponsive templates use this content item to display the footer.
- Main Content Placeholder - This content item acts as a placeholder for each content record, or page, of the website. Place this content item where you want the actual page content to appear. Typically, this will be placed a middle row.
- Primary Navigation - This is the main navigation of the website, and is usually placed towards the top of the page underneath the Logo and Utility Navigation content item.
- Secondary Navigation - This content item is used to display the secondary navigation. This is usually displayed to the left or right side of the page's Main Content. If you are using a secondary navigation for your site, the website layout must have specific styling elements. See Inserting custom website layout code for more information.
- Utility Navigation - Place this content item where you want the service and account options to display. For example, Translation, Sign In, Universal Search, Create Account, Easy edit, and On behalf of. You will probably have more than one of these content items in the website template. For example, you might want the Easy Edit button in the right corner of all pages, and the Sign In link in the left corner of all pages. You would need to use the Utility Navigation content item twice to accomplish this.
Note: The Secondary Navigation item is required for all website templates to ensure community notifications are properly sent.
- Add any other content items to the website template.
- Logo Header - The header can be created through a Content Html content item. From the HTML tab in Advanced mode, add the following code:
- Social Media buttons - Use the Content Html or Content Display content items to configure social media buttons such as Facebook, X (Twitter), or LinkedIn. From the HTML tab (Advanced mode) in the Content Html content item, add the following code:
- Slideshow - Configure the template so that the Slideshow content item only appears on your home page. This can be done by utilizing the Content Display content item.
- Ensure that Everyone Read is selected in your template Access Settings.
- Click Save & Publish.
- To apply the website template to one of your websites, go to RiSE > Site Builder > Manage websites.
- Select the desired website.
- Click the Look and feel tab, then click Advanced Options.
- From the Template (master page) drop-down, select the new website template.
- Configure any other styling elements, then click Save.
- Publish the site.
Note: It's recommended that you first create a new Website Content Folder for custom templates. This is so that template edit permissions can be restricted to users specified by you. See Restricting edit permissions for website templates and layouts for more information.
Warning! Save after selecting a theme. Selecting a new theme will erase any previously added content items if the Website template has not yet been saved.
< a href="[website]Default.aspx" id="masterHeaderImage" title="Home">iMIS</a>
<a href="http://www.facebook.com/advsol" title="Visit our Facebook page" target="_blank">
<img class="SocialSprite FacebookIcon" style="border-width: 0px;"
alt="Facebook icon" src="[Theme]/images/pixel.png" /></a>
<a href="http://x.com/#!/advsol" title="Visit our X page" target="_blank">
<img class="SocialSprite XIcon" style="border-width: 0px;" alt="X icon"
src="[Theme]/images/pixel.png" /></a>
Note: Although the XIcon class has been added, the TwitterIcon CSS class remains an active class.
<a href="http://www.linkedin.com/company/advanced-solutions-international-inc."
title="Visit our LinkedIn page" target="_blank"><img class="SocialSprite LinkedInIcon"
style="border-width: 0px;" alt="LinkedIn icon" src="[Theme]/images/pixel.png" /></a>
See Creating RiSE-built website templates for more.
Best Practices
Review the following best practices when creating your website:
The theme CSS files control the styles (colors, fonts, headings, button styles, link styles, and so forth) displayed within the website. To customize the styling of a website, start from a copy of another theme’s CSS files, or build your own. Review the following best practices when working with CSS style sheets:
The following key terms are used throughout the style sheet best practices:
- Hypertext Markup Language (HTML) - The very basic building blocks of a webpage.
- Elements - Items contained within an HTML tag. For example, the <h1> tag refers to the highest level of headings.
- Cascading Style Sheet (CSS) - The language used to create style sheets.
- Style sheet - A file of CSS rules for how to present elements on a web page.
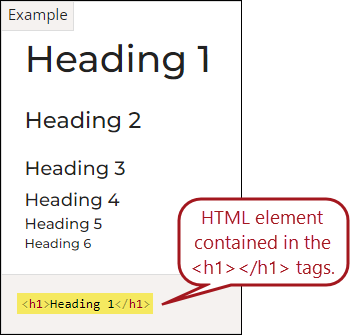
Refer to the following resources to assist with defining and customizing style sheets:
Themes control many of the aesthetic elements of the website, such as fonts and colors. Before modifying a theme, find the best one: apply all the themes to the default Member site in turn, and decide which theme is closest to the desired final look and layout.
To change a website theme, do the following:
- Go to RiSE > Site Builder > Manage websites.
- Select the desired website, then click the Look and feel tab.
- Select a website theme. See Using out-of-the-box themes for an overview of each theme.
- Save the changes.
- Publish the site.
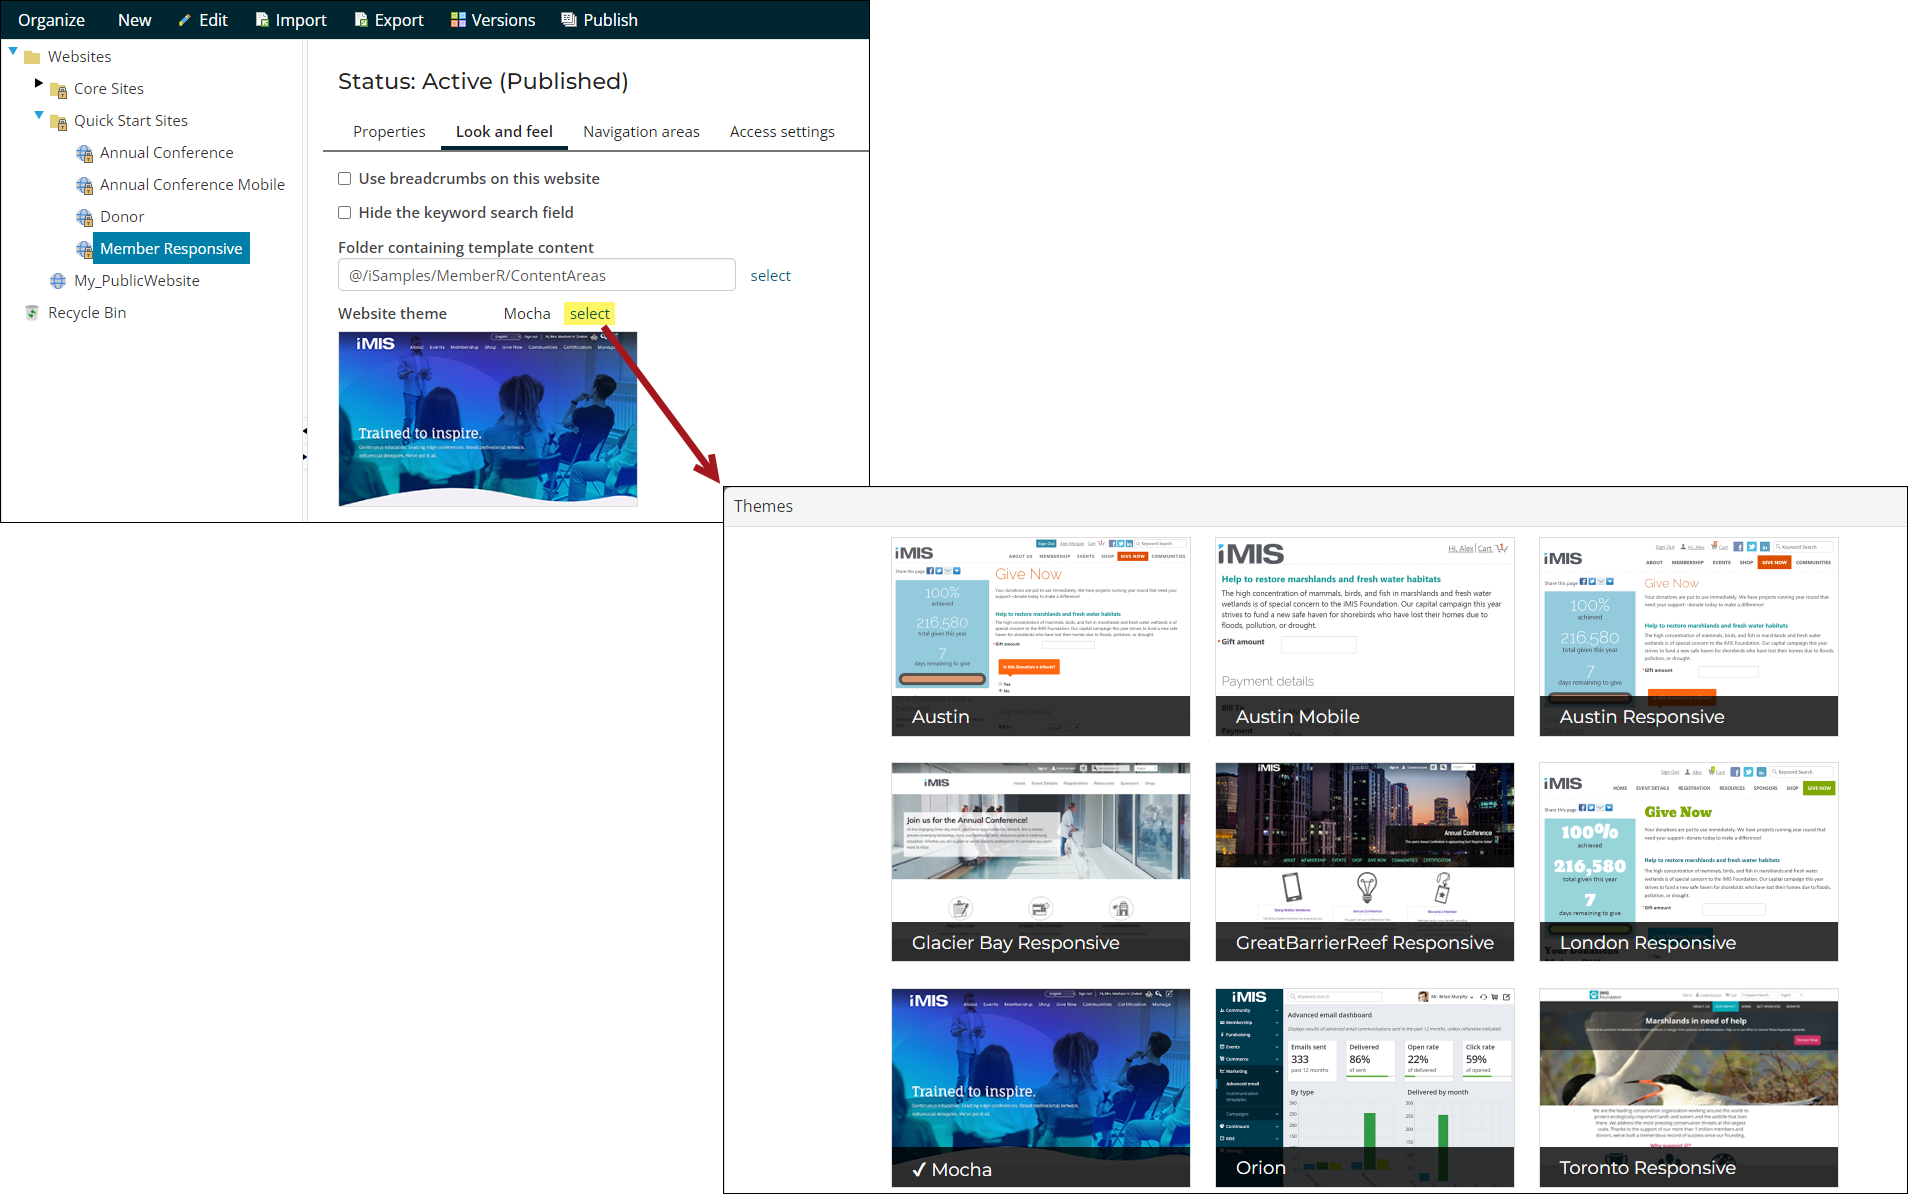
Do not edit a copied theme's style sheet directly. The best practice is to create a separate style sheet for your customizations, making sure the custom style sheet loads after the default style sheet.
Style sheets are loaded alphabetically, so prepending the new style sheet with zz_ ensures the custom style sheet loads last.
Example: You downloaded the Mocha website theme and want to start changing the default colors. Instead of opening and editing 99-Mocha.css, you create a new .css file called zz_[ClientName].css, add the contents of 99-Mocha.css to zz_[ClientName].css, and begin making changes in zz_[ClientName].css. Beginning the new style sheet name with zz_ ensures the custom style sheet loads last, which uses the custom styles over the styles in 99-Mocha.css.
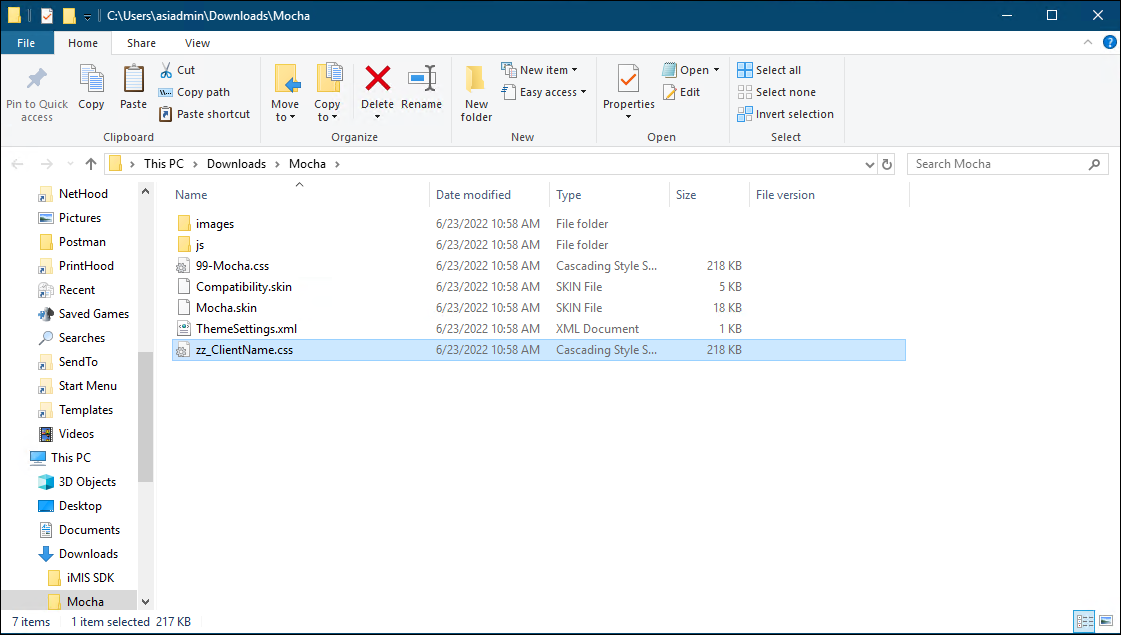
Once you create a separate stylesheet for a copied theme, add custom CSS to override the default values defined in the 99-[theme].css file. The following are common CSS customizations:
Changing color codes
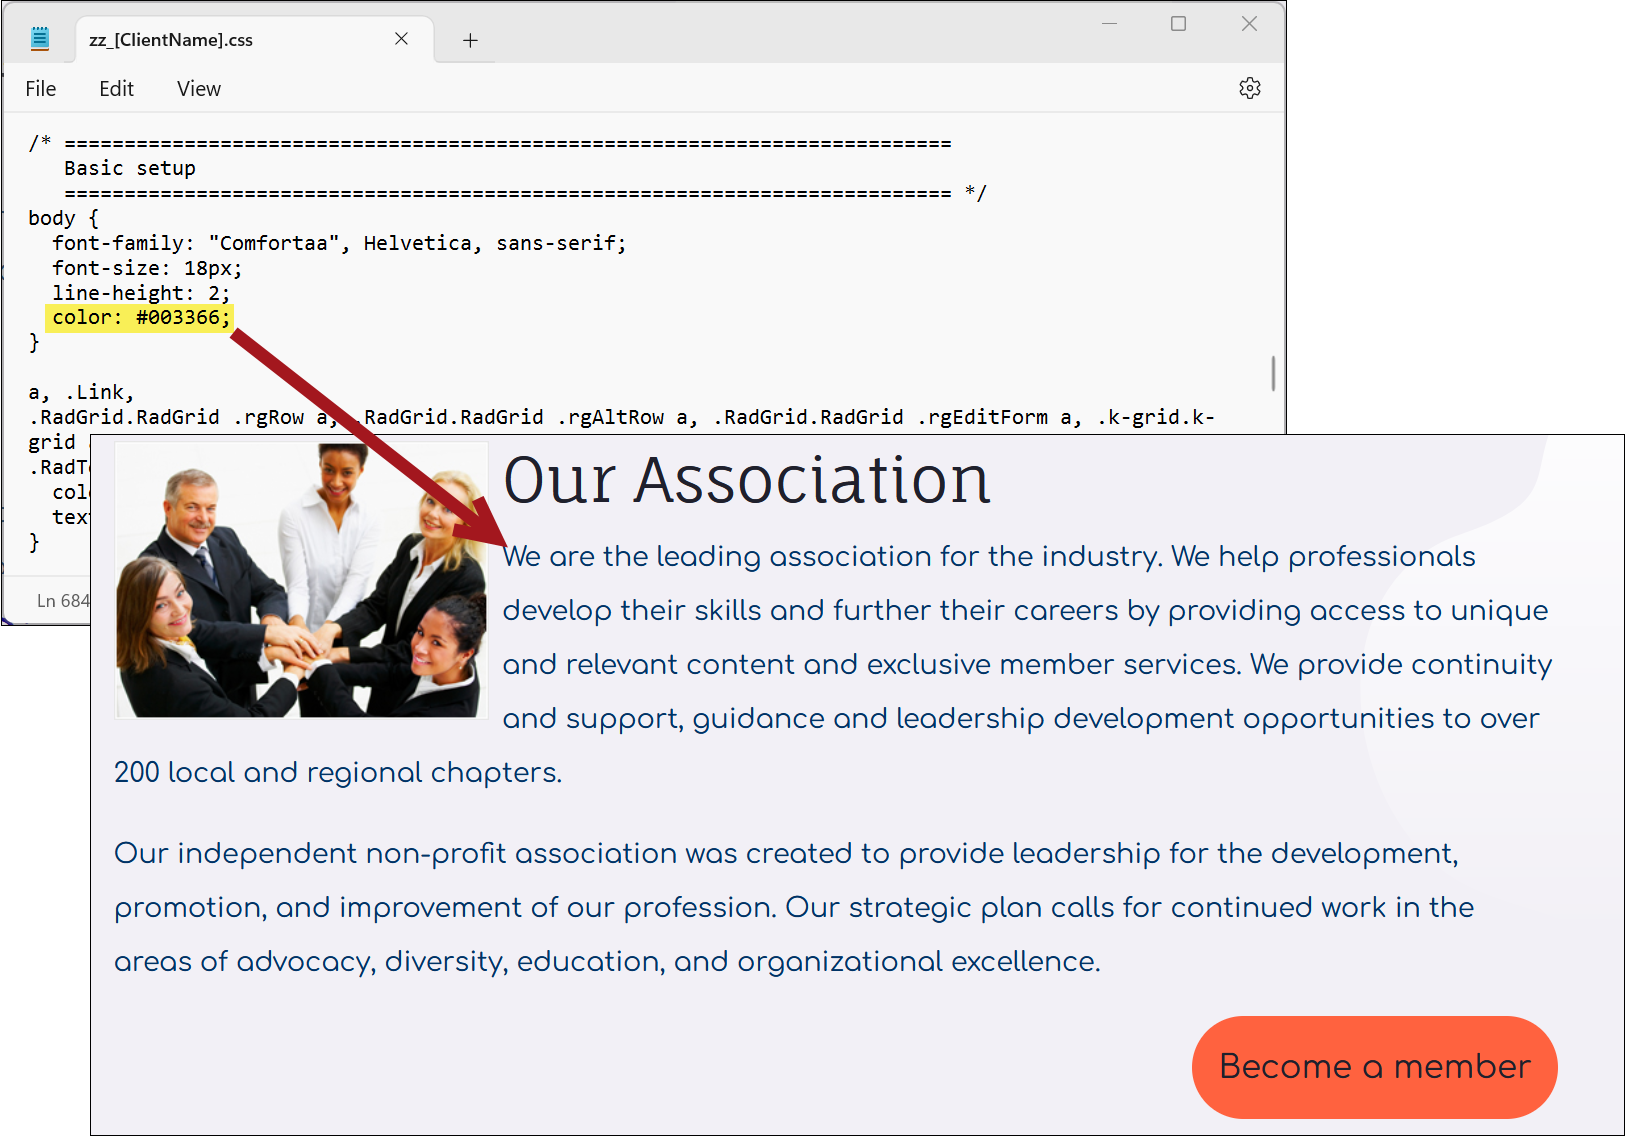
To customize the colors of website elements such as text, buttons, and links, define new color values. From your custom style sheet, locate the CSS rules targeting the desired elements, and enter the new color codes. For help finding color codes, refer to an online color picker.
For example, the CSS applied in the image below results in the body text being blue:
To change the colors of website icons, see Customizing the colors of website icons.
Changing font size and family
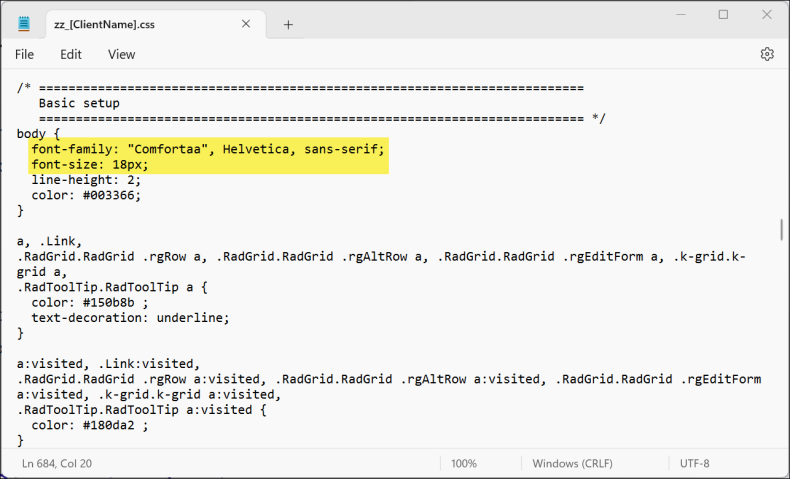
Similarly, change the font size and family of body text and titles by specifying new values within a custom stylesheet. To determine the selectors for the desired elements, refer to the iMIS Style Guide.
From your custom style sheet, define new font-size and font-family values for the desired elements.
Changing the header logo
The header logos for out-of-the-box sites are defined in 99-[theme].css by the selector #masterHeaderImage.
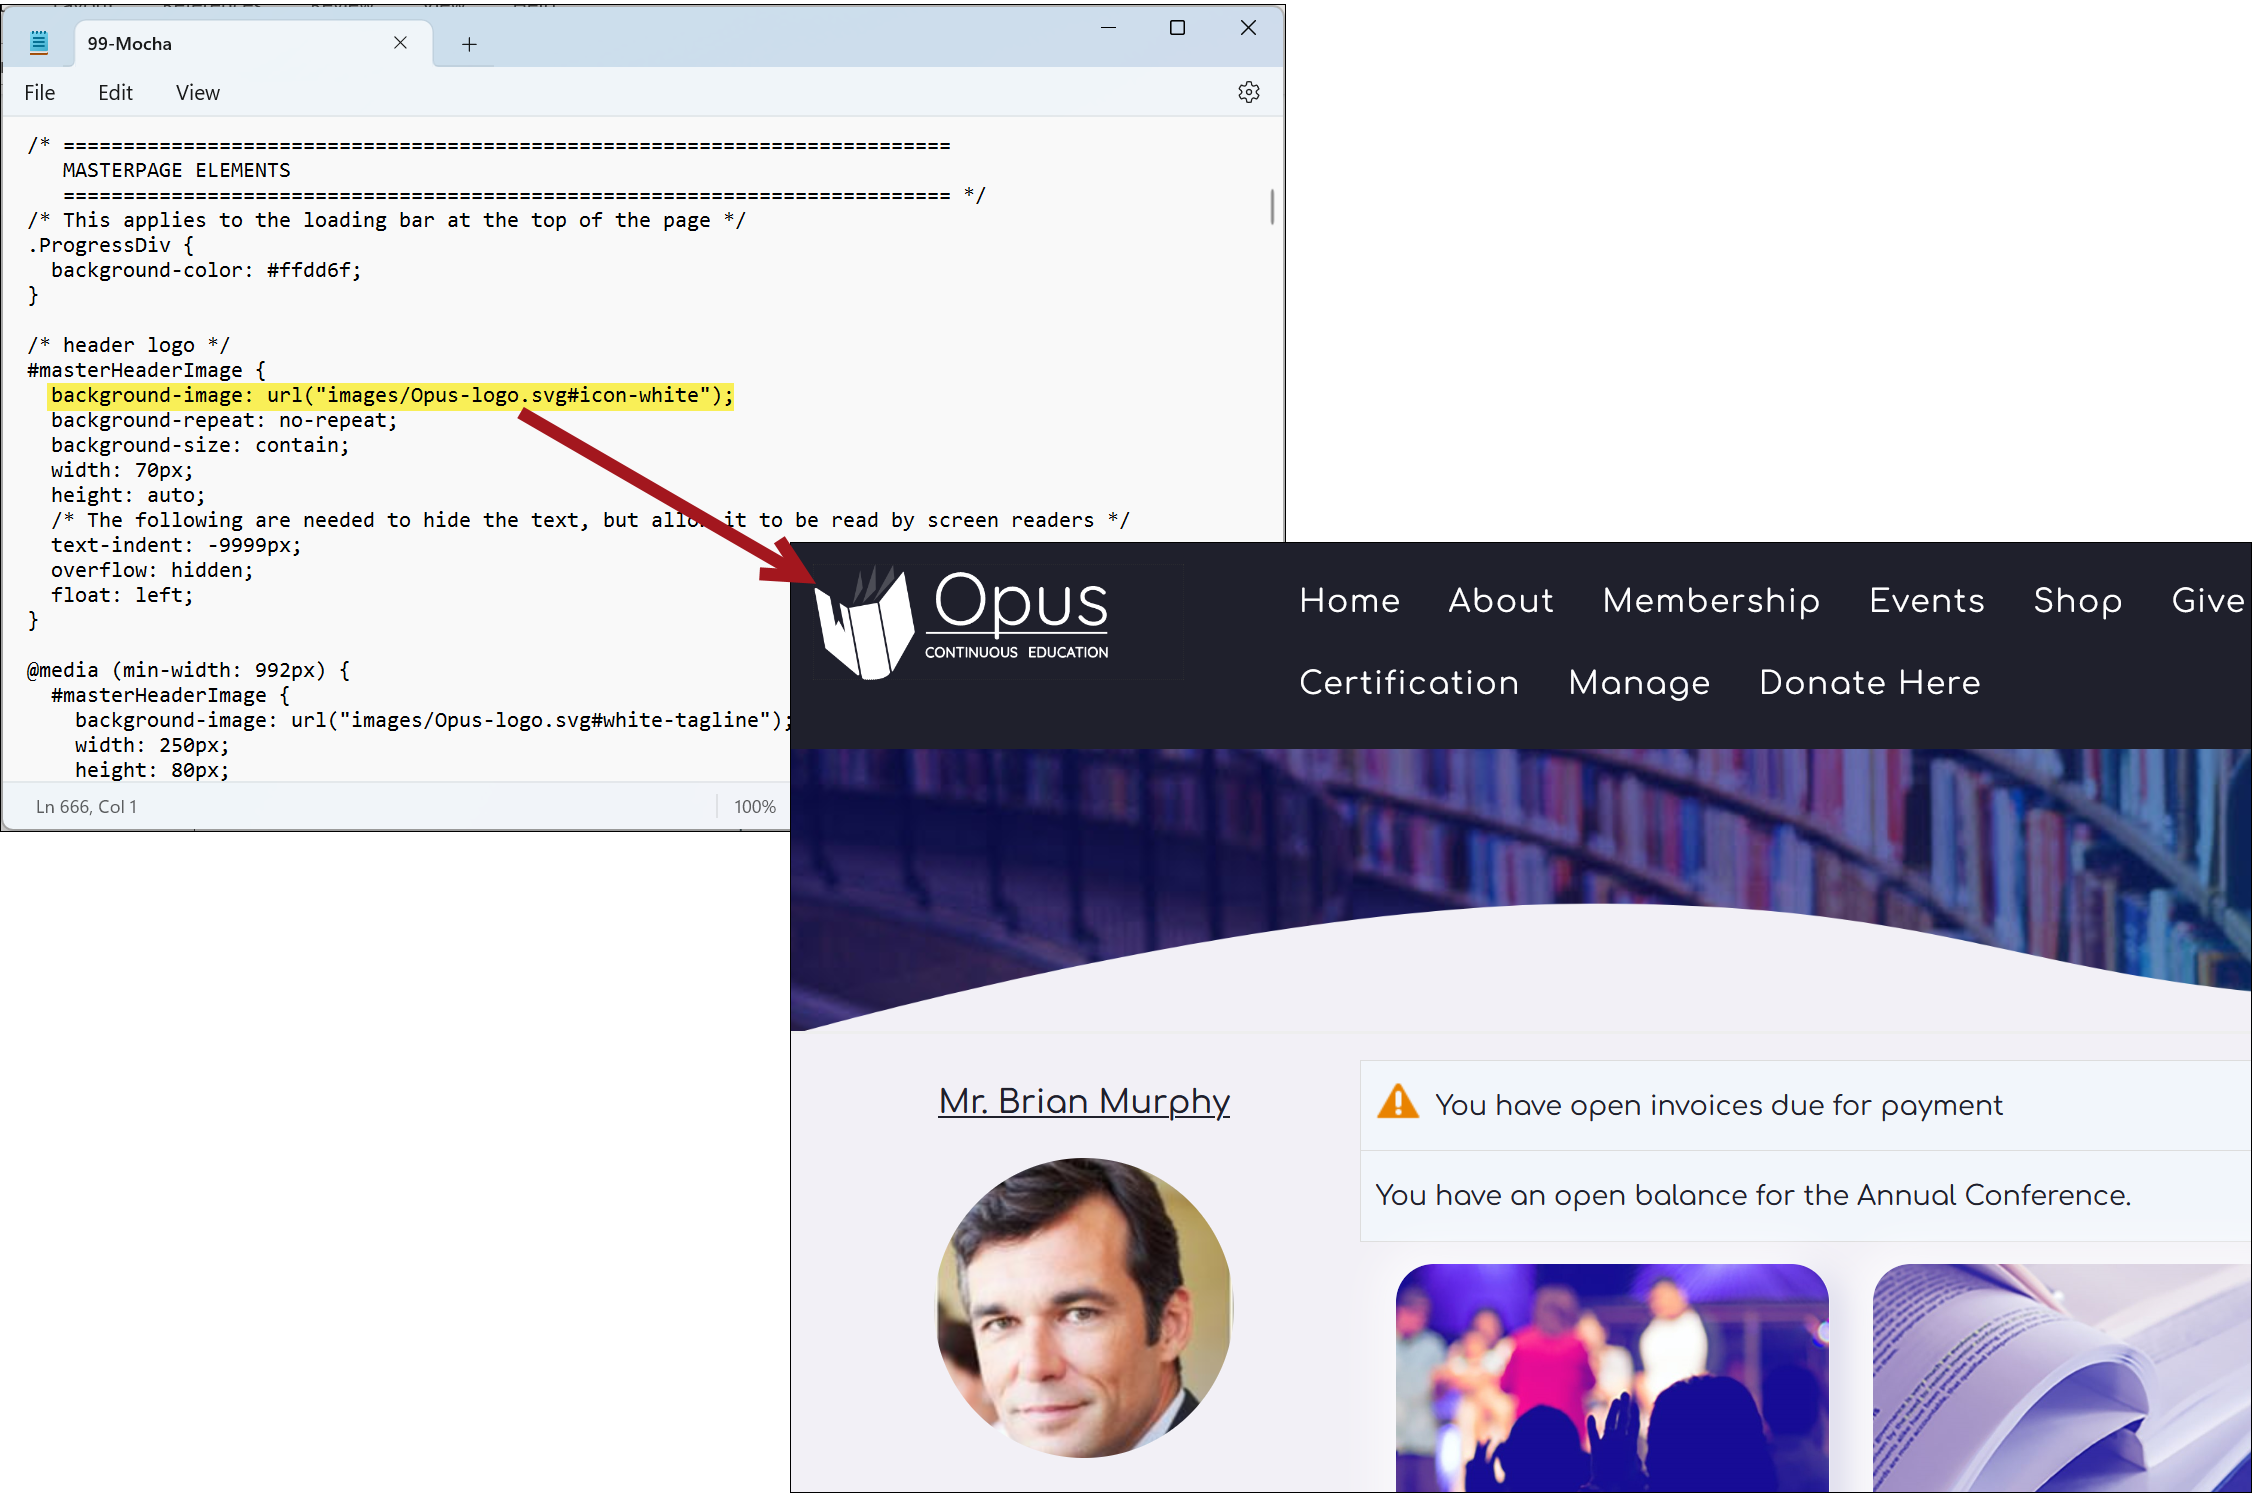
To change the logo, define new values for the #masterHeaderImage background image and dimensions in your separate style sheet. See Using out-of-the-box themes for the logo dimensions required for each theme.
Updating the background image for the annual conference ad in the sidebar
In the out-of-the-box Member responsive site, an Annual Conference ad appears in the website sidebar.
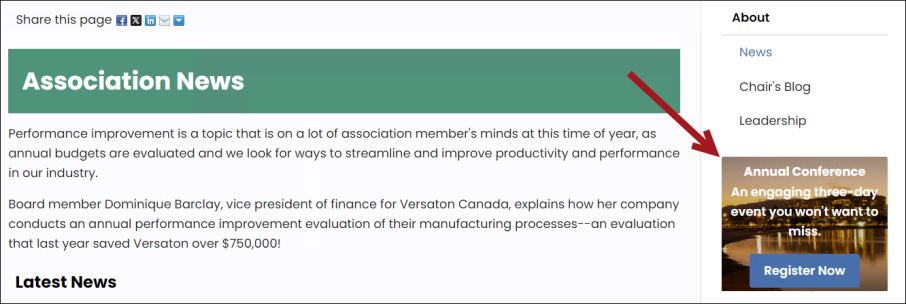
The image for this ad is stored in out-of-the-box themes. To change the image, define a new background image for the .bg-img-conference-small selector:
- To access the custom theme files, see Editing and updating a custom theme. As stated in the introduction, ensure you are already working from a copy of the out-of-the-box theme, and the copied theme contains a separate stylesheet for your customizations.
- Add the desired image to the images folder of your custom theme.
- Open the custom CSS file, for example, zz_[ClientName].css.
- Locate the following element and replace
background-imagewith the image you just added to the image folder: - Save the changes.
- See Making a custom theme available in iMIS to learn how to apply the new theme files to your website.
.bg-img-conference-small {
background-color: #081337;
background-image: url("../../images/samples/Member/cairnsnight.jpg");
}
Customizing the homepage banner
The iMIS quick-start-sites use several content records to render the banners on their home pages. These banners can be customized by updating the related content records, or from the theme’s style sheet. For more information, see Updating the homepage images on out-of-the-box themes.
When updating theme files, it is recommended to not rename the .css file names. Renaming the .css files will require you to upload a whole new theme instead of editing the existing theme.
Example: A custom copy of the Mocha theme contains a style sheet named zz_MyTheme.css. A staff user downloads the theme files to make a quick styling change. While editing style sheet, they rename the file to zz_OurWebsiteTheme.css. They upload the new version of the custom theme to iMIS. When the staff user reviews the website, the changes are not present. This is because the CSS file name was changed. When the CSS file name is changed, a new website theme must be created in iMIS (RiSE > Theme Builder > Themes), rather than the existing theme file being edited.
It is recommended that you use the Bootstrap grid library (included with iMIS) to define content layouts. Currently only the column classes (.col-*) from the bootstrap grid system are supported. ASI also provides and supports YUI 2 grids, but ASI no longer recommends using the YUI grids.
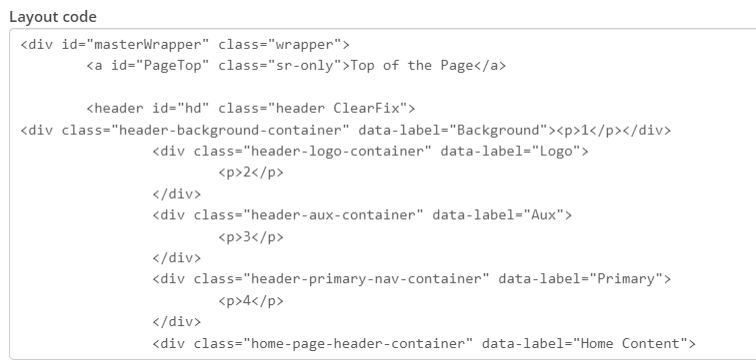
You can also create your own grids using custom CSS or another grid framework. To do so you must include the CSS for your grids in your theme. Simply add the CSS file to your theme’s folder in the App_Themes folder. If you plan to code custom content layouts, you must be familiar with CSS layout techniques.
To define layouts, go to go to RiSE > Page Builder > Manage layouts. For more information, see Creating custom layouts.
WCAG is the most globally recognized accessibility standard. Out-of-the-box style sheets are WCAG 2.2 AA compliant, but customizations may not be compliant.
Body text, large text (18 pt+), non-text controls, and hover states must have sufficient contrast. Use a color contrast checker to verify compliance with WCAG standards.
Directly copied content may result in inline CSS overriding the theme.
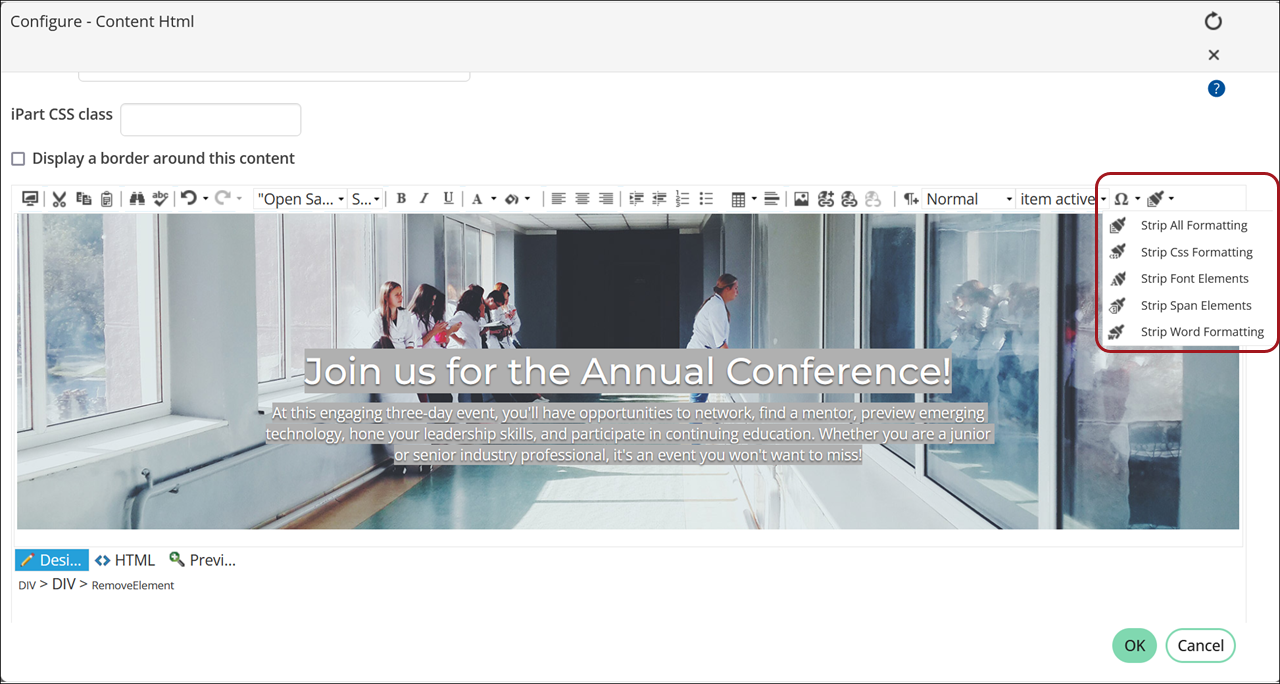
When pasting copied media into the Content HTML content item, use the Format Stripper (Advanced mode) to remove any applied formatting. You have the option to select the type of formatting you want to remove from any highlighted content: All, CSS, Font, Span, or Word.
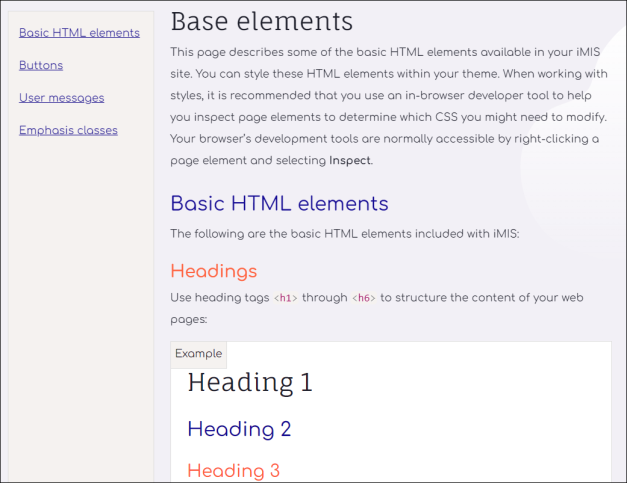
iMIS Member Responsive, Donor, and Staff sites include a Style Guide that allows users with administrative privileges to see the impact of changes to site themes from one central location. Content editors are able to preview their site themes and changes. Theme designers who choose to dive deeper into style sheets are able to see their work in a single central location. There is no longer a need to navigate to several different pages or content records to see the effects of customization.
You can review the Style Guide from the following locations:
- In the Member Responsive Quick Start Site: Go to Manage > Style Guide.
- In the Donor Quick Start Site: Go to Manage > Style Guide.
- In the Staff site: Go to RiSE > Style Guide > Base Elements.
The Style Guide displays the basic styling elements in an attractive, easy-to-navigate manner. Review the pages in iMIS for specific definitions of all Style Guide elements.
When designing custom CSS, take advantage of browser-based developer tools to test and troubleshoot changes before committing them to your style sheets.
Press F12 in any browser to toggle the Developer Toolbar:
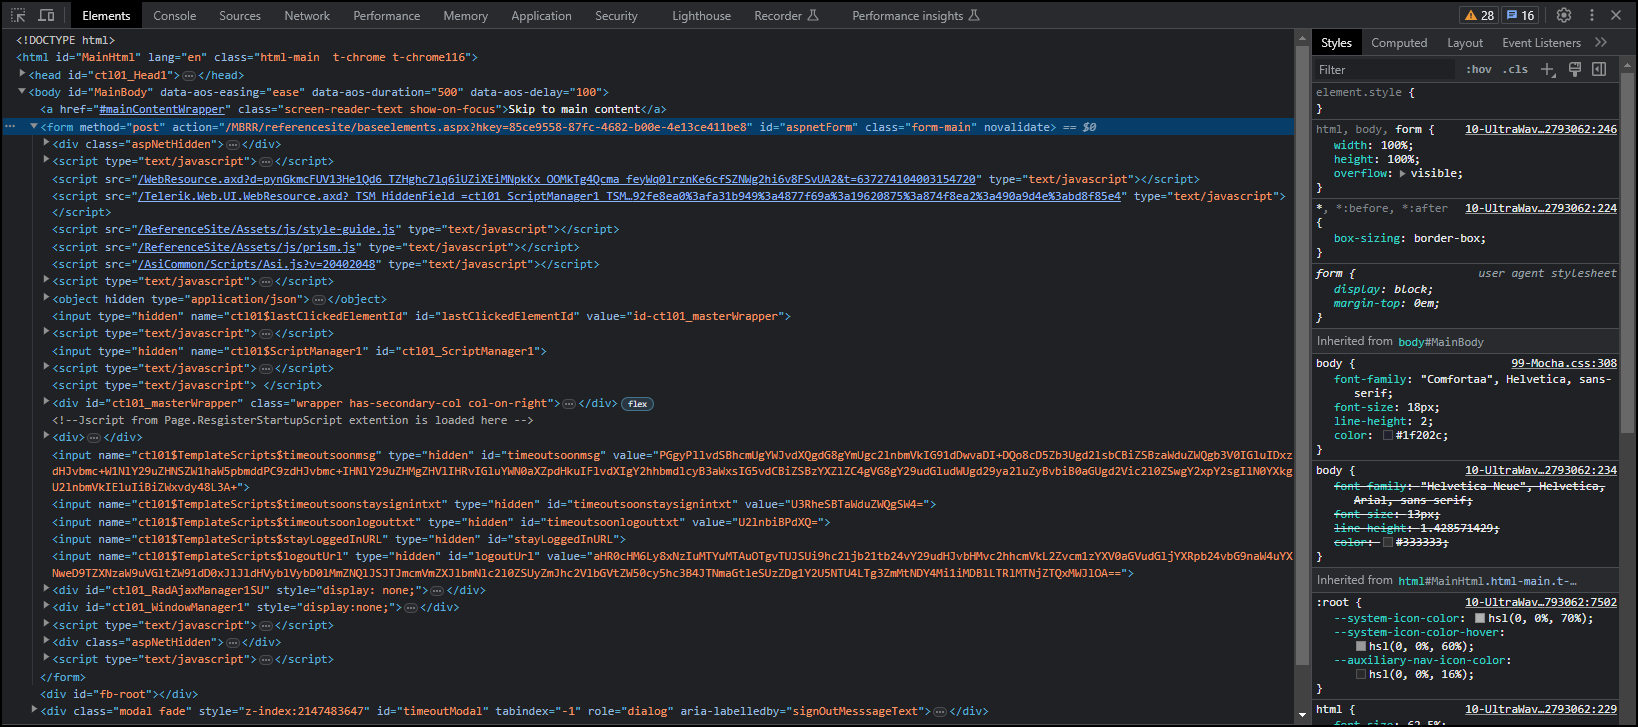
For more information on the developer toolbar, refer to the Mozilla developer tools documentation.
When working with responsive themes, test various screen sizes before publishing your changes.
Using responsive design mode
To test various screen sizes from your browser, do the following:
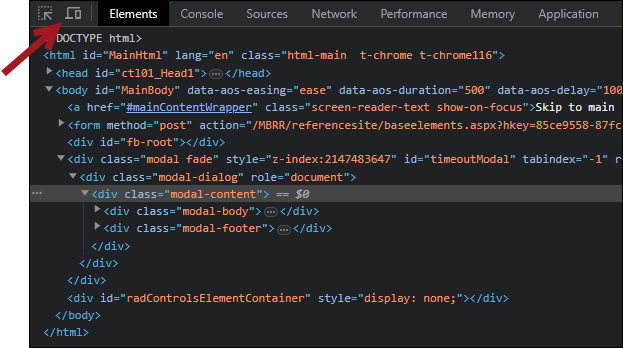
- Press F12 or use the CTRL+SHIFT+I shortcut in any browser to toggle the Developer Toolbar.
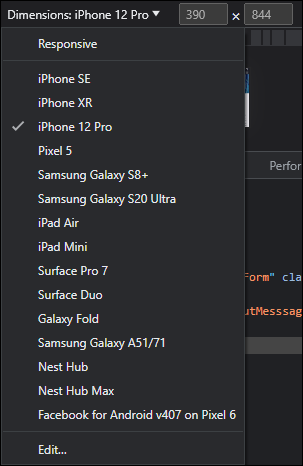
- Click the device icon or use the CTRL+SHIFT+M shortcut to toggle responsive design mode.
- Change the screen size using the dimensions drop-down. Choose a variety of devices to assess how the content responds.
Troubleshooting responsive issues on mobile
When non-responsive website content is viewed on mobile devices, the content may shrink to a size that is uncomfortable to read, or retain its original size and format, requiring users to scroll horizontally to see the entire page. For example, the content in the image below is cut off when viewed on a mobile device:
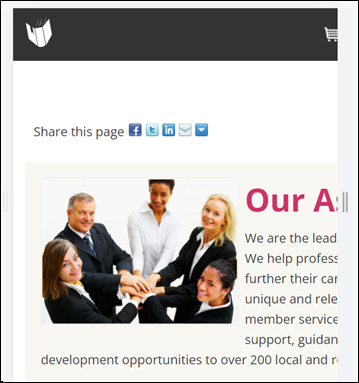
Responsive issues are typically caused by videos, tables, or images with a fixed width. Content with a fixed width always appears at the same size (ex. 650px wide), instead of resizing to fit the screen. The remaining content on the page is forced to conform to the fixed width.
To identify the cause of the responsive layout issues, use the element inspector from the developer toolbar. Select elements potentially causing the responsiveness issues, then delete the elements.

Continue removing potentially problematic elements until the mobile formatting is correct.
The device toolbar only shows how the page will react to the screen size being different. Different devices and browsers have unique issues, so further investigation into the specific browser and device may be required.
Out-of-the-box RiSE sites are WCAG 2.2 AA compliant, but content inserted into sites may not be compliant. To ensure your site is follows the WCAG guidelines, see the Accessibility checklist.
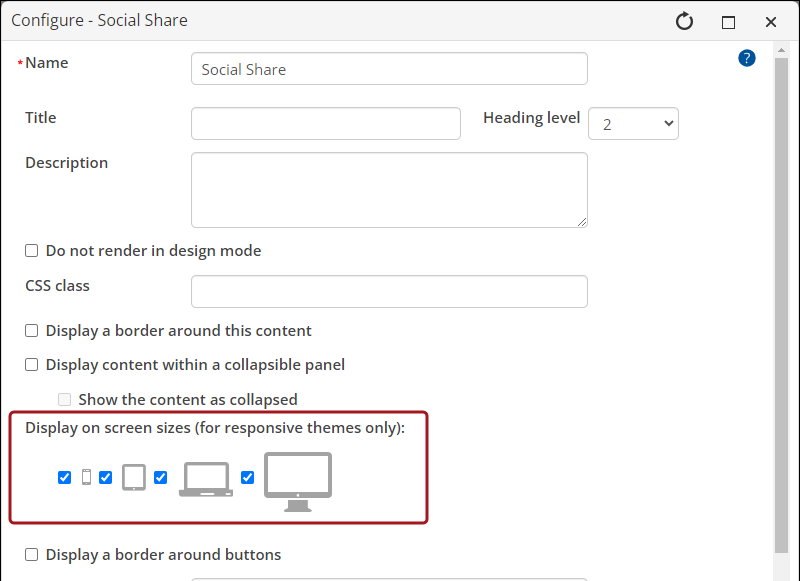
Users can configure any of their websites using responsive themes to selectively show or hide various content based on the screen size of the browser or device used to visit the site. For example, an organization might want to have two versions of the About Us content: a longer About Us description when a user is visiting the site using a large-sized screen, and a shorter description when the user is visiting using a mobile device. See Implementing Responsive Web Design for full steps.
Responsive content
You can select how dynamic content items are displayed on various devices. Many content items provide a configuration option where you can choose how your content items are displayed. When disabled, content is hidden on screen sizes accordingly:
- Extra-small screens – The width of the screen is less than 768px.
- Small screens – The width of the screen is greater than 768px and less than 991px.
- Medium screens – The width of the screen is greater than 992px and less than 1199px.
- Large screens – The width of the screen is greater than or equal to 1200px.
Responsive layout
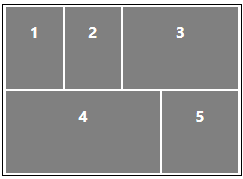
Content layouts define a grid structure for the body of a web page. They determine how many rows or columns each page will have. A responsive layout adjusts that structure fluidly in response to the size of the browser or device used to visit the site.
The out-of-the-box content layouts available in iMIS are based on the Bootstrap grid system. These work with any website, but when used within an iMIS theme specifically created to be responsive, such as Austin_Responsive, you can take full advantage of this fluid, percentage-based grid system.
Responsive navigation
There are three levels of responsive navigation in responsive-themed websites:
- Primary navigation – On larger screens and devices, the primary navigation displays along the top of the page. When resized below 768px, the primary navigation is hidden within a toggle on your website which remains hidden until the toggle is clicked.
- Sub-navigation – If any of the primary navigation items have sub-navigation, then these items are displayed on the page when hovering over the primary navigation item, and on the page itself (most useful for touchscreen devices, some of which do not support hovering). In the Austin_Responsive theme, the sub-navigation moves from the right column on larger displays to the bottom of the page on displays smaller than 768px wide.
- Auxiliary navigation – On larger screens and devices, the auxiliary navigation displays at the very top of the page. When resized to a width less than 768px, navigation icons are displayed in place of the text.
See Responsive navigation for more information.
Search engine optimization (SEO) is the process of maximizing the number of visitors to a particular website by ensuring that the site appears high on the list of results returned by a search engine like Google or Bing. Enhancing your website to appear high at the top of these searches is fundamental and essential.
The following best practices are recommend in order to achieve maximum SEO:
- Write a description of meta elements
- Use keywords, phrases, and images in meta tags
- Have a mobile-friendly website
- Use unique titles for each page on your site by using <title> tags
- Reduce the size of large images
- Have a useful 404 page
- Use canonical URLs
- Page title suffix
- Using simple URLs for navigation links
- Disabling search engines from searching the page
For full tips, see Using RiSE to maximize SEO results.
A website is considered to be accessible if all people, including disabled and elderly people, can use it. Building your website around the Web Content Accessibility Guidelines (WCAG) can often make your website more usable to users in general.
Note: Creating drag-and-drop forms using Form Builder, dashboards using Report Writer, and rearranging a content record are not considered WCAG 2.2 compliant, because there are no alternatives to the drag-and-drop modes (WCAG guideline 2.5.7).
Review the following best practices regarding accessibility:
- Alternative content for rich media – Rich media content refers to any content that is not plain text, such as videos, audio files, images, graphs, etc. Ensure the following is true for rich media included in your site:
- Non-text content includes a detailed alternative text description.
- Transcripts or captions are provided for prerecorded audio and videos.
- Captions are provided for live videos.
- Audio and video content does not play automatically. When you embed videos, only begin to play upon request.
- Audio and video control buttons are always visible.
- Content – Ensure the following is true for content inserted into copied websites:
- Content uses semantic HTML markup (proper tags for headings, numbered lists, paragraphs, etc.). Avoid using font selectors. Use heading selectors, such as <h1></h1>, instead.
- Content is clear and well structured.
- Links use self-explanatory labels (“Become a member”, “Download annual report”, etc.) and do not use ambiguous descriptions ("Click here", “Visit link”).
- Documents are accessible (PDF, Word, PowerPoint).
- Themes and colors – Ensure the following is true for custom website themes:
- Color is not used to convey information (error messages, data graphs, etc.).
- Body text, large titles (18pt+), non-text controls, and hover states have sufficient contrast. To verify, use a Color contrast checker.
- The website is responsive and allows for 400% scaling (mobile).
- Avoid using HTML tables.
- Forms – Ensure forms added or modified using custom code meet the following criteria:
- All form fields have associated labels.
- No device-dependent event handlers are used (MouseOver, DblClick, etc.).
- All clickable items include a text description.
- Erroneous fields are clearly identified.
- Error messages are described using plain text.
- General user-experience
- Website elements (navigation, buttons, etc.) are visually consistent and have predictable behavior.
- Features and instructions are accessible through more than one device (and target more than one sense (ex: mouse and keyboard).
- Time limits can be paused, extended, adjusted or longer than 20 hours.
For more information about WCAG guidelines, see the Web Content Accessibility Guidelines (WCAG) Overview. For more information regarding best practices and iMIS, see Accessibility best practices.
Resources
Use the following resources to ensure website accessibility:
- Making your website inclusive and accessible to all training
- WAVE plugin
- Color contrast checker
- NVDA screen reader - Use a screen reader to understand how users with visual disabilities will interact with the site.
Advanced RiSE features
RiSE has many advanced features to further customize your website and your members' website experience. Review the following advanced features:
Google Analytics tracks and collects important data on how visitors interact with a website. Google Analytics provides reports on the data collected allowing you to assess whether your website is meeting its goals. This tracking is accomplished by adding a Google Analytics script to the website.
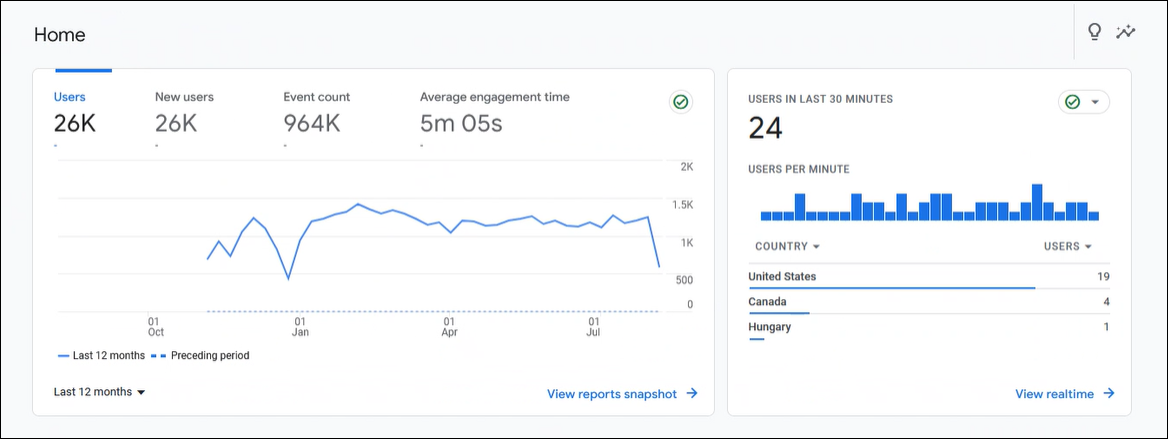
For full steps, see Tracking your site with Google Analytics.
In some instances, you might need to redirect a user depending on a certain set of conditions, for example, a contact's member status, authentication, or role. These types of redirect rules can be added to any content record from the Redirect rules tab.
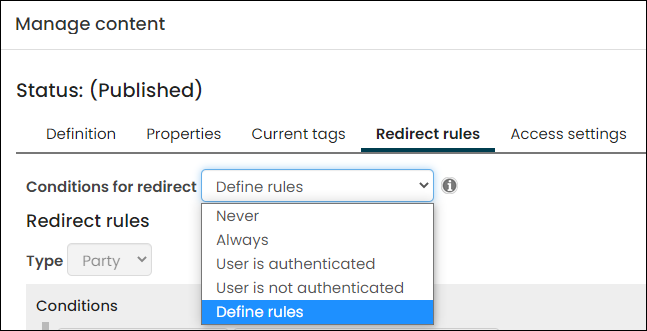
For example, redirecting a user to a specific page based on whether they are a member:
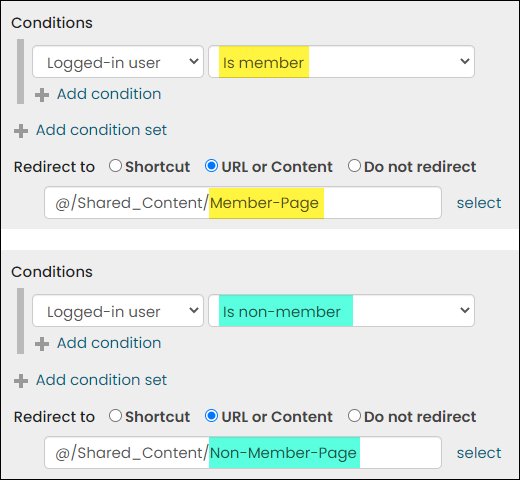
- Rule 1: Logged-in user | Is member
- Rule 2: Logged-in user | Is non-member
See Using the contact redirector for more information.
Tags are a special type of keyword that you can associate with content records. Tags help generate more successful search results, and the automatic population of content based on tags. All descendants of a content folder inherit the tags defined for the content folder.
When you create a child tag, it automatically copies the properties of the parent tag. Subsequent changes to the parent tag's properties do not affect the child tag.
To define a new tag, do the following:
- Go to RiSE > Tagging > Tags.
- Click New to create a new tag.
- Enter a Tag Name.
- Define the tag’s Properties, Related Tags, and Access Settings.
To define a new tagged list, do the following:
- Go to RiSE > Tagging > Tagged list formats.
- Select New > Tagged List Format to create a new tagged list format.
- Enter a Name, and define the content properties.
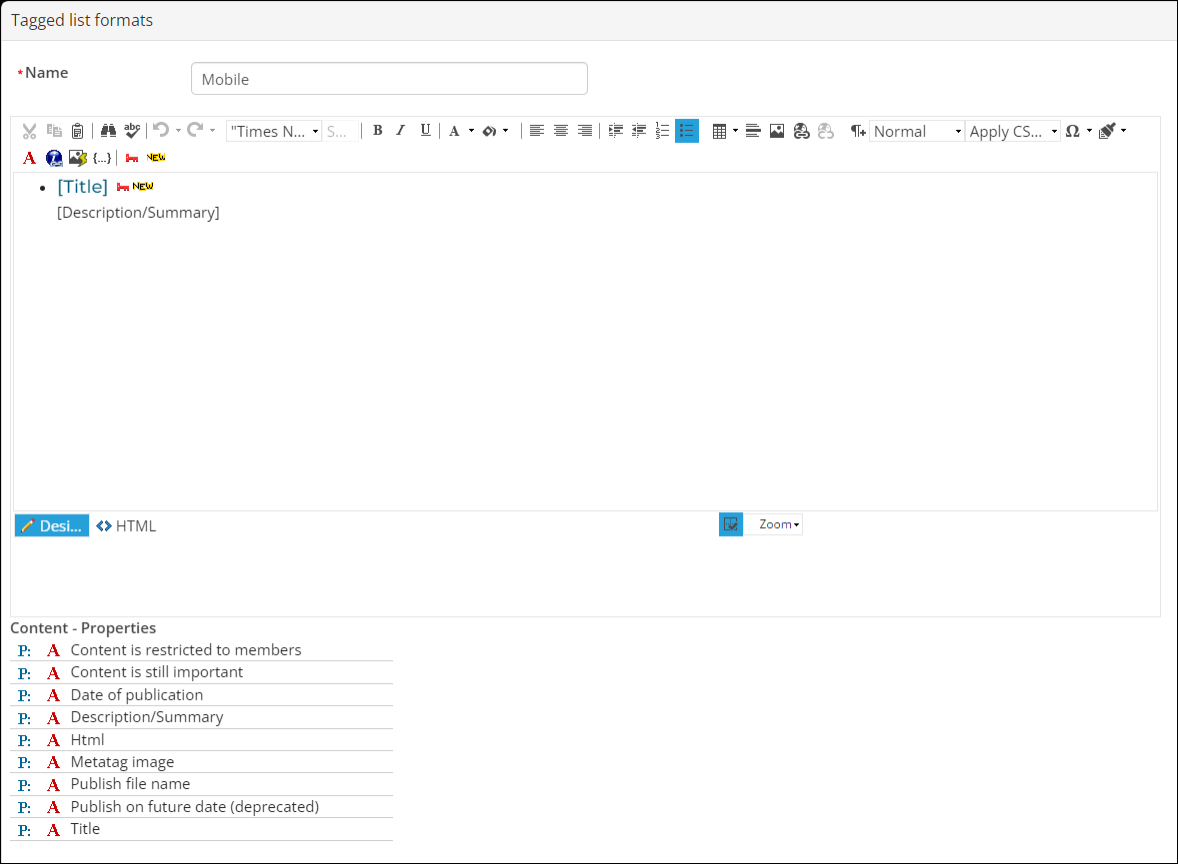
See Tagging for more information regarding Tags and Tagged list formats.
Forms helps you design and deploy beautiful and functional forms that drive value for your staff and constituents. Forms can combine information from multiple iMIS data sources while enforcing complex business rules to ensure that your data is captured correctly and completely while leading your constituents on the journeys that you have planned for them.

Review the following resources to learn more about Forms:
Process automation helps you improve staff productivity and constituent engagement by automating manual tasks and communications. Your members receive timely and relevant communications, such as a new member welcome, donation thank you, or event reminders. Process automation uses scheduled tasks and alerts that can be displayed on the Staff site or your public website. Process Automation is a licensed feature. For more information, contact your AiSP or ASI Technical Support.
Review the following resources to learn more about Process Automation:
Panels are custom displays of data that you can name, build, arrange in grids, and add to your site. Using the Panel Editor and Panel Collection Editor content items, your users can browse, edit, add, and delete their data, as you specify.
You can configure content items to let your users add and edit that data directly from their browser page.
Review the following resources to learn more about Panels: