Last updated on: January 27, 2026
iMIS Desktop to Staff site: Migrated features
The following features have been migrated from the Desktop to the Staff site.
Community
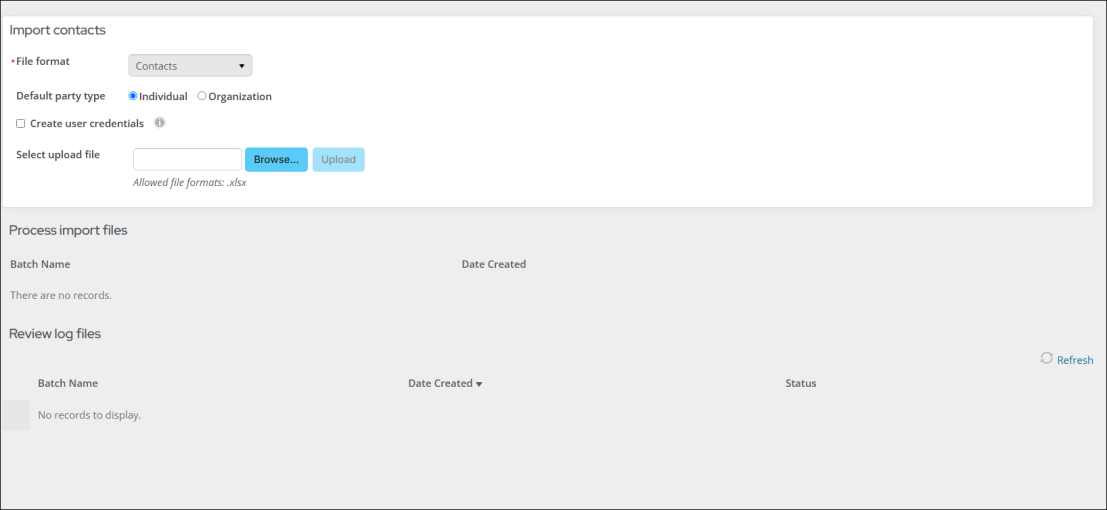
In the iMIS Desktop, a comma-delimited text file that defines the format of the data could be used to import contact data into the Name table in the iMIS database. The Staff site now has an Import contacts feature that can be used to import contacts into your iMIS database.
Importing contacts
To import contact information through the staff site, do the following:
- Enter your contact data in a file.
- Go to Community > Import contacts.
- Browse to select your new import file.
- Upload the import file.
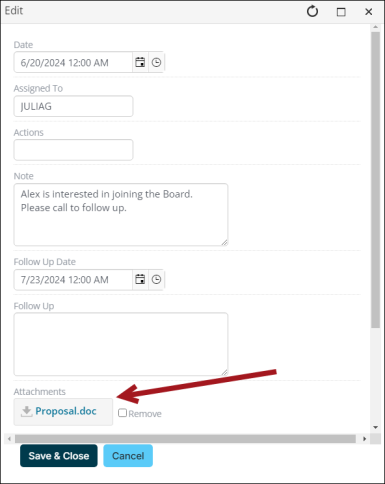
The Staff site allows you to add attachments to activity records, similar to the process in the iMIS Desktop. Activity attachments are now located in multi-instance contact panels. For more information, see Adding activity attachments.

Activity tasks allow staff users to assign follow-up tasks for other staff users as reminders to perform certain actions. After activity tasks are delegated, staff users can manage tasks assigned to them from the Community dashboard's My tasks tab. The Activity Profile was also created to help in managing tasks for individual users. In addition, the Follow up activity alert task was created to notify staff users that an activity task is assigned to them.
For more information about Activity tasks, see Managing activity tasks.

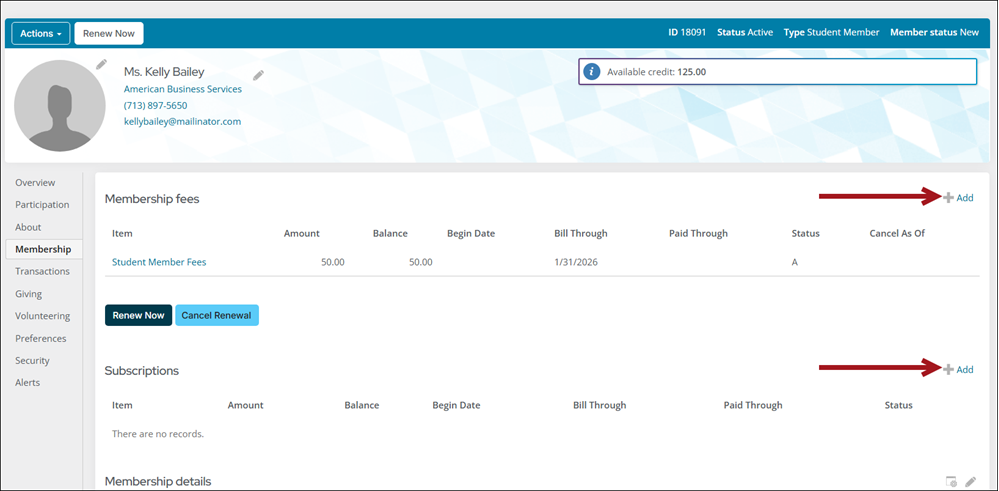
Subscription items (dues and non-dues) can be added to members’ account pages and be given immediate access to their subscription items before being billed.
See Adding subscription items to a member's account before renewal for more information.
Authorized Staff users can manage committees by adding, editing, and deleting committees from the Committees page (Community > Committees). Staff users can also manage their committee rosters by assigning committee members additional roles, among other tasks, using the updated Committees landing pages.

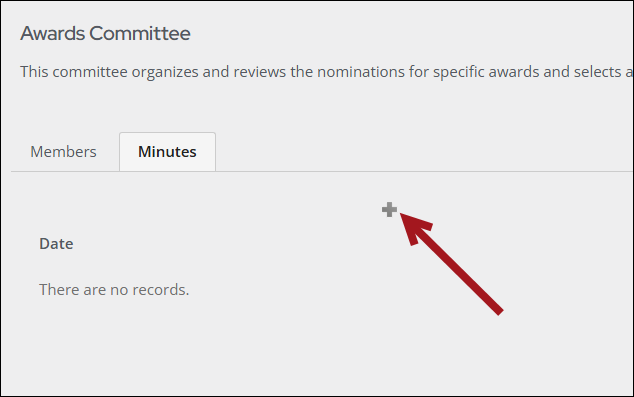
Committee minutes and notes are added to committee pages directly from the Staff site. Notes are added about a specific committee member, while minutes are added to committee group page.
Adding committee notes and minutes
To add committee notes and minutes, do the following:
- Go to Community > Committees.
- Select the committee.
- (Notes) To add notes, locate the member, then select the edit icon for that member. Enter notes in the Notes field.
- (Minutes) To add minutes, click the Minutes tab, then select the add icon.
- Click Save.

Example: Teresa has an open registration. She recently moved, so she updated her address on her account page. Her address update is automatically reflected in her event registration.
For this functionality to be available, the Disable auto flow down of organization address information setting (Settings > Contacts > System options) cannot be enabled.
The company’s address will flow down when the contact’s primary organization is updated in one of the following locations:
- Contact Mini Profile
- Company's Roster
- Merging the contact’s primary organization into an organization with a different address
Changing the primary organization from the Contact Mini Profile
Choosing a new Primary organization from the contact’s Mini Profile will allow the staff user to update the contact’s address or leave the address unaltered.
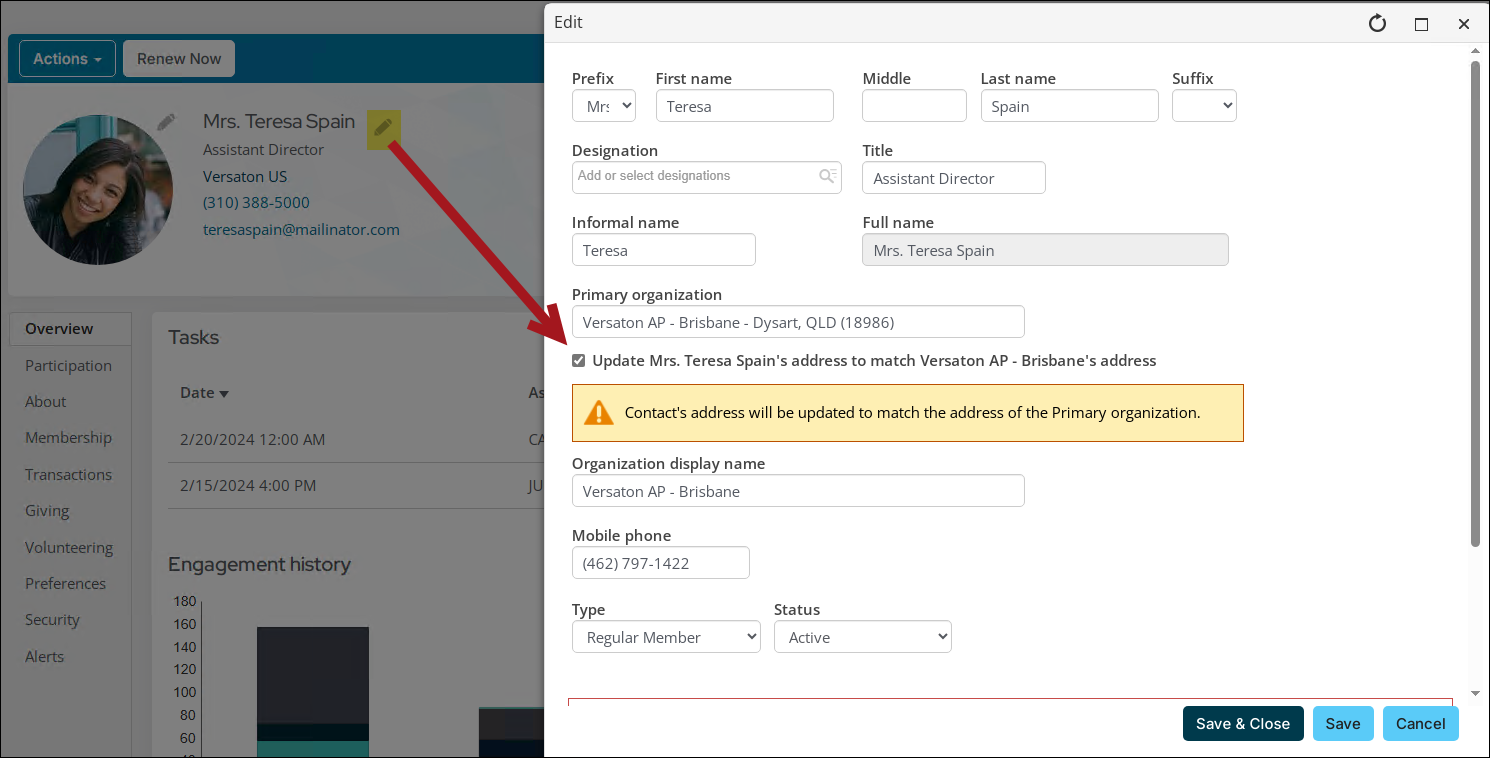
If the Staff user decides to not update the contact’s address to match the primary organization’s address, the information message reflects that decision.

Changing the primary organization from the company roster
When a contact is added to an organization’s roster as a member, staff users have an option to update the contact’s address to match the new primary organization’s address or leave the address unaltered.
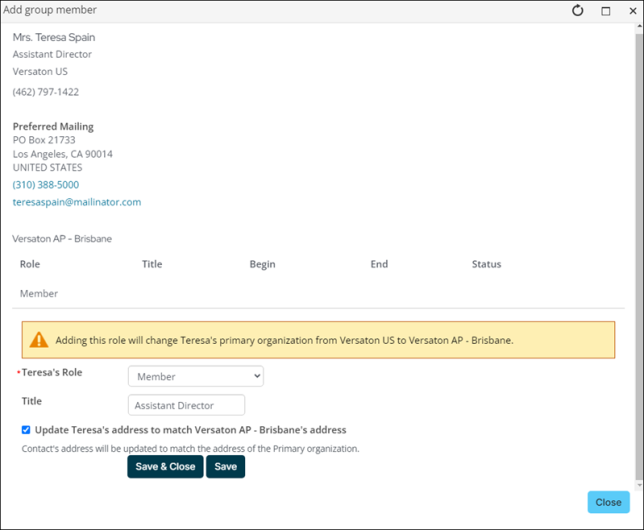
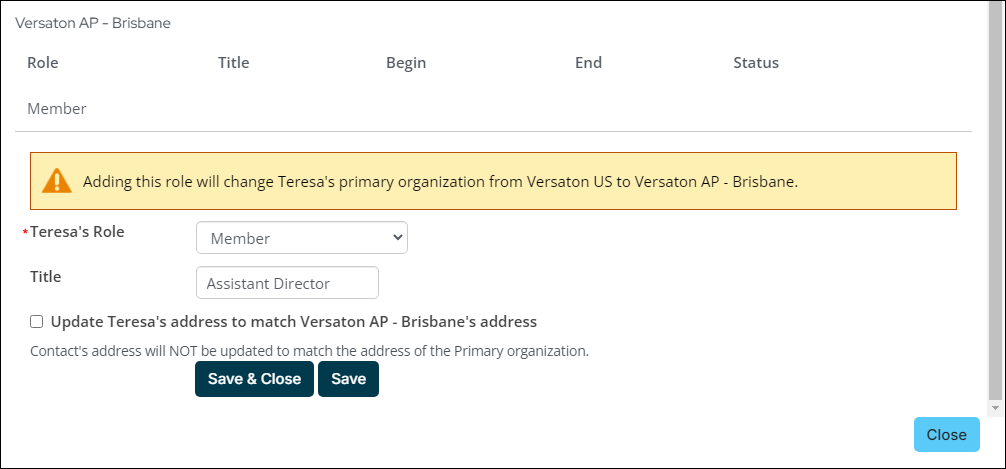
If the Staff user decides to not update the contact’s address to match the primary organization’s address, the information message reflects that decision.
Membership
The billing cycles window defines a billing run to bill a particular group of people for a particular set of products.
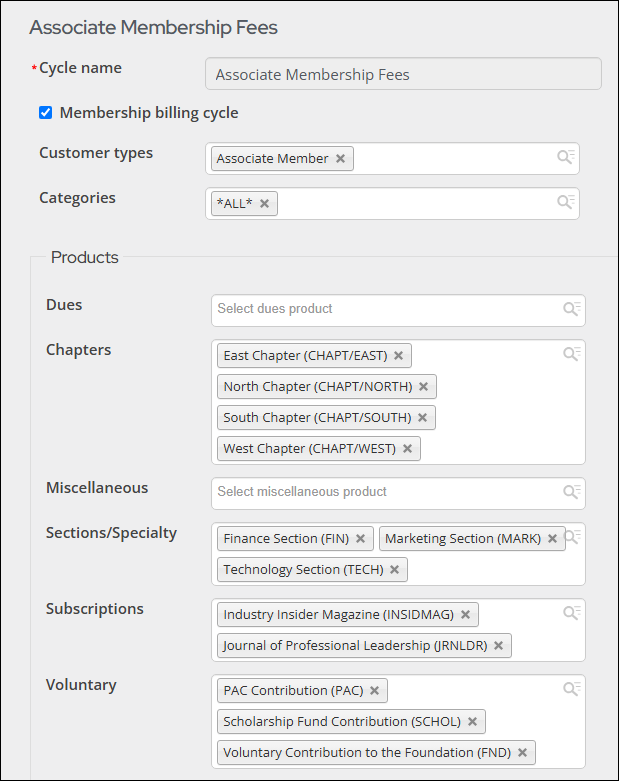
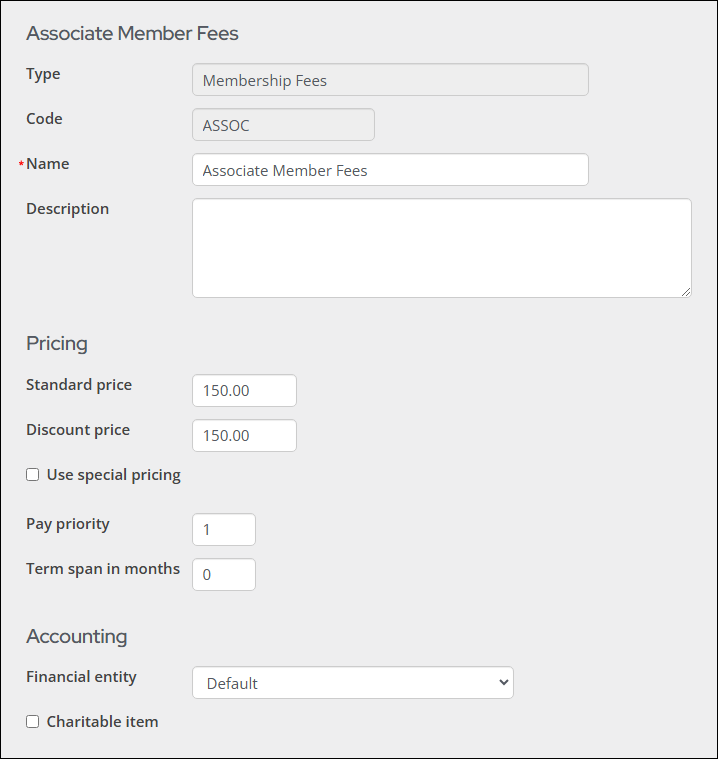
The billing products window defines product line items, default pricing, and account information.
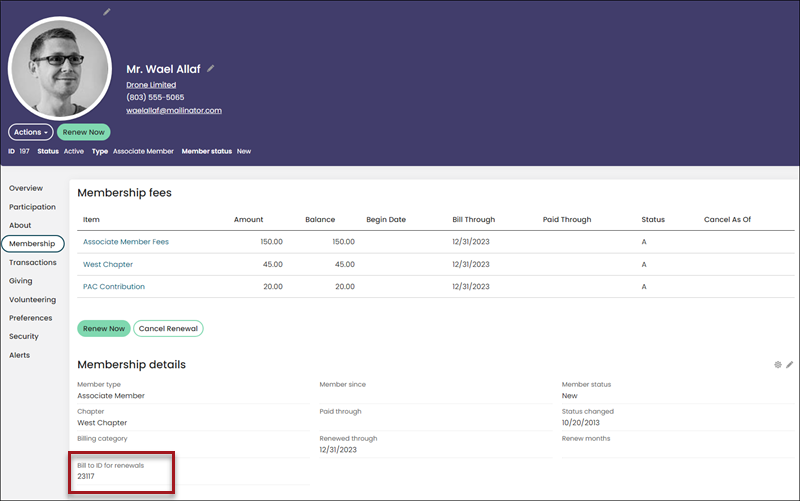
In the iMIS Desktop on the billing window, you were able to define a Bill to ID (now called the Bill to ID for renewals) per line item (subscription). In the Staff site, you are not able to define a Bill to ID for renewals per line item, and instead, a single Bill to ID for renewals is used when billing is run.
The Bill to ID for renewals is located on the out-of-the-box staff account pages on the Membership tab.
The following outlines how the Bill to ID for renewals is used with List Billing:
- If the member has a Bill to ID for renewals defined on their profile page, the person or organization associated with that Bill to ID for renewals is billed. Out-of-the-box, the Bill to ID for renewals is defined from the staff-view of account pages on the Overview or Membership tab in the Membership details panel.
- If the member does not have a primary organization, then the member will receive their own invoice.
Note: The Bill to ID for renewals is honored whether or not the customer type has Bill organization enabled.
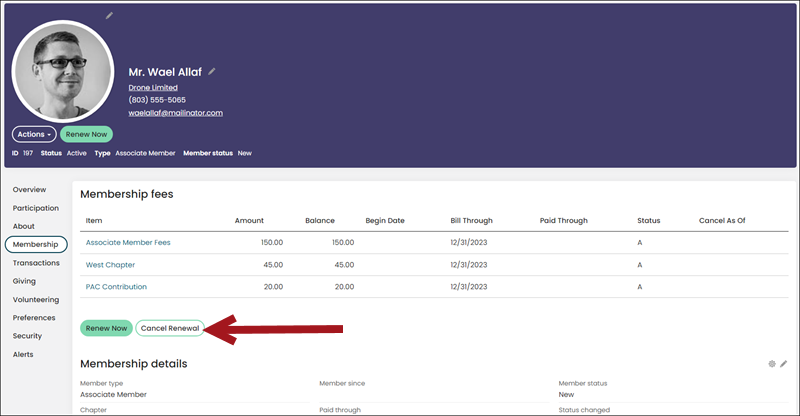
In the event a member decides they do not want to renew their membership but have already elected to renew, staff can cancel the renewal for the member if it has not already been paid. The cancellation can be performed from the staff-facing view of the member's profile page. Cancellation for accrual dues can be performed from the invoice detail page.
Cancelling a renewal
To cancel a member's renewal from the Staff site, do the following:
- Go to the member's profile page.
- Click the Membership tab, then click Cancel Renewal.
- You are taken to the cart. Review the order, then submit the cart.
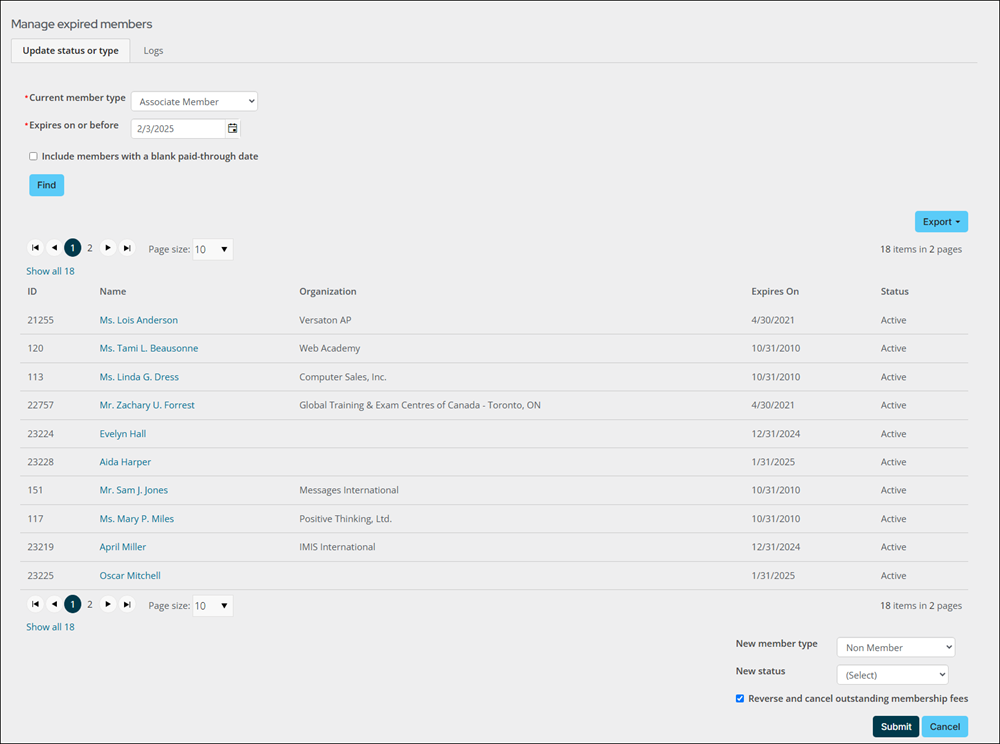
Administering the member status and member type for members who fail to renew is an important task in maintaining organizations. If member statuses or member types are not modified, expired members might retain unwarranted access to organizational privileges.
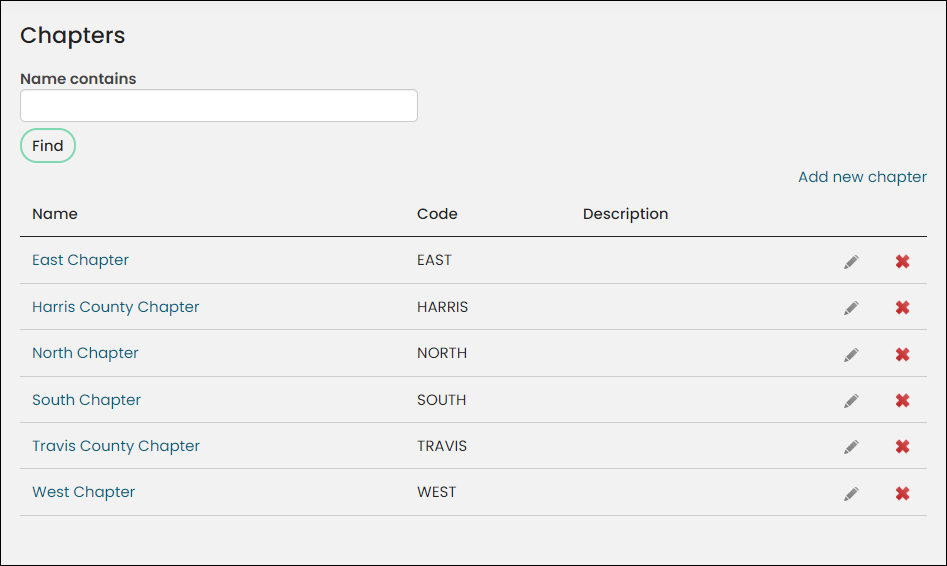
Staff users can manage chapter members, edit roles and enrollment dates, and delete members directly from the Staff site. Members can also access their chapters from the Participation tab on their profile pages.
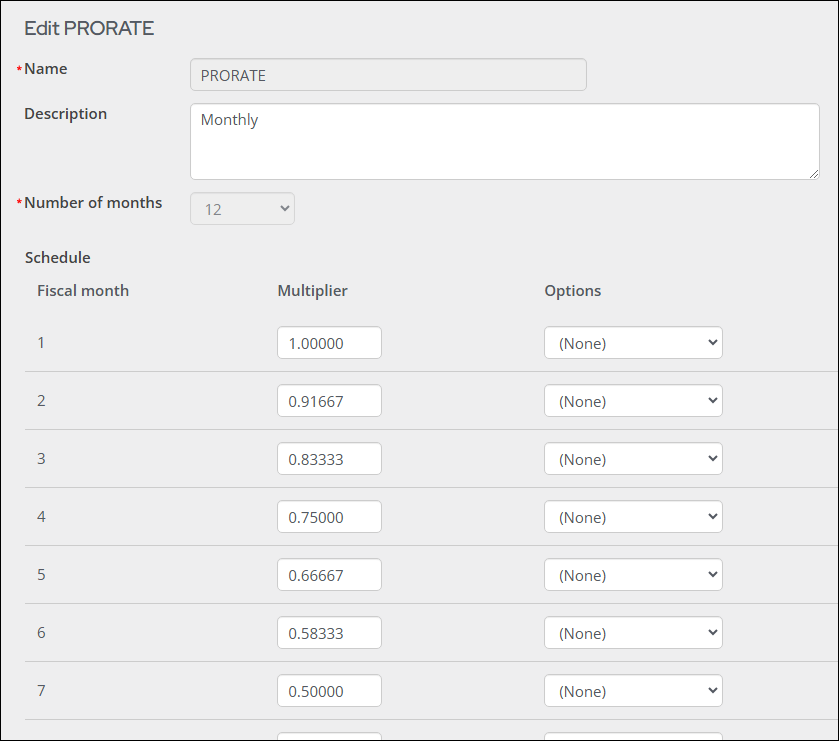
Prorating means allocating or assigning an amount to an activity or product that is proportional to some base (determined by a formula or procedure). Prorating is only applied to organizations that bill on an annual or fixed-term basis, as opposed to an anniversary or rotating term basis.
Note: The number of months used by the prorate rule for an individual is Thru Date to Join Date. Prorate only applies if the Join Date is populated before running the billing.
Using prorating
To add a new prorating rule from the Staff site, do the following:
- In the Staff site, go to Membership > Prorating rules. A Prorating schedules window is displayed.
- Click Add new prorating rule. A New schedule window is displayed. You will define your new prorating rule in this window.
- Enter a Name and optional Description for the new rule.
- Enter the Number of months. You can select up to 12 months. The value selected for the Number of months field will determine the number of rows to define in your new prorating rule.
- For each row in the rule, define the Rate and Options.
- Click Save & Exit.
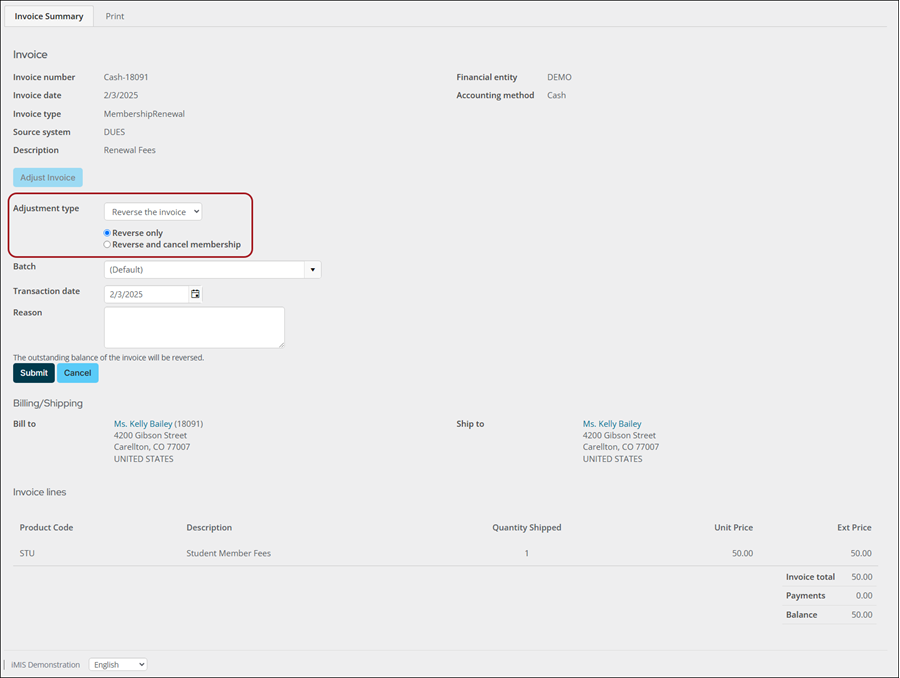
Easily reverse a membership invoice without also cancelling the membership. See Reversing a membership or subscription renewal for more information.
In the iMIS Desktop, you could associate a company record with a specific individual by using the Suppress Individual Name Fields for Company Records field. In iMIS EMS, this functionality has been deprecated.
If you are upgrading from an earlier version of iMIS, those records that had a company associated with a specific individual become a "combo record." You cannot create a new combo record in iMIS EMS.
What's a combo record?
A combo record is a company record that also includes a first and/or last name. If someone logs in as a company rather than an individual, their account is considered a combo record.
Switching from a combo record to an individual
iMIS EMS no longer supports combo records, so if you upgrade and notice there are combo records, it is important these are taken care of. If you are logging in as a company record rather than an individual record, you should do the following:
- Create an individual account (Community > Add contact). Create login credentials (username and password) for this account. Update other items on this account as necessary, such as member type, email, address, etc.
- Link the new individual account to the company's record as an administrator or the main contact person.
- Go to Community > Add contact, and add the contact.
- Go to the company's record (Community > Find contacts > Organization tab).
- From the company record, click the Contacts tab.
- Select Add contact.
- Search for the contact you added, then select the contact.
- Select a Role for the contact.
- Enter the contact's Title, such as Contact Person.
- Click Save & Close.
- Edit the company record and remove the first name, last name, and username from the account. When this is done, the account is no longer a combo record and is purely a company/organization account only.
- Going forward, login with the individual account you created in Step 1.
Do the following to link a contact to a company:
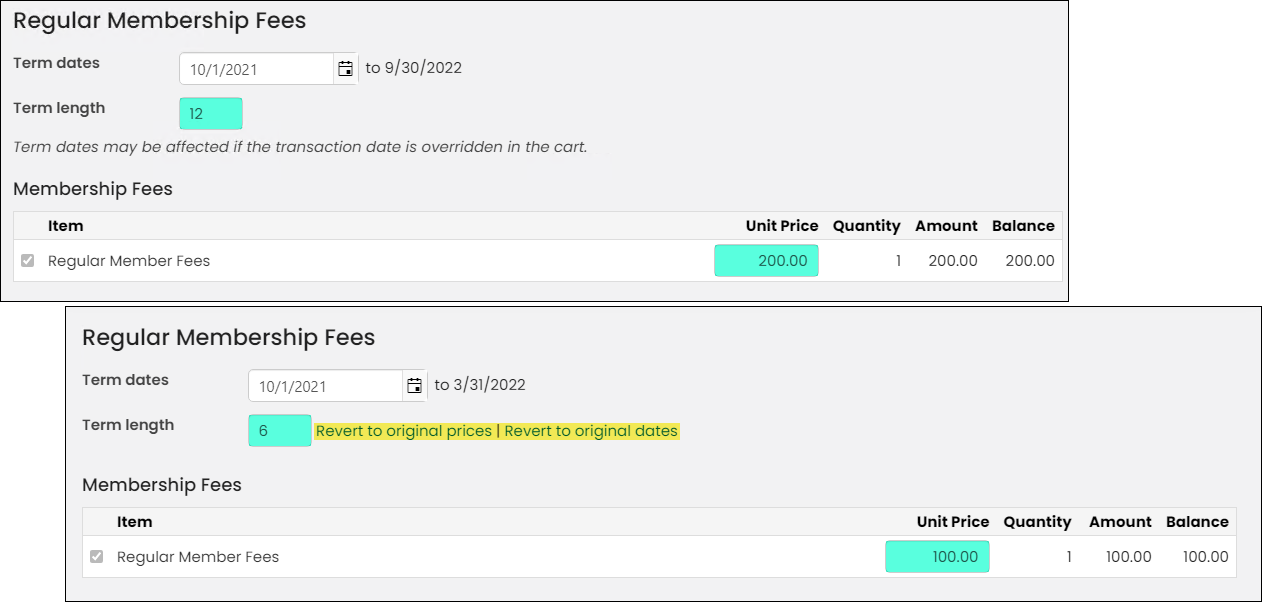
Although the process of overriding term dates, lengths, and prices for new members, membership renewals, and subscription items has migrated from the Desktop to the Staff site, the process has remained consistent. The Staff-site process takes place in the online Cart.
For more information, refer to Overriding prices and term dates on subscription items.
Formerly in Desktop, to include multiple dues products in a billing cycle as a Primary fee for a customer type, wildcards were used so new customer types did not have to be created for each dues product. Defining Use formula in the customer type eliminates the need to do this.
See Billing with multiple primary membership fees for more information.

Fundraising
Distributions are now referred to as Gift items, and Staff users can define gift itemsto which donors and members can donate directly.

Note: The iMIS Desktop setting, Allow Premiums as Products, is no longer a configurable setting and is instead always in effect.
Similar to the Desktop process, you can associate premiums with gift items, but the Staff site offers a feature called Premium sets. With premium sets, you can easily associate a premium product with multiple gift items, add source codes, and assign availability dates.
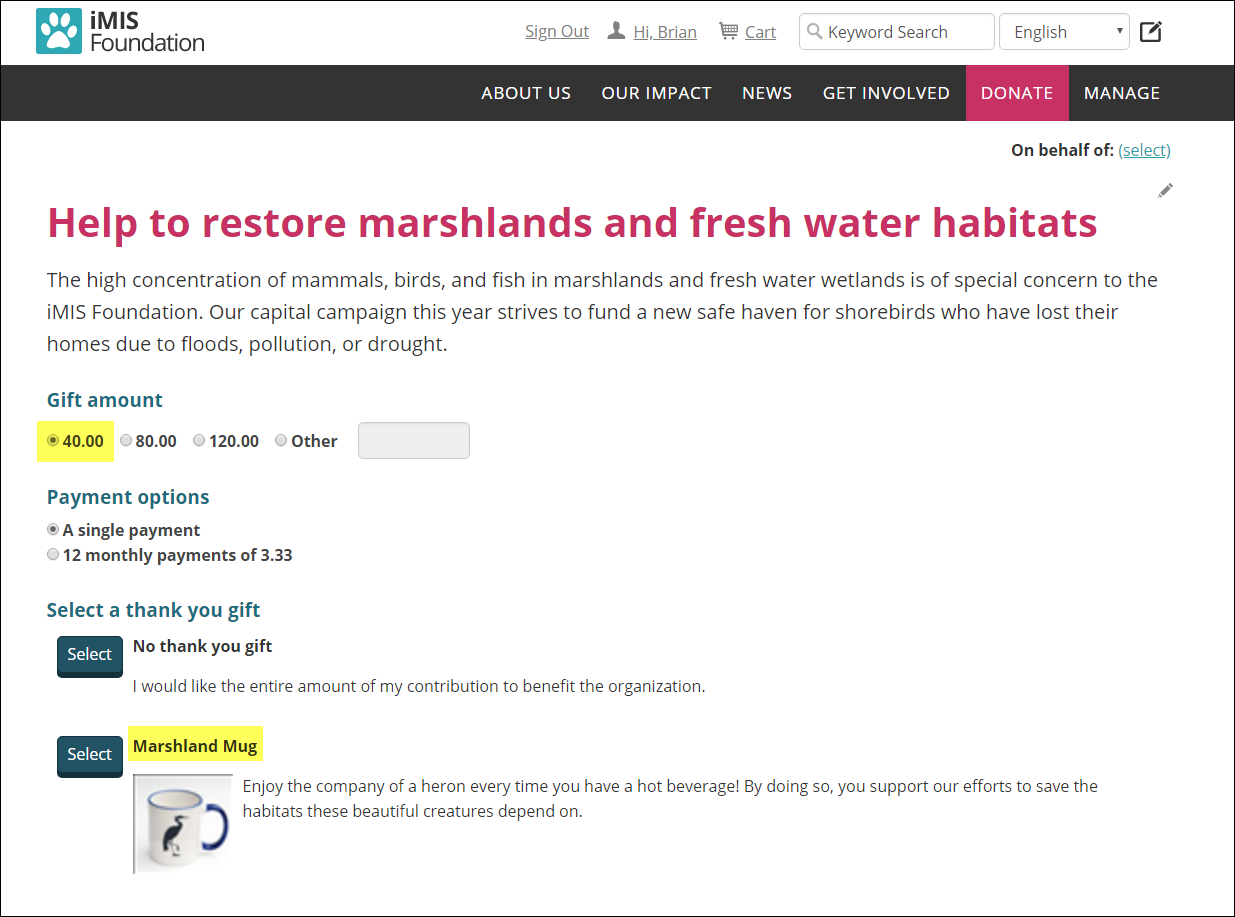
Previously, gift premium transactions were manually processed to an order. After upgrades, all gift premium transactions are automatically processed to the order stage. You must process all existing premium transactions in the iMIS Desktop before upgrading. If you were not able to process premiums before upgrading to iMIS EMS, see Resolving pending premiums.
Using premiums
To use premium sets in the Staff site, do the following:
- Go to Commerce > Find products:
- Locate and open the product for edit.
- Click the Accounting tab.
- Enable Offer item as a premium and fill out the available fields.
- Save the product.
- Go to Fundraising > Premium sets.
- Select Add new.
- Enter a Name for the premium set.
- Assign Eligible gift items to the set.
- Choose which Premiums belong in the set.
- Click Save.
For more information, see Premiums.
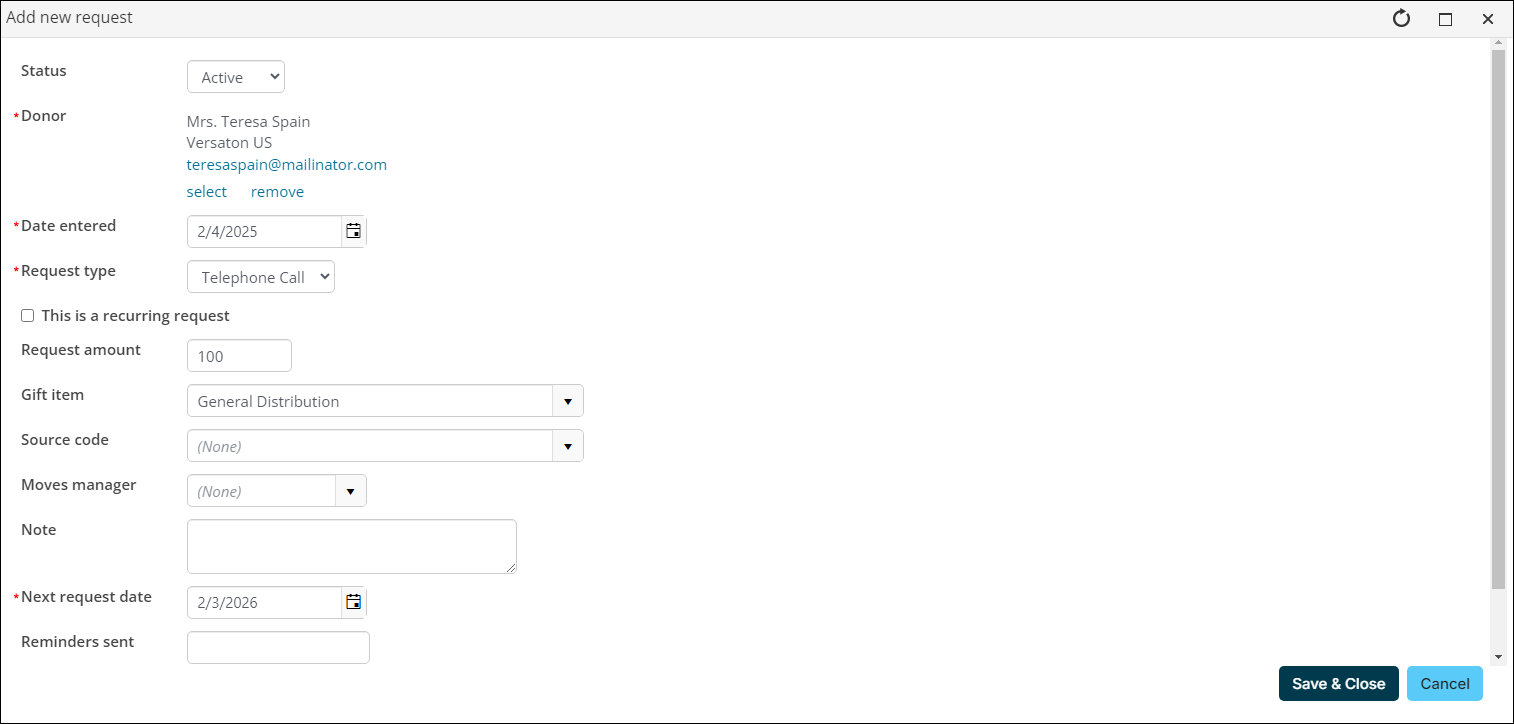
The Fundraising Requests feature allows you to track activities, such as phone calls, letters, emails, and notes that ask for a gift or pledge. This feature also enables you to associate donations with the requests that prompted them. See Fundraising requests.
There may be instances in which a donation receipt must be voided. The Desktop allowed you to generate replacement receipts for already-receipted gifts. The Receipting feature now enables you to void receipts and issue replacement receipts with new receipt numbers directly from the Staff site.

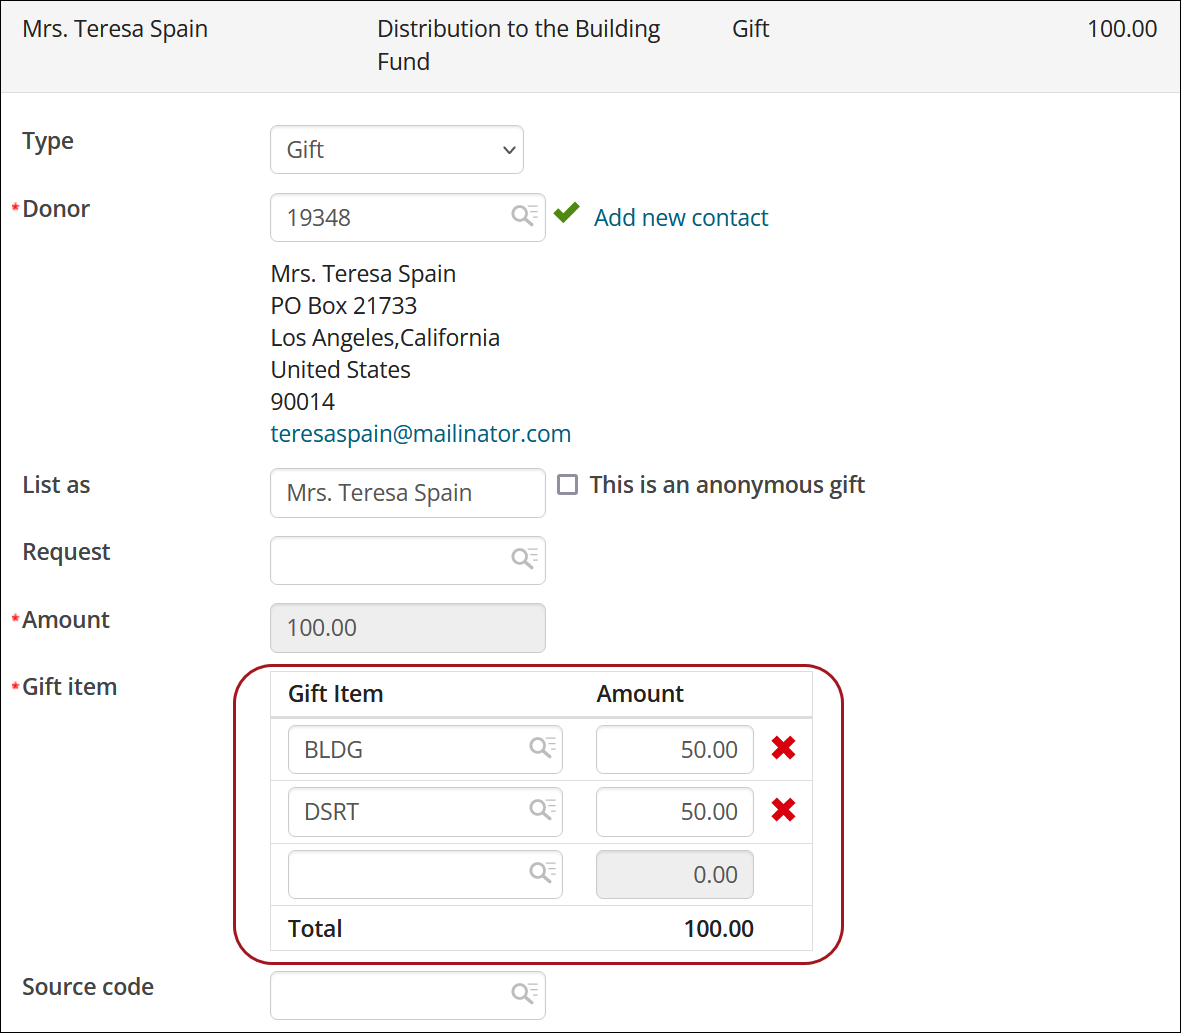
Enter split gifts from Fundraising > Enter gifts by selecting the Split gift items option. This option allows you to allocate a single gift or pledge to multiple gift items and specify the amount to contribute to each gift item.
Events
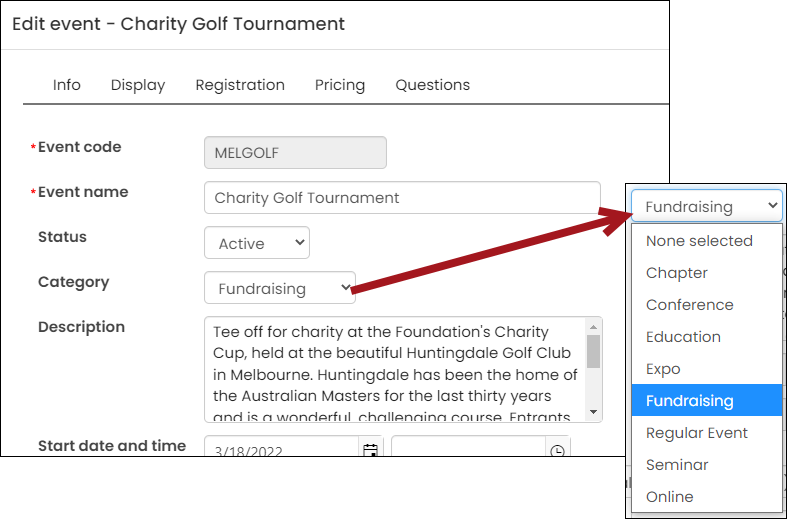
Event categories, previously known as event types, can now be defined from the Staff site. Assigning a category to an event allows you to organize events, event reports, and event queries more efficiently.
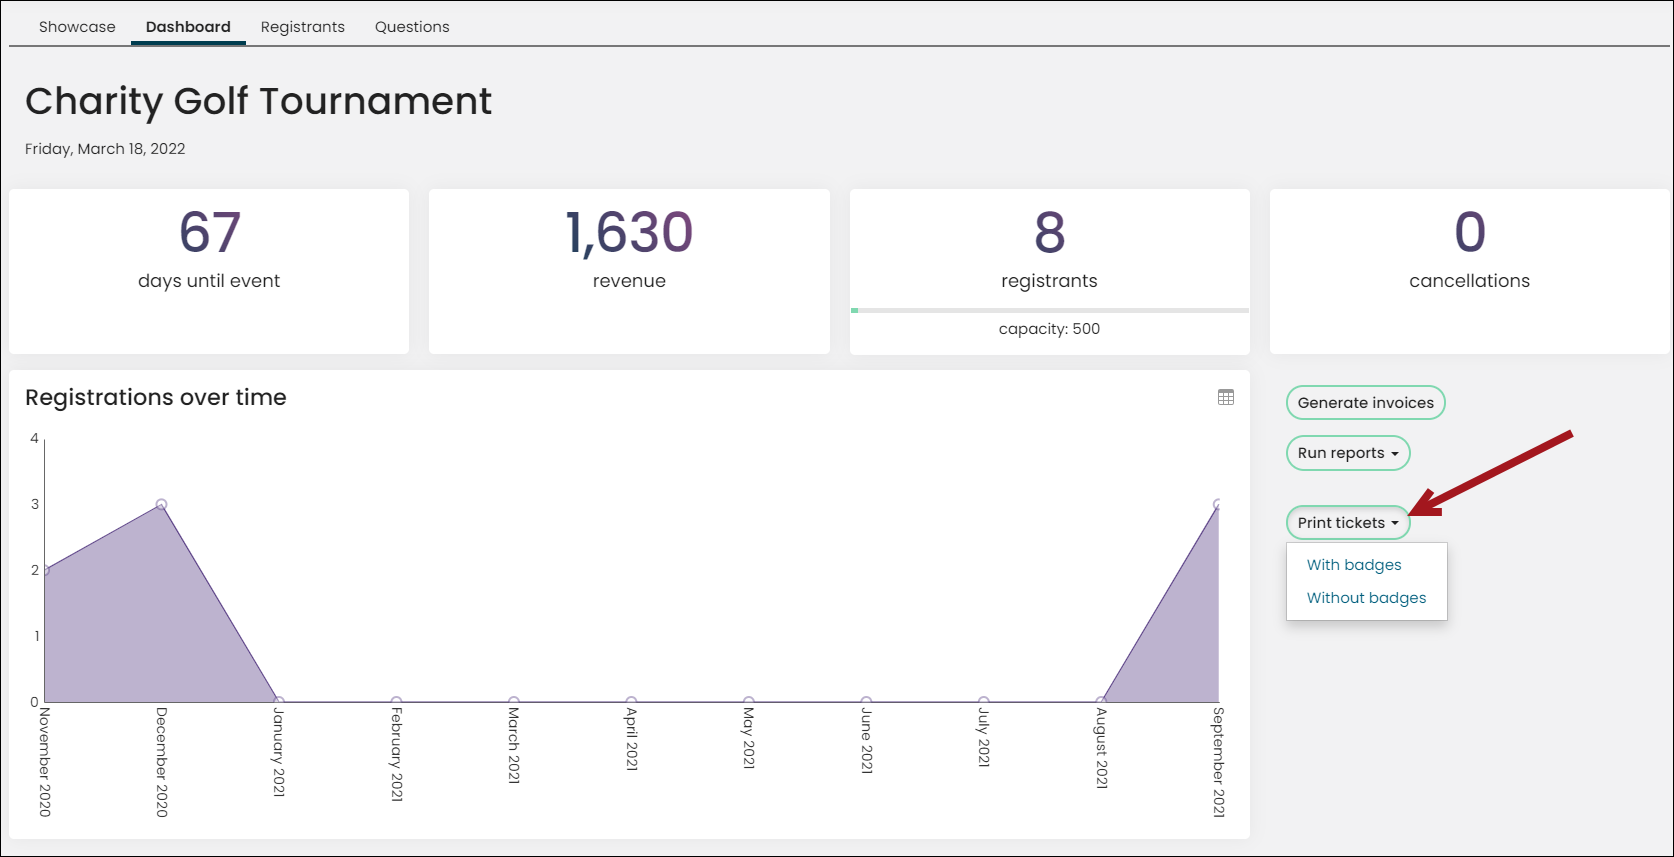
Event registration options and program items can now be printed as tickets from the Staff site. When Print tickets is enabled for individual registration options and program items of an event, a Print tickets button appears on the event-specific dashboard, allowing staff users to run a report that generates the tickets. Staff users can choose to run the report With badges or Without badges.
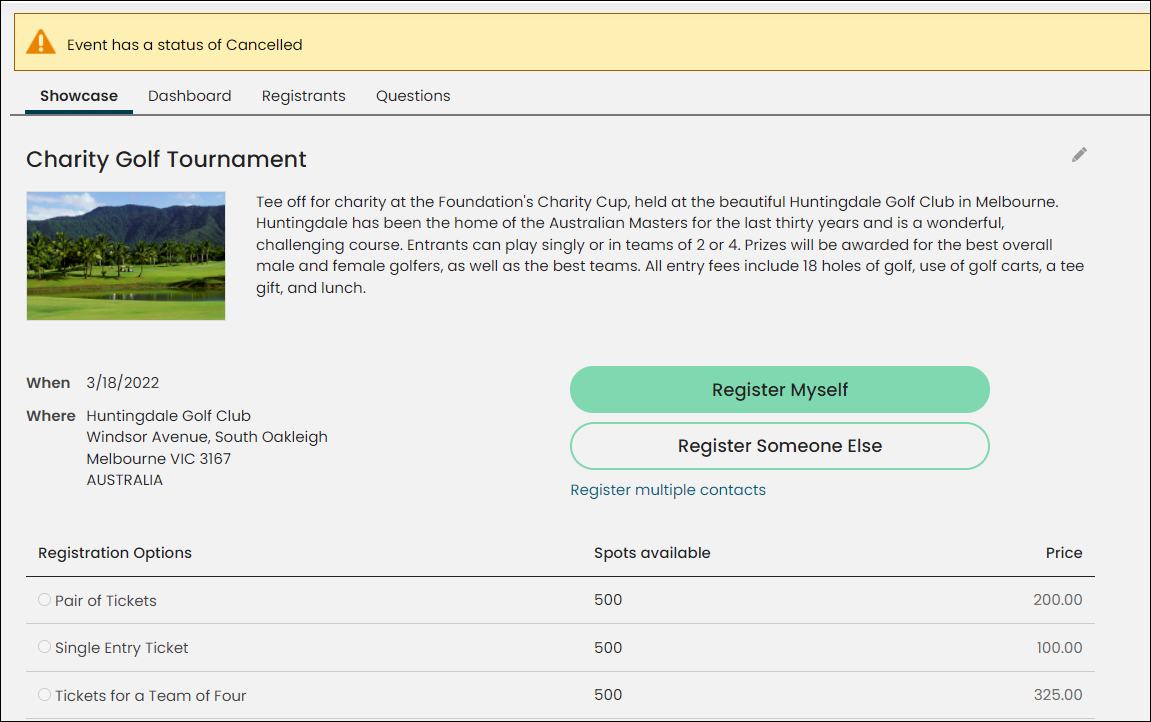
After an event has been saved for the first time, the Cancel event button is available from the Event edit window.
For more information on Cancelling events, see Cancelling an event.
Staff users can define Continuing Education Units (CEU) and CEU types for event registration options and program items. This means that CEUs can efficiently be awarded and adjusted directly from the Staff site. See Defining and marking CEU attendance.

Once CEUs have been defined for an event registration option or program item, a staff user can mark attendance for that event by choosing to Mark All Attended or Mark All Absent, or individually mark attendance for each registrant.
When a registrant cannot attend a particular event because of a conflict or unforeseen occurrence, you can transfer the registrant to another event.
Transferring registrations
To transfer a registration from one registrant to another in the Staff site, do the following:
- Cancel one registration. This results in an outstanding credit.
- Process a registration for a second registrant.
- Apply the existing credit from the initial cancelled registration to the second registrant.
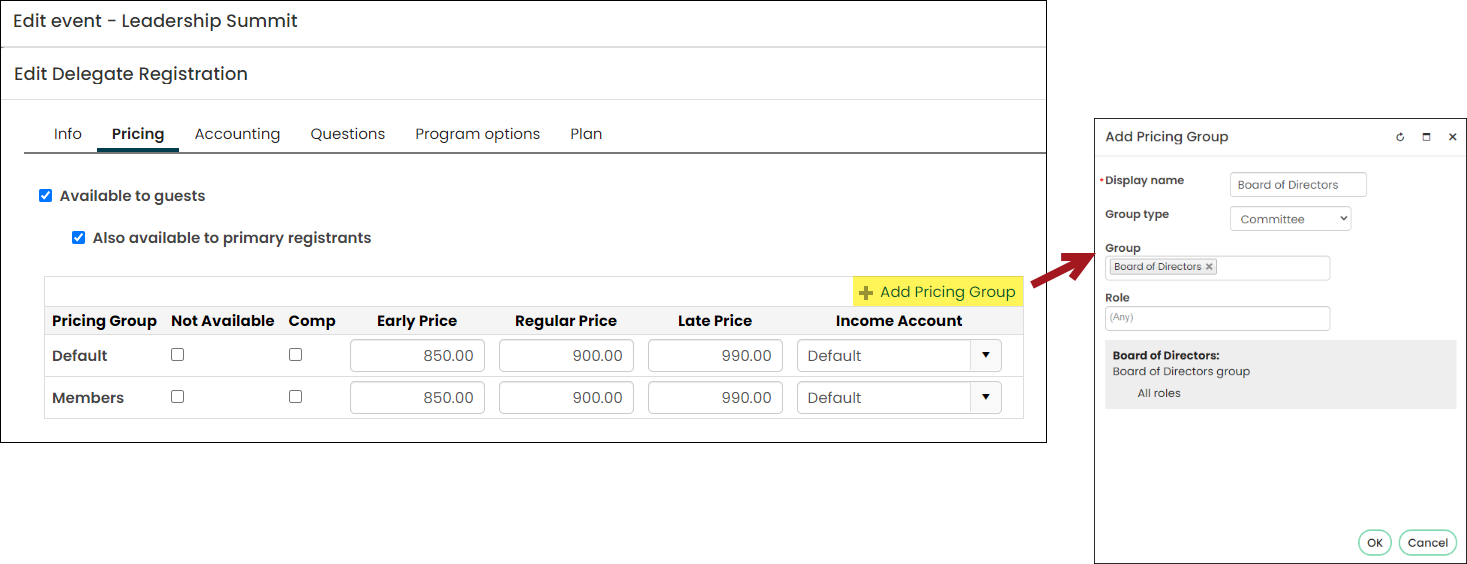
Event pricing is now specified by assigning pricing groups. Pricing can be defined through standard groups, such as committees and member types, or dynamic IQA groups.
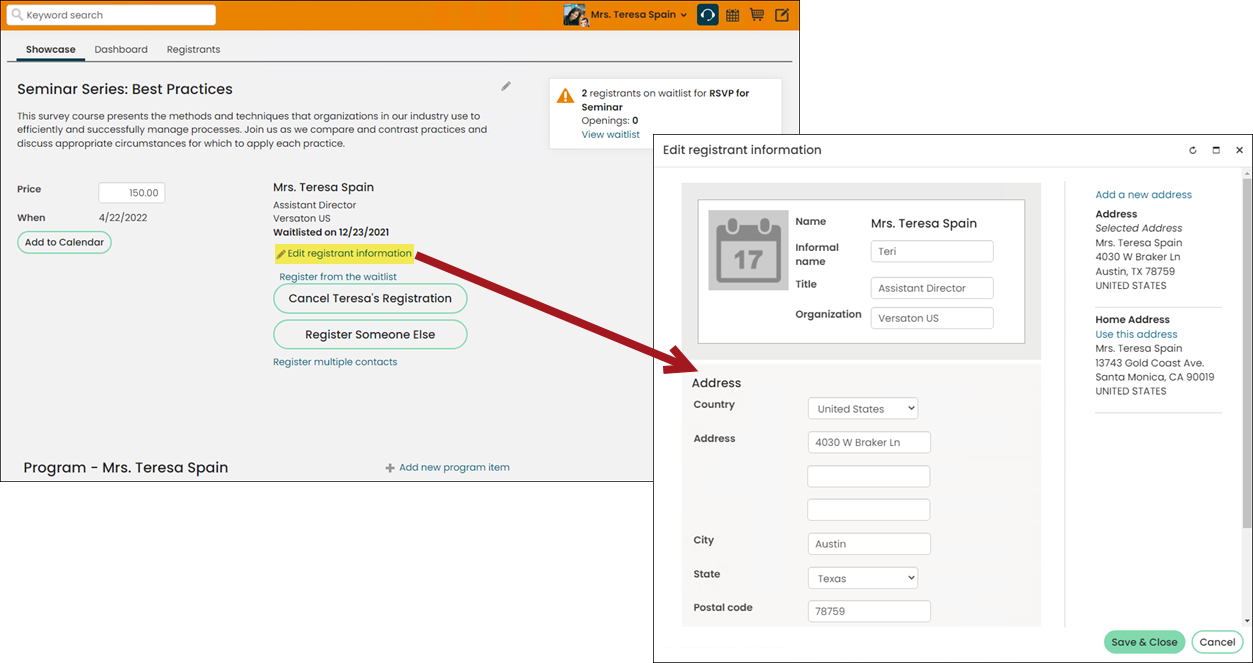
In iMIS Desktop, automatic updating of contact address changes for event registrations required enabling the Update open meetings addresses with address changes setting. In iMIS EMS, address changes for a contact are reflected in their open event registrations by default, removing the need for this setting. Address changes made on the attendee's account page automatically reflect in their event registrations, and changes made in the event registration automatically update their account page.
Example: Teresa has an open registration. She recently moved, so she updated her address on her account page. Her address update is automatically reflected in her event registration.

Commerce
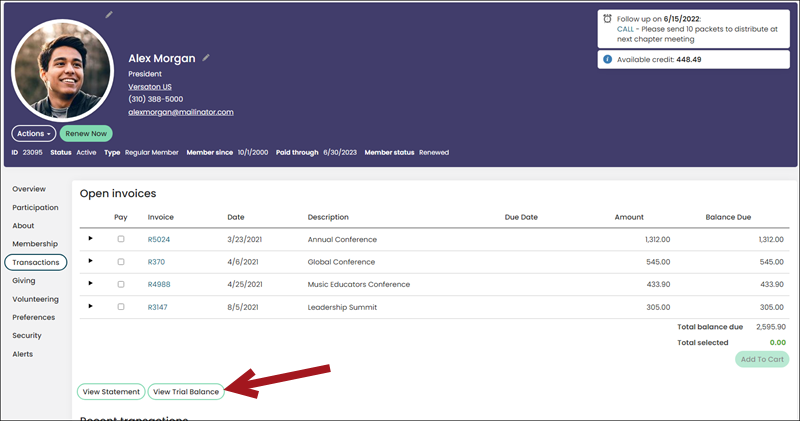
View and print AR statements from the Staff site.
Members and authenticated users can view and print AR statements using the View Statement button found in the Open Invoices section of the My Participation tab on their account page.
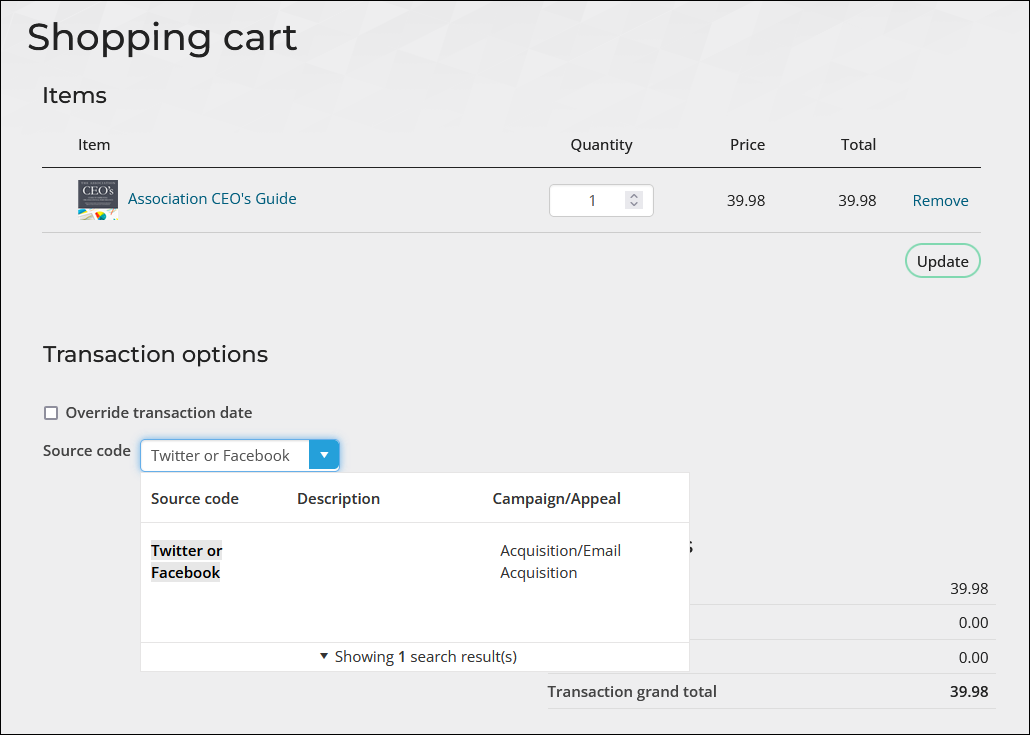
Select a source code in the shopping cart to associate the code with entire orders, membership dues, or event registrations. As you type in the Source code field, the field acts as a drop-down. The drop-down displays each source code, along with its Description and Campaign/Appeal.
System administrators and staff users with an Orders: 4 module authorization level have the option to cancel orders that have not yet been invoiced (status is not COMPLETED). To cancel an order, select Cancel order from the Actions drop-down of the order details page.
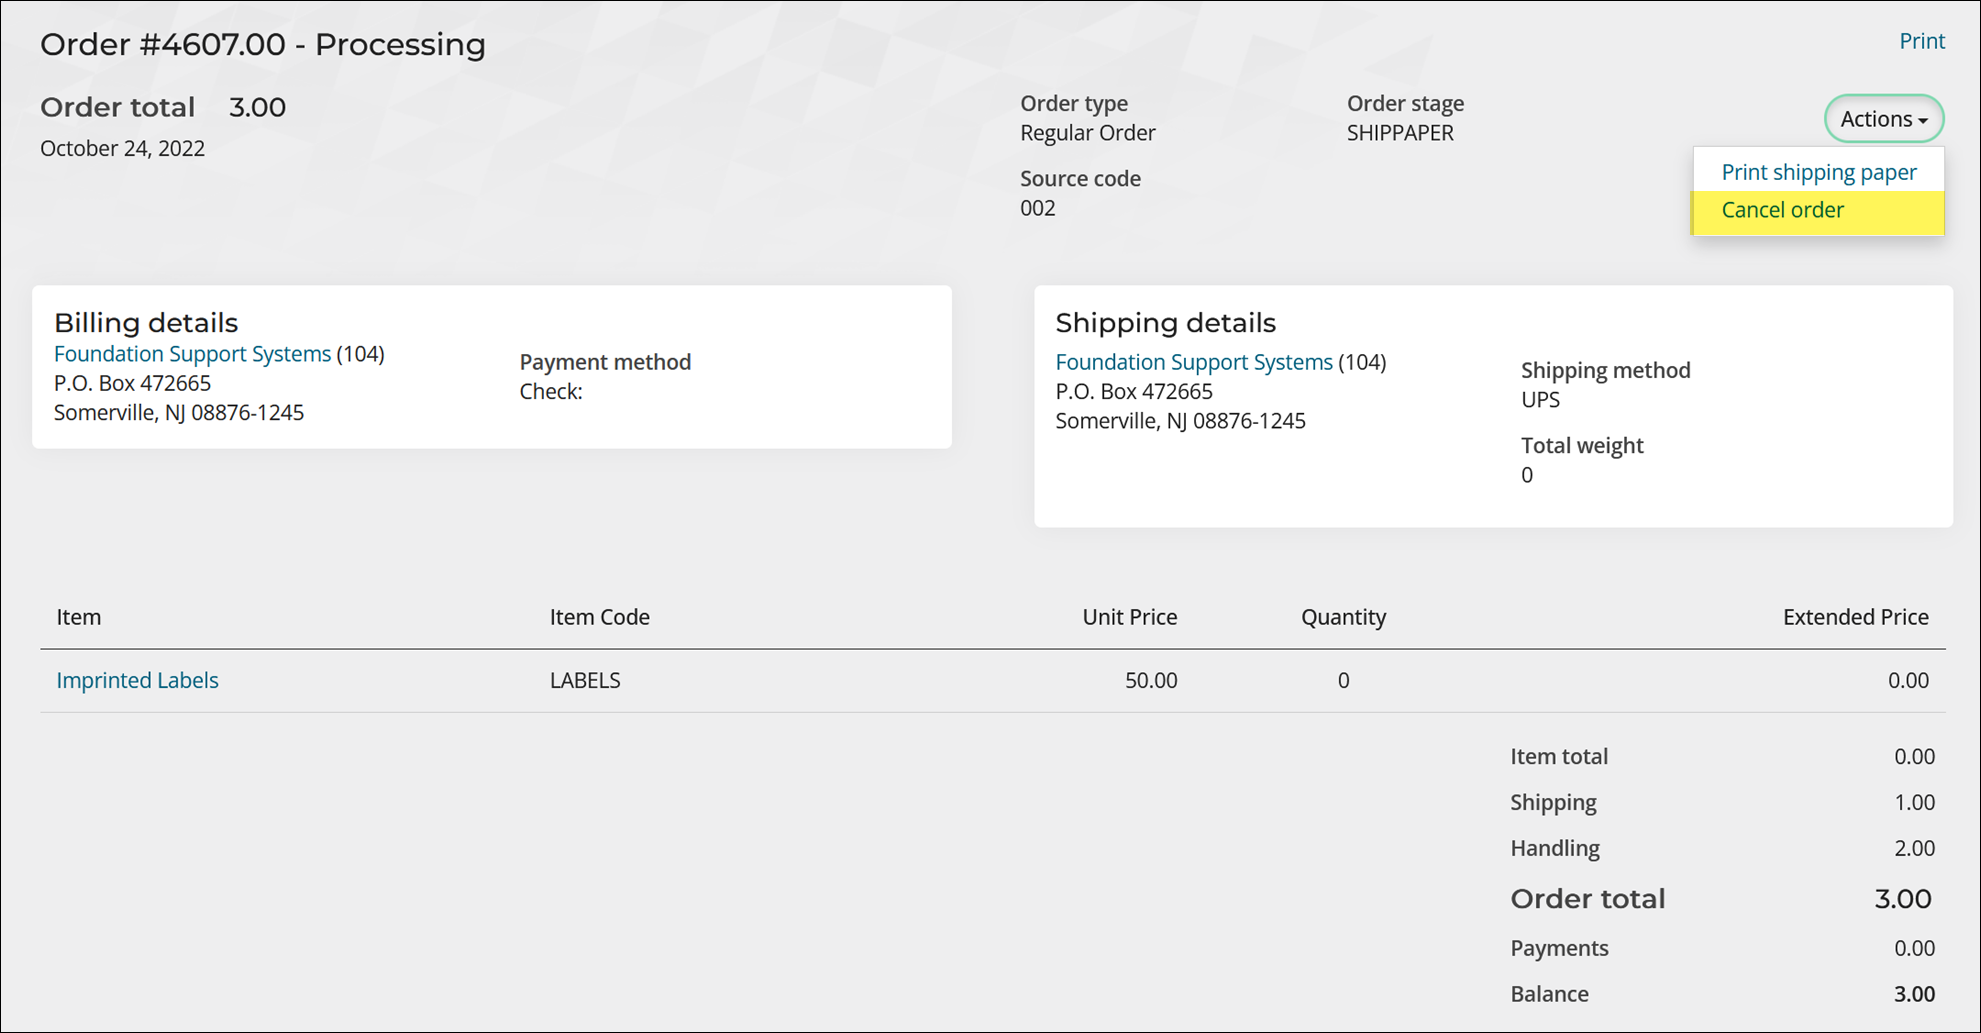
Once cancelled, orders cannot be restored as they were in the Desktop. To manually restore a cancelled order, re-enter the order.
The Use customer's default tax authority option enables staff users to calculate taxes for orders based on the customer's Default tax. To enable this setting, go to Settings > Commerce > System options.
See Calculating online sales tax to learn how to use this setting.
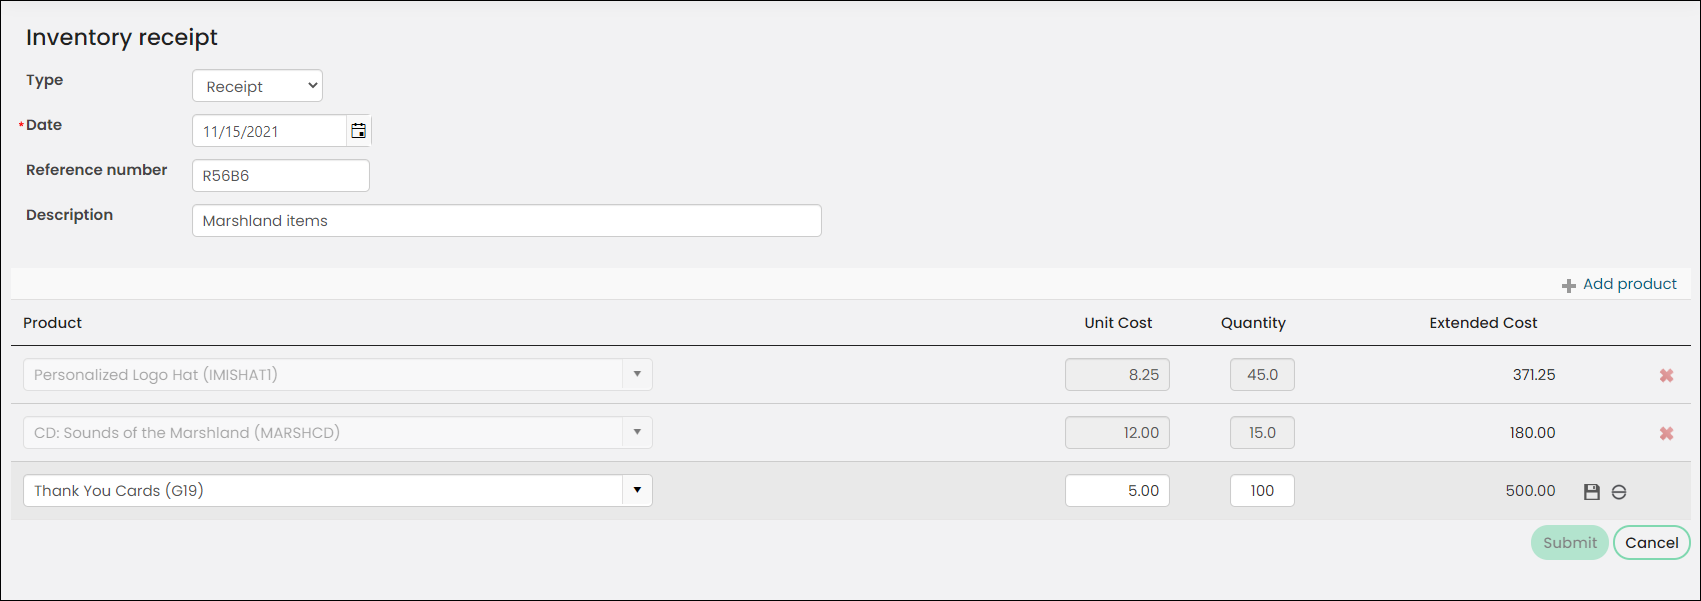
Certain aspects of product inventory management have migrated from the Desktop to the Staff site; however, related inventory features such as warehousing, restocking, manual inventory posting, backorders, and standard valuation method, have not yet been implemented in the Staff site.
Using product inventory
To add new inventory items or adjust inventory levels, do the following:
- Go to Commerce > Inventory receipts.
- Select Add inventory receipt.
- From the Type drop-down, select Receipt if you are entering new inventory items, or select Adjustment to make adjustments to current inventory levels.
- Enter a Date.
- (optional) Enter a Reference number and Description.
- Choose the product to add or adjust by selecting Add product.
- Enter the Unit Cost and Quantity, then Save.
- Continue adding products.
- Click Submit.
See Entering and adjusting inventory.
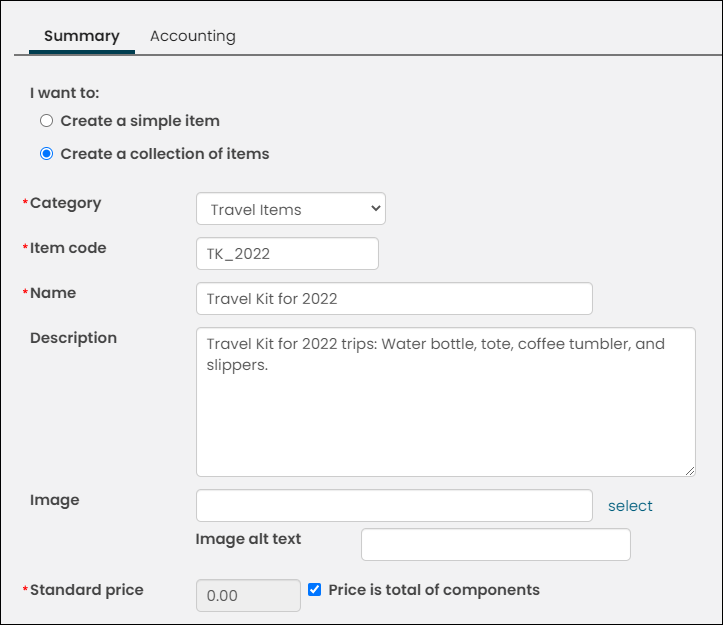
Product Kits or Kitting, now known as a collection of items, gives you flexibility to define and display groups of commerce items. You can organize collections of commerce items into three general types, each with options, default values, and display choices.
Note: The ability to define a collection of items is available to those with the KITTING license only.
Defining a collection of items
Do the following to define a collection of items in the Staff site:
- Go to Commerce > Add products.
- Select Create a collection of items to define a set of individual items.
- Select the Category for this collection.
- Enter the Item code.
- Enter the Name and optional Description of the item.
- Enter the Standard price, or select the Price is total of components option.
- Define the components of the collection.
- Click Save.
For a more detailed overview, see Defining a collection of items.
Customers can view details about orders they have placed, track what was ordered and when, and view the status of orders. Staff users can search for orders and view details.
Viewing order details
Note: Only users who have access to the order can view the order details.
To view order details in the Staff site, do the following:
- Go to Commerce > Find orders.
- Search for the order.
- Select the Order Number to review detailed order information.
For more information about viewing order details, see Reviewing orders.
In iMIS, you can process each order through stages to completion. There are several possible order stages, but the number and type of stages through which an order is processed depends on the order's type. Different order types require different processing stages.
For more information, refer to Processing orders.
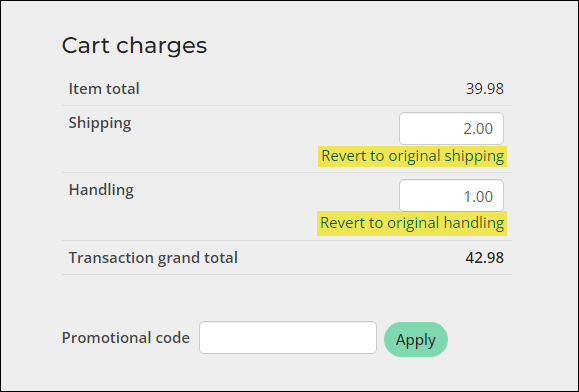
Staff users can update shipping and handling costs from a customer’s cart, including non-shippable items. For more information, see Overriding shipping and handling charges.
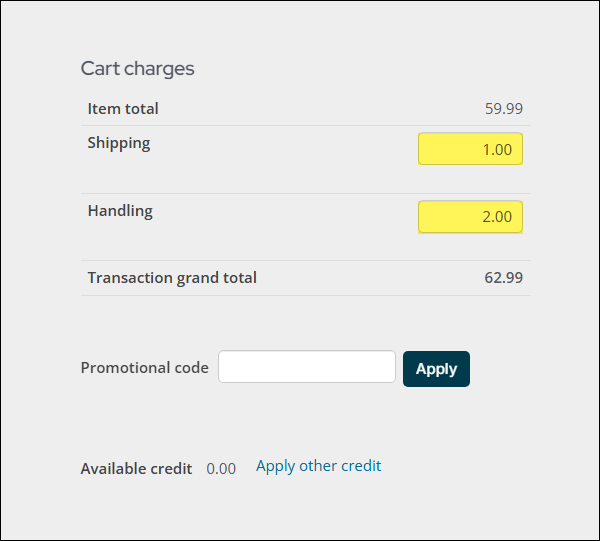
Overriding shipping and handling charges
Do the following:
- Go On behalf of a customer.
- Add the desired items to the customer’s cart. At least one item must be a commerce item for the shipping and handling charges to be overridden.
- Under Cart charges , manually input new shipping and/or handling amounts.
- Select Revert to undo the shipping and/or handling changes and return them to the original amounts.
- Add the payment details, then click Submit Order.
Note: Once the original shipping and handling amounts have been overridden, they cannot be reset to the original amount unless the items are removed and re-added to the cart.
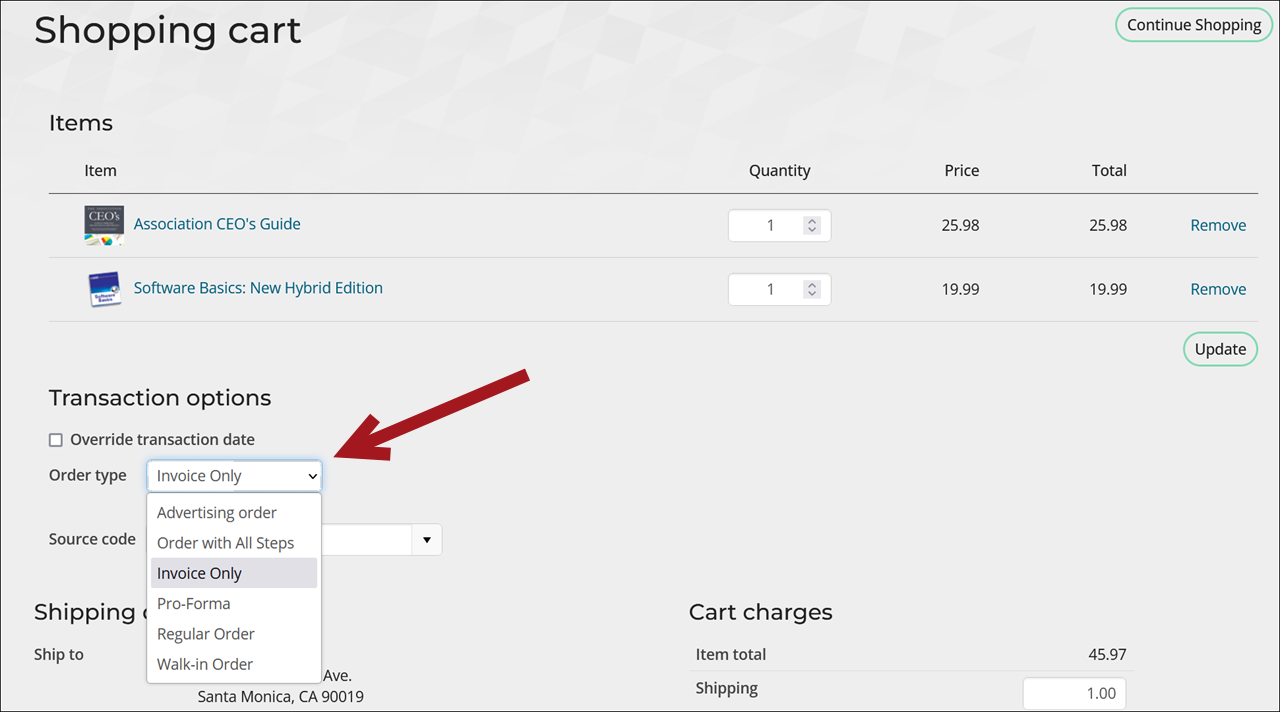
Authorized staff users can override the default order type from the shopping cart. When the cart contains commerce products, the Order type drop-down appears in the Transaction options area. This drop-down is automatically populated with the default order type defined in the commerce settings. Choose a new value from the drop-down to override the default order type for all commerce orders generated from the cart.
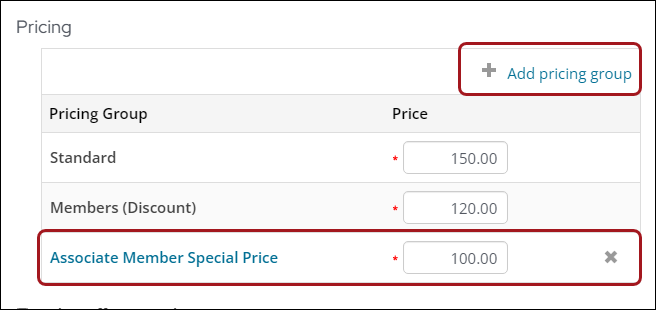
Create pricing groups to define special pricing for commerce products. Once you create a pricing group, you can reuse the group for other products or event functions. Review the products using the pricing group from the Pricing group detail window.
Finance
The nature of a fundamental self-service site makes traditional multiple batch control different and irrelevant. Concepts such as control totals, user-created multiple batches, and so forth are not available through the Staff site. From the Staff site, you can now configure your preferred batch mode, view and print information about existing batches, and post batches.
Posting batches
To post a batch, do the following:
- Go to Finance > Batches, and select an Open or Ready batch.
- When a batch is Open, additional transactions can be added. The status can be changed to Ready for review (click Set Ready) when modifications are finalized.
- Batches marked Ready no longer require editing and can be posted (click Post Batch). However, authorized staff users can change the batch status back to Open (click Set Open).
- Click Post Batch. A message is displayed confirming that the batch has been submitted for posting. The batch Status is changed to Closed.
For more information about using Batches, see Managing batches.

Deleting subscription records allows staff users cleanup a contact’s subscription list and remove any unwanted subscriptions. For example, if a subscription was added incorrectly and needs to be removed or corrected, then deleting the item is the best course of action. Alternatively, if you want to preserve the subscription, mark the item Inactiveor add a Cancelled as of date instead.
Note: You must be a system administrator or a staff user with Dues: 4 module authorization level or higher to delete membership fees and non-dues subscriptions.
The need to delete a subscription record may occur in any of the following situations:
- A contact is updating their account and notices old subscriptions that they have not renewed, nor have they been billed for in two years.
- A contact incorrectly added a subscription and needs it to be removed or corrected.
- A staff user accidentally bills a member for an optional subscription item and needs to delete the item from the member’s billing.
See Deleting subscription records for more information.
iMIS offers generic general ledger export functionality in the Staff site. Customers can use any accounting package, many of which have import utilities.
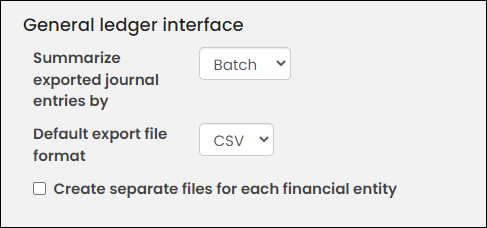
Important! The only out-of-the-box file formats are IIF and CSV.
Exporting general ledger transactions
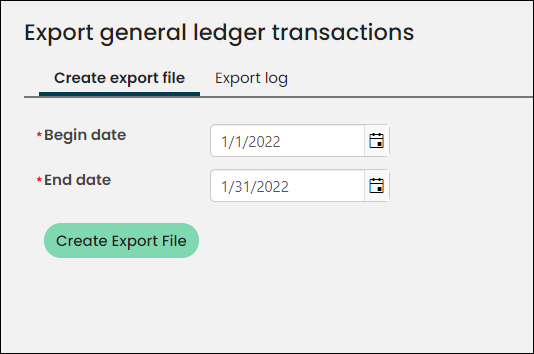
- Before you export general ledger transactions, you must set a summarization option and define the file format. Go to Settings > Finance > General. In the General ledger interface section, define configuration options.
- Create the general ledger export file:
- Go to Finance > Closing procedures> General ledger export.
- Select a Begin date and an End date. Any type of transaction dated within the specified range will be included in the export file.
- Click Create Export File. The file will be downloaded locally.
Previously, you had to visit several different Desktop windows to apply various types of open credits. The updated functionality in the Staff site allows customers with outstanding credits can have those credits applied to their transactions during the cart checkout, regardless of the items being purchased.
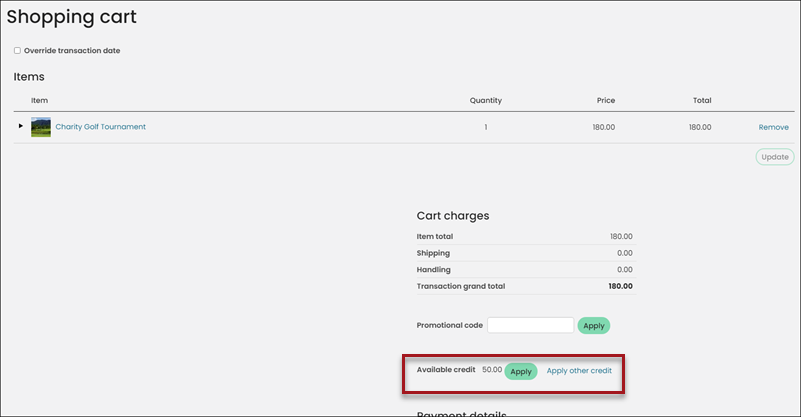
Configuring your site to accept open credits
There are three areas that must be configured before you can apply open credits:
- Site administrators must set up a new Open Creditpayment method payment method.
- The Open Credit payment method must be added to the default payment method set.
- The Open Credit Display content item is added to your shopping cart content record.
For a more detailed overview, see Applying an open credit.
Payments can be searched for and reviewed to obtain a better understanding of the payment details, and to determine which payments have actually been made in iMIS.
Searching for payments
To locate a payment in the Staff site, do the following:
- Go to Finance > Pay Central > Find payments.
- Enter search details, then click Find.
- Select View details to open the payment details for a specific payment.
For more detailed information, see Viewing payments.
Recording a payment reversal
Payments can be reversed (for insufficient funds, credit card chargebacks, and so forth) and the payment reversal recorded within the Payment detail window. This applies to individual payments, and the reversal details can be viewed using the View reversal link.

See Recording a payment reversal for more information.
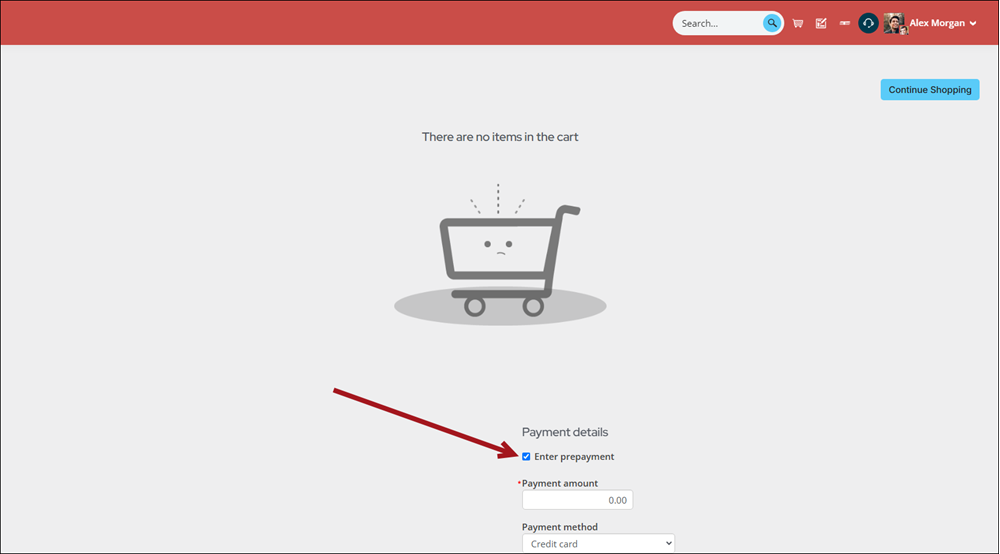
Users can use prepayments to prepare for an upcoming purchase or registration. Payments sent ahead of time can be entered by a staff user operating On behalf of a contact. Staff users can also enter prepayments On behalf of a user in the form of an overpayment.
Easily add a description to ensure appropriate notes are kept about the prepayment's purpose.
For a more detailed overview, see Applying prepayments.
Settings
Users can upload attachments to activity panels. A single activity record can allow up to fifty attachments.
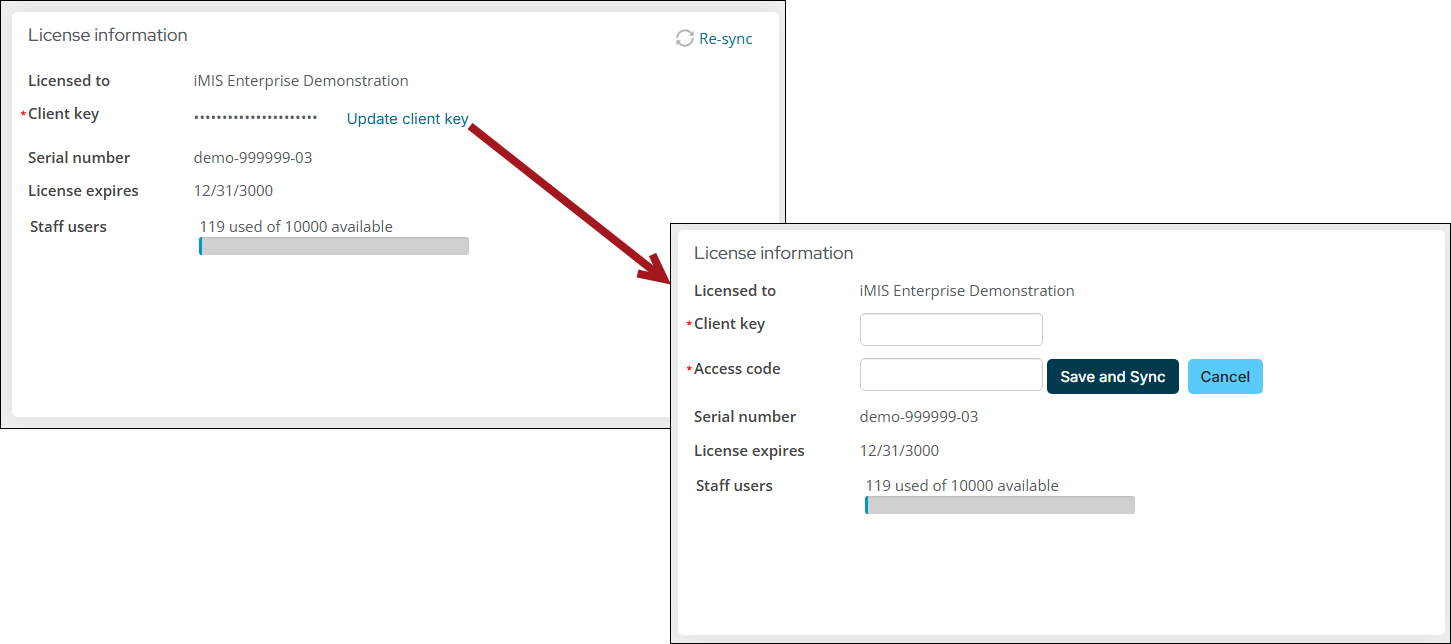
To update licensing information in iMIS EMS, all you need is a Client key and Account code. The Client key and Account code are provided to you by ASI. To add these values to your iMIS, go to Settings > About iMIS.
See Configuring licensing in iMIS for more information.
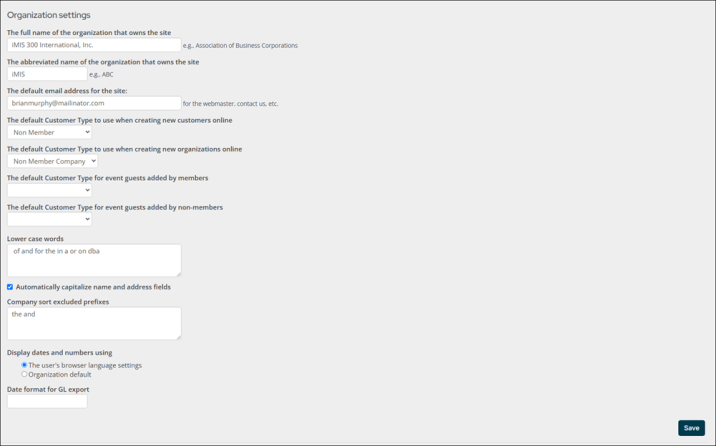
Some organization settings have migrated from the Desktop. Lower case words and Company sort excluded prefixed can now be configured from the Staff site.
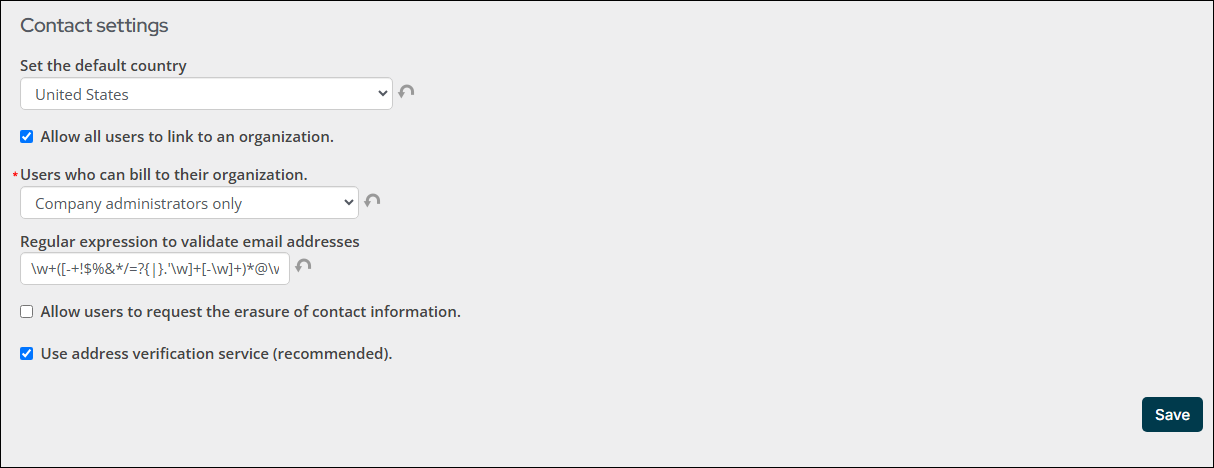
Contact settings, previously known as Customer settings on the Desktop, are now available on the Staff site.
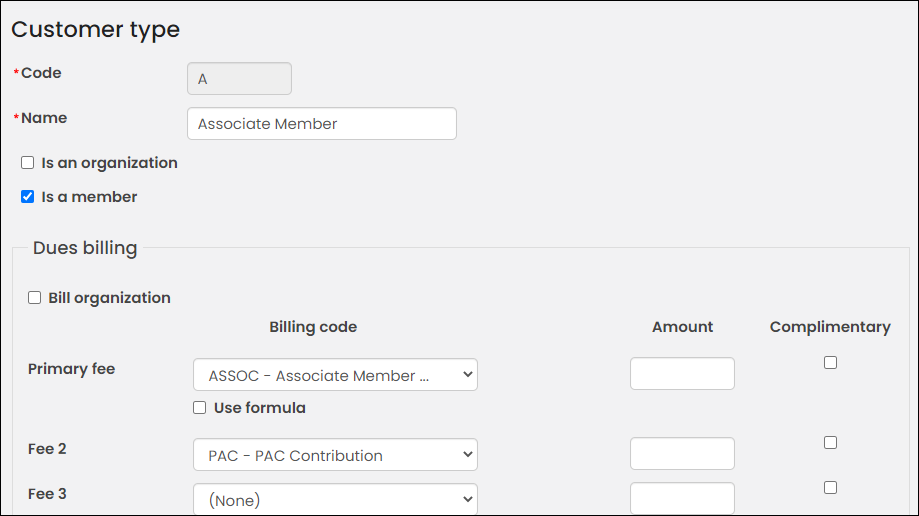
The ability to create Customer types has migrated from the Desktop. Authorized users can define customer types and assign them to major customer classes directly from the Staff site.
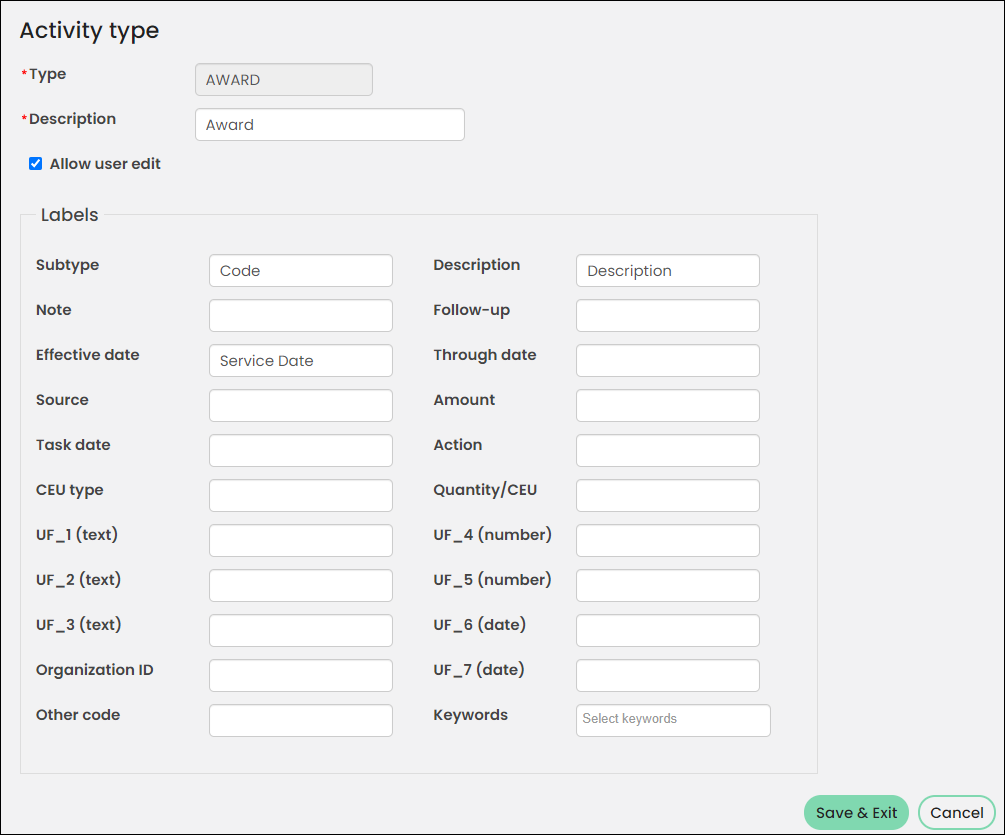
Access to the
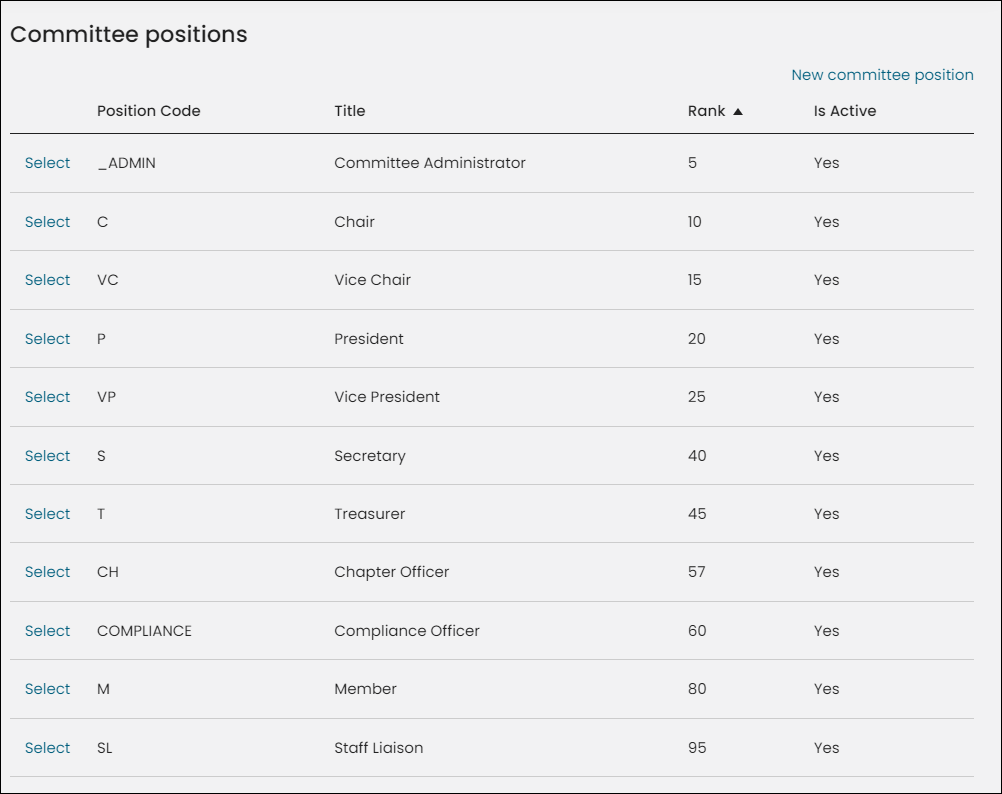
Managing your committee is even easier now that defining Committee positions can be done directly from the Staff site.
Relationship types can be added and managed from the Staff site, to help you easily create relationships between your contacts. See Relationships for details.
Several configuration settings for addresses have also made the progression to the Web.
Address formats
Editing the out-of-the-box address formats, as well as creating new address formats, can now be done from the Staff site. Please review the chart that outlines the existing address formats in iMIS.
States and provinces
Several preconfigured States and Provinces that come with iMIS are ready to use and can be found on the Staff site. You can edit or delete an existing State or Province, or you can add one that iMIS does not come with.
Countries
iMIS provides out-of-the-box Countries for your organization to begin using. Edit a country or add a new country directly from the Staff site.
Several Membership settings are now available on the Web. Instead of working through the Desktop, system administrators can set up general membership billing options, like billing intervals and accounting methods, directly from the Staff site.
From the Staff site, system administrators can now take advantage of the available configuration settings for Fundraising.
Note: The iMIS Desktop setting, Allow Premiums as Products, is no longer a configurable setting and is instead always in effect.
The Event settings window has also migrated to the Staff site that provides configuration settings for Events. This window allows system administrators to define high-level, event-related values and that was previously available on the Desktop only.
Commerce settings are crucial for any organization that actively adds new products or gifts to their site. For system administrators, the following configuration settings can now be accessed from the Staff site:
Order types
System administrators determine the number and types of stages an order goes through in processing by defining Order types. Since different order types require different processing stages, order types must be defined before orders can be entered and processed.
Defining product categories
Product categories allow you to classify your products. You must define your product categories before defining your individual products. Each time you define a product, you must assign it to one of your product categories.
Shipping orders
Staff users can define Shipping options from the Staff site (Settings > Commerce > Shipping). Staff users must be assigned an Orders: 5 module authorization level in order to have access to this navigation item.
See Defining shipping zones for more information.
The following areas have finance-related settings migrated from the Desktop to the Staff site: